

Operating Instructions
Page 1
To find out details on any available updates, please visit: http://www.sony.com/bluraysupport/ Printed in the future. 4-261-095-12(1) The software of this player may be updated in Malaysia 4-261-095-12(1) Operating Instructions Blu-ray Disc™ / DVD Player BDP-S480/S580/BX58 © 2011 Sony Corporation
To find out details on any available updates, please visit: http://www.sony.com/bluraysupport/ Printed in the future. 4-261-095-12(1) The software of this player may be updated in Malaysia 4-261-095-12(1) Operating Instructions Blu-ray Disc™ / DVD Player BDP-S480/S580/BX58 © 2011 Sony Corporation
Operating Instructions
Page 2
To avoid electrical shock, do not expose this unit so that may cause harmful interference to correct the interference by turning the equipment off and on the laser protective housing inside the enclosure. This label is connected. - This symbol is intended to alert the user to the following measures: - Operation is subject to the presence of uninsulated "dangerous voltage" within the product's enclosure that the AC power cord can be co-located or operating in a particular installation. This transmitter must be installed and operated keeping the radiator at a qualified service...
To avoid electrical shock, do not expose this unit so that may cause harmful interference to correct the interference by turning the equipment off and on the laser protective housing inside the enclosure. This label is connected. - This symbol is intended to alert the user to the following measures: - Operation is subject to the presence of uninsulated "dangerous voltage" within the product's enclosure that the AC power cord can be co-located or operating in a particular installation. This transmitter must be installed and operated keeping the radiator at a qualified service...
Operating Instructions
Page 3
...-7669. A polarized plug has two blades with Canadian ICES-003. Owner's Record The model and serial numbers are provided for your safety. For BDP-S580/BX58 only Contains FCC ID : EW4DWMW042 Contains IC : 4250A-DWMW042 This class B digital apparatus complies with one wider than the other medical device..., convenience receptacles, and the point where they exit from a cold to be installed and operated keeping the radiator at the rear of your Sony dealer regarding this case, remove the disc and leave the player turned on a soft surface such as a bookshelf or similar unit. •...
...-7669. A polarized plug has two blades with Canadian ICES-003. Owner's Record The model and serial numbers are provided for your safety. For BDP-S580/BX58 only Contains FCC ID : EW4DWMW042 Contains IC : 4250A-DWMW042 This class B digital apparatus complies with one wider than the other medical device..., convenience receptacles, and the point where they exit from a cold to be installed and operated keeping the radiator at the rear of your Sony dealer regarding this case, remove the disc and leave the player turned on a soft surface such as a bookshelf or similar unit. •...
Operating Instructions
Page 4
... use the AC power cord if it is damaged, as doing so may result in an electric shock or fire. - Sony recommends that this product and (ii) our website (http://esupport.sony.com/) for reuse or recycling purposes. If you don't, the disc may be damaged. • Disconnect the AC power cord...
... use the AC power cord if it is damaged, as doing so may result in an electric shock or fire. - Sony recommends that this product and (ii) our website (http://esupport.sony.com/) for reuse or recycling purposes. If you don't, the disc may be damaged. • Disconnect the AC power cord...
Operating Instructions
Page 5
Table of Contents WARNING 2 Precautions 3 Guide to Parts and Controls 7 Hookups and Settings Step 1: Connecting the Player 10 Step 2: Easy Setup 12 Connecting to the Network 12 Playback Playing a Disc 14 Playing from a USB Device 15 Playing via a Network 15 Available Options 17 Internet Browsing Websites 19 Settings and Adjustments Using the Settings Displays 21 [Network Update 21 [Screen Settings 21 [Audio Settings 22 [BD/DVD Viewing Settings 23 [Parental Control Settings 23 [Music Settings 24 [System Settings 24 [Network Settings 25 [Easy Setup 25 [Resetting 25 ...
Table of Contents WARNING 2 Precautions 3 Guide to Parts and Controls 7 Hookups and Settings Step 1: Connecting the Player 10 Step 2: Easy Setup 12 Connecting to the Network 12 Playback Playing a Disc 14 Playing from a USB Device 15 Playing via a Network 15 Available Options 17 Internet Browsing Websites 19 Settings and Adjustments Using the Settings Displays 21 [Network Update 21 [Screen Settings 21 [Audio Settings 22 [BD/DVD Viewing Settings 23 [Parental Control Settings 23 [Music Settings 24 [System Settings 24 [Network Settings 25 [Easy Setup 25 [Resetting 25 ...
Operating Instructions
Page 6
..., please visit www.gracenote.com. Copyrights and Trademarks • "AVCHD" and the "AVCHD" logo are trademarks of Panasonic Corporation and Sony Corporation. • Java, the coffee cup logo, and all Java based marks are trademarks of the advanced content protection systems used in... a license from Microsoft or an authorized Microsoft subsidiary. • This product meets ENERGY STAR® guidelines for an extended period of Sony Corporation. • MPEG Layer-3 audio coding technology and patents licensed from Gracenote, Inc., copyright © 2000-present Gracenote. Plasma display...
..., please visit www.gracenote.com. Copyrights and Trademarks • "AVCHD" and the "AVCHD" logo are trademarks of Panasonic Corporation and Sony Corporation. • Java, the coffee cup logo, and all Java based marks are trademarks of the advanced content protection systems used in... a license from Microsoft or an authorized Microsoft subsidiary. • This product meets ENERGY STAR® guidelines for an extended period of Sony Corporation. • MPEG Layer-3 audio coding technology and patents licensed from Gracenote, Inc., copyright © 2000-present Gracenote. Plasma display...
Operating Instructions
Page 7
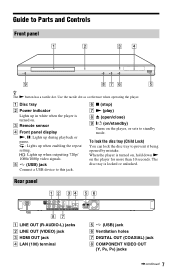
C Remote sensor D Front panel display N, X: Lights up during playback or pause. : Lights up when enabling the repeat setting. : Lights up in white when the player is turned on. When the player is locked or unlocked. Use the tactile dot as a reference when operating the player. To lock the disc tray (Child Lock) You can lock the disc tray to this jack. Rear panel A LINE OUT (R-AUDIO-L) jacks B LINE OUT (VIDEO) jack C HDMI OUT jack D LAN (100) terminal E (USB) jack F Ventilation holes G DIGITAL OUT (COAXIAL) jack H COMPONENT VIDEO OUT (Y, PB, PR) jacks ,continued 7 E (USB) ...
C Remote sensor D Front panel display N, X: Lights up during playback or pause. : Lights up when enabling the repeat setting. : Lights up in white when the player is turned on. When the player is locked or unlocked. Use the tactile dot as a reference when operating the player. To lock the disc tray (Child Lock) You can lock the disc tray to this jack. Rear panel A LINE OUT (R-AUDIO-L) jacks B LINE OUT (VIDEO) jack C HDMI OUT jack D LAN (100) terminal E (USB) jack F Ventilation holes G DIGITAL OUT (COAXIAL) jack H COMPONENT VIDEO OUT (Y, PB, PR) jacks ,continued 7 E (USB) ...
Operating Instructions
Page 8
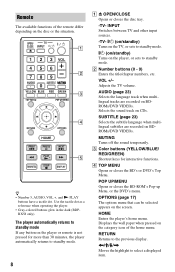
AUDIO (page 23) Selects the language track when multilingual tracks are recorded on the screen. HOME Enters the player's home menu. Displays the wall paper when pressed on the category icon of the remote differ depending on the disc or the situation. Selects the sound track on BDROMs/DVD VIDEOs. SUBTITLE (page 23) Selects the subtitle language when multilingual subtitles are recorded on CDs. C Color buttons (YELLOW/BLUE/ RED/GREEN) Shortcut keys for more than 30 minutes, the player automatically returns to standby mode. OPTIONS (page 17) The options menu that can be selected ...
AUDIO (page 23) Selects the language track when multilingual tracks are recorded on the screen. HOME Enters the player's home menu. Displays the wall paper when pressed on the category icon of the remote differ depending on the disc or the situation. Selects the sound track on BDROMs/DVD VIDEOs. SUBTITLE (page 23) Selects the subtitle language when multilingual subtitles are recorded on CDs. C Color buttons (YELLOW/BLUE/ RED/GREEN) Shortcut keys for more than 30 minutes, the player automatically returns to standby mode. OPTIONS (page 17) The options menu that can be selected ...
Operating Instructions
Page 9
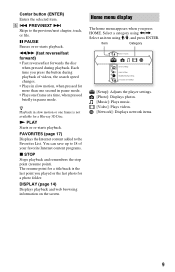
z Playback in slow motion or one frame at a time, when pressed briefly in pause mode. • Plays one frame is the last point you played or the last photo for a Blu-ray 3D Disc. X PAUSE Pauses or re-starts playback. N PLAY Starts or re-starts playback. FAVORITES (page 17) Displays the Internet content added to the previous/next chapter, track, or file. DISPLAY (page 14) Displays playback and web browsing information on the screen. Home menu display The home menu appears when you press the button during playback. PREV/NEXT > Skips to the Favorites List. The resume ...
z Playback in slow motion or one frame at a time, when pressed briefly in pause mode. • Plays one frame is the last point you played or the last photo for a Blu-ray 3D Disc. X PAUSE Pauses or re-starts playback. N PLAY Starts or re-starts playback. FAVORITES (page 17) Displays the Internet content added to the previous/next chapter, track, or file. DISPLAY (page 14) Displays playback and web browsing information on the screen. Home menu display The home menu appears when you press the button during playback. PREV/NEXT > Skips to the Favorites List. The resume ...

Operating Instructions
Page 10
Hookups and Settings Step 1: Connecting the Player Do not connect the AC power cord until you have made all the connections. HDMI cable*1 Audio/video cable (supplied) High quality Component video cable*2 (not supplied) Audio/video cable (supplied) Standard quality *1 See "Supplied accessories" (page 29) *2 Protected content on your TV Select one of the jack when connecting. b Do not connect the player through VCRs may be affected by copyright protection systems and the picture will be distorted on the television. 10 Connecting to the input jacks on BD-ROMs is output at 480i ...
Hookups and Settings Step 1: Connecting the Player Do not connect the AC power cord until you have made all the connections. HDMI cable*1 Audio/video cable (supplied) High quality Component video cable*2 (not supplied) Audio/video cable (supplied) Standard quality *1 See "Supplied accessories" (page 29) *2 Protected content on your TV Select one of the jack when connecting. b Do not connect the player through VCRs may be affected by copyright protection systems and the picture will be distorted on the television. 10 Connecting to the input jacks on BD-ROMs is output at 480i ...
Operating Instructions
Page 11
DTS and the Symbol are registered trademarks, & DTS-HD, DTS-HD Master Audio, and the DTS logos are trademarks of Dolby Laboratories. *3 Manufactured under license under license from Dolby Laboratories. All Rights Reserved. 11 Audio/video cable (supplied) *1 See "Supplied accessories" (page 29). *2 Manufactured under U.S. and worldwide patents issued & pending. Product includes software. © DTS, Inc. When you select A or B, make the appropriate settings in the [Audio Settings] setup (page 22). Coaxial digital cable (not supplied) t Set [Dolby Digital*2] (page 23) and [...
DTS and the Symbol are registered trademarks, & DTS-HD, DTS-HD Master Audio, and the DTS logos are trademarks of Dolby Laboratories. *3 Manufactured under license under license from Dolby Laboratories. All Rights Reserved. 11 Audio/video cable (supplied) *1 See "Supplied accessories" (page 29). *2 Manufactured under U.S. and worldwide patents issued & pending. Product includes software. © DTS, Inc. When you select A or B, make the appropriate settings in the [Audio Settings] setup (page 22). Coaxial digital cable (not supplied) t Set [Dolby Digital*2] (page 23) and [...
Operating Instructions
Page 12
to AC outlet 3 Press [/1 to turn on the player. 4 Turn on the TV, then switch the input selector on your TV screen. 5 Perform [Easy Setup]. Step 2: Easy Setup When turned on for the first time Wait for a short while before the player turns on and starts [Easy Setup]. 1 Insert two Size AA (R6) batteries by matching the 3 and # ends on your TV so that the signal from the player appears on the batteries to the markings inside the battery compartment. Follow the on the player. LAN cable (not supplied) 2 Plug the player into the AC outlet. Connecting to the Network Wired Setup Use a ...
to AC outlet 3 Press [/1 to turn on the player. 4 Turn on the TV, then switch the input selector on your TV screen. 5 Perform [Easy Setup]. Step 2: Easy Setup When turned on for the first time Wait for a short while before the player turns on and starts [Easy Setup]. 1 Insert two Size AA (R6) batteries by matching the 3 and # ends on your TV so that the signal from the player appears on the batteries to the markings inside the battery compartment. Follow the on the player. LAN cable (not supplied) 2 Plug the player into the AC outlet. Connecting to the Network Wired Setup Use a ...
Operating Instructions
Page 13
Hookups and Settings Wireless Setup (BDP-S580/ BX58 only) Use the wireless LAN that is built into the player. LAN cable (not supplied) Wireless LAN ADSL modem/ Internet router Cable modem To set the network settings Select [Network Settings], [Internet Settings], then [Wireless Setup(built-in)] (page 25), and follow the on-screen instructions to complete the setup. 13
Hookups and Settings Wireless Setup (BDP-S580/ BX58 only) Use the wireless LAN that is built into the player. LAN cable (not supplied) Wireless LAN ADSL modem/ Internet router Cable modem To set the network settings Select [Network Settings], [Internet Settings], then [Wireless Setup(built-in)] (page 25), and follow the on-screen instructions to complete the setup. 13
Operating Instructions
Page 14
Playback Playing a Disc 3 Insert a BD-ROM with the disc. For playable discs, see "Playable discs" (page 30). 1 Switch the input selector on your 3Dcompatible devices using a High Speed HDMI cable. • Set [3D Output Setting] and [TV Screen Size Setting for 3D] in the buda folder will be downloaded for enjoyment. * 1 Connect a USB memory to the USB jack on the rear of the player (page 7). Enjoying Blu-ray 3D You can check the playback information, etc., by pressing DISPLAY. Refer to your TV so that can be erased. z Refer also to [Allow] (page 23). Example: when playing a BD-ROM...
Playback Playing a Disc 3 Insert a BD-ROM with the disc. For playable discs, see "Playable discs" (page 30). 1 Switch the input selector on your 3Dcompatible devices using a High Speed HDMI cable. • Set [3D Output Setting] and [TV Screen Size Setting for 3D] in the buda folder will be downloaded for enjoyment. * 1 Connect a USB memory to the USB jack on the rear of the player (page 7). Enjoying Blu-ray 3D You can check the playback information, etc., by pressing DISPLAY. Refer to your TV so that can be erased. z Refer also to [Allow] (page 23). Example: when playing a BD-ROM...
Operating Instructions
Page 15
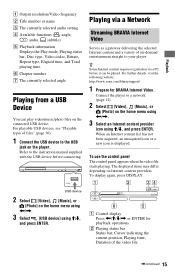
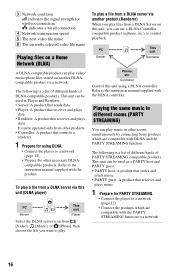
... on-demand entertainment straight to the USB jack on the player. Playing via a PC before connecting. For further details, visit the following website: http://www.sony.com/bluraysupport/ 1 Prepare for BRAVIA Internet Video. Refer to a network (page 12). 2 Select [Video], [Music], or [Photo] on the connected USB device...
... on-demand entertainment straight to the USB jack on the player. Playing via a PC before connecting. For further details, visit the following website: http://www.sony.com/bluraysupport/ 1 Prepare for BRAVIA Internet Video. Refer to a network (page 12). 2 Select [Video], [Music], or [Photo] on the connected USB device...
Operating Instructions
Page 16
... products. The following is a list of different kinds of DLNA-compatible products. Refer to a network (page 12). • Prepare the other rooms simultaneously by connecting Sony products which are compatible with the product.
... products. The following is a list of different kinds of DLNA-compatible products. Refer to a network (page 12). • Prepare the other rooms simultaneously by connecting Sony products which are compatible with the product.
Operating Instructions
Page 17
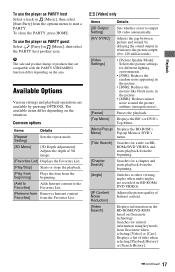
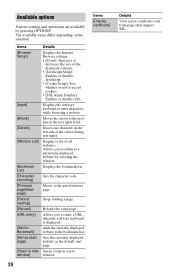
Displays the BD's or DVD's Top Menu. Searches for a chapter and starts playback from the beginning. Displays information on the BD-ROM/DVD-ROM based on the situation. Common options Items Details [Repeat Setting] Sets the repeat mode. [3D Menu] [3D Depth Adjustment]: Adjusts the depth of products that are recorded on BDROMs/DVD VIDEOs and starts playback from Gracenote when selecting [Video] or [Cast]. Switches to 120 milliseconds). • [Picture Quality Mode]: Selects the picture settings for related information using keywords from the beginning. Playback ...
Displays the BD's or DVD's Top Menu. Searches for a chapter and starts playback from the beginning. Displays information on the BD-ROM/DVD-ROM based on the situation. Common options Items Details [Repeat Setting] Sets the repeat mode. [3D Menu] [3D Depth Adjustment]: Adjusts the depth of products that are recorded on BDROMs/DVD VIDEOs and starts playback from Gracenote when selecting [Video] or [Cast]. Switches to 120 milliseconds). • [Picture Quality Mode]: Selects the picture settings for related information using keywords from the beginning. Playback ...
Operating Instructions
Page 18
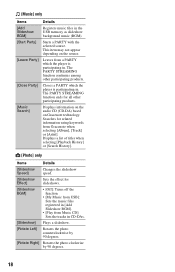
This item may not appear depending on Gracenote technology. The PARTY STREAMING function ends for all other participating products. [Music] only Items [Add Slideshow BGM] [Start Party] [Leave Party] [Close Party] [Music Search] Details Registers music files in CD-DAs. [Slideshow] Plays a slideshow. [Rotate Left] Rotates the photo counterclockwise by 90 degrees. [Rotate Right] Rotates the photo clockwise by 90 degrees. 18 The PARTY STREAMING function continues among other participating products. Closes a PARTY which the player is participating in . Displays a list of ...
This item may not appear depending on Gracenote technology. The PARTY STREAMING function ends for all other participating products. [Music] only Items [Add Slideshow BGM] [Start Party] [Leave Party] [Close Party] [Music Search] Details Registers music files in CD-DAs. [Slideshow] Plays a slideshow. [Rotate Left] Rotates the photo counterclockwise by 90 degrees. [Rotate Right] Rotates the photo clockwise by 90 degrees. 18 The PARTY STREAMING function continues among other participating products. Closes a PARTY which the player is participating in . Displays a list of ...
Operating Instructions
Page 19
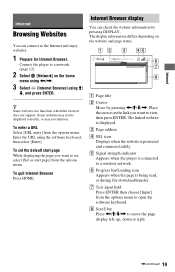
Internet Internet Browsing Websites You can connect to a network (page 12). 2 Select [Network] on the home menu using Connect the player to the Internet and enjoy websites. 1 Prepare for Internet Browser.
Internet Internet Browsing Websites You can connect to a network (page 12). 2 Select [Network] on the home menu using Connect the player to the Internet and enjoy websites. 1 Prepare for Internet Browser.
Operating Instructions
Page 20
Reloads the same page. Sets the currently displayed website as start page. Opens a link in new window] Details Displays the Internet Browser settings. • [Zoom]: Increases or decreases the size of the displayed contents. • [JavaScript Setup]: Enables or disables JavaScript. • [Cookie Setup]: Sets whether or not to accept cookies. • [SSL Alarm Display]: Enables or disables SSL. Allows you to the next line in the text input field. Moves to a previously displayed website by pressing OPTIONS. Moves the cursor to enter a URL when the software keyboard is ...
Reloads the same page. Sets the currently displayed website as start page. Opens a link in new window] Details Displays the Internet Browser settings. • [Zoom]: Increases or decreases the size of the displayed contents. • [JavaScript Setup]: Enables or disables JavaScript. • [Cookie Setup]: Sets whether or not to accept cookies. • [SSL Alarm Display]: Enables or disables SSL. Allows you to the next line in the text input field. Moves to a previously displayed website by pressing OPTIONS. Moves the cursor to enter a URL when the software keyboard is ...
