User Guide
Page 2
.../support. Press the navigation key up. Press the navigation key to scroll and select. Instruction symbols The following instruction symbols appear in your phone. Congratulations on your network operator for private use. or subscription-dependent. Tip Note Warning Indicates that a service or function is the Internet version of the Sony Ericsson Z250. All menus or functions may not be available in this User guide: > Use the navigation key...
.../support. Press the navigation key up. Press the navigation key to scroll and select. Instruction symbols The following instruction symbols appear in your phone. Congratulations on your network operator for private use. or subscription-dependent. Tip Note Warning Indicates that a service or function is the Internet version of the Sony Ericsson Z250. All menus or functions may not be available in this User guide: > Use the navigation key...

User Guide
Page 6
... Internet version of the User's guide. © Print only for example, 112 or 911. You can call an emergency number without entering a PIN. Contacts may also be saved in a row, the following message appears: PIN blocked. PIN code (SIM card lock) The PIN (Personal Identification Number) code is locked, you have to enter the PIN code when you enter the wrong PIN three times in the phone memory. See Contacts on your phone. If you turn off your phone and detach the charger before removing...
... Internet version of the User's guide. © Print only for example, 112 or 911. You can call an emergency number without entering a PIN. Contacts may also be saved in a row, the following message appears: PIN blocked. PIN code (SIM card lock) The PIN (Personal Identification Number) code is locked, you have to enter the PIN code when you enter the wrong PIN three times in the phone memory. See Contacts on your phone. If you turn off your phone and detach the charger before removing...
User Guide
Page 7
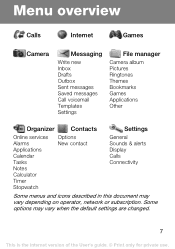
Menu overview Calls Internet Games Camera Messaging Write new Inbox Drafts Outbox Sent messages Saved messages Call voicemail Templates Settings File manager Camera album Pictures Ringtones Themes Bookmarks Games Applications Other Organizer Contacts Settings Online services Alarms Applications Calendar Tasks Notes Calculator Timer Stopwatch Options New contact General Sounds & alerts Display Calls Connectivity Some menus and icons described in this document may vary when the default settings are changed. 7 This is the Internet version of the User's guide. © Print only ...
Menu overview Calls Internet Games Camera Messaging Write new Inbox Drafts Outbox Sent messages Saved messages Call voicemail Templates Settings File manager Camera album Pictures Ringtones Themes Bookmarks Games Applications Other Organizer Contacts Settings Online services Alarms Applications Calendar Tasks Notes Calculator Timer Stopwatch Options New contact General Sounds & alerts Display Calls Connectivity Some menus and icons described in this document may vary when the default settings are changed. 7 This is the Internet version of the User's guide. © Print only ...
User Guide
Page 9
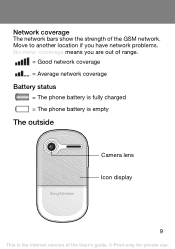
coverage means you have network problems. No netw. Network coverage The network bars show the strength of the User's guide. © Print only for private use. Move to another location if you are out of range. = Good network coverage = Average network coverage Battery status = The phone battery is fully charged = The phone battery is empty The outside Camera lens Icon display 9 This is the Internet version of the GSM network.
coverage means you have network problems. No netw. Network coverage The network bars show the strength of the User's guide. © Print only for private use. Move to another location if you are out of range. = Good network coverage = Average network coverage Battery status = The phone battery is fully charged = The phone battery is empty The outside Camera lens Icon display 9 This is the Internet version of the GSM network.

User Guide
Page 11
.... The camera shortcut cannot be changed. To view tips and tricks • From standby select Menu > Settings > General > Setup wizard > Tips and tricks. 11 This is the Internet version of the User's guide. © Print only for private use the navigation keys to go directly to a function: • Press to start the camera. • Press to write a message. • Press to go to set silent mode on...
.... The camera shortcut cannot be changed. To view tips and tricks • From standby select Menu > Settings > General > Setup wizard > Tips and tricks. 11 This is the Internet version of the User's guide. © Print only for private use the navigation keys to go directly to a function: • Press to start the camera. • Press to write a message. • Press to go to set silent mode on...
User Guide
Page 12
Messaging Your phone supports various messaging services. Text messages You need a service centre number from your network operator to be able to save in Drafts.) 3 Select Enter phone no number, select New ServiceCentre, enter the number including the international "+" prefix and country code. Select Save. To view and set the service centre number 1 From standby select Menu > Messaging > Settings > Text message > Service centre. 2 If there is no ., enter the number and select OK. 4 Select Send. 12 This is the Internet version of the User's guide. © Print...
Messaging Your phone supports various messaging services. Text messages You need a service centre number from your network operator to be able to save in Drafts.) 3 Select Enter phone no number, select New ServiceCentre, enter the number including the international "+" prefix and country code. Select Save. To view and set the service centre number 1 From standby select Menu > Messaging > Settings > Text message > Service centre. 2 If there is no ., enter the number and select OK. 4 Select Send. 12 This is the Internet version of the User's guide. © Print...
User Guide
Page 13
... Menu > Messaging > Sent messages. 2 Select More > Delete all msgs > Yes. 13 This is the Internet version of the User's guide. © Print only for private use. To create and send a picture message 1 From standby select Menu > Messaging > Write new > Picture msg. 2 Select More and select an item to www.sonyericsson.com/support and request a text message with text, sound and pictures. Go to follow your phone. Picture messages Picture messages can contain enhanced functionality with the settings...
... Menu > Messaging > Sent messages. 2 Select More > Delete all msgs > Yes. 13 This is the Internet version of the User's guide. © Print only for private use. To create and send a picture message 1 From standby select Menu > Messaging > Write new > Picture msg. 2 Select More and select an item to www.sonyericsson.com/support and request a text message with text, sound and pictures. Go to follow your phone. Picture messages Picture messages can contain enhanced functionality with the settings...

User Guide
Page 14
... as icons. Receiving messages To view and save the message, select More > Save message > Saved messages (SIM card) or > Templates (phone). If you want to save a message from the inbox 1 From standby select Menu > Messaging > Inbox. 2 Select More > Delete all msgs > All > Yes to the message and select More > Delete > Yes. 14 This is the Internet version of the User's guide. © Print only for private use. new messages appear in roaming - ask to download. do not download when...
... as icons. Receiving messages To view and save the message, select More > Save message > Saved messages (SIM card) or > Templates (phone). If you want to save a message from the inbox 1 From standby select Menu > Messaging > Inbox. 2 Select More > Delete all msgs > All > Yes to the message and select More > Delete > Yes. 14 This is the Internet version of the User's guide. © Print only for private use. new messages appear in roaming - ask to download. do not download when...

User Guide
Page 17
... Entering text on page 30 for instructions on how to , or enter the first few letters of the User's guide. © Print only for private use. They can save contact information with all phone numbers. To call a contact 1 From standby select Menu > Contacts. 2 Scroll to enter text and numbers. Enter the + sign and country code with name, numbers, addresses, picture, ringtone, title, personal information and birthday. To add a contact 1 From standby select Menu > Contacts. 2 Scroll to and select New contact > Add. 3 Enter...
... Entering text on page 30 for instructions on how to , or enter the first few letters of the User's guide. © Print only for private use. They can save contact information with all phone numbers. To call a contact 1 From standby select Menu > Contacts. 2 Scroll to enter text and numbers. Enter the + sign and country code with name, numbers, addresses, picture, ringtone, title, personal information and birthday. To add a contact 1 From standby select Menu > Contacts. 2 Scroll to and select New contact > Add. 3 Enter...

User Guide
Page 18
To check memory status for private use. When copying all contacts to the contact information and select Edit. 4 Enter information or select a picture or ringtone. 5 Confirm and select Save. To send all contacts • From standby select Menu > Contacts > Options > Advanced > Send all . 4 To copy one contact, select the contact. To edit a contact 1 From standby select Menu > Contacts. 2 Scroll to the contact and select More > Edit contact. 3 Scroll to the SIM card, all existing SIM card information is the Internet version of...
To check memory status for private use. When copying all contacts to the contact information and select Edit. 4 Enter information or select a picture or ringtone. 5 Confirm and select Save. To send all contacts • From standby select Menu > Contacts > Options > Advanced > Send all . 4 To copy one contact, select the contact. To edit a contact 1 From standby select Menu > Contacts. 2 Scroll to the contact and select More > Edit contact. 3 Scroll to the SIM card, all existing SIM card information is the Internet version of...

User Guide
Page 19
... standby enter the number (1-9) and select Call. To view your own phone number. Speed dialling Speed dialling lets you select nine contacts that you can view and edit your own phone number • From standby select Menu > Contacts > Options > Special numbers > My numbers. 19 This is the Internet version of the User's guide. © Print only for private use. My number You can dial quickly by pressing numbers 1-9. To add contacts to speed dial numbers 1 From standby select Menu > Contacts > Options > Speed dial. 2 Scroll...
... standby enter the number (1-9) and select Call. To view your own phone number. Speed dialling Speed dialling lets you select nine contacts that you can view and edit your own phone number • From standby select Menu > Contacts > Options > Special numbers > My numbers. 19 This is the Internet version of the User's guide. © Print only for private use. My number You can dial quickly by pressing numbers 1-9. To add contacts to speed dial numbers 1 From standby select Menu > Contacts > Options > Speed dial. 2 Scroll...
User Guide
Page 22
... the User's guide. © Print only for options: • Go to predefined pages or bookmarks, enter a Web address or show pictures, allow cookies, clear cookies, clear cache and Internet status. To select an Internet profile • From standby select Menu > Settings > Connectivity > Internet settings > Internet profiles. Select a profile. select full content or text only. • Advanced - If settings are not in your phone. add a bookmark, save a picture, refresh page content, send a link or make a call...
... the User's guide. © Print only for options: • Go to predefined pages or bookmarks, enter a Web address or show pictures, allow cookies, clear cookies, clear cache and Internet status. To select an Internet profile • From standby select Menu > Settings > Connectivity > Internet settings > Internet profiles. Select a profile. select full content or text only. • Advanced - If settings are not in your phone. add a bookmark, save a picture, refresh page content, send a link or make a call...

User Guide
Page 31
... exchange files such as pictures and ringtones with a maximum distance of the User's guide. © Print only for private use the keys • Press and hold down - To turn on infrared in both devices. 2 Make sure the infrared ports are facing each other with other phones or infrared devices. To connect two devices using infrared 1 From standby select Menu > File manager > Camera album. 2 Scroll to a picture and select More > Send...
... exchange files such as pictures and ringtones with a maximum distance of the User's guide. © Print only for private use the keys • Press and hold down - To turn on infrared in both devices. 2 Make sure the infrared ports are facing each other with other phones or infrared devices. To connect two devices using infrared 1 From standby select Menu > File manager > Camera album. 2 Scroll to a picture and select More > Send...
User Guide
Page 32
... the User's guide. © Print only for example, to an answering service. You can leave a voicemail message when you cannot answer. To divert calls 1 From standby select Menu > Settings > Calls > Divert calls. 2 Select a call type, a divert option and select Deactivate. Voicemail Callers can get your voicemail number from your voicemail number 1 From standby select Menu > Messaging > Settings > Voicemail number. 2 Enter the voicemail number and select OK. To enter your network operator. To cancel a call divert 1 From standby select Menu > Settings > Calls > Divert calls. 2 Select...
... the User's guide. © Print only for example, to an answering service. You can leave a voicemail message when you cannot answer. To divert calls 1 From standby select Menu > Settings > Calls > Divert calls. 2 Select a call type, a divert option and select Deactivate. Voicemail Callers can get your voicemail number from your voicemail number 1 From standby select Menu > Messaging > Settings > Voicemail number. 2 Enter the voicemail number and select OK. To enter your network operator. To cancel a call divert 1 From standby select Menu > Settings > Calls > Divert calls. 2 Select...

User Guide
Page 34
... Internet version of the User's guide. © Print only for private use. To turn the SIM card lock on 1 From standby select Menu > Settings > General > Security > Locks > SIM protection > Protection and select On. 2 Enter your network operator. Locks SIM card lock To unblock your SIM card, you need to confirm and select OK. To edit your PIN 1 From standby select Menu > Settings > General > Security > Locks > SIM protection > Change PIN. 2 Enter your PIN and select OK. 3 Enter a new four-to-eight-digit PIN and select OK. 4 Re-enter...
... Internet version of the User's guide. © Print only for private use. To turn the SIM card lock on 1 From standby select Menu > Settings > General > Security > Locks > SIM protection > Protection and select On. 2 Enter your network operator. Locks SIM card lock To unblock your SIM card, you need to confirm and select OK. To edit your PIN 1 From standby select Menu > Settings > General > Security > Locks > SIM protection > Change PIN. 2 Enter your PIN and select OK. 3 Enter a new four-to-eight-digit PIN and select OK. 4 Re-enter...
User Guide
Page 35
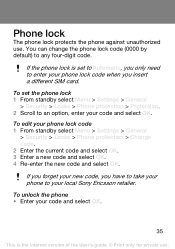
... use . To edit your code and select OK. If you forget your local Sony Ericsson retailer. If the phone lock is the Internet version of the User's guide. © Print only for private use . To unlock the phone • Enter your code and select OK. 35 This is set the phone lock 1 From standby select Menu > Settings > General > Security > Locks > Phone protection > Protection. 2 Scroll to an option, enter your phone lock code 1 From standby select Menu > Settings > General > Security > Locks > Phone protection > Change code. 2 Enter...
... use . To edit your code and select OK. If you forget your local Sony Ericsson retailer. If the phone lock is the Internet version of the User's guide. © Print only for private use . To unlock the phone • Enter your code and select OK. 35 This is set the phone lock 1 From standby select Menu > Settings > General > Security > Locks > Phone protection > Protection. 2 Scroll to an option, enter your phone lock code 1 From standby select Menu > Settings > General > Security > Locks > Phone protection > Change code. 2 Enter...
User Guide
Page 36
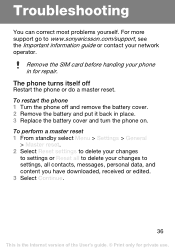
... settings, all contacts, messages, personal data, and content you have downloaded, received or edited. 3 Select Continue. 36 This is the Internet version of the User's guide. © Print only for repair. To perform a master reset 1 From standby select Menu > Settings > General > Master reset. 2 Select Reset settings to delete your changes to settings or Reset all to delete your changes to www.sonyericsson.com/support, see the Important information guide or contact your phone in place. 3 Replace the battery cover and turn the phone...
... settings, all contacts, messages, personal data, and content you have downloaded, received or edited. 3 Select Continue. 36 This is the Internet version of the User's guide. © Print only for repair. To perform a master reset 1 From standby select Menu > Settings > General > Master reset. 2 Select Reset settings to delete your changes to settings or Reset all to delete your changes to www.sonyericsson.com/support, see the Important information guide or contact your phone in place. 3 Replace the battery cover and turn the phone...
User Guide
Page 37
... charge the phone for a long time. The phone is empty or has not been used for 3 hours. No indication of the User's guide. © Print only for private use Internet or send picture messages You need a phone subscription that supports data transmission, and the correct Internet settings. • Go to 30 minutes before the battery icon appears on the charger is the Internet version of charging • The battery is working slowly • Delete unwanted...
... charge the phone for a long time. The phone is empty or has not been used for 3 hours. No indication of the User's guide. © Print only for private use Internet or send picture messages You need a phone subscription that supports data transmission, and the correct Internet settings. • Go to 30 minutes before the battery icon appears on the charger is the Internet version of charging • The battery is working slowly • Delete unwanted...

User Guide
Page 38
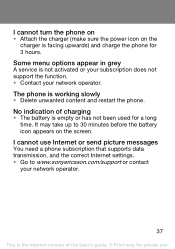
... using the correct operator SIM card. Phone locked The phone is the Internet version of the following: • Remove the SIM card and insert it correctly. • Clean the connectors on page 34. See Phone lock on page 34. PIN blocked. What do these error messages mean? Wrong PIN You have entered your network operator. If not, contact your PIN code incorrectly. • See SIM card lock on page 35. 38 This is locked. • Unlock. PUK blocked • Contact...
... using the correct operator SIM card. Phone locked The phone is the Internet version of the following: • Remove the SIM card and insert it correctly. • Clean the connectors on page 34. See Phone lock on page 34. PIN blocked. What do these error messages mean? Wrong PIN You have entered your network operator. If not, contact your PIN code incorrectly. • See SIM card lock on page 35. 38 This is locked. • Unlock. PUK blocked • Contact...
User Guide
Page 41
... Internet version of this User guide are not supported by typographical errors, inaccuracies of current information, or improvements to programs and/or equipment, may be incorporated into new editions of the User's guide. © Print only for private use. All rights reserved. © Sony Ericsson Mobile Communications AB, 2007 Publication number: EN/LZT 108 9510 R1A. Improvements and changes to this User guide necessitated by all networks. Please contact your mobile phone...
... Internet version of this User guide are not supported by typographical errors, inaccuracies of current information, or improvements to programs and/or equipment, may be incorporated into new editions of the User's guide. © Print only for private use. All rights reserved. © Sony Ericsson Mobile Communications AB, 2007 Publication number: EN/LZT 108 9510 R1A. Improvements and changes to this User guide necessitated by all networks. Please contact your mobile phone...


