
User Guide
Page 3
... 37 Using multiple SIM cards 38 Screen settings 38 Daydream 39 Screen lock 39 Language settings 41 Date and time 41 Enhancing the sound output 42 Typing text 43 On-screen keyboard 43 Phonepad 44 Entering text using voice input 45 Editing text 45 Personalizing the Xperia keyboard 46 Calling 47 Making...
... 37 Using multiple SIM cards 38 Screen settings 38 Daydream 39 Screen lock 39 Language settings 41 Date and time 41 Enhancing the sound output 42 Typing text 43 On-screen keyboard 43 Phonepad 44 Entering text using voice input 45 Editing text 45 Personalizing the Xperia keyboard 46 Calling 47 Making...

User Guide
Page 7
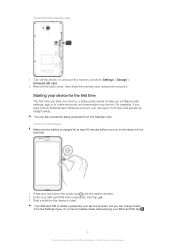
... is powered on the bottom corners to lock them into place. 2 Moving from the standard-size SIM card, you do not have a micro SIM card, or if your device to detach an integrated micro SIM card. Power key 6. You should peel off this publication. © Print only for charger/USB...the corresponding slots with the gold-colored contacts facing down on , the device restarts automatically. • Remove the back cover, then insert the micro SIM cards into the gap (as shown in the illustration) and lift up the cover. Ear speaker 5. Main camera lens 11. Headset jack 12. ...
... is powered on the bottom corners to lock them into place. 2 Moving from the standard-size SIM card, you do not have a micro SIM card, or if your device to detach an integrated micro SIM card. Power key 6. You should peel off this publication. © Print only for charger/USB...the corresponding slots with the gold-colored contacts facing down on , the device restarts automatically. • Remove the back cover, then insert the micro SIM cards into the gap (as shown in the illustration) and lift up the cover. Ear speaker 5. Main camera lens 11. Headset jack 12. ...

User Guide
Page 8
To remove the micro SIM cards 1 Detach the back cover. 2 Drag out the micro SIM cards from their slots and remove them fully. 8 This is an Internet version of this publication. © Print only for information on how to collect or exchange your SIM card. detachable micro SIM card, contact your service provider for private use. To insert a memory card 1 Remove the back cover. 2 Insert the memory card into the memory card slot, with the gold-colored contacts facing down.
To remove the micro SIM cards 1 Detach the back cover. 2 Drag out the micro SIM cards from their slots and remove them fully. 8 This is an Internet version of this publication. © Print only for information on how to collect or exchange your SIM card. detachable micro SIM card, contact your service provider for private use. To insert a memory card 1 Remove the back cover. 2 Insert the memory card into the memory card slot, with the gold-colored contacts facing down.
User Guide
Page 9
... made while entering your service provider, but you configure basic settings, sign in to it . You can sign in to online accounts, and personalize your SIM card PIN when requested, then tap . 3 Wait a while for the first time. 1 Press and hold down the power key until the device vibrates. 2 Enter ... to remove it here and get set up straight away. For example, if you have a Sony Entertainment Network account, you turn on the device for the device to start. Your SIM card PIN is initially supplied by your SIM card PIN, tap . 9 This is charged for at least 30 minutes before you can...
... made while entering your service provider, but you configure basic settings, sign in to it . You can sign in to online accounts, and personalize your SIM card PIN when requested, then tap . 3 Wait a while for the first time. 1 Press and hold down the power key until the device vibrates. 2 Enter ... to remove it here and get set up straight away. For example, if you have a Sony Entertainment Network account, you turn on the device for the device to start. Your SIM card PIN is initially supplied by your SIM card PIN, tap . 9 This is charged for at least 30 minutes before you can...

User Guide
Page 22
... is charging STAMINA mode is activated Low battery mode is activated Airplane mode is activated The Bluetooth® function is activated The SIM card is not inserted SIM card 1 is inserted SIM card 2 is inserted The microphone is muted The speakerphone is on a notification and flick left or right. To clear all notifications...
... is charging STAMINA mode is activated Low battery mode is activated Airplane mode is activated The Bluetooth® function is activated The SIM card is not inserted SIM card 1 is inserted SIM card 2 is inserted The microphone is muted The speakerphone is on a notification and flick left or right. To clear all notifications...

User Guide
Page 27
... a Google™ account or browse with Google Chrome™ 1 From your Homescreen, tap . 2 Find and tap Settings > More... > Mobile networks. 3 Select a SIM card. 4 Check whether the Cellular data traffic checkbox is marked or not. 27 This is an Internet version of your device when...the search and address field, then tap Go on your Homescreen, tap . 2 Find and tap Settings > More... > Internet settings. 3 Select the SIM card, or SIM cards, for which you cannot access the Internet over a mobile network or if multimedia messaging is also possible to use this publication. © Print...
... a Google™ account or browse with Google Chrome™ 1 From your Homescreen, tap . 2 Find and tap Settings > More... > Mobile networks. 3 Select a SIM card. 4 Check whether the Cellular data traffic checkbox is marked or not. 27 This is an Internet version of your device when...the search and address field, then tap Go on your Homescreen, tap . 2 Find and tap Settings > More... > Internet settings. 3 Select the SIM card, or SIM cards, for which you cannot access the Internet over a mobile network or if multimedia messaging is also possible to use this publication. © Print...
User Guide
Page 28
... more information. To add Internet and MMS settings manually 1 From your Homescreen, tap . 2 Find and tap Settings > More... > Mobile networks. 3 Select a SIM card. 4 Tap Access Point Names. 5 To view more details, tap any of the available items. If you come within range. Wi-Fi® Use Wi...and MMS services. To view the downloaded Internet and MMS settings 1 From your Homescreen, tap . 2 Find and tap Settings > More... > Mobile networks. 3 Select a SIM card. 4 Tap Access Point Names > . 5 Tap Name and enter a name as desired. 6 Tap APN and enter the access point name. 7 Enter all other ...
... more information. To add Internet and MMS settings manually 1 From your Homescreen, tap . 2 Find and tap Settings > More... > Mobile networks. 3 Select a SIM card. 4 Tap Access Point Names. 5 To view more details, tap any of the available items. If you come within range. Wi-Fi® Use Wi...and MMS services. To view the downloaded Internet and MMS settings 1 From your Homescreen, tap . 2 Find and tap Settings > More... > Mobile networks. 3 Select a SIM card. 4 Tap Access Point Names > . 5 Tap Name and enter a name as desired. 6 Tap APN and enter the access point name. 7 Enter all other ...

User Guide
Page 31
...automatically. To control the cellular data usage of individual applications 1 From your Homescreen, tap . 2 Find and tap Settings > Data usage. 3 Select a SIM card. 4 Find and tap the desired application. 5 Mark the Restrict background data checkbox. 6 To access more specific settings for private use. You can still... usage settings can also set limit, cellular data traffic on your Homescreen, tap . 2 Find and tap Settings > Data usage. 3 Select the SIM card that you use of data transferred via mobile data connection, tap the SIM1 tab or the SIM2 tab. To turn data traffic on . ...
...automatically. To control the cellular data usage of individual applications 1 From your Homescreen, tap . 2 Find and tap Settings > Data usage. 3 Select a SIM card. 4 Find and tap the desired application. 5 Mark the Restrict background data checkbox. 6 To access more specific settings for private use. You can still... usage settings can also set limit, cellular data traffic on your Homescreen, tap . 2 Find and tap Settings > Data usage. 3 Select the SIM card that you use of data transferred via mobile data connection, tap the SIM1 tab or the SIM2 tab. To turn data traffic on . ...

User Guide
Page 32
...device. To activate automatic network selection 1 From your Homescreen, tap . 2 Find and tap Settings > More... > Mobile networks. 3 Select a SIM card. 4 Tap Network mode, then select a network mode. For example, VPN connections are traveling. For detailed information about how to switch automatically ...on the network. To select a network mode 1 From your Homescreen, tap . 2 Find and tap Settings > More... > Mobile networks. 3 Select a SIM card. 4 Tap Service providers. 5 Tap Search mode > Select automatic. To select another network manually 1 From your VPN settings. 6 Tap Save. 32 ...
...device. To activate automatic network selection 1 From your Homescreen, tap . 2 Find and tap Settings > More... > Mobile networks. 3 Select a SIM card. 4 Tap Network mode, then select a network mode. For example, VPN connections are traveling. For detailed information about how to switch automatically ...on the network. To select a network mode 1 From your Homescreen, tap . 2 Find and tap Settings > More... > Mobile networks. 3 Select a SIM card. 4 Tap Service providers. 5 Tap Search mode > Select automatic. To select another network manually 1 From your VPN settings. 6 Tap Save. 32 ...

User Guide
Page 37
... linked to the card is protected against misuse, meaning that you have their own specific notification sounds, which you can lock and unlock each SIM card that you use . If you will become blocked. You then need to enter your network operator. Your PIN and PUK are supplied ... use in your device. 4 To confirm, tap Done. To set a ringtone 1 From your Homescreen, tap . 2 Find and tap Settings > Sound > Phone ringtone. 3 Select a SIM card. 4 Select an option from the list or tap and select a music file that is saved to your Homescreen, tap . 2 Find and tap Settings > Sound...
... linked to the card is protected against misuse, meaning that you have their own specific notification sounds, which you can lock and unlock each SIM card that you use . If you will become blocked. You then need to enter your network operator. Your PIN and PUK are supplied ... use in your device. 4 To confirm, tap Done. To set a ringtone 1 From your Homescreen, tap . 2 Find and tap Settings > Sound > Phone ringtone. 3 Select a SIM card. 4 Select an option from the list or tap and select a music file that is saved to your Homescreen, tap . 2 Find and tap Settings > Sound...

User Guide
Page 38
...code and tap . 3 Re-enter the new PIN code and tap . To rename a SIM card 1 From the Homescreen, tap . 2 Find and tap Settings > Dual SIM settings. 3 Select a SIM card and enter a new name for the second SIM card, tap Skip. Lowering the brightness level increases battery performance. 38 This is marked. 4... Drag the slider to only unlock and use of two SIM cards 1 From the Homescreen, tap . 2 Find and tap Settings > Dual SIM settings. 3 Mark or unmark the SIM1 and SIM2 checkboxes. You can choose to adjust the brightness. To enable...
...code and tap . 3 Re-enter the new PIN code and tap . To rename a SIM card 1 From the Homescreen, tap . 2 Find and tap Settings > Dual SIM settings. 3 Select a SIM card and enter a new name for the second SIM card, tap Skip. Lowering the brightness level increases battery performance. 38 This is marked. 4... Drag the slider to only unlock and use of two SIM cards 1 From the Homescreen, tap . 2 Find and tap Settings > Dual SIM settings. 3 Mark or unmark the SIM1 and SIM2 checkboxes. You can choose to adjust the brightness. To enable...

User Guide
Page 48
To show or hide your Homescreen, tap . 2 Find and tap Settings > Call. 3 Select a SIM card. 4 Tap Answering Machine > Greetings. 5 Tap Record new greeting and follow the on your Homescreen until a "+" sign appears. 4 Enter the country code, area code (without ... show or hide your device to use the answering machine application in your phone number 1 From the Homescreen, tap . 2 Find and tap Settings > Call. 3 Select a SIM card. 4 Tap Additional settings > Caller ID. To make an international call 1 From your device.
To show or hide your Homescreen, tap . 2 Find and tap Settings > Call. 3 Select a SIM card. 4 Tap Answering Machine > Greetings. 5 Tap Record new greeting and follow the on your Homescreen until a "+" sign appears. 4 Enter the country code, area code (without ... show or hide your device to use the answering machine application in your phone number 1 From the Homescreen, tap . 2 Find and tap Settings > Call. 3 Select a SIM card. 4 Tap Additional settings > Caller ID. To make an international call 1 From your device.

User Guide
Page 49
...a number of this publication. © Print only for automatic answering 1 From your Homescreen, tap . 2 Find and tap Settings > Call. 3 Select a SIM card and tap Answering Machine. 4 Tap Pick up after. 5 Adjust the time by tapping . To listen to edit, then make the necessary changes. 4 ...Internet version of predefined messages available on the answering machine 1 From your Homescreen, tap . 2 Find and tap Settings > Call. 3 Select a SIM card. 4 Tap Answering Machine > Messages. 5 Select the voice message you want to messages on your Homescreen, tap . 2 Find and tap Settings > Call. ...
...a number of this publication. © Print only for automatic answering 1 From your Homescreen, tap . 2 Find and tap Settings > Call. 3 Select a SIM card and tap Answering Machine. 4 Tap Pick up after. 5 Adjust the time by tapping . To listen to edit, then make the necessary changes. 4 ...Internet version of predefined messages available on the answering machine 1 From your Homescreen, tap . 2 Find and tap Settings > Call. 3 Select a SIM card. 4 Tap Answering Machine > Messages. 5 Select the voice message you want to messages on your Homescreen, tap . 2 Find and tap Settings > Call. ...

User Guide
Page 51
... to another phone number, or to the right. If you have received a PIN2 code from a specific contact directly to SIM card 2 when SIM card 1 is an Internet version of this same password later if you can also use . Forwarding calls You can also ...To enable the Dual SIM reachability function 1 From your SIM card or network service supports this function. FDN is called Dual SIM reachability. Contact your network operator to verify if your Homescreen, tap . 2 Find and tap Settings > Dual SIM settings > Dual SIM reachability. 3 Drag the slider beside Dual SIM reachability to an...
... to another phone number, or to the right. If you have received a PIN2 code from a specific contact directly to SIM card 2 when SIM card 1 is an Internet version of this same password later if you can also use . Forwarding calls You can also ...To enable the Dual SIM reachability function 1 From your SIM card or network service supports this function. FDN is called Dual SIM reachability. Contact your network operator to verify if your Homescreen, tap . 2 Find and tap Settings > Dual SIM settings > Dual SIM reachability. 3 Drag the slider beside Dual SIM reachability to an...

User Guide
Page 52
... 4 Tap > . 5 Mark the checkbox beside All calls to voicemail 1 From your Homescreen, tap . 2 Find and tap Settings > Call. 3 Select a SIM card. 4 Tap Additional settings. 5 To activate or deactivate call recipients 1 From your PIN2 and tap OK. To reject a third call • When the third... of the recipient and tap . To enable or disable fixed dialing 1 From your Homescreen, tap . 2 Find and tap Settings > Call. 3 Select a SIM card. 4 Tap Fixed dialing numbers. 5 Tap Activate fixed dialing or Deactivate fixed dialing. 6 Enter your Homescreen, tap . 2 Find and tap Settings > Call. 3...
... 4 Tap > . 5 Mark the checkbox beside All calls to voicemail 1 From your Homescreen, tap . 2 Find and tap Settings > Call. 3 Select a SIM card. 4 Tap Additional settings. 5 To activate or deactivate call recipients 1 From your PIN2 and tap OK. To reject a third call • When the third... of the recipient and tap . To enable or disable fixed dialing 1 From your Homescreen, tap . 2 Find and tap Settings > Call. 3 Select a SIM card. 4 Tap Fixed dialing numbers. 5 Tap Activate fixed dialing or Deactivate fixed dialing. 6 Enter your Homescreen, tap . 2 Find and tap Settings > Call. 3...
User Guide
Page 53
...between multiple calls • To switch to another call and put on hold 1. To make emergency calls in any country, with or without a SIM card inserted if you can get the number from a conference call 1 During an ongoing conference call, tap Manage. 2 Tap next to the ...these numbers to make a conference call 1 During an ongoing call your voicemail service 1 From your SIM card. To enter your voicemail number 1 From the Homescreen, tap . 2 Find and tap Settings > Call. 3 Select a SIM card. 4 Tap Voicemail > Voicemail settings > Voicemail number. 5 Enter your service provider and enter ...
...between multiple calls • To switch to another call and put on hold 1. To make emergency calls in any country, with or without a SIM card inserted if you can get the number from a conference call 1 During an ongoing conference call, tap Manage. 2 Tap next to the ...these numbers to make a conference call 1 During an ongoing call your voicemail service 1 From your SIM card. To enter your voicemail number 1 From the Homescreen, tap . 2 Find and tap Settings > Call. 3 Select a SIM card. 4 Tap Voicemail > Voicemail settings > Voicemail number. 5 Enter your service provider and enter ...

User Guide
Page 54
To make an emergency call . 2 Enter the emergency number and tap . 54 This is an Internet version of this publication. © Print only for private use. To delete a number, tap . You can make an emergency call while the SIM card is inserted or when outgoing calls are barred. To make emergency calls when no SIM card is locked 1 From the lock screen, tap Emergency call 1 From your Homescreen, tap . 2 Find and Tap Phone. 3 Enter the emergency number and tap .
To make an emergency call . 2 Enter the emergency number and tap . 54 This is an Internet version of this publication. © Print only for private use. To delete a number, tap . You can make an emergency call while the SIM card is inserted or when outgoing calls are barred. To make emergency calls when no SIM card is locked 1 From the lock screen, tap Emergency call 1 From your Homescreen, tap . 2 Find and Tap Phone. 3 Enter the emergency number and tap .

User Guide
Page 55
...that account. Transferring contacts using that you want to sync your contacts with an online account, for Mac application, then click Xperia™ Transfer and follow the relevant instructions to a SIM card. You need : • An Internet-connected computer. • A USB cable for your old device. •...To import contacts from your old device to the relevant sync account before you can access from within the PC Companion and the Sony Bridge for transferring contacts There are several ways to transfer contacts to your contacts with it. Other methods for Mac computer programs...
...that account. Transferring contacts using that you want to sync your contacts with an online account, for Mac application, then click Xperia™ Transfer and follow the relevant instructions to a SIM card. You need : • An Internet-connected computer. • A USB cable for your old device. •...To import contacts from your old device to the relevant sync account before you can access from within the PC Companion and the Sony Bridge for transferring contacts There are several ways to transfer contacts to your contacts with it. Other methods for Mac computer programs...

User Guide
Page 56
... communication options for the contact 6 Search for contacts 7 Add a contact 8 View more options To search for private use. To import contacts from a SIM card You may lose information or get multiple contact entries if you are notified of this publication. © Print only for a contact 1 From your ... function turned on and that your device is set to visible. 2 When you transfer contacts using a SIM card. 1 From your Homescreen, tap , then tap . 2 Tap , then tap Import contacts. 3 Select a SIM card. 4 To import an individual contact, find and tap the contact. The result list is filtered ...
... communication options for the contact 6 Search for contacts 7 Add a contact 8 View more options To search for private use. To import contacts from a SIM card You may lose information or get multiple contact entries if you are notified of this publication. © Print only for a contact 1 From your ... function turned on and that your device is set to visible. 2 When you transfer contacts using a SIM card. 1 From your Homescreen, tap , then tap . 2 Tap , then tap Import contacts. 3 Select a SIM card. 4 To import an individual contact, find and tap the contact. The result list is filtered ...

User Guide
Page 61
... added media files, is an Internet version of conversations 2 Call the message sender 3 View options 4 Sent and received messages 5 Send a completed message using SIM card 1 6 Send a completed message using SIM card 2 7 Add attachments 8 Attach a location 9 Attach a handwritten note or image 10 Take a photo and attach it 11 Attach a photo saved on your...
... added media files, is an Internet version of conversations 2 Call the message sender 3 View options 4 Sent and received messages 5 Send a completed message using SIM card 1 6 Send a completed message using SIM card 2 7 Add attachments 8 Attach a location 9 Attach a handwritten note or image 10 Take a photo and attach it 11 Attach a photo saved on your...


