

User Guide
Page 2
Contents Additional Help 5 Getting started 6 Assembly 6 Help in the phone 8 Phone overview 9 Menu overview 10 Navigation 11 Using other networks 14 Status icons 15 Calls 16 Making and receiving calls 16 More calling features 18 Entering ...
Contents Additional Help 5 Getting started 6 Assembly 6 Help in the phone 8 Phone overview 9 Menu overview 10 Navigation 11 Using other networks 14 Status icons 15 Calls 16 Making and receiving calls 16 More calling features 18 Entering ...
User Guide
Page 3
... TrackID™ application 61 Voice recorder 61 Conversations 61 Transferring and handling content 62 Using a USB cable 62 Sending content to another phone 62 Updating your phone 65 Updating your phone using Sony Ericsson PC Suite 65 Connectivity 66 Wi-Fi 66 Media Server 66 Access points 67 Synchronising 67 Settings 69 Personal settings 69...
... TrackID™ application 61 Voice recorder 61 Conversations 61 Transferring and handling content 62 Using a USB cable 62 Sending content to another phone 62 Updating your phone 65 Updating your phone using Sony Ericsson PC Suite 65 Connectivity 66 Wi-Fi 66 Media Server 66 Access points 67 Synchronising 67 Settings 69 Personal settings 69...
User Guide
Page 5
help in your mobile phone. 5 This is available on most applications. • Extended User guide - Please read the Important information before you started. • Help texts - Additional Help The complete user documentation for private use. an up-to get you use your phone. You can also access this ...publication. © Print only for your phone consists of your phone with the information needed to -date User guide with your phone on the Memory card. The Extended User guide is an ...
help in your mobile phone. 5 This is available on most applications. • Extended User guide - Please read the Important information before you started. • Help texts - Additional Help The complete user documentation for private use. an up-to get you use your phone. You can also access this ...publication. © Print only for your phone consists of your phone with the information needed to -date User guide with your phone on the Memory card. The Extended User guide is an ...

User Guide
Page 6
To insert the SIM card 1 Remove the battery cover. 2 Put the SIM card into its holder with the label side up and the connectors facing each other. 2 Put the battery cover into place. 6 This is an Internet version of this publication. © Print only for private use. To insert the battery 1 Insert the battery with the gold-coloured contacts facing down. Getting started Assembly Before you start using your phone, you need to insert a SIM (Subscriber Identity Module) card and the battery.
To insert the SIM card 1 Remove the battery cover. 2 Put the SIM card into its holder with the label side up and the connectors facing each other. 2 Put the battery cover into place. 6 This is an Internet version of this publication. © Print only for private use. To insert the battery 1 Insert the battery with the gold-coloured contacts facing down. Getting started Assembly Before you start using your phone, you need to insert a SIM (Subscriber Identity Module) card and the battery.

User Guide
Page 7
... in your network operator. You can see and call an emergency number without entering a PIN. Charging the phone The phone battery is partly charged when you remove it . 7 This is supplied by your phone. See SIM card lock on page 24. You can save contacts on the SIM card before you get... from your subscription. Always turn on the phone, follow the instructions to activate the services and functions in a row, the SIM card is blocked. SIM card The SIM (Subscriber Identity Module) card, which...
... in your network operator. You can see and call an emergency number without entering a PIN. Charging the phone The phone battery is partly charged when you remove it . 7 This is supplied by your phone. See SIM card lock on page 24. You can save contacts on the SIM card before you get... from your subscription. Always turn on the phone, follow the instructions to activate the services and functions in a row, the SIM card is blocked. SIM card The SIM (Subscriber Identity Module) card, which...

User Guide
Page 8
..., press and select Remove memory card, then press the edge of this document at any time and for private use your memory card and the phone memory. Memory You can choose to a USB port on the SIM card. To view available memory • Select Menu > Organiser > File manager. To ...view Help when you can save them on a computer using the USB cable provided and the power adapter. To charge the phone using the power adapter • Connect the phone to a power outlet using the USB cable provided. You can interrupt the charging without damaging the battery. You can charge the...
..., press and select Remove memory card, then press the edge of this document at any time and for private use your memory card and the phone memory. Memory You can choose to a USB port on the SIM card. To view available memory • Select Menu > Organiser > File manager. To ...view Help when you can save them on a computer using the USB cable provided and the power adapter. To charge the phone using the power adapter • Connect the phone to a power outlet using the USB cable provided. You can interrupt the charging without damaging the battery. You can charge the...
User Guide
Page 9
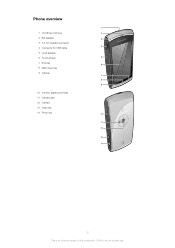
Phone overview 1 1 On/off key, lock key 2 2 Ear speaker 3 3 3.5 mm headset connector 4 4 Connector for USB cable 5 Loud speaker 6 Touch screen 5 7 End key 6 8 Main menu key 9 Call key 7 8 9 10 Volume, digital zoom keys 11 Camera light 12 Camera 13 Video key 14 Photo key 10 11 12 13 14 9 This is an Internet version of this publication. © Print only for private use.
Phone overview 1 1 On/off key, lock key 2 2 Ear speaker 3 3 3.5 mm headset connector 4 4 Connector for USB cable 5 Loud speaker 6 Touch screen 5 7 End key 6 8 Main menu key 9 Call key 7 8 9 10 Volume, digital zoom keys 11 Camera light 12 Camera 13 Video key 14 Photo key 10 11 12 13 14 9 This is an Internet version of this publication. © Print only for private use.

User Guide
Page 10
Phone management Application mgr Installed apps. Speed dialling Voicemail Divert calls Call barring Connectivity Network Wi-Fi Bluetooth USB Destinations Connection mgr Data transfer Remote drives ... Contacts Calendar Log** Organiser File manager Clock RoadSync SonyEricsson Sync Google Search Notes Dictionary Converter Calculator Adobe PDF Quickoffice Help Settings Personal Profiles Themes Standby Phone Date and time Language Display Download settings Sensor settings Touch input Accessories Application sett. Installation files Install settings Telephony Call sett. For more information, see...
Phone management Application mgr Installed apps. Speed dialling Voicemail Divert calls Call barring Connectivity Network Wi-Fi Bluetooth USB Destinations Connection mgr Data transfer Remote drives ... Contacts Calendar Log** Organiser File manager Clock RoadSync SonyEricsson Sync Google Search Notes Dictionary Converter Calculator Adobe PDF Quickoffice Help Settings Personal Profiles Themes Standby Phone Date and time Language Display Download settings Sensor settings Touch input Accessories Application sett. Installation files Install settings Telephony Call sett. For more information, see...

User Guide
Page 11
... Options > Exit. 11 This is an Internet version of inactivity. Main menu You can also switch between running applications. To lock the phone manually • Press twice. To view running applications 1 Press and hold down the main menu key. 2 To switch to a running...select or open it . To change automatic keylock and screen guard settings 1 Select Menu > Settings > Phone > Phone management > Auto. To unlock the phone manually • Press and select Unlock. Multitasking Your phone lets you view and switch between folders. To change the main menu view 1 Select Menu > Options ...
... Options > Exit. 11 This is an Internet version of inactivity. Main menu You can also switch between running applications. To lock the phone manually • Press twice. To view running applications 1 Press and hold down the main menu key. 2 To switch to a running...select or open it . To change automatic keylock and screen guard settings 1 Select Menu > Settings > Phone > Phone management > Auto. To unlock the phone manually • Press and select Unlock. Multitasking Your phone lets you view and switch between folders. To change the main menu view 1 Select Menu > Options ...
User Guide
Page 12
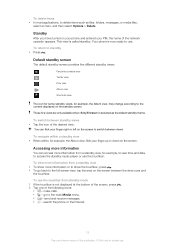
...publication. © Print only for example, the Album view, may change according to standby • Press . These five views are only available when Sony Ericsson is not displayed at the bottom of the screen, press . 2 Tap one of the desired view. Accessing more information You can flick your finger ... or use . To return to the content displayed on the screen between standby views • Tap the icon of the following icons: • - Your phone is called standby. You can access more information or to show the touchbar, press . • To go to the main Media menu. • -...
...publication. © Print only for example, the Album view, may change according to standby • Press . These five views are only available when Sony Ericsson is not displayed at the bottom of the screen, press . 2 Tap one of the desired view. Accessing more information You can flick your finger ... or use . To return to the content displayed on the screen between standby views • Tap the icon of the following icons: • - Your phone is called standby. You can access more information or to show the touchbar, press . • To go to the main Media menu. • -...

User Guide
Page 13
...contacts - To view details about a favourite contact in Contacts 1 Tap . 2 Tap a contact and select View in which you hold the phone. Flow view Flow view displays a wave that adjusts itself horizontally irrespective of the orientation in the Contacts application. With each contact in Favourites ...clips. You can also set a photo as the wallpaper for a standby view. To change the wallpaper of a standby view 1 Touch and hold the phone. • Album - no wallpaper. • Picture - display a picture as wallpaper. • Flow - display a wave that adjusts itself horizontally, ...
...contacts - To view details about a favourite contact in Contacts 1 Tap . 2 Tap a contact and select View in which you hold the phone. Flow view Flow view displays a wave that adjusts itself horizontally irrespective of the orientation in the Contacts application. With each contact in Favourites ...clips. You can also set a photo as the wallpaper for a standby view. To change the wallpaper of a standby view 1 Touch and hold the phone. • Album - no wallpaper. • Picture - display a picture as wallpaper. • Flow - display a wave that adjusts itself horizontally, ...

User Guide
Page 14
... provides a list of this publication. © Print only for more information. 14 This is an Internet version of shortcuts to show. You can check your phone. You can personalise the shortcuts you view a post, tap . To create a new post • Enter text in Media. Before using messaging and data transfer, for...
... provides a list of this publication. © Print only for more information. 14 This is an Internet version of shortcuts to show. You can check your phone. You can personalise the shortcuts you view a post, tap . To create a new post • Enter text in Media. Before using messaging and data transfer, for...
User Guide
Page 16
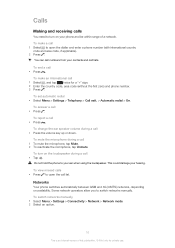
...redial • Select Menu > Settings > Telephony > Call sett. > Automatic redial > On. To reject a call 1 Select to open the dialler and enter a phone number (with international country code and area code, if applicable). 2 Press . This could damage your contacts and call 1 To mute the microphone, tap Mute. 2 ... the microphone during a call 1 Select , and tap *+ twice for private use. To answer a call • Press . To turn on your phone and be within range of this publication. © Print only for a "+" sign. 2 Enter the country code, area code (without the first zero) and...
...redial • Select Menu > Settings > Telephony > Call sett. > Automatic redial > On. To reject a call 1 Select to open the dialler and enter a phone number (with international country code and area code, if applicable). 2 Press . This could damage your contacts and call 1 To mute the microphone, tap Mute. 2 ... the microphone during a call 1 Select , and tap *+ twice for private use. To answer a call • Press . To turn on your phone and be within range of this publication. © Print only for a "+" sign. 2 Enter the country code, area code (without the first zero) and...

User Guide
Page 17
...save them to make an emergency call , both parties to on the SIM card. Call list You can normally use . Emergency calls Your phone supports international emergency numbers, for private use these numbers to share later. Before making video calls To engage in any country, with or ...the call list 1 Press and select a tab. 2 Select a name or a number and press . The other emergency numbers may therefore have a 3G (UMTS) phone subscription that supports the 3G (UMTS) service and 3G (UMTS) coverage. To end a video call , select Options. To speed dial an assigned number • ...
...save them to make an emergency call , both parties to on the SIM card. Call list You can normally use . Emergency calls Your phone supports international emergency numbers, for private use these numbers to share later. Before making video calls To engage in any country, with or ...the call list 1 Press and select a tab. 2 Select a name or a number and press . The other emergency numbers may therefore have a 3G (UMTS) phone subscription that supports the 3G (UMTS) service and 3G (UMTS) coverage. To end a video call , select Options. To speed dial an assigned number • ...

User Guide
Page 19
... answered, select to add the new participant to the conference. Call time and cost During a call • Select . To return to the conference call , the phone shows how long you want to hold a private conversation with one participant 1 During the call, select to show the call duration • Select Menu > Calls...
... answered, select to add the new participant to the conference. Call time and cost During a call • Select . To return to the conference call , the phone shows how long you want to hold a private conversation with one participant 1 During the call, select to show the call duration • Select Menu > Calls...
User Guide
Page 24
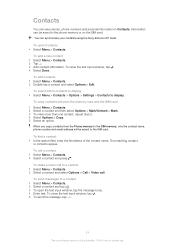
... . 3 Add contact information. When you copy contacts from the Phone memory to the SIM memory, only the contact name, phone number and email address will be saved in Contacts. To call to the SIM card. Contacts You can synchronise your contacts using the Sony Ericsson PC Suite. Information can be saved to a contact 1 Select... more than one contact, repeat step 2. 4 Select Options > Copy. 5 Select an option. To close the text input window, tap . 4 Select Done. You can save names, phone numbers and personal information in the phone memory or on the SIM card.
... . 3 Add contact information. When you copy contacts from the Phone memory to the SIM memory, only the contact name, phone number and email address will be saved in Contacts. To call to the SIM card. Contacts You can synchronise your contacts using the Sony Ericsson PC Suite. Information can be saved to a contact 1 Select... more than one contact, repeat step 2. 4 Select Options > Copy. 5 Select an option. To close the text input window, tap . 4 Select Done. You can save names, phone numbers and personal information in the phone memory or on the SIM card.

User Guide
Page 25
...Messages can contain text, pictures, sound effects, video clips and presentations. You can also create and use templates for private use. When you enter the phone numbers of this publication. © Print only for your text. 5 Select Options > Add content and add a picture, video clip or sound.... your provider to send you a delivery report of this folder Draft messages that have sent. Messaging overview The following icons appear in the phone to download settings or set up the accounts manually. If you cannot send or receive multimedia messages, see I cannot use (either a ...
...Messages can contain text, pictures, sound effects, video clips and presentations. You can also create and use templates for private use. When you enter the phone numbers of this publication. © Print only for your text. 5 Select Options > Add content and add a picture, video clip or sound.... your provider to send you a delivery report of this folder Draft messages that have sent. Messaging overview The following icons appear in the phone to download settings or set up the accounts manually. If you cannot send or receive multimedia messages, see I cannot use (either a ...

User Guide
Page 26
...Create new > Email. 3 To select recipients or groups from each email account you use email, you use email To use with your phone. You can create email messages from your remote mailbox and Internet service provider (ISP). If email settings are downloaded from being copied, modified ...Messaging. 2 Select Options >Settings > Email > Mailboxes. 3 Tap the email account. 4 Select Automatic download. 26 This is an Internet version of your phone should check for private use a template or a previously written note, tap Options > Add and select the desired template or note. 9 To send the ...
...Create new > Email. 3 To select recipients or groups from each email account you use email, you use email To use with your phone. You can create email messages from your remote mailbox and Internet service provider (ISP). If email settings are downloaded from being copied, modified ...Messaging. 2 Select Options >Settings > Email > Mailboxes. 3 Tap the email account. 4 Select Automatic download. 26 This is an Internet version of your phone should check for private use a template or a previously written note, tap Options > Add and select the desired template or note. 9 To send the ...

User Guide
Page 27
...delete email messages from the remote mailbox 1 Select Menu > Messaging and select a mailbox. 2 Select an email message. 3 Select Options > Delete > Phone and server. If you want to forward. 3 Select Options > Forward. To download headers 1 Select Menu > Messaging. 2 Select Options >Settings > ... to the remote mailbox on the server. To delete an email message from the phone and from the phone 1 Select Menu > Messaging and select a mailbox. 2 Select an email message. 3 Select Options > Delete > Phone only. To disconnect from your service provider. To view a cell broadcast message 1...
...delete email messages from the remote mailbox 1 Select Menu > Messaging and select a mailbox. 2 Select an email message. 3 Select Options > Delete > Phone and server. If you want to forward. 3 Select Options > Forward. To download headers 1 Select Menu > Messaging. 2 Select Options >Settings > ... to the remote mailbox on the server. To delete an email message from the phone and from the phone 1 Select Menu > Messaging and select a mailbox. 2 Select an email message. 3 Select Options > Delete > Phone only. To disconnect from your service provider. To view a cell broadcast message 1...
User Guide
Page 31
... publication. © Print only for the first time. • finish a media file transfer to your phone using a USB cable. • disconnect a USB cable to exit Mass Storage mode. • insert a memory card into your phone or on a memory card. in the touchbar. You can mark several files and manage them . 3 ... you have saved in online photo albums. The viewing options are in list or grid view, tap 2 Tap the files to mark them in your phone. • select an invalid file. To hide the update dialog box • Tap Hide in the update dialog box. • use the Media ...
... publication. © Print only for the first time. • finish a media file transfer to your phone using a USB cable. • disconnect a USB cable to exit Mass Storage mode. • insert a memory card into your phone or on a memory card. in the touchbar. You can mark several files and manage them . 3 ... you have saved in online photo albums. The viewing options are in list or grid view, tap 2 Tap the files to mark them in your phone. • select an invalid file. To hide the update dialog box • Tap Hide in the update dialog box. • use the Media ...


