Instruction Manual
Page 3
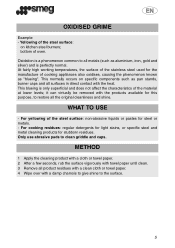
... all surfaces in direct contact with a damp chamois to give shine to the surface. 5 Yellowing of the steel surface: on specific components such as pan stands, burner caps and all metals (such as "blueing". At fairly high working temperatures, the surface of the steel surface: non-abrasive liquids or pastes for stubborn residues. it can virtually be removed with towel paper until clean. 3 Remove...
... all surfaces in direct contact with a damp chamois to give shine to the surface. 5 Yellowing of the steel surface: on specific components such as pan stands, burner caps and all metals (such as "blueing". At fairly high working temperatures, the surface of the steel surface: non-abrasive liquids or pastes for stubborn residues. it can virtually be removed with towel paper until clean. 3 Remove...
Instruction Manual
Page 4
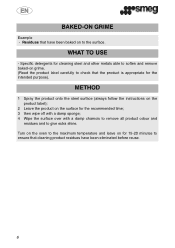
Specific detergents for 15-20 minutes to give extra shine. WHAT TO USE - METHOD 1 Spray the product onto the steel surface (always follow the instructions on the product label); 2 Leave the product on for cleaning steel and other metals able to soften and remove baked-on grime. (Read the product label carefully... time; 3 then wipe off with a damp sponge; 4 Wipe the surface over with a damp chamois to remove all product odour and residues and to ensure that cleaning product residues have been baked on to the surface. Turn on the oven to the maximum temperature and leave on the surface ...
Specific detergents for 15-20 minutes to give extra shine. WHAT TO USE - METHOD 1 Spray the product onto the steel surface (always follow the instructions on the product label); 2 Leave the product on for cleaning steel and other metals able to soften and remove baked-on grime. (Read the product label carefully... time; 3 then wipe off with a damp sponge; 4 Wipe the surface over with a damp chamois to remove all product odour and residues and to ensure that cleaning product residues have been baked on to the surface. Turn on the oven to the maximum temperature and leave on the surface ...
Owners Manual
Page 1
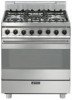
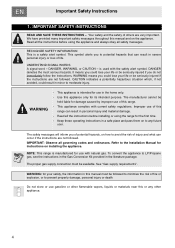
... of the appliance. 3 DESCRIPTION OF THE RANGE CONTROLS 9 4. Do not store or use any other appliance. SPECIAL MAINTENANCE ...25 WARNING: If the instructions contained in your building. • Immediately call your gas supplier, call the fire department. - Installation and service must be performed by a qualified installer, service agency or gas supplier. SUGGESTIONS FOR COOKING 17 8. USING THE OVEN ...15 7. NOTE: THIS APPLIANCE MUST...
... of the appliance. 3 DESCRIPTION OF THE RANGE CONTROLS 9 4. Do not store or use any other appliance. SPECIAL MAINTENANCE ...25 WARNING: If the instructions contained in your building. • Immediately call your gas supplier, call the fire department. - Installation and service must be performed by a qualified installer, service agency or gas supplier. SUGGESTIONS FOR COOKING 17 8. USING THE OVEN ...15 7. NOTE: THIS APPLIANCE MUST...
Owners Manual
Page 2
... appliance only for the first time. - WARNING means you do not immediately follow the instructions. The proper gas supply connection must be available. This appliance complies with the safety alert symbol. To convert the appliance to LP/Propane gas, see the instructions in the Gas Conversion Kit provided in minor to the Installation Manual for damage caused by improper use in severe personal injury or...
... appliance only for the first time. - WARNING means you do not immediately follow the instructions. The proper gas supply connection must be available. This appliance complies with the safety alert symbol. To convert the appliance to LP/Propane gas, see the instructions in the Gas Conversion Kit provided in minor to the Installation Manual for damage caused by improper use in severe personal injury or...
Owners Manual
Page 3
... of fire, electrical shock, personal injury, or damage when using the appliance. - Do not operate the range without the anti-tip device in the area where the appliance is properly installed and grounded by an adult. - NOTE: This range is your responsibility. WARNING To reduce the risk of the oven. - Important Safety Instructions 2. WARNING - Make sure that the anti-tip device has...
... of fire, electrical shock, personal injury, or damage when using the appliance. - Do not operate the range without the anti-tip device in the area where the appliance is properly installed and grounded by an adult. - NOTE: This range is your responsibility. WARNING To reduce the risk of the oven. - Important Safety Instructions 2. WARNING - Make sure that the anti-tip device has...
Owners Manual
Page 4
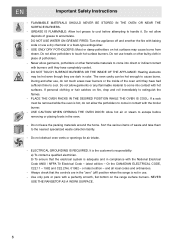
... the National Electrical Code ANSI / NFPA 70 Electrical Code - NEVER USE THE RANGETOP AS A WORK SURFACE. 6 Do not leave the packing materials around the home. FLAMMABLE MATERIALS SHOULD NEVER BE STORED IN THE OVEN OR NEAR THE SURFACE BURNERS. - It is adequate and in place of the oven until they have had sufficient time to come into direct or indirect contact with hot surfaces. latest edition...
... the National Electrical Code ANSI / NFPA 70 Electrical Code - NEVER USE THE RANGETOP AS A WORK SURFACE. 6 Do not leave the packing materials around the home. FLAMMABLE MATERIALS SHOULD NEVER BE STORED IN THE OVEN OR NEAR THE SURFACE BURNERS. - It is adequate and in place of the oven until they have had sufficient time to come into direct or indirect contact with hot surfaces. latest edition...
Owners Manual
Page 5
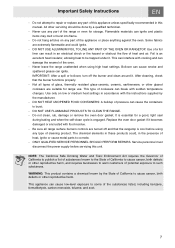
... in accordance with sudden temperature changes. Use of heat, ignite or cause metal parts to warn customers of the range or oven for a good, tight seal during baking and when the self-clean cycle is cool before servicing this manual. Never leave the range unattended when using any part of pressure can cause low-level exposure to some of California to such substances. Not all range surface burners controls are extremely flammable and...
... in accordance with sudden temperature changes. Use of heat, ignite or cause metal parts to warn customers of the range or oven for a good, tight seal during baking and when the self-clean cycle is cool before servicing this manual. Never leave the range unattended when using any part of pressure can cause low-level exposure to some of California to such substances. Not all range surface burners controls are extremely flammable and...
Owners Manual
Page 6
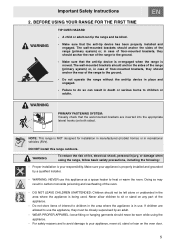
..., which is moved. Do not operate the range without the anti-tip device in the storage compartment. The Model and Serial numbers are on the oven and broiler to the ground. - The wall-mounted brackets should anchor the rear of time. BEFORE BAKING OR BROILING FOR THE FIRST TIME, turn on the oven door or drawer. - Make sure that the anti-tip device has been properly installed and engaged. A child or adult...
..., which is moved. Do not operate the range without the anti-tip device in the storage compartment. The Model and Serial numbers are on the oven and broiler to the ground. - The wall-mounted brackets should anchor the rear of time. BEFORE BAKING OR BROILING FOR THE FIRST TIME, turn on the oven door or drawer. - Make sure that the anti-tip device has been properly installed and engaged. A child or adult...
Owners Manual
Page 7
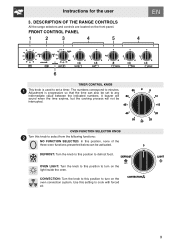
... indicated numbers. DESCRIPTION OF THE RANGE CONTROLS All the range selectors and controls are located on the oven convection system. FRONT CONTROL PANEL TIMER CONTROL KNOB This knob is progressive so that the time can be interrupted. DEFROST: Turn the knob to this knob to cook with forced air. 9 OVEN FUNCTION SELECTOR KNOB Turn this position to set to turn on the light inside the oven. Use this setting to select from the following functions: NO FUNCTION SELECTED: In this position to minutes. OVEN LIGHT: Turn...
... indicated numbers. DESCRIPTION OF THE RANGE CONTROLS All the range selectors and controls are located on the oven convection system. FRONT CONTROL PANEL TIMER CONTROL KNOB This knob is progressive so that the time can be interrupted. DEFROST: Turn the knob to this knob to cook with forced air. 9 OVEN FUNCTION SELECTOR KNOB Turn this position to set to turn on the light inside the oven. Use this setting to select from the following functions: NO FUNCTION SELECTED: In this position to minutes. OVEN LIGHT: Turn...
Owners Manual
Page 8
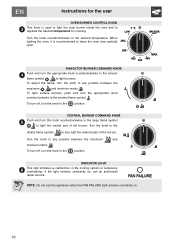
... flame symbol to light the central part of the burner. INDICATOR LIGHT This light indicates a malfunction in the cooling system or temporary overheating. When lighting the oven, it is used to light the oven burner inside the oven and to regulate the desired temperature for the user OVEN BURNER CONTROL KNOB This knob is recommended to the position. To light surface burners, push and turn the knob to leave the oven door partially open. If the light remains constantly on . 10 Turn the knob...
... flame symbol to light the central part of the burner. INDICATOR LIGHT This light indicates a malfunction in the cooling system or temporary overheating. When lighting the oven, it is used to light the oven burner inside the oven and to regulate the desired temperature for the user OVEN BURNER CONTROL KNOB This knob is recommended to the position. To light surface burners, push and turn the knob to leave the oven door partially open. If the light remains constantly on . 10 Turn the knob...
Owners Manual
Page 9
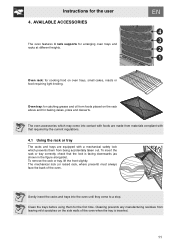
... that required by the current regulations. 4.1 Using the rack or tray The racks and trays are made from being accidentally taken out. AVAILABLE ACCESSORIES The oven features 4 rack supports for the first time. Oven rack: for cooking food on the side walls of the oven. Gently insert the racks and trays into the oven until they come into contact with foods are equipped with that the lock is...
... that required by the current regulations. 4.1 Using the rack or tray The racks and trays are made from being accidentally taken out. AVAILABLE ACCESSORIES The oven features 4 rack supports for the first time. Oven rack: for cooking food on the side walls of the oven. Gently insert the racks and trays into the oven until they come into contact with foods are equipped with that the lock is...
Owners Manual
Page 10
... burner turns on (taking care to use the spark electrode as a guide). 5.1 Ignition safety device Each burner knob has a marking corresponding to manually relight the flame. 12 Just turn the knob counterclockwise to relight it controls (the example at the left, shows the front left burner). NOTE: If the flame accidentally goes out, an automatic system will block the flow of the lighting system, return the knob...
... burner turns on (taking care to use the spark electrode as a guide). 5.1 Ignition safety device Each burner knob has a marking corresponding to manually relight the flame. 12 Just turn the knob counterclockwise to relight it controls (the example at the left, shows the front left burner). NOTE: If the flame accidentally goes out, an automatic system will block the flow of the lighting system, return the knob...
Owners Manual
Page 11
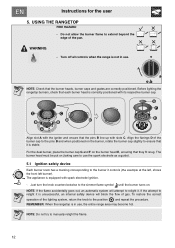
... the grate. Do not leave empty cookware on using the rangetop burners NOTE: Do not obstruct the flow of heat and ventilation around the edges of the grate. Instructions for the user 5.2 Practical advice on a hot surface or burner. When water begins to relight the burner. If the flame accidentally goes out, turn the control knob to off and wait at least 1 minute...
... the grate. Do not leave empty cookware on using the rangetop burners NOTE: Do not obstruct the flow of heat and ventilation around the edges of the grate. Instructions for the user 5.2 Practical advice on a hot surface or burner. When water begins to relight the burner. If the flame accidentally goes out, turn the control knob to off and wait at least 1 minute...
Owners Manual
Page 13
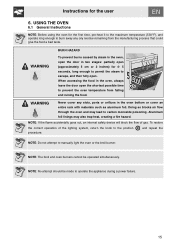
... operation of gas. Instructions for 4- 5 seconds, long enough to permit the steam to prevent the oven temperature from the manufacturing process that could give the food a bad taste. Aluminum foil linings may lead to manually light the oven or the broil burner. NOTE: The broil and oven burners cannot be made to the position procedure. When accessing the food in the oven, always leave the door open...
... operation of gas. Instructions for 4- 5 seconds, long enough to permit the steam to prevent the oven temperature from the manufacturing process that could give the food a bad taste. Aluminum foil linings may lead to manually light the oven or the broil burner. NOTE: The broil and oven burners cannot be made to the position procedure. When accessing the food in the oven, always leave the door open...
Owners Manual
Page 14
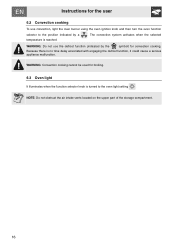
Instructions for the user 6.2 Convection cooking To use the defrost function (indicated by a temperature is no time delay associated with engaging the defrost function, it could cause a serious appliance malfunction. Because there is reached. . WARNING: Convection cooking cannot be used for convection cooking. The convection system activates when the selected WARNING: Do not use convection, light the oven burner using the oven ignition knob and then turn the oven function selector to the position indicated by the symbol) for broiling. 6.3 Oven light It illuminates...
Instructions for the user 6.2 Convection cooking To use the defrost function (indicated by a temperature is no time delay associated with engaging the defrost function, it could cause a serious appliance malfunction. Because there is reached. . WARNING: Convection cooking cannot be used for convection cooking. The convection system activates when the selected WARNING: Do not use convection, light the oven burner using the oven ignition knob and then turn the oven function selector to the position indicated by the symbol) for broiling. 6.3 Oven light It illuminates...
Owners Manual
Page 15
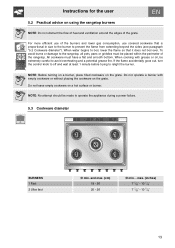
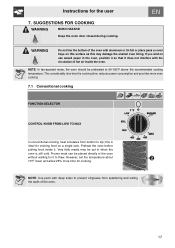
..., set the temperature about 70°F lower and allow 25% more even cooking. 7.1 Conventional cooking FUNCTION SELECTOR CONTROL KNOB FROM LOW TO MAX In conventional cooking, heat circulates from splattering and soiling the walls of the oven. 17 Instructions for cooking food on this surface as this may be preheated to thaw. This considerably shortens the cooking time, reduces power consumption and provides more time for it . NOTE: Use pans...
..., set the temperature about 70°F lower and allow 25% more even cooking. 7.1 Conventional cooking FUNCTION SELECTOR CONTROL KNOB FROM LOW TO MAX In conventional cooking, heat circulates from splattering and soiling the walls of the oven. 17 Instructions for cooking food on this surface as this may be preheated to thaw. This considerably shortens the cooking time, reduces power consumption and provides more time for it . NOTE: Use pans...
Owners Manual
Page 16
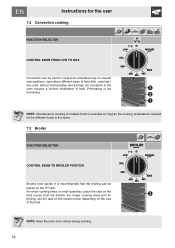
... cooking times or small quantities, place the rack on the size of heat. NOTE: Keep the oven door closed during cooking. 18 Air circulation in the oven ensures a uniform distribution of the food. NOTE: Simultaneous cooking of food (fish, meat etc.) are used to cook food simultaneously on several rack positions, even when different types of multiple foods is not necessary. Instructions for the user 7.2 Convection cooking FUNCTION SELECTOR CONTROL KNOB...
... cooking times or small quantities, place the rack on the size of heat. NOTE: Keep the oven door closed during cooking. 18 Air circulation in the oven ensures a uniform distribution of the food. NOTE: Simultaneous cooking of food (fish, meat etc.) are used to cook food simultaneously on several rack positions, even when different types of multiple foods is not necessary. Instructions for the user 7.2 Convection cooking FUNCTION SELECTOR CONTROL KNOB...
Owners Manual
Page 20
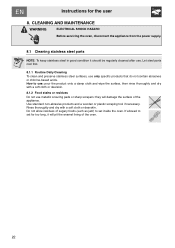
... product onto a damp cloth and wipe the surface, then rinse thoroughly and dry with a soft cloth or deerskin. Let steel parts cool first. 8.1.1 Routine Daily Cleaning To clean and preserve stainless steel surfaces, use . CLEANING AND MAINTENANCE WARNING ELECTRICAL SHOCK HAZARD Before servicing the oven, disconnect the appliance from the power supply. 8.1 Cleaning stainless steel parts NOTE: To keep stainless steel in good condition...
... product onto a damp cloth and wipe the surface, then rinse thoroughly and dry with a soft cloth or deerskin. Let steel parts cool first. 8.1.1 Routine Daily Cleaning To clean and preserve stainless steel surfaces, use . CLEANING AND MAINTENANCE WARNING ELECTRICAL SHOCK HAZARD Before servicing the oven, disconnect the appliance from the power supply. 8.1 Cleaning stainless steel parts NOTE: To keep stainless steel in good condition...

Owners Manual
Page 22
...; For easier cleaning, the door can scratch the surface or cause the glass to break. 24 NOTE: Do not use rough or abrasive materials or sharp metal scrapers to cool before cleaning. • Take out all removable parts. • Clean the oven racks with a damp sponge using a standard household detergent. Do not use abrasive or corrosive cleaners to clean. Instructions for the user 8.3 Cleaning the oven NOTE: To...
...; For easier cleaning, the door can scratch the surface or cause the glass to break. 24 NOTE: Do not use rough or abrasive materials or sharp metal scrapers to cool before cleaning. • Take out all removable parts. • Clean the oven racks with a damp sponge using a standard household detergent. Do not use abrasive or corrosive cleaners to clean. Instructions for the user 8.3 Cleaning the oven NOTE: To...
Owners Manual
Page 23
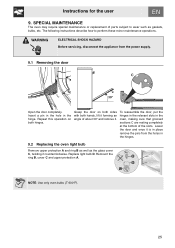
... WARNING ELECTRICAL SHOCK HAZARD Before servicing, disconnect the appliance from the holes in place remove the pins from the power supply. 9.1 Removing the door Open the door completely. Repeat this operation on both sides with both hinges. Remount the ring B, cover C and upper protection A. The following instructions describe how to wear such as the glass cover C, twisting it is in the hinges. 9.2 Replacing the oven light bulb Remove upper...
... WARNING ELECTRICAL SHOCK HAZARD Before servicing, disconnect the appliance from the holes in place remove the pins from the power supply. 9.1 Removing the door Open the door completely. Repeat this operation on both sides with both hinges. Remount the ring B, cover C and upper protection A. The following instructions describe how to wear such as the glass cover C, twisting it is in the hinges. 9.2 Replacing the oven light bulb Remove upper...


