
Instruction Manual 4
Page 5
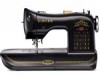
Thread take-up lever 3. Accessory tray 7. Stitch width dial (model 160) ia Presser foot pressure dial 1. Bobbin winder spindle 9. Use a soft cloth to clean the machine. 2 Do not expose the machtne to direct sunhght -2- Stitch length dial 10, Reverse button 11 Needle clamp screw 12. Spool pins 8. Stitch selector 2. Shuttle cover 6. 02/01/2008 Names of parts and their functions 2 13 JijIJ /T3h 5 /( 1 1 1. Thread tension dial 4. Presser foot 5. I
Thread take-up lever 3. Accessory tray 7. Stitch width dial (model 160) ia Presser foot pressure dial 1. Bobbin winder spindle 9. Use a soft cloth to clean the machine. 2 Do not expose the machtne to direct sunhght -2- Stitch length dial 10, Reverse button 11 Needle clamp screw 12. Spool pins 8. Stitch selector 2. Shuttle cover 6. 02/01/2008 Names of parts and their functions 2 13 JijIJ /T3h 5 /( 1 1 1. Thread tension dial 4. Presser foot 5. I

Instruction Manual 4
Page 24
Satin stitching, i.e. 02/01/2008 traigrit stitcnang 1 This stitch is used for monograms, decorative stitches, applique etc. 4 1 Zigzag stitching Stitch selector position (model 160) rnn Stitch selector position (model 140') Model 160 Set the stitch width dial between 1 and 4 depending on which zigzag width you want. For light fabrics use a short sutch length. The zigzag presser foot is the most commonly used for both straight and z,gzag stitching. 3. close zigzag, is used stitch. 2.
Satin stitching, i.e. 02/01/2008 traigrit stitcnang 1 This stitch is used for monograms, decorative stitches, applique etc. 4 1 Zigzag stitching Stitch selector position (model 160) rnn Stitch selector position (model 140') Model 160 Set the stitch width dial between 1 and 4 depending on which zigzag width you want. For light fabrics use a short sutch length. The zigzag presser foot is the most commonly used for both straight and z,gzag stitching. 3. close zigzag, is used stitch. 2.
Instruction Manual 4
Page 30
Model 160 Select position B Model 140 Select position G 2. Raise the needle 2 4. Step Stitch selector 1. Sew the right column (in the centre using the seam ripper. Sew the left column 9. Raise the needle '2 LI 10.Modell6O Select position C Model 140 Select position... you cut. Raise the needle 4 7, Modell6O Select position D 11 j Modell4O Select position I Cut the buttonhole in reverse> fl 3. I 8. Model 160 Select position C Model 140 Select position H 5. Sew 5-6 stitches 6. Be careful when you start to sew. 02/01/2008 Buttonholes Set the stitch length...
Model 160 Select position B Model 140 Select position G 2. Raise the needle 2 4. Step Stitch selector 1. Sew the right column (in the centre using the seam ripper. Sew the left column 9. Raise the needle '2 LI 10.Modell6O Select position C Model 140 Select position... you cut. Raise the needle 4 7, Modell6O Select position D 11 j Modell4O Select position I Cut the buttonhole in reverse> fl 3. I 8. Model 160 Select position C Model 140 Select position H 5. Sew 5-6 stitches 6. Be careful when you start to sew. 02/01/2008 Buttonholes Set the stitch length...


