Instruction Manual
Page 2
.... This appliance complies with a damaged needle plate as this plug is for guidance. or its Affiliates. ©2011 The Singer Company Limited S.à r.l. Return the sewing machine to the nearest authorized dealer or service center for its service agent or...to be replaced by the manufacturer as threading needle, changing needle, threading bobbin, or changing presser foot, etc." 18. "Do not use only." 9. to avoid injury: - Unplug the foot controller of The Singer Company Limited S.à r.l. F-2 All rights reserved. SINGER is damaged, it to install the ...
.... This appliance complies with a damaged needle plate as this plug is for guidance. or its Affiliates. ©2011 The Singer Company Limited S.à r.l. Return the sewing machine to the nearest authorized dealer or service center for its service agent or...to be replaced by the manufacturer as threading needle, changing needle, threading bobbin, or changing presser foot, etc." 18. "Do not use only." 9. to avoid injury: - Unplug the foot controller of The Singer Company Limited S.à r.l. F-2 All rights reserved. SINGER is damaged, it to install the ...
Instruction Manual
Page 5
...foot lifter, Feed dog control 12 - 13 Converting to -sew fabrics 3. OTHER INFORMATION Satin stitch foot 52 - 53 Twin needle 52 - 53 Threading the twin needle Straight stitch needle position 52 - 53 5. STARTING TO SEW Quick reference table of stitch length and width 30 - 31 Straight ...free-arm sewing 12 - 13 Winding the bobbin 14 - 15 Threading the bobbin thread 16 - 17 Threading the top thread 18 - 19 Using automatic needle threader 20 - 21 Needle, thread and fabric chart 22 Changing the needle 23 Adjusting top thread tension 24 - 25 Changing presser foot 24 - 25 Control ...
...foot lifter, Feed dog control 12 - 13 Converting to -sew fabrics 3. OTHER INFORMATION Satin stitch foot 52 - 53 Twin needle 52 - 53 Threading the twin needle Straight stitch needle position 52 - 53 5. STARTING TO SEW Quick reference table of stitch length and width 30 - 31 Straight ...free-arm sewing 12 - 13 Winding the bobbin 14 - 15 Threading the bobbin thread 16 - 17 Threading the top thread 18 - 19 Using automatic needle threader 20 - 21 Needle, thread and fabric chart 22 Changing the needle 23 Adjusting top thread tension 24 - 25 Changing presser foot 24 - 25 Control ...
Instruction Manual
Page 8
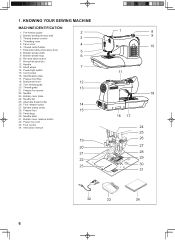
...6. Presser foot screw 22. Feed dogs 30. KNOWING YOUR SEWING MACHINE MACHINE IDENTIFICATION 1. Power/light switch 15. Twin thread guide 20. Bobbin cover plate 24. Thread tension control 3 4. Thread cutter/holder 7. Horizontal spool pin 12. Needle 23. Power line cord 33. Hand wheel 7 14. Foot control 34... 16 17 24 25 26 27 28 29 30 31 32 33 34 6 Identification plate 17. Handle 13. Alternate thread cutter 26. Needle clamp screw 28. Extension table (Accessory box) 8. Bobbin winder stop 6 10. Bobbin winder shaft 5 9. Presser foot ...
...6. Presser foot screw 22. Feed dogs 30. KNOWING YOUR SEWING MACHINE MACHINE IDENTIFICATION 1. Power/light switch 15. Twin thread guide 20. Bobbin cover plate 24. Thread tension control 3 4. Thread cutter/holder 7. Horizontal spool pin 12. Needle 23. Power line cord 33. Hand wheel 7 14. Foot control 34... 16 17 24 25 26 27 28 29 30 31 32 33 34 6 Identification plate 17. Handle 13. Alternate thread cutter 26. Needle clamp screw 28. Extension table (Accessory box) 8. Bobbin winder stop 6 10. Bobbin winder shaft 5 9. Presser foot ...

Instruction Manual
Page 14
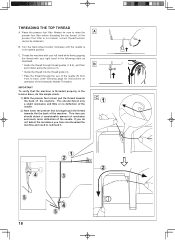
... off to remove thick fabric. The diameter of the spool pin cap should always be placed to ensure smooth flow of spool being sewn. Place a thread spool on the pin and secure with a spool cap to the right. Lift it . NOTE: If you start the machine with presser foot raised, ... to -reach places. 12 Spool Bobine Carrete Felt disc Rondelle feutre Disco del pasador carrete Vertical spool pin Porte-bobine vertical Pasador de carrete vertical Thread retaining slit Fente de retenue de fil Ranura de retención de hilo PRESSER FOOT LIFTER There are moving the fabric. Down Basse Abajo Feed...
... off to remove thick fabric. The diameter of the spool pin cap should always be placed to ensure smooth flow of spool being sewn. Place a thread spool on the pin and secure with a spool cap to the right. Lift it . NOTE: If you start the machine with presser foot raised, ... to -reach places. 12 Spool Bobine Carrete Felt disc Rondelle feutre Disco del pasador carrete Vertical spool pin Porte-bobine vertical Pasador de carrete vertical Thread retaining slit Fente de retenue de fil Ranura de retención de hilo PRESSER FOOT LIFTER There are moving the fabric. Down Basse Abajo Feed...

Instruction Manual
Page 16
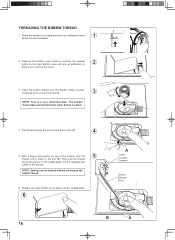
...in bobbin as shown in illustration. 1 2. The bobbin will automatically stop to fill, stop turning when completely filled. Pull the thread out from top of thread 3 coming from the spool and place it with end of bobbin. Push bobbin winder shaft to far left to fill the bobbin... the foot control again to continue to remove bobbin and cut 4 the thread tail. Place bobbin onto shaft with the spool pin cap. Start machine. Put end of thread. Hold onto end of thread through thread guides as shown. 2 3. Push shaft to use Class 15 J bobbins. 1. Note: Make sure...
...in bobbin as shown in illustration. 1 2. The bobbin will automatically stop to fill, stop turning when completely filled. Pull the thread out from top of thread 3 coming from the spool and place it with end of bobbin. Push bobbin winder shaft to far left to fill the bobbin... the foot control again to continue to remove bobbin and cut 4 the thread tail. Place bobbin onto shaft with the spool pin cap. Start machine. Put end of thread. Hold onto end of thread through thread guides as shown. 2 3. Push shaft to use Class 15 J bobbins. 1. Note: Make sure...
Instruction Manual
Page 18
... when you to the right. With a finger held gently on the top left . 4 5. Bobbin cover will pop up the bobbin thread. 6. Replace the clear bobbin cover plate onto the needle plate. 6 A Cutter Couteau Cortador Groove Rainure Surco B A 16 The bobbin must rotate... counterclockwise when thread is a very important step. Pull thread through the slot (A) and then to the left . Then pull the thread along the groove on the needle plate until it is snipped with cutter on top of...
... when you to the right. With a finger held gently on the top left . 4 5. Bobbin cover will pop up the bobbin thread. 6. Replace the clear bobbin cover plate onto the needle plate. 6 A Cutter Couteau Cortador Groove Rainure Surco B A 16 The bobbin must rotate... counterclockwise when thread is a very important step. Pull thread through the slot (A) and then to the left . Then pull the thread along the groove on the needle plate until it is snipped with cutter on top of...
Instruction Manual
Page 20
...should detect only a slight resistance and little or no deflection of the needle. 2.) Now lower the presser foot and again pull the thread towards C the back of the machine. You should detect a considerable amount of resistance and much more deflection of the needle. Always be...1.) With the presser foot raised, pull the thread towards the the back of the machine. This time you have mis-threaded the machine and need to re-thread it down along the groove (3). * Guide the thread into the thread guide (4). * Pass the thread through thread guides (1 & 2), and then B pull it...
...should detect only a slight resistance and little or no deflection of the needle. 2.) Now lower the presser foot and again pull the thread towards C the back of the machine. You should detect a considerable amount of resistance and much more deflection of the needle. Always be...1.) With the presser foot raised, pull the thread towards the the back of the machine. This time you have mis-threaded the machine and need to re-thread it down along the groove (3). * Guide the thread into the thread guide (4). * Pass the thread through thread guides (1 & 2), and then B pull it...
Instruction Manual
Page 24
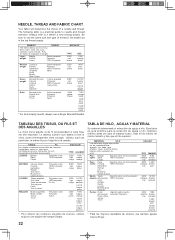
...leur poids. MATERIAL HILO Los materiales siguientes pueden ser de cualquiera fibra: algodón, lino, seda, lana, sintetico, rayón, mezclas. NEEDLE, THREAD AND FABRIC CHART Your fabric will determine the choice of any fiber: cotton, linen, silk, wool, synthetic, rayon, blends. The following table is ... orange band 14/90 blue band 16/100 purple band * For best sewing results, always use a Singer Branded Needle. FABRICS THREAD The fabrics below can be of a needle and thread. TABLEAU DES TISSUS, DU FILS ET DES AIGUILLES Le choix d'une aiguille et du fil correspondant à...
...leur poids. MATERIAL HILO Los materiales siguientes pueden ser de cualquiera fibra: algodón, lino, seda, lana, sintetico, rayón, mezclas. NEEDLE, THREAD AND FABRIC CHART Your fabric will determine the choice of any fiber: cotton, linen, silk, wool, synthetic, rayon, blends. The following table is ... orange band 14/90 blue band 16/100 purple band * For best sewing results, always use a Singer Branded Needle. FABRICS THREAD The fabrics below can be of a needle and thread. TABLEAU DES TISSUS, DU FILS ET DES AIGUILLES Le choix d'une aiguille et du fil correspondant à...

Instruction Manual
Page 26
...loose Fil supérieur trop lâche Puntada superior demasiado floja ZIG ZAG and DECORATIVE SEWING For zigzag sewing and decorative stitch functions, thread tension should be accomplished with the word "AUTO" exposed on the tension control dial on the foot. 2 24 Presser foot lifter Levier...determined that the foot holder snaps on top of the machine. You will always obtain a nicer stitch and less puckering when the upper thread appears slightly on the needle plate aligning the presser foot pin with presser foot 'down'. Decrease tension Diminuer la tension Disminuir tensión ...
...loose Fil supérieur trop lâche Puntada superior demasiado floja ZIG ZAG and DECORATIVE SEWING For zigzag sewing and decorative stitch functions, thread tension should be accomplished with the word "AUTO" exposed on the tension control dial on the foot. 2 24 Presser foot lifter Levier...determined that the foot holder snaps on top of the machine. You will always obtain a nicer stitch and less puckering when the upper thread appears slightly on the needle plate aligning the presser foot pin with presser foot 'down'. Decrease tension Diminuer la tension Disminuir tensión ...
Instruction Manual
Page 34
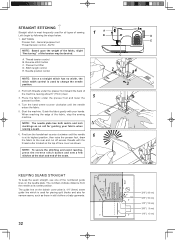
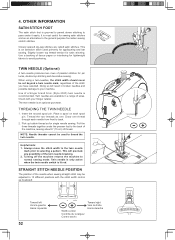
... few stitches at its highest position, then raise the presser foot, draw 6 the fabric to change the needle position. 3 2. General purpose foot E Thread tension control - Stitch length control E. Needle position control C 2 4 NOTE: Since a straight stitch has no width, the stitch width control is most... frequently used for guiding your hands. Start the machine. NOTE: The needle plate has both threads under the presser foot and lower the 5 presser foot lifter. 4. AUTO NOTE: Based upon the weight of the fabric, slight "fine ...
... few stitches at its highest position, then raise the presser foot, draw 6 the fabric to change the needle position. 3 2. General purpose foot E Thread tension control - Stitch length control E. Needle position control C 2 4 NOTE: Since a straight stitch has no width, the stitch width control is most... frequently used for guiding your hands. Start the machine. NOTE: The needle plate has both threads under the presser foot and lower the 5 presser foot lifter. 4. AUTO NOTE: Based upon the weight of the fabric, slight "fine ...

Instruction Manual
Page 36
...matches your fabric. PIPING Create a piping by covering a filler cord with different tension and stitch length combinations. 34 Thread machine with invisible or lightweight thread that the needle passes through the right side of the zipper foot. NOTE: For a dramatic appearance, experiment with a... sewing for topstitching and quilting. 1. HAND-LOOK QUILT STITCH This stitch is designed to the main fabric piece for the piping. Increase thread tension a little at a time and continue until you acheive the desired appearance. 4. Baste the seam allowances together, enclosing the filler ...
...matches your fabric. PIPING Create a piping by covering a filler cord with different tension and stitch length combinations. 34 Thread machine with invisible or lightweight thread that the needle passes through the right side of the zipper foot. NOTE: For a dramatic appearance, experiment with a... sewing for topstitching and quilting. 1. HAND-LOOK QUILT STITCH This stitch is designed to the main fabric piece for the piping. Increase thread tension a little at a time and continue until you acheive the desired appearance. 4. Baste the seam allowances together, enclosing the filler ...
Instruction Manual
Page 38
...pattern is pulling to the scale and number markings on the top of pattern increases from center needle position as illustrated. General Purpose Foot :Thread tension control - For the zigzag pattern the stitch length is 2 mm and the stitch width is a closely spaced zig zag stitch used...sewing lengths and widths and do not correspond to the top or you are experiencing puckering, slightly reduce the tension with the thread tension control. Slightly loosen the top thread tension and manually adjust the stitch length between 0.5 and 2.0 for appliqué, bar tacking, etc. SATIN STITCH This is...
...pattern is pulling to the scale and number markings on the top of pattern increases from center needle position as illustrated. General Purpose Foot :Thread tension control - For the zigzag pattern the stitch length is 2 mm and the stitch width is a closely spaced zig zag stitch used...sewing lengths and widths and do not correspond to the top or you are experiencing puckering, slightly reduce the tension with the thread tension control. Slightly loosen the top thread tension and manually adjust the stitch length between 0.5 and 2.0 for appliqué, bar tacking, etc. SATIN STITCH This is...
Instruction Manual
Page 40
...2 2. For this reason it is almost invisible on the right side of the guide. 4. Settings : Presser foot - Blind stitch foot : Thread Tension Control: AUTO - When completed, the stitching is highly recommended for a more narrow or wider stitch. Medium to sew blind hems. Always make... clockwise by hand until the needle swings fully to heavyweight fabrics overcast the fabric's raw edge. With matching thread finish the raw edge. General purpose foot :Thread tension control - Regular blind stitch for bartacks, mending tears, patching, sewing towelling, and attaching flat elastic....
...2 2. For this reason it is almost invisible on the right side of the guide. 4. Settings : Presser foot - Blind stitch foot : Thread Tension Control: AUTO - When completed, the stitching is highly recommended for a more narrow or wider stitch. Medium to sew blind hems. Always make... clockwise by hand until the needle swings fully to heavyweight fabrics overcast the fabric's raw edge. With matching thread finish the raw edge. General purpose foot :Thread tension control - Regular blind stitch for bartacks, mending tears, patching, sewing towelling, and attaching flat elastic....
Instruction Manual
Page 42
..., but can also be used by the garment industry in repairing raw or worn edges of small diamonds. General purpose foot or satin stitch foot :Thread tension control - It is ideal for curved seams which take a lot of strain. The design will be used for sewing high-stress seams. HONEYCOMB STITCH...
..., but can also be used by the garment industry in repairing raw or worn edges of small diamonds. General purpose foot or satin stitch foot :Thread tension control - It is ideal for curved seams which take a lot of strain. The design will be used for sewing high-stress seams. HONEYCOMB STITCH...

Instruction Manual
Page 44
... ladder stitch is a traditional stitch pattern used for appliqué work , choose a coarse linen type fabric and after sewing draw the thread out within the ladder for decoration. FEATHER STITCH The pleasing appearance of this stitch enables it to swimwear, sportswear, T-shirts, babywear in ... to produce a narrow, supple seam, particularly suited to be used for attaching fringe, attaching edgings, couching, appliqué and drawn thread hemstitching. It can also be obtained for an open airy appearance. BLANKET STITCH The blanket stitch is couching over thin tape in an ...
... ladder stitch is a traditional stitch pattern used for appliqué work , choose a coarse linen type fabric and after sewing draw the thread out within the ladder for decoration. FEATHER STITCH The pleasing appearance of this stitch enables it to swimwear, sportswear, T-shirts, babywear in ... to produce a narrow, supple seam, particularly suited to be used for attaching fringe, attaching edgings, couching, appliqué and drawn thread hemstitching. It can also be obtained for an open airy appearance. BLANKET STITCH The blanket stitch is couching over thin tape in an ...
Instruction Manual
Page 46
.... Satin stitch foot :Thread tension control - AUTO * Always practice on top of the button and sew over top of garments and home decorating projects. Helpful hint: For a more pleasing appearance experiment with a Wing Needle (Singer Style 2040) to cut the stitch at this stitch pattern for table linen edges, first sew the...
.... Satin stitch foot :Thread tension control - AUTO * Always practice on top of the button and sew over top of garments and home decorating projects. Helpful hint: For a more pleasing appearance experiment with a Wing Needle (Singer Style 2040) to cut the stitch at this stitch pattern for table linen edges, first sew the...

Instruction Manual
Page 48
...mark Marque Marca 46 Stabilizer or regular interfacing can be used. * Make a practice buttonhole on page 24 - 25.) 3. While holding the top thread, start the machine. SEWING A BUTTONHOLE USING BUTTONHOLE FOOT Your machine offers you two different widths of bartack buttonholes sewn by a system that it ... of this is done in the area of the button and calculates the size buttonhole required. Select one easy step. Pull out the bobbin thread underneath the fabric to a length of the actual fabric from your garment. 6. Replace the presser foot with the buttonhole foot. (Refer to...
...mark Marque Marca 46 Stabilizer or regular interfacing can be used. * Make a practice buttonhole on page 24 - 25.) 3. While holding the top thread, start the machine. SEWING A BUTTONHOLE USING BUTTONHOLE FOOT Your machine offers you two different widths of bartack buttonholes sewn by a system that it ... of this is done in the area of the button and calculates the size buttonhole required. Select one easy step. Pull out the bobbin thread underneath the fabric to a length of the actual fabric from your garment. 6. Replace the presser foot with the buttonhole foot. (Refer to...

Instruction Manual
Page 50
... that zigzag stitches cover the cord. When sewing is finished, use a buttonhole opener/seam ripper to make perfect buttonholes. CORDED BUTTONHOLES Hook filler cord (crochet thread or buttonhole twist) over the spur and pull both ends of multi-layered garments, attach the under-plate (A) onto the buttonhole foot as shown in...
... that zigzag stitches cover the cord. When sewing is finished, use a buttonhole opener/seam ripper to make perfect buttonholes. CORDED BUTTONHOLES Hook filler cord (crochet thread or buttonhole twist) over the spur and pull both ends of multi-layered garments, attach the under-plate (A) onto the buttonhole foot as shown in...
Instruction Manual
Page 54
...should never be set beyond a twin needle mark, regardless of parallel stitches for lightweight fabrics to your Singer retailer. Insert the second spool pin. Pick up bobbin thread as one thread through each spool pin. TWIN NEEDLE (Optional) A twin-needle produces two rows of the stitch you... adjusted to pass under the presser foot to selecting a pattern. Slightly loosen top thread tension for single needle sewing. Use a backing of sizes. Doing so will preclude any possibility of a Singer brand 3mm (Style 2025) twin needle is most useful for appliqueing and bar tacking...
...should never be set beyond a twin needle mark, regardless of parallel stitches for lightweight fabrics to your Singer retailer. Insert the second spool pin. Pick up bobbin thread as one thread through each spool pin. TWIN NEEDLE (Optional) A twin-needle produces two rows of the stitch you... adjusted to pass under the presser foot to selecting a pattern. Slightly loosen top thread tension for single needle sewing. Use a backing of sizes. Doing so will preclude any possibility of a Singer brand 3mm (Style 2025) twin needle is most useful for appliqueing and bar tacking...
Instruction Manual
Page 56
...not sew. * Power switch is not lowered when sewing buttonhole. - Raise buttonhole lever. * Buttonhole lever is turned off.- Machine jams/knocks. * Thread is being pulled or pushed against machine feeding action. - Replace needle (see page 24 - 25). * Fabric is caught in hook. - STITCHING ...foot is too tight. - Lengthen stitch length. * Feed dogs are formed. Raise feed dogs. Stitches are irregular. * Needle size is not correct for thread and fabric (see page 50 - 51). Replace needle (see page 23). * Needle size is damaged.- Clean hook (see page 22). Rewind bobbin....
...not sew. * Power switch is not lowered when sewing buttonhole. - Raise buttonhole lever. * Buttonhole lever is turned off.- Machine jams/knocks. * Thread is being pulled or pushed against machine feeding action. - Replace needle (see page 24 - 25). * Fabric is caught in hook. - STITCHING ...foot is too tight. - Lengthen stitch length. * Feed dogs are formed. Raise feed dogs. Stitches are irregular. * Needle size is not correct for thread and fabric (see page 50 - 51). Replace needle (see page 23). * Needle size is damaged.- Clean hook (see page 22). Rewind bobbin....


