Instruction Manual
Page 1
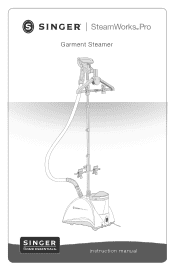
SteamWorks Pro Garment Steamer ON OFF instruction manual
SteamWorks Pro Garment Steamer ON OFF instruction manual
Instruction Manual
Page 2
...or wind it will cause damage. Do not immerse this product in operation. 7. Do not operate the steamer without filling the water reservoir. Move the appliance by SINGER Home Essentials may cause fire or electrical shock. 3. If the cord becomes damaged or the appliance has been... dropped or damaged, do not disassemble the steamer. Read all instructions before changing Steam Head attachments to cool ...
...or wind it will cause damage. Do not immerse this product in operation. 7. Do not operate the steamer without filling the water reservoir. Move the appliance by SINGER Home Essentials may cause fire or electrical shock. 3. If the cord becomes damaged or the appliance has been... dropped or damaged, do not disassemble the steamer. Read all instructions before changing Steam Head attachments to cool ...
Instruction Manual
Page 3
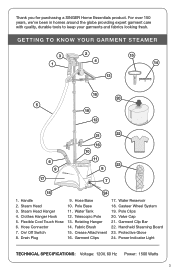
.... Pole Clips 20. Handheld Steaming Board 23. Clothes Hanger Hook 5. Drain Plug 9. Pole Base 11. Telescopic Pole 13. Handle 2. getting to keep your garment steamer 3 1 2 4 15 14 13 16 20 5 19 12 6 9 17 21 22 16 10 11 23 8 7 18 24 1. Steam Head Hanger ...4. Valve Cap 21. Protective Glove 24. Fabric Brush 15. Garment Clips 17. Thank you for purchasing a SINGER Home Essentials product. Steam Head 3. Flexible Cool Touch Hose 6. Hose Base 10. Water Tank 12. Garment Clip Bar 22. Power Indicator Light Technical...
.... Pole Clips 20. Handheld Steaming Board 23. Clothes Hanger Hook 5. Drain Plug 9. Pole Base 11. Telescopic Pole 13. Handle 2. getting to keep your garment steamer 3 1 2 4 15 14 13 16 20 5 19 12 6 9 17 21 22 16 10 11 23 8 7 18 24 1. Steam Head Hanger ...4. Valve Cap 21. Protective Glove 24. Fabric Brush 15. Garment Clips 17. Thank you for purchasing a SINGER Home Essentials product. Steam Head 3. Flexible Cool Touch Hose 6. Hose Base 10. Water Tank 12. Garment Clip Bar 22. Power Indicator Light Technical...
Instruction Manual
Page 4
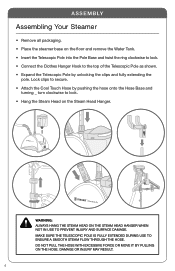
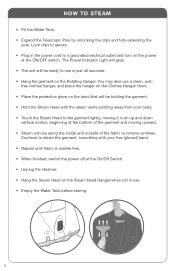
... Steam Head on the Steam Head Hanger when not in use to prevent injury and surface damage. A ssem b ly Assembling Your Steamer • Remove all packaging. • Place the steamer base on the floor and remove the Water Tank. • Insert the Telescopic Pole into the Pole Base and twist the ring...
... Steam Head on the Steam Head Hanger when not in use to prevent injury and surface damage. A ssem b ly Assembling Your Steamer • Remove all packaging. • Place the steamer base on the floor and remove the Water Tank. • Insert the Telescopic Pole into the Pole Base and twist the ring...
Instruction Manual
Page 5
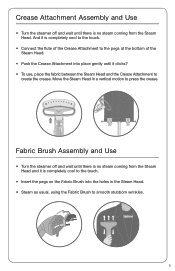
Fabric Brush Assembly and Use • Turn the steamer off and wait until there is no steam coming from the Steam Head and it clicks? • To use, place the fabric between the Steam ... Head in the Steam Head. • Steam as usual, using the Fabric Brush to create the crease. Crease Attachment Assembly and Use • Turn the steamer off and wait until there is no steam coming from the Steam Head.
Fabric Brush Assembly and Use • Turn the steamer off and wait until there is no steam coming from the Steam Head and it clicks? • To use, place the fabric between the Steam ... Head in the Steam Head. • Steam as usual, using the Fabric Brush to create the crease. Crease Attachment Assembly and Use • Turn the steamer off and wait until there is no steam coming from the Steam Head.
Instruction Manual
Page 6
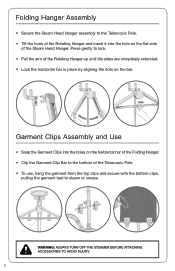
WARNING: Always turn off the steamer before attaching accessories to lock. • Pull the arm of the Rotating Hanger up until the sides are completely extended. • Lock the horizontal bar ...
WARNING: Always turn off the steamer before attaching accessories to lock. • Pull the arm of the Rotating Hanger up until the sides are completely extended. • Lock the horizontal bar ...
Instruction Manual
Page 7
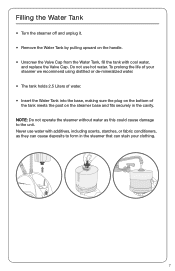
Do not use water with cool water, and replace the Valve Cap. Never use hot water. NOTE: Do not operate the steamer without water as they can stain your steamer we recommend using distilled or de-mineralized water. • The tank holds 2.5 Liters of water. • Insert the Water Tank into the ...of your clothing. 7 To prolong the life of the tank meets the post on the steamer base and fits securely in the steamer that can cause deposits to the unit. Filling the Water Tank • Turn the steamer off and unplug it. • Remove the Water Tank by pulling upward on the ...
Do not use water with cool water, and replace the Valve Cap. Never use hot water. NOTE: Do not operate the steamer without water as they can stain your steamer we recommend using distilled or de-mineralized water. • The tank holds 2.5 Liters of water. • Insert the Water Tank into the ...of your clothing. 7 To prolong the life of the tank meets the post on the steamer base and fits securely in the steamer that can cause deposits to the unit. Filling the Water Tank • Turn the steamer off and unplug it. • Remove the Water Tank by pulling upward on the ...
Instruction Manual
Page 8
... free (gloved) hand. • Repeat until fabric is wrinkle free. • When finished, switch the power off at the On/Off Switch. • Unplug the steamer. • Hang the Steam Head on the hand that will rise along the inside and outside of the garment and moving it in use a clean...
... free (gloved) hand. • Repeat until fabric is wrinkle free. • When finished, switch the power off at the On/Off Switch. • Unplug the steamer. • Hang the Steam Head on the hand that will rise along the inside and outside of the garment and moving it in use a clean...
Instruction Manual
Page 9
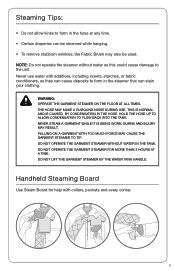
...the floor at a time. Handheld Steaming Board Use Steam Board for more than 3 hours at all times. The hose may cause the garment steamer to form in the steamer that can stain your clothing. Burns and injury may also be steamed while hanging. • To remove stubborn wrinkles, the Fabric Brush may... condensation in the hose. Never use . Hold the hose up to allow kinks to flow back into the tank. Do not operate the garment steamer for help with additives, including scents, starches, or fabric conditioners, as this could cause damage to the unit. This is normal and is being worn....
...the floor at a time. Handheld Steaming Board Use Steam Board for more than 3 hours at all times. The hose may cause the garment steamer to form in the steamer that can stain your clothing. Burns and injury may also be steamed while hanging. • To remove stubborn wrinkles, the Fabric Brush may... condensation in the hose. Never use . Hold the hose up to allow kinks to flow back into the tank. Do not operate the garment steamer for help with additives, including scents, starches, or fabric conditioners, as this could cause damage to the unit. This is normal and is being worn....

Instruction Manual
Page 10
... store. Removing Mineral Build-Up It is about 40 minutes. • Drain the solution by pulling upward on your water quality, SINGER recommends removing the mineral build-up inside the steamer, causing intermittent or weak steam. Rinse it drain completely. Remove the Water Tank by removing the Drain Plug and emptying the... near the top of 1 cup vinegar and 1 cup water. • Slowly pour the solution into the Hose Connector and Water Reservoir inlet and drain. C l eanin g SINGER recommends cleaning your garment steamer at least 30 minutes. • Remove the Cool Touch Hose.
... store. Removing Mineral Build-Up It is about 40 minutes. • Drain the solution by pulling upward on your water quality, SINGER recommends removing the mineral build-up inside the steamer, causing intermittent or weak steam. Rinse it drain completely. Remove the Water Tank by removing the Drain Plug and emptying the... near the top of 1 cup vinegar and 1 cup water. • Slowly pour the solution into the Hose Connector and Water Reservoir inlet and drain. C l eanin g SINGER recommends cleaning your garment steamer at least 30 minutes. • Remove the Cool Touch Hose.

Instruction Manual
Page 11
... delicate fabrics. • Especially on delicate fabrics, test the heat setting in an inconspicuous place (like an inside seam) before steaming. Safety feature switches the steamer off automatically if the tank runs out of clothing before steaming the entire garment. • Always consult the garment care label on a piece of water...
... delicate fabrics. • Especially on delicate fabrics, test the heat setting in an inconspicuous place (like an inside seam) before steaming. Safety feature switches the steamer off automatically if the tank runs out of clothing before steaming the entire garment. • Always consult the garment care label on a piece of water...
Instruction Manual
Page 12
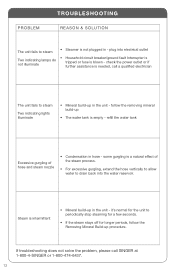
... u b l eshootin g REASON & SOLUTION The unit fails to periodically stop steaming for a few seconds. • If the steam stays off for the unit to steam • Steamer is not plugged in - plug into the water reservoir. check the power outlet or if further assistance is empty - Steam is intermittent • Mineral build...
... u b l eshootin g REASON & SOLUTION The unit fails to periodically stop steaming for a few seconds. • If the steam stays off for the unit to steam • Steamer is not plugged in - plug into the water reservoir. check the power outlet or if further assistance is empty - Steam is intermittent • Mineral build...
Instruction Manual
Page 13
... not be used by the original consumer owner of purchase. Who Is Covered By This Limited Warranty? The SINGER SteamWorks Pro Garment Steamer is warranted only for normal household (noncommercial) use of other than SINGER parts and SINGER approved service in the repair and maintenance of maintenance or other neglect, failure to follow the care, cleaning...
... not be used by the original consumer owner of purchase. Who Is Covered By This Limited Warranty? The SINGER SteamWorks Pro Garment Steamer is warranted only for normal household (noncommercial) use of other than SINGER parts and SINGER approved service in the repair and maintenance of maintenance or other neglect, failure to follow the care, cleaning...
Instruction Manual
Page 14
... gives you specific legal rights, and you may also have any questions regarding these warranties, please contact us: SINGER Sewing Company 1-800-4-SINGER E-mail: [email protected] ATTN: Consumer Affairs (1-800-474-6437) 1224 Heil Quaker Boulevard LaVergne, TN 37068... or through the Customer Service Area of our web site: www.singerco.com SINGER® IS A REGISTERED TRADEMARK OF THE SINGER COMPANY LIMITED. 14 How Do I Have Questions About The Warranty? If you have other rights ... the above limitation or exclusion may be obtained by returning the GARMENT STEAMER with: 1.
... gives you specific legal rights, and you may also have any questions regarding these warranties, please contact us: SINGER Sewing Company 1-800-4-SINGER E-mail: [email protected] ATTN: Consumer Affairs (1-800-474-6437) 1224 Heil Quaker Boulevard LaVergne, TN 37068... or through the Customer Service Area of our web site: www.singerco.com SINGER® IS A REGISTERED TRADEMARK OF THE SINGER COMPANY LIMITED. 14 How Do I Have Questions About The Warranty? If you have other rights ... the above limitation or exclusion may be obtained by returning the GARMENT STEAMER with: 1.


