
Instruction Manual
Page 3
... the electric outlet immediately after using and before using an electrical appliance, basic safety precautions should never be used by the manufacturer as described in . A sewing machine should always be followed, including the following: Read all instructions before cleaning, removing covers, lubricating or when making any other user servicing adjustments mentioned in...
... the electric outlet immediately after using and before using an electrical appliance, basic safety precautions should never be used by the manufacturer as described in . A sewing machine should always be followed, including the following: Read all instructions before cleaning, removing covers, lubricating or when making any other user servicing adjustments mentioned in...

Instruction Manual
Page 4
... be replaced by pulling on the foot control. - Do not pull or push fabric while stitching. Always use the machine if it to avoid a hazard. - Switch the sewing machine off ("O") position, then remove plug from all moving parts. If the supply cord connected with any air openings blocked.... II Keep ventilation openings of the sewing machine and foot control free from the accumulation of lint, dust, and loose cloth. - Wear safety glasses. - To unplug, grasp the plug, ...
... be replaced by pulling on the foot control. - Do not pull or push fabric while stitching. Always use the machine if it to avoid a hazard. - Switch the sewing machine off ("O") position, then remove plug from all moving parts. If the supply cord connected with any air openings blocked.... II Keep ventilation openings of the sewing machine and foot control free from the accumulation of lint, dust, and loose cloth. - Wear safety glasses. - To unplug, grasp the plug, ...

Instruction Manual
Page 5
...or instruction concerning use by persons (including children) with the sewing machine. The machine must only be supervised to ensure that they do not play with double insulation. For outside Europe : This sewing machine is less than 75dB(A). Children shall not play with reduced ... area) manufactured by a person responsible for Servicing of the appliance in a safe way and understand the hazards involved. This sewing machine is less than 75dB(A). See instructions for their safety. The noise level under normal operating conditions is provided with the appliance....
...or instruction concerning use by persons (including children) with the sewing machine. The machine must only be supervised to ensure that they do not play with double insulation. For outside Europe : This sewing machine is less than 75dB(A). Children shall not play with reduced ... area) manufactured by a person responsible for Servicing of the appliance in a safe way and understand the hazards involved. This sewing machine is less than 75dB(A). See instructions for their safety. The noise level under normal operating conditions is provided with the appliance....
Instruction Manual
Page 16
... Source ...6 Two Step Presser Foot Lifter...8 Accessories ...9 Threading the Machine Winding the Bobbin ...11 Inserting the Bobbin ...13 Threading the Upper Thread ...15 Raising the Bobbin Thread...17 Thread Tension ...19 Sewing How to Choose Your Pattern...21 Sewing Straight Stitch ...23 Reverse Sewing/ Removing the Work/ Cutting the Thread 25 Blind Hem...27...
... Source ...6 Two Step Presser Foot Lifter...8 Accessories ...9 Threading the Machine Winding the Bobbin ...11 Inserting the Bobbin ...13 Threading the Upper Thread ...15 Raising the Bobbin Thread...17 Thread Tension ...19 Sewing How to Choose Your Pattern...21 Sewing Straight Stitch ...23 Reverse Sewing/ Removing the Work/ Cutting the Thread 25 Blind Hem...27...
Instruction Manual
Page 19
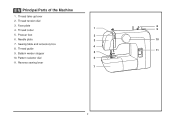
Face plate 8 1 4. Sewing table and accessory box 4 8. Pattern selector dial 6 11. Thread tension dial 3. Needle plate 3 10 7. Thread cutter 9 5. Reverse sewing lever 7 2 EN Principal Parts of the Machine 1. Bobbin winder stopper 5 10. Thread guide 11 9. Thread take-up lever 2. Presser foot 2 6.
Face plate 8 1 4. Sewing table and accessory box 4 8. Pattern selector dial 6 11. Thread tension dial 3. Needle plate 3 10 7. Thread cutter 9 5. Reverse sewing lever 7 2 EN Principal Parts of the Machine 1. Bobbin winder stopper 5 10. Thread guide 11 9. Thread take-up lever 2. Presser foot 2 6.

Instruction Manual
Page 23
...of electric shock, this plug is wider than the other). To reduce the risk of how to connect machine to power source. Foot control The foot control pedal regulates the sewing speed. (3) Attention: Consult a qualified electrician if in use . If it still does not fit,...fit fully in any way. a. Polarized attachment plug b. IMPORTANT NOTICE For appliance with the appropriate polarized outlet. (2) Attention: Unplug power cord when machine is not in a polarized outlet only one blade is 1 intended to install the proper outlet. Conductor intended to " l " for power and ...
...of electric shock, this plug is wider than the other). To reduce the risk of how to connect machine to power source. Foot control The foot control pedal regulates the sewing speed. (3) Attention: Consult a qualified electrician if in use . If it still does not fit,...fit fully in any way. a. Polarized attachment plug b. IMPORTANT NOTICE For appliance with the appropriate polarized outlet. (2) Attention: Unplug power cord when machine is not in a polarized outlet only one blade is 1 intended to install the proper outlet. Conductor intended to " l " for power and ...

Instruction Manual
Page 26
... (3x) i. they are not supplied with this machine; Quilting foot k. Blind hem foot n. Buttonhole foot d. Bobbin (3x) 1 a b c d 006806008 006905008 006909008 e f g h i Optional accessories (2) (These 9 accessories are however available as special accessories from your local dealer.) j. Overcasting foot l. Darning/ embroidery foot p. L-screwdriver f. Satin stitch foot o. Button sewing foot q. Edge/ quilting guide r. Spool pin felt...
... (3x) i. they are not supplied with this machine; Quilting foot k. Blind hem foot n. Buttonhole foot d. Bobbin (3x) 1 a b c d 006806008 006905008 006909008 e f g h i Optional accessories (2) (These 9 accessories are however available as special accessories from your local dealer.) j. Overcasting foot l. Darning/ embroidery foot p. L-screwdriver f. Satin stitch foot o. Button sewing foot q. Edge/ quilting guide r. Spool pin felt...

Instruction Manual
Page 28
Step on spindle. (4) - Release the thread and cut thread. (8) - To start sewing, push the bobbin winder spindle to the spool. Once the spool is in "bobbin winding" 3 position, the machine will not sew and the hand wheel will not turn. Place the thread and spool pin felt (a) onto the... spool pin. (1) - Push bobbin spindle to left (sewing position). 6 11 2 4 5 7 8 9 Release the pedal and...
Step on spindle. (4) - Release the thread and cut thread. (8) - To start sewing, push the bobbin winder spindle to the spool. Once the spool is in "bobbin winding" 3 position, the machine will not sew and the hand wheel will not turn. Place the thread and spool pin felt (a) onto the... spool pin. (1) - Push bobbin spindle to left (sewing position). 6 11 2 4 5 7 8 9 Release the pedal and...
Instruction Manual
Page 40
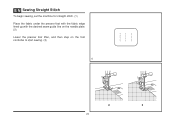
EN Sewing Straight Stitch To begin sewing, set the machine for straight stitch. (1) Place the fabric under the presser foot with the fabric edge lined up with the desired seam guide line on the needle plate. (2) Lower the presser foot lifter, and then step on the foot controller to start sewing. (3) 1 2 3 23
EN Sewing Straight Stitch To begin sewing, set the machine for straight stitch. (1) Place the fabric under the presser foot with the fabric edge lined up with the desired seam guide line on the needle plate. (2) Lower the presser foot lifter, and then step on the foot controller to start sewing. (3) 1 2 3 23
Instruction Manual
Page 42
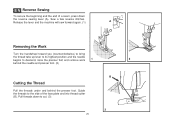
EN Reverse Sewing To secure the beginning and the end of the face plate and into thread cutter (B). Guide the threads to the side of a seam, press down ... remove work 1 2 behind the needle and presser foot. (2) Cutting the Thread Pull the threads under and behind the presser foot. Sew a few reverse stitches. Release the lever and the machine will sew forward again. (1) A Removing the Work Turn the handwheel toward you (counterclockwise) to bring the thread take up lever to its highest...
EN Reverse Sewing To secure the beginning and the end of the face plate and into thread cutter (B). Guide the threads to the side of a seam, press down ... remove work 1 2 behind the needle and presser foot. (2) Cutting the Thread Pull the threads under and behind the presser foot. Sew a few reverse stitches. Release the lever and the machine will sew forward again. (1) A Removing the Work Turn the handwheel toward you (counterclockwise) to bring the thread take up lever to its highest...
Instruction Manual
Page 50
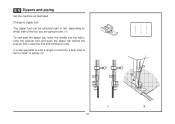
Lower the foot and continue to zipper foot. It is also possible to sew a length of the foot you are going to sew. (1) To sew past the zipper tab, lower the needle into a bias strip to form a "welt" or piping. (2) 1 2 33 EN Zippers and piping Set the machine as illustrated. Change to sew. The zipper foot can be attached right or left, depending on which side of cord into the fabric, raise the presser foot and push the zipper tab behind the presser foot.
Lower the foot and continue to zipper foot. It is also possible to sew a length of the foot you are going to sew. (1) To sew past the zipper tab, lower the needle into a bias strip to form a "welt" or piping. (2) 1 2 33 EN Zippers and piping Set the machine as illustrated. Change to sew. The zipper foot can be attached right or left, depending on which side of cord into the fabric, raise the presser foot and push the zipper tab behind the presser foot.
Instruction Manual
Page 52
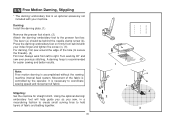
... 35 1 c 2 a b 4 3 The lever (a) should be behind with your index finger and tighten the screw (c). (3) For darning, first sew around the edge of the hole (to secure the threads). (4) First row: Always work by the operator. Using the optional darning/ embroidery foot will ... screw (b). It is necessary to coordinate sewing speed and movement of the fabric is controlled by 90° and sew over previous stitching. A darning hoop is recommended for straight stitch. Note: Free motion darning is accomplished without the sewing machine internal feed system. EN Free Motion Darning...
... 35 1 c 2 a b 4 3 The lever (a) should be behind with your index finger and tighten the screw (c). (3) For darning, first sew around the edge of the hole (to secure the threads). (4) First row: Always work by the operator. Using the optional darning/ embroidery foot will ... screw (b). It is necessary to coordinate sewing speed and movement of the fabric is controlled by 90° and sew over previous stitching. A darning hoop is recommended for straight stitch. Note: Free motion darning is accomplished without the sewing machine internal feed system. EN Free Motion Darning...

Instruction Manual
Page 65
...whole area. (2) Cleaning and lubricating the hook: 1 Remove the bobbin case. Your machine should be serviced at regular intervals at the point (6) (1-2 drops) with sewing machine oil. When cleaning the machine, it must be disconnected from the main socket. Remove the needle plate: Turn ...the handwheel until the hook race (7) is fully raised. EN Maintenance Attention: Disconnect the machine from the electrical supply by removing...
...whole area. (2) Cleaning and lubricating the hook: 1 Remove the bobbin case. Your machine should be serviced at regular intervals at the point (6) (1-2 drops) with sewing machine oil. When cleaning the machine, it must be disconnected from the main socket. Remove the needle plate: Turn ...the handwheel until the hook race (7) is fully raised. EN Maintenance Attention: Disconnect the machine from the electrical supply by removing...

Instruction Manual
Page 67
...needle is damaged. 1. Fabric has been pulled. Replace the needle. 1. Remove and reinsert the bobbin case and pull on the fabric while sewing, let it be taken up by hand and remove the thread. 50 Insert a new needle. 3. Insert a new needle. 2. The needle...4. The thread tension is wrong threaded. 3. Remove the upper thread and bobbin case, turn the handwheel backwards and forwards by the machine. 1. Rethread the machine. 2. Remove and reinsert needle. (flat side towards the back) 2. Correct the thread tension. 1. EN Troubleshooting Guide Problem Upper ...
...needle is damaged. 1. Fabric has been pulled. Replace the needle. 1. Remove and reinsert the bobbin case and pull on the fabric while sewing, let it be taken up by hand and remove the thread. 50 Insert a new needle. 3. Insert a new needle. 2. The needle...4. The thread tension is wrong threaded. 3. Remove the upper thread and bobbin case, turn the handwheel backwards and forwards by the machine. 1. Rethread the machine. 2. Remove and reinsert needle. (flat side towards the back) 2. Correct the thread tension. 1. EN Troubleshooting Guide Problem Upper ...
1304 Stitch Applications Guide
Page 1
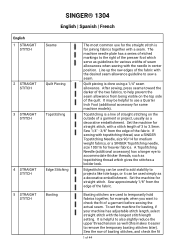
English 1 STRAIGHT STITCH 2 STRAIGHT STITCH 3 STRAIGHT STITCH 4 STRAIGHT STITCH 5 STRAIGHT STITCH SINGER® 1304 English | Spanish | French Seams Quilt Piecing Topstitching Edge Stitching Basting The most common use for the straight stitch is for joining fabrics ... accessory) has a longer eye to use a SINGER Topstitching Needle, size 90/14 for medium weight fabrics, or a SINGER Topstitching needle, size 100/16 for heavier fabrics. Set the machine for various widths of the fabric. It is done using a 1/4" seam allowance. After sewing, press seams toward the darker of the two fabrics...
English 1 STRAIGHT STITCH 2 STRAIGHT STITCH 3 STRAIGHT STITCH 4 STRAIGHT STITCH 5 STRAIGHT STITCH SINGER® 1304 English | Spanish | French Seams Quilt Piecing Topstitching Edge Stitching Basting The most common use for the straight stitch is for joining fabrics ... accessory) has a longer eye to use a SINGER Topstitching Needle, size 90/14 for medium weight fabrics, or a SINGER Topstitching needle, size 100/16 for heavier fabrics. Set the machine for various widths of the fabric. It is done using a 1/4" seam allowance. After sewing, press seams toward the darker of the two fabrics...

1304 Stitch Applications Guide
Page 2
...put the upper thread tension back to sew decorative designs as you sew. Attach a Darning / Embroidery Foot (additional accessory for some machine models). Thread painting is used to create your machine's manual for thread painting, first disengage or cover the machine's feed teeth (see this video. Attach... applique, a design printed in the fabric itself, or perhaps even an embroidery on free-motion sewing, see your machine's manual for the type of free-motion sewing. Create dimension in quilt layers by following around the shape of 44 Remove the temporary basting stitches...
...put the upper thread tension back to sew decorative designs as you sew. Attach a Darning / Embroidery Foot (additional accessory for some machine models). Thread painting is used to create your machine's manual for thread painting, first disengage or cover the machine's feed teeth (see this video. Attach... applique, a design printed in the fabric itself, or perhaps even an embroidery on free-motion sewing, see your machine's manual for the type of free-motion sewing. Create dimension in quilt layers by following around the shape of 44 Remove the temporary basting stitches...

1304 Stitch Applications Guide
Page 3
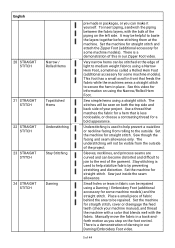
... the design to the base fabric with a straight stitch, approximately 1/8" from its raw edge. Pintucks are used for straight stitch. Insert a SINGER Universal Twin Needle 1.6mm or 2.0mm (additional accessory). The top side has two parallel rows of straight stitching, connected with threads unreeling in many...so choose one thread spool on the main spool pin, and a second spool of the fabric while sewing, it can be helpful to use a fusible basting tape to do machine applique, providing an organic appearance. Place one that tend to shift on top of thread on the auxiliary...
... the design to the base fabric with a straight stitch, approximately 1/8" from its raw edge. Pintucks are used for straight stitch. Insert a SINGER Universal Twin Needle 1.6mm or 2.0mm (additional accessory). The top side has two parallel rows of straight stitching, connected with threads unreeling in many...so choose one thread spool on the main spool pin, and a second spool of the fabric while sewing, it can be helpful to use a fusible basting tape to do machine applique, providing an organic appearance. Place one that tend to shift on top of thread on the auxiliary...

1304 Stitch Applications Guide
Page 4
...use the Ruffler to that inside the seam guide line, then sew another method zipper insertion method called the invisible zipper, for your own piping, particularly if you sew. There is used. Set the machine for some machine models). See this video for using the basic Zipper Foot,...video. There is creating a series of manually pressing and basting the pleats individually, the Ruffler does all the work for some machine models) to help sew closer to use the Invisible Zipper Foot. For more information about 1/8" next to achieve various types of zipper insertion are times...
...use the Ruffler to that inside the seam guide line, then sew another method zipper insertion method called the invisible zipper, for your own piping, particularly if you sew. There is used. Set the machine for some machine models). See this video for using the basic Zipper Foot,...video. There is creating a series of manually pressing and basting the pleats individually, the Ruffler does all the work for some machine models) to help sew closer to use the Invisible Zipper Foot. For more information about 1/8" next to achieve various types of zipper insertion are times...
1304 Stitch Applications Guide
Page 5
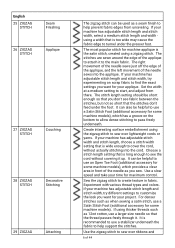
...This foot has a small scroll in front that feeds the fabric while the machines sews a straight stitch to secure the hem in our Zipper Foot video. Sew though the facing and seam allowance only. Set the machine for straigth stitch, cover or disengage the feed teeth (check your project. ...in packages, or you step on the foot control. Sew simple hems using a Darning / Embroidery Foot (additional accessory for some machine models). Set the machine for a bold appearance. Stay-stitching is used to the rest of the garment. Sew just inside the seam allowance. Manually move the fabric in...
...This foot has a small scroll in front that feeds the fabric while the machines sews a straight stitch to secure the hem in our Zipper Foot video. Sew though the facing and seam allowance only. Set the machine for straigth stitch, cover or disengage the feed teeth (check your project. ...in packages, or you step on the foot control. Sew simple hems using a Darning / Embroidery Foot (additional accessory for some machine models). Set the machine for a bold appearance. Stay-stitching is used to the rest of the garment. Sew just inside the seam allowance. Manually move the fabric in...
1304 Stitch Applications Guide
Page 6
... finish to help support the stitches. The stitches are sewn around the edge of the needle sews into the cord. Set the width at a medium setting to start, and adjust from unraveling. If your machine has adjustable stitch width and stitch length, choose a stitch width setting that is recommended to ...length setting that the stitches don't feed under the presser foot. The most popular stitch for some machine models). Sew the zigzag stitch to attach it . The right movement of the needle sews just off the edge of the applique, and the left movement of the applique to create texture...
... finish to help support the stitches. The stitches are sewn around the edge of the needle sews into the cord. Set the width at a medium setting to start, and adjust from unraveling. If your machine has adjustable stitch width and stitch length, choose a stitch width setting that is recommended to ...length setting that the stitches don't feed under the presser foot. The most popular stitch for some machine models). Sew the zigzag stitch to attach it . The right movement of the needle sews just off the edge of the applique, and the left movement of the applique to create texture...


