Instruction Manual
Page 3
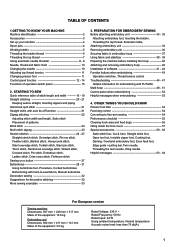
...sewing examples 33 3. PREPARATION FOR EMBROIDERY SEWING Before attaching embroidery unit 34 - 35 Attaching embroidery foot, Inserting the bobbin, Threading the top thread, Extension table, Attaching embroidery unit 36 Removing embroidery unit 36 Securing fabric in embroidery hoop 37 Using fabric and stabilizer 38 - 39 Preparing the machine...Entredeux stitch, Ladder stitch, Criss-cross stitch, Fishbone stitch Sewing on a button 27 Buttonholes 28 - 31 Using buttonhole foot, Procedure, Corded buttonholes Buttonholing with FUTURA Multi hoop 48 - 51 Control panel when embroidering 52 ...
...sewing examples 33 3. PREPARATION FOR EMBROIDERY SEWING Before attaching embroidery unit 34 - 35 Attaching embroidery foot, Inserting the bobbin, Threading the top thread, Extension table, Attaching embroidery unit 36 Removing embroidery unit 36 Securing fabric in embroidery hoop 37 Using fabric and stabilizer 38 - 39 Preparing the machine...Entredeux stitch, Ladder stitch, Criss-cross stitch, Fishbone stitch Sewing on a button 27 Buttonholes 28 - 31 Using buttonhole foot, Procedure, Corded buttonholes Buttonholing with FUTURA Multi hoop 48 - 51 Control panel when embroidering 52 ...

Instruction Manual
Page 5
... spool net (long) 7 18. Vinyl bag 20. Embroidery presser foot 23. Zipper foot 1 13. Blind hem foot 14. ACCESSORIES FOR SEWING MACHINE Sewing machine accessories are located in the storage compartments of your sewing machine is another very useful foot and should be used for most... decorative sewing. Spool pin cap (mini) 6. Buttonhole opener/Brush 9....
... spool net (long) 7 18. Vinyl bag 20. Embroidery presser foot 23. Zipper foot 1 13. Blind hem foot 14. ACCESSORIES FOR SEWING MACHINE Sewing machine accessories are located in the storage compartments of your sewing machine is another very useful foot and should be used for most... decorative sewing. Spool pin cap (mini) 6. Buttonhole opener/Brush 9....

Instruction Manual
Page 14
Simply press a button to enter Program Mode. For regular sewing, the LCD display shows the number of the selected stitch, an image of the stitch, and stitch width and stitch length settings. Read more about ... page 13 for information about the display when creating a stitch program, and page 52 for regular sewing, programming and embroidering. PROGRAM MODE BUTTON Press this button to select that stitch. 3. The information on the machine without the embroidery unit attached, straight stitch number 00, is selected. DIRECT SELECTION BUTTONS Frequently used stitches are...
Simply press a button to enter Program Mode. For regular sewing, the LCD display shows the number of the selected stitch, an image of the stitch, and stitch width and stitch length settings. Read more about ... page 13 for information about the display when creating a stitch program, and page 52 for regular sewing, programming and embroidering. PROGRAM MODE BUTTON Press this button to select that stitch. 3. The information on the machine without the embroidery unit attached, straight stitch number 00, is selected. DIRECT SELECTION BUTTONS Frequently used stitches are...

Instruction Manual
Page 17
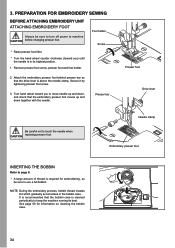
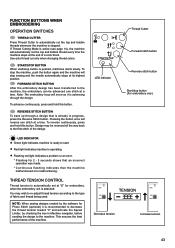
...bobbin 5 threads. 3. However, when foot control is set at the exact spot in both the sewing mode and the embroidery mode. 7 15 NEEDLE STOP POSITION SELECTOR BUTTON When the machine is turned on, needle is plugged, the Start/Stop button will return to its down-stop ...LED lamp lit. Push it again and it will be activated. Red light indicates machine is ready to sew. FUNCTIONS OF OPERATION SWITCH PANEL 1. TACKING STITCH MODE BUTTON Press Tacking Stitch Button and the sewing machine makes 1 2 START/STOP to start. SPEED CONTROL LEVER Sliding the lever sets...
...bobbin 5 threads. 3. However, when foot control is set at the exact spot in both the sewing mode and the embroidery mode. 7 15 NEEDLE STOP POSITION SELECTOR BUTTON When the machine is turned on, needle is plugged, the Start/Stop button will return to its down-stop ...LED lamp lit. Push it again and it will be activated. Red light indicates machine is ready to sew. FUNCTIONS OF OPERATION SWITCH PANEL 1. TACKING STITCH MODE BUTTON Press Tacking Stitch Button and the sewing machine makes 1 2 START/STOP to start. SPEED CONTROL LEVER Sliding the lever sets...
Instruction Manual
Page 36
... cleaned periodically to keep the machine running its highest position. 1. Attach the embroidery presser foot behind presser bar so that the bobbin case is in the bobbin case. NOTE: During the embroidery process, bobbin thread creates lint which gradually accumulates in its best. PREPARATION FOR EMBROIDERY SEWING BEFORE ATTACHING EMBROIDERY UNIT ATTACHING EMBROIDERY FOOT Always be sure...
... cleaned periodically to keep the machine running its highest position. 1. Attach the embroidery presser foot behind presser bar so that the bobbin case is in the bobbin case. NOTE: During the embroidery process, bobbin thread creates lint which gradually accumulates in its best. PREPARATION FOR EMBROIDERY SEWING BEFORE ATTACHING EMBROIDERY UNIT ATTACHING EMBROIDERY FOOT Always be sure...

Instruction Manual
Page 38
... not detach. Doing so may be sure to close for general sewing. 3 Handle 1 Release lever 2 Handle Release lever 36 Holding handle of the embroidery unit and pull it towards the left direction, checking that the embroidery unit is pushed in as far as it clicks into place....cap Carriage 2 Connector 3. Make sure that the embroidery unit is fully engaged, hold the handle of embroidery unit, carefully slide toward the left to turn off the machine. Don't push the carriage or put strong pressure on the machine and embroidery unit. Turn connector cap to the right to page...
... not detach. Doing so may be sure to close for general sewing. 3 Handle 1 Release lever 2 Handle Release lever 36 Holding handle of the embroidery unit and pull it towards the left direction, checking that the embroidery unit is pushed in as far as it clicks into place....cap Carriage 2 Connector 3. Make sure that the embroidery unit is fully engaged, hold the handle of embroidery unit, carefully slide toward the left to turn off the machine. Don't push the carriage or put strong pressure on the machine and embroidery unit. Turn connector cap to the right to page...
Instruction Manual
Page 43
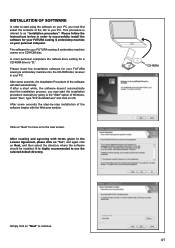
...most personal computers the default drive setting for a CD-ROM drive is "D:" Please insert the installation software for your FUTURA sewing & embroidery machine into the CD-ROM disc receiver in order to successfully install the software for your PC. If after a short ...-ROM disc. It is refered to continue. 41 CD-ROM Simply click on to as instructions below in your FUTURA sewing & embroidery machine comes on to use the selected default directory. The software for your FUTURA sewing & embroidery machine on Next, and then select the directory where the software should be installed.
...most personal computers the default drive setting for a CD-ROM drive is "D:" Please insert the installation software for your FUTURA sewing & embroidery machine into the CD-ROM disc receiver in order to successfully install the software for your PC. If after a short ...-ROM disc. It is refered to continue. 41 CD-ROM Simply click on to as instructions below in your FUTURA sewing & embroidery machine comes on to use the selected default directory. The software for your FUTURA sewing & embroidery machine on Next, and then select the directory where the software should be installed.

Instruction Manual
Page 44
...CORRECT START-UP PROCEDURE WHEN EMBROIDERING The following steps must be stored. Next attach the embroidery unit to open the embroidery software. Simply click on your computer and sewing machine. 1. Boot up . Make sure the needle has been moved to continue. will ...indicate the stage at which the installation 100%. Double click on the hard disk. Now you . 2. Please wait for proper start the copy and to the given directory on the FUTURA...
...CORRECT START-UP PROCEDURE WHEN EMBROIDERING The following steps must be stored. Next attach the embroidery unit to open the embroidery software. Simply click on your computer and sewing machine. 1. Boot up . Make sure the needle has been moved to continue. will ...indicate the stage at which the installation 100%. Double click on the hard disk. Now you . 2. Please wait for proper start the copy and to the given directory on the FUTURA...
Instruction Manual
Page 45
... or is already in Machine navigator, before sending the design to the machine, the embroidery can be reversed all the way back LED indicator LED INDICATOR Green light indicates machine is ready to automatically cut the top and bobbin threads whenever the machine is active (see page 14), the machine will stop sewing and the needle automatically...
... or is already in Machine navigator, before sending the design to the machine, the embroidery can be reversed all the way back LED indicator LED INDICATOR Green light indicates machine is ready to automatically cut the top and bobbin threads whenever the machine is active (see page 14), the machine will stop sewing and the needle automatically...
Instruction Manual
Page 50
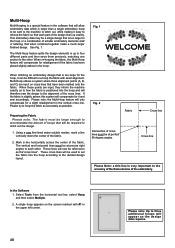
...a very vertically down the center of the fabric. Preparing the Fabric Please note: The fabric must be sent to the machine to stitch out, while making it and sew accordingly. A single hoop appears on cross lines that will be large enough to accommodate the amount of the design lines up... additional hoops will appear as the design data requires. When re-hooping the fabric, the Multi-Hoop feature will allow embroidery data which is larger than a single embroidery hoop to be at perfect 90 degree angles. When these points are input on the screen marked with #1 in the...
...a very vertically down the center of the fabric. Preparing the Fabric Please note: The fabric must be sent to the machine to stitch out, while making it and sew accordingly. A single hoop appears on cross lines that will be large enough to accommodate the amount of the design lines up... additional hoops will appear as the design data requires. When re-hooping the fabric, the Multi-Hoop feature will allow embroidery data which is larger than a single embroidery hoop to be at perfect 90 degree angles. When these points are input on the screen marked with #1 in the...

Instruction Manual
Page 51
...or individual design elements and arrange them in the hoop area on the inner hoop. The design data is sent to Machine" tool on the "Transmit to the machine for sewing one section at a time. Set fabric and stabilizer into the software. (Additional 4. The example shown uses lettering ... of data 1 within the guide line markings of the hoop. (See There are markings which indicates the exact center of the embroidery data that is a Center Hoop line which together define the maximum sewing area for Multiple Hooping. Guide lines are referred to the machine for sewing. 3.
...or individual design elements and arrange them in the hoop area on the inner hoop. The design data is sent to Machine" tool on the "Transmit to the machine for sewing one section at a time. Set fabric and stabilizer into the software. (Additional 4. The example shown uses lettering ... of data 1 within the guide line markings of the hoop. (See There are markings which indicates the exact center of the embroidery data that is a Center Hoop line which together define the maximum sewing area for Multiple Hooping. Guide lines are referred to the machine for sewing. 3.

Instruction Manual
Page 54
... used to step through the design color by using the Needle Stop Up/Down and Reverse buttons as illustrated. After transferring desired design(s) to your FUTURA sewing and embroidery machine, the display shows number of current color block and total number of the upper dial. Turn the lower dial. STEP BETWEEN COLOR BLOCKS To...
... used to step through the design color by using the Needle Stop Up/Down and Reverse buttons as illustrated. After transferring desired design(s) to your FUTURA sewing and embroidery machine, the display shows number of current color block and total number of the upper dial. Turn the lower dial. STEP BETWEEN COLOR BLOCKS To...

Instruction Manual
Page 56
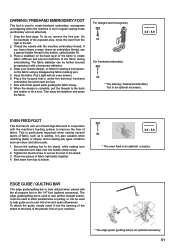
... Feed dog control CONVERTING TO FREE-ARM SEWING arm model. To replace, slide the extension table back into a slim free-arm model for children's clothes, cuffs, trouser legs, and other hard-to remove thick fabric. With the extension table removed the machine converts into place until it to its ... the movement of the fabric that you, not the feed dogs, are three positions for darning, freehand embroidery and monogramming so that is being sewn. Raise the lifter to the middle position to sew. 2. Lower the presser foot to insert or remove fabric. 3. 4. They should be raised for all...
... Feed dog control CONVERTING TO FREE-ARM SEWING arm model. To replace, slide the extension table back into a slim free-arm model for children's clothes, cuffs, trouser legs, and other hard-to remove thick fabric. With the extension table removed the machine converts into place until it to its ... the movement of the fabric that you, not the feed dogs, are three positions for darning, freehand embroidery and monogramming so that is being sewn. Raise the lifter to the middle position to sew. 2. Lower the presser foot to insert or remove fabric. 3. 4. They should be raised for all...
Instruction Manual
Page 63
... on the back layer of the fabric to create fabric stiffness and prevent distortion of fabric, such as in regular sewing mode (embroidery unit not attached). 1. Pull it with the machine's feeding system to improve the flow of fabric right sides together. 4. Secure the walking foot to the back and... tie a knot. To do so, remove the free arm. Thread the needle with a fast speed while guiding the fabric slowly. 8. Sew with the machine embroidery thread. EVEN FEED FOOT This foot has its own set in quilting. Tighten the thumb screw to secure the foot to stitch parallel lines...
... on the back layer of the fabric to create fabric stiffness and prevent distortion of fabric, such as in regular sewing mode (embroidery unit not attached). 1. Pull it with the machine's feeding system to improve the flow of fabric right sides together. 4. Secure the walking foot to the back and... tie a knot. To do so, remove the free arm. Thread the needle with a fast speed while guiding the fabric slowly. 8. Sew with the machine embroidery thread. EVEN FEED FOOT This foot has its own set in quilting. Tighten the thumb screw to secure the foot to stitch parallel lines...
Instruction Manual
Page 65
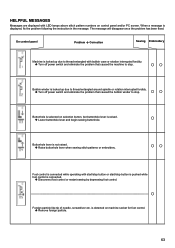
... entangled around spindle or rotation interrupted forcibly. is detected on selection button, but buttonhole lever is connected. When a message is On control panel Problem Correction Sewing Embroidery Machine is locked up due to stop button is pushed while foot control is raised. Foot control is not raised. HELPFUL MESSAGES Messages are displayed with...
... entangled around spindle or rotation interrupted forcibly. is detected on selection button, but buttonhole lever is connected. When a message is On control panel Problem Correction Sewing Embroidery Machine is locked up due to stop button is pushed while foot control is raised. Foot control is not raised. HELPFUL MESSAGES Messages are displayed with...


