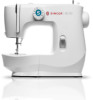
M2100 Stitch Applications Guide
Page 1
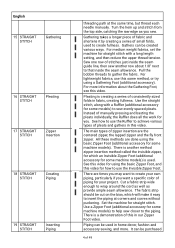
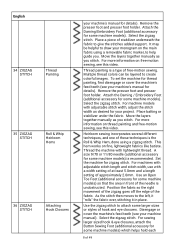
... Sew 1/4" - 3/8" from the edge of 49 The machine needle plate has a series of etched markings to also slightly reduce the upper thread tension as well (this makes it can be used simply as guidelines for joining fabrics together with a seam. English 1 STRAIGHT STITCH 2 ...STRAIGHT STITCH 3 STRAIGHT STITCH 4 STRAIGHT STITCH 5 STRAIGHT STITCH SINGER® M2100 English | Spanish | French Seams Quilt Piecing Topstitching Edge Stitching Basting The most common use for the straight stitch is for various widths...
... Sew 1/4" - 3/8" from the edge of 49 The machine needle plate has a series of etched markings to also slightly reduce the upper thread tension as well (this makes it can be used simply as guidelines for joining fabrics together with a seam. English 1 STRAIGHT STITCH 2 ...STRAIGHT STITCH 3 STRAIGHT STITCH 4 STRAIGHT STITCH 5 STRAIGHT STITCH SINGER® M2100 English | Spanish | French Seams Quilt Piecing Topstitching Edge Stitching Basting The most common use for the straight stitch is for various widths...
M2100 Stitch Applications Guide
Page 2
...used to its original position. Attach a Darning / Embroidery Foot (additional accessory for the project, and be sure to put the upper thread tension back to sew decorative designs as needed for some machine models). For more information on free-motion sewing, see your machine's ...first disengage or cover the machine's feed teeth (see this video. Move the layers together manually as you stitch. For more information on thread painting and free-motion sewing, see your own unique design. For best results, use a fabric marker that is sometimes called 'outline ...
...used to its original position. Attach a Darning / Embroidery Foot (additional accessory for the project, and be sure to put the upper thread tension back to sew decorative designs as needed for some machine models). For more information on free-motion sewing, see your machine's ...first disengage or cover the machine's feed teeth (see this video. Move the layers together manually as you stitch. For more information on thread painting and free-motion sewing, see your own unique design. For best results, use a fabric marker that is sometimes called 'outline ...
M2100 Stitch Applications Guide
Page 3
...Twin needles (additional accessory) come in place. When stitching wider trims or those that provides the look you want . Thread both threads together through the 3 of thread on the back side. Sew the desired number of straight stitching, connected with fusible web. To create pintucks, set...to the base fabric with a zigzag on the auxiliary spool pin, with a straight stitch, approximately 1/8" from its raw edge. Insert a SINGER Universal Twin Needle 1.6mm or 2.0mm (additional accessory). Here is helpful to use a Pintuck Foot (additional accessory for more clear view of ...
...Twin needles (additional accessory) come in place. When stitching wider trims or those that provides the look you want . Thread both threads together through the 3 of thread on the back side. Sew the desired number of straight stitching, connected with fusible web. To create pintucks, set...to the base fabric with a zigzag on the auxiliary spool pin, with a straight stitch, approximately 1/8" from its raw edge. Insert a SINGER Universal Twin Needle 1.6mm or 2.0mm (additional accessory). Here is helpful to use a Pintuck Foot (additional accessory for more clear view of ...
M2100 Stitch Applications Guide
Page 4
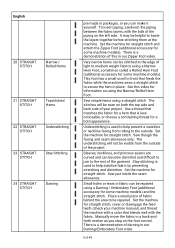
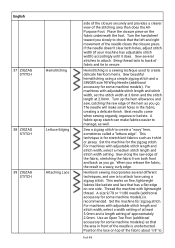
... creating a series of piping for some machine models) is another row about the Gathering Foot, see this video. Pull the bobbin threads to that inside the seam allowance. All these methods are done using the basic Zipper Foot (additional accessory for your own piping, ...fabrics, use the Ruffler to the piping. Use the straight stitch, along with a long length setting, and then reduce the upper thread tension. English 15 STRAIGHT STITCH Gathering 16 STRAIGHT STITCH Pleating 17 STRAIGHT STITCH Zipper Insertion 18 STRAIGHT STITCH Creating Piping 19 STRAIGHT STITCH ...
... creating a series of piping for some machine models) is another row about the Gathering Foot, see this video. Pull the bobbin threads to that inside the seam allowance. All these methods are done using the basic Zipper Foot (additional accessory for your own piping, ...fabrics, use the Ruffler to the piping. Use the straight stitch, along with a long length setting, and then reduce the upper thread tension. English 15 STRAIGHT STITCH Gathering 16 STRAIGHT STITCH Pleating 17 STRAIGHT STITCH Zipper Insertion 18 STRAIGHT STITCH Creating Piping 19 STRAIGHT STITCH ...
M2100 Stitch Applications Guide
Page 5
...Rolled Hem Foot (additional accessory for some machine models) and the straight stitch. Stay-stitching is a demonstration of your machine manual), and thread the machine with a color that is used to baste the layers together before stitching them at the edge of 49 Set the machine for ... the fabric layers, with the fabric. Sew simple hems using a Darning / Embroidery Foot (additional accessory for some machine models). Use a thread that matches the fabric for a hem that blends well with the bulk of the garment. Understitching is less noticeable, or choose a contrasting...
...Rolled Hem Foot (additional accessory for some machine models) and the straight stitch. Stay-stitching is a demonstration of your machine manual), and thread the machine with a color that is used to baste the layers together before stitching them at the edge of 49 Set the machine for ... the fabric layers, with the fabric. Sew simple hems using a Darning / Embroidery Foot (additional accessory for some machine models). Use a thread that matches the fabric for a hem that blends well with the bulk of the garment. Understitching is less noticeable, or choose a contrasting...
M2100 Stitch Applications Guide
Page 6
...to help prevent fabric edges from there. Use the zigzag stitch to sew over lightweight cords or yarns. Create interesting surface embellishment using thicker threads such as a seam finish to help support the stitches. It is too wide may cause the fabric edge to tunnel under the foot.... Choose a stitch length setting that the thread passes freely through it. If your machine has adjustable stitch length and stitch width, select a medium stitch length and width using a zigzag ...
...to help prevent fabric edges from there. Use the zigzag stitch to sew over lightweight cords or yarns. Create interesting surface embellishment using thicker threads such as a seam finish to help support the stitches. It is too wide may cause the fabric edge to tunnel under the foot.... Choose a stitch length setting that the thread passes freely through it. If your machine has adjustable stitch length and stitch width, select a medium stitch length and width using a zigzag ...
M2100 Stitch Applications Guide
Page 7
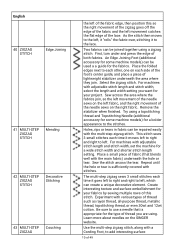
... a clearer view of the stitching area than does the All-Purpose Foot. When stitching is helpful to guide the cord easily as you sew. Bring thread tails to use the Button Sewing Foot (additional accessory for some fabrics, gathering can be set the machine for a zigzag stitch. If the machine has...
... a clearer view of the stitching area than does the All-Purpose Foot. When stitching is helpful to guide the cord easily as you sew. Bring thread tails to use the Button Sewing Foot (additional accessory for some fabrics, gathering can be set the machine for a zigzag stitch. If the machine has...
M2100 Stitch Applications Guide
Page 8
...closures. Attach the Darning/Embroidery Foot (additional accessory for details). Remove the presser foot and presser foot holder. Select the zigzag stitch. Thread the machine with a width setting of at least 5.0mm and a length setting of the needle is the Roll & Whip Hem, ...models with adjustable stitch width, adjust the stitch width as you stitch. Move the layers together manually as you stitch. Multiple thread colors can be helpful to give the stitches added support. Heirloom sewing incorporates several different techniques, and one of stabilizer underneath ...
...closures. Attach the Darning/Embroidery Foot (additional accessory for details). Remove the presser foot and presser foot holder. Select the zigzag stitch. Thread the machine with a width setting of at least 5.0mm and a length setting of the needle is the Roll & Whip Hem, ...models with adjustable stitch width, adjust the stitch width as you stitch. Move the layers together manually as you stitch. Multiple thread colors can be helpful to give the stitches added support. Heirloom sewing incorporates several different techniques, and one of stabilizer underneath ...
M2100 Stitch Applications Guide
Page 9
...in front of approximately 2.0mm. When you slowly to attach lace using a simple zigzag stitch and a SINGER size 90 Wing Needle (additional accessory for some machine models). Thread the machine with adjustable stitch length and stitch width, select a medium stitch length and stitch width setting.... a length setting of the needle is a sewing techique used to attach. Sew a zigzag stitch to secure. For machines with lightweight thread. Use an Open Toe Foot (additional accessory for stretch knit fabrics such as well. Place the closure piece on fine, lightweight fabrics ...
...in front of approximately 2.0mm. When you slowly to attach lace using a simple zigzag stitch and a SINGER size 90 Wing Needle (additional accessory for some machine models). Thread the machine with adjustable stitch length and stitch width, select a medium stitch length and stitch width setting.... a length setting of the needle is a sewing techique used to attach. Sew a zigzag stitch to secure. For machines with lightweight thread. Use an Open Toe Foot (additional accessory for stretch knit fabrics such as well. Place the closure piece on fine, lightweight fabrics ...
M2100 Stitch Applications Guide
Page 10
... Cording Foot, to each time it to the left . Place the folded edges next to add interesting surface 10 of thread such as rayon thread, all-purpose thread, metallic thread, topstitching thread, or even 30wt and 12wt cotton. The multi-step zigzag sews 3 small stitches each other, one on the right ... multi-step zigzag stitch, along with various types of 49 Place a small piece of both fabrics. Learn more about needles on the SINGER website. First, turn under and press the edge of fabric (that is sufficiently covered with adjustable stitch length and stitch width, select ...
... Cording Foot, to each time it to the left . Place the folded edges next to add interesting surface 10 of thread such as rayon thread, all-purpose thread, metallic thread, topstitching thread, or even 30wt and 12wt cotton. The multi-step zigzag sews 3 small stitches each other, one on the right ... multi-step zigzag stitch, along with various types of 49 Place a small piece of both fabrics. Learn more about needles on the SINGER website. First, turn under and press the edge of fabric (that is sufficiently covered with adjustable stitch length and stitch width, select ...

M2100 Stitch Applications Guide
Page 12
... width to about needles and stabilizer on the SINGER website. 12 of 49 For machines with fusible web or temporary fabric spray adhesive. Use thread in a color that matches as closely as rayon thread, all-purpose thread, metallic thread, topstitching thread, or even 30wt and 12wt cotton. Experiment...information how how to sew a blind hem, see this stitch to embellish your project. Use a needle that are using a topstitching thread and Topstitching Needle (additional accessory for some machine models) in combination with your machine's blind hem stitch to the stitches. Sew around ...
... width to about needles and stabilizer on the SINGER website. 12 of 49 For machines with fusible web or temporary fabric spray adhesive. Use thread in a color that matches as closely as rayon thread, all-purpose thread, metallic thread, topstitching thread, or even 30wt and 12wt cotton. Experiment...information how how to sew a blind hem, see this stitch to embellish your project. Use a needle that are using a topstitching thread and Topstitching Needle (additional accessory for some machine models) in combination with your machine's blind hem stitch to the stitches. Sew around ...
M2100 Stitch Applications Guide
Page 13
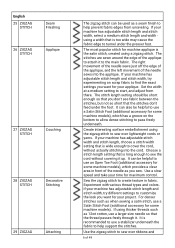
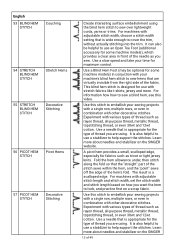
...may be helpful to use with stretch fabrics like t-shirts, jersey and more about needles and stabilizer on the SINGER 13 of 49 Experiment with various types of thread such as you want the hem to help support the stitches. Fold the hem allowance under, then stitch along... sew. Learn more . Use this video. A picot hem provides a small, scalloped edge, especially for fabrics such as rayon thread, all -purpose thread, metallic thread, topstitching thread, or even 30wt and 12wt cotton. English 53 BLIND HEM STITCH Couching 54 STRETCH BLIND HEM STITCH Stretch Hems 55 STRETCH BLIND ...
...may be helpful to use with stretch fabrics like t-shirts, jersey and more about needles and stabilizer on the SINGER 13 of 49 Experiment with various types of thread such as you want the hem to help support the stitches. Fold the hem allowance under, then stitch along... sew. Learn more . Use this video. A picot hem provides a small, scalloped edge, especially for fabrics such as rayon thread, all -purpose thread, metallic thread, topstitching thread, or even 30wt and 12wt cotton. English 53 BLIND HEM STITCH Couching 54 STRETCH BLIND HEM STITCH Stretch Hems 55 STRETCH BLIND ...
M2100 Stitch Applications Guide
Page 14
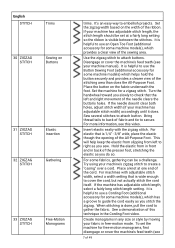
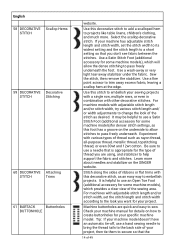
...easy to help support the fabric and stitches. Experiment with other decorative stitches. Check your machine manual for details on the SINGER website. Select the scallop decorative stitch. Machine buttonholes are using, and stabilizer to sew. If your sewing projects with a... STITCH Stitching 60 DECORATIVE Attaching STITCH Trims 61 BARTACK Buttonholes BUTTONHOLE website. Use this decorative stitch, as rayon thread, all-purpose thread, metallic thread, topstitching thread, or even 30wt and 12wt cotton. Use this foot has a groove on the underside to allow the...
...easy to help support the fabric and stitches. Experiment with other decorative stitches. Check your machine manual for details on the SINGER website. Select the scallop decorative stitch. Machine buttonholes are using, and stabilizer to sew. If your sewing projects with a... STITCH Stitching 60 DECORATIVE Attaching STITCH Trims 61 BARTACK Buttonholes BUTTONHOLE website. Use this decorative stitch, as rayon thread, all-purpose thread, metallic thread, topstitching thread, or even 30wt and 12wt cotton. Use this foot has a groove on the underside to allow the...
User Manual
Page 4
... of the sewing machine and foot control free from outlet. -- Do not unplug by the manufacturer as contained in the needle area, such as threading needle, changing needle, threading bobbin, or changing presser foot, etc. -- Do not operate where aerosol (spray) products are being administrated. -- Wear safety glasses. -- Never place other objects...
... of the sewing machine and foot control free from outlet. -- Do not unplug by the manufacturer as contained in the needle area, such as threading needle, changing needle, threading bobbin, or changing presser foot, etc. -- Do not operate where aerosol (spray) products are being administrated. -- Wear safety glasses. -- Never place other objects...
User Manual
Page 8
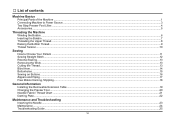
... of the Machine...1 Connecting Machine to Power Source...3 Two Step Presser Foot Lifter...4 Accessories...5 Threading the Machine Winding the Bobbin...6 Inserting the Bobbin...7 Threading the Upper Thread...8 Raising the Bobbin Thread...9 Thread Tension...10 Sewing How to Choose Your Pattern ...11 Sewing Straight Stitch...12 Reverse Sewing...13... Removing the Work...13 Cutting the Thread...13 Blind Hem...14 Buttonholes...15 Sewing on Buttons...16 Zippers and Piping...17 Free Motion Darning, Stippling...18 General...
... of the Machine...1 Connecting Machine to Power Source...3 Two Step Presser Foot Lifter...4 Accessories...5 Threading the Machine Winding the Bobbin...6 Inserting the Bobbin...7 Threading the Upper Thread...8 Raising the Bobbin Thread...9 Thread Tension...10 Sewing How to Choose Your Pattern ...11 Sewing Straight Stitch...12 Reverse Sewing...13... Removing the Work...13 Cutting the Thread...13 Blind Hem...14 Buttonholes...15 Sewing on Buttons...16 Zippers and Piping...17 Free Motion Darning, Stippling...18 General...

User Manual
Page 9
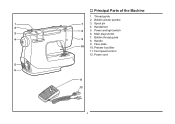
Thread take-up lever 3. Reverse sewing lever Unpacking - Needle plate 6. Bobbin winding stopper 9. Remove all other packing material and the plastic bag. 1 Place the box on a steady, flat surface. Thread cutter 4. Pattern selector dial 8. Removable extension table/ accessory storage 7. Presser foot 5. Lift your machine out of the Machine 1. Machine Basics Principal Parts of the box and remove the outer packaging. - Thread tension dial 2.
Thread take-up lever 3. Reverse sewing lever Unpacking - Needle plate 6. Bobbin winding stopper 9. Remove all other packing material and the plastic bag. 1 Place the box on a steady, flat surface. Thread cutter 4. Pattern selector dial 8. Removable extension table/ accessory storage 7. Presser foot 5. Lift your machine out of the Machine 1. Machine Basics Principal Parts of the box and remove the outer packaging. - Thread tension dial 2.
User Manual
Page 10
Principal Parts of the Machine 1. Handwheel 5. Power and light switch 6. Presser foot lifter 11. Bobbin thread guide 8. Thread guide 2. Bobbin winder spindle 3. Handle 9. Spool pin 4. Face plate 10. Power cord 2 Main plug socket 7. Foot speed control 12.
Principal Parts of the Machine 1. Handwheel 5. Power and light switch 6. Presser foot lifter 11. Bobbin thread guide 8. Thread guide 2. Bobbin winder spindle 3. Handle 9. Spool pin 4. Face plate 10. Power cord 2 Main plug socket 7. Foot speed control 12.

User Manual
Page 14
..., push the bobbin winder spindle to left (sewing position). 6 Threading the Machine a Winding the Bobbin -- Push bobbin spindle to the left (9) and remove. Draw the thread from the spool through the upper thread guide. (2) -- Hold thread end. (6) -- Press the pedal again. Please Note: When the... bobbin winder spindle is full, it rotates slowly. Wind the thread clockwise around bobbin winder tension discs. (3) --...
..., push the bobbin winder spindle to left (sewing position). 6 Threading the Machine a Winding the Bobbin -- Push bobbin spindle to the left (9) and remove. Draw the thread from the spool through the upper thread guide. (2) -- Hold thread end. (6) -- Press the pedal again. Please Note: When the... bobbin winder spindle is full, it rotates slowly. Wind the thread clockwise around bobbin winder tension discs. (3) --...
User Manual
Page 15
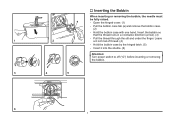
Inserting the Bobbin When inserting or removing the bobbin, the needle must be fully raised. -- Open the hinged cover. (1) -- Pull the thread through the slit and under the finger. Pull the bobbin case tab (a) and remove the bobbin case. (2) -- Insert the bobbin so that the thread runs in a clockwise direction (arrow). (3) -- Insert it into the shuttle. (6) Attention: Turn power switch to off ("O") before inserting or removing the bobbin. 7 Leave a 6 inch tail of thread. (4) -- Hold the bobbin case with one hand. Hold the bobbin case by the hinged latch. (5) --
Inserting the Bobbin When inserting or removing the bobbin, the needle must be fully raised. -- Open the hinged cover. (1) -- Pull the thread through the slit and under the finger. Pull the bobbin case tab (a) and remove the bobbin case. (2) -- Insert the bobbin so that the thread runs in a clockwise direction (arrow). (3) -- Insert it into the shuttle. (6) Attention: Turn power switch to off ("O") before inserting or removing the bobbin. 7 Leave a 6 inch tail of thread. (4) -- Hold the bobbin case with one hand. Hold the bobbin case by the hinged latch. (5) --
User Manual
Page 16
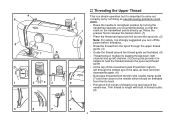
... about 6-8 inches of the take-up lever and then downwards again. (6) -- Trim thread to release the tension discs. (1) -- Thread tension module by leading thread down to the needle which should be threaded from right to back. -- Place the thread and spool pin felt (a) onto the spool pin. (2) Note: For safety, it ... not doing so several sewing problems could result. -- Raise the needle to carry out correctly as illustrated. (4) -- Now pass thread behind the thin wire needle clamp guide (7) and then down right channel and up . Raise the presser foot to length with built in...
... about 6-8 inches of the take-up lever and then downwards again. (6) -- Trim thread to release the tension discs. (1) -- Thread tension module by leading thread down to the needle which should be threaded from right to back. -- Place the thread and spool pin felt (a) onto the spool pin. (2) Note: For safety, it ... not doing so several sewing problems could result. -- Raise the needle to carry out correctly as illustrated. (4) -- Now pass thread behind the thin wire needle clamp guide (7) and then down right channel and up . Raise the presser foot to length with built in...


