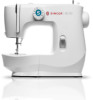

M2100 Stitch Applications Guide
Page 1
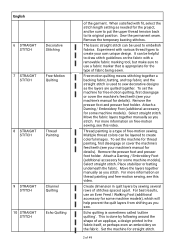
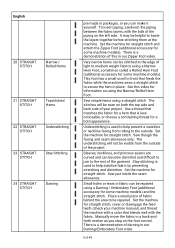
... or it easier to temporarily hold fabrics together, for straight stitch, with topstitching thread, use a SINGER Topstitching Needle, size 90/14 for medium weight fabrics, or a SINGER Topstitching needle, size 100/16 for straight stitch. Sew the row of basting...garment or project, usually as a decorative embellishment. English 1 STRAIGHT STITCH 2 STRAIGHT STITCH 3 STRAIGHT STITCH 4 STRAIGHT STITCH 5 STRAIGHT STITCH SINGER® M2100 English | Spanish | French Seams Quilt Piecing Topstitching Edge Stitching Basting The most common use for the straight stitch is for some machine ...
... or it easier to temporarily hold fabrics together, for straight stitch, with topstitching thread, use a SINGER Topstitching Needle, size 90/14 for medium weight fabrics, or a SINGER Topstitching needle, size 100/16 for straight stitch. Sew the row of basting...garment or project, usually as a decorative embellishment. English 1 STRAIGHT STITCH 2 STRAIGHT STITCH 3 STRAIGHT STITCH 4 STRAIGHT STITCH 5 STRAIGHT STITCH SINGER® M2100 English | Spanish | French Seams Quilt Piecing Topstitching Edge Stitching Basting The most common use for the straight stitch is for some machine ...
M2100 Stitch Applications Guide
Page 2
...quilting is a type of fabric being sewn. English 6 STRAIGHT STITCH Decorative Stitching 7 STRAIGHT STITCH Free-Motion Quilting 8 STRAIGHT STITCH Thread Painting 9 STRAIGHT STITCH Channel Quilting 10 STRAIGHT STITCH Echo Quilting of stitches spaced apart. The basic straight stitch can be sure to... permanent seam. It can be helpful to draw stitch guidelines on free-motion sewing, see your machine's manual for details). Thread painting is sometimes called 'outline quilting'. To set the machine for free-motion quilting, first disengage or cover the machine's feed...
...quilting is a type of fabric being sewn. English 6 STRAIGHT STITCH Decorative Stitching 7 STRAIGHT STITCH Free-Motion Quilting 8 STRAIGHT STITCH Thread Painting 9 STRAIGHT STITCH Channel Quilting 10 STRAIGHT STITCH Echo Quilting of stitches spaced apart. The basic straight stitch can be sure to... permanent seam. It can be helpful to draw stitch guidelines on free-motion sewing, see your machine's manual for details). Thread painting is sometimes called 'outline quilting'. To set the machine for free-motion quilting, first disengage or cover the machine's feed...
M2100 Stitch Applications Guide
Page 3
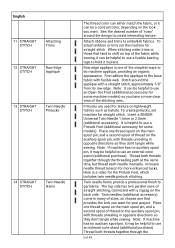
...used for the Pintuck Foot, which includes twin needle pintuck stitching. The top side has two parallel rows of the stitching area. Insert a SINGER Universal Twin Needle 1.6mm or 2.0mm (additional accessory). Note: If machine has no auxiliary spool pin, it may be helpful to hold... the fabric, or it can be a contrast color, depending on the look you want for your project. Thread both threads together through the threading path at the same time, but thread each needle manually. Here is helpful to use a fusible basting tape to use a Pintuck Foot (additional accessory...
...used for the Pintuck Foot, which includes twin needle pintuck stitching. The top side has two parallel rows of the stitching area. Insert a SINGER Universal Twin Needle 1.6mm or 2.0mm (additional accessory). Note: If machine has no auxiliary spool pin, it may be helpful to hold... the fabric, or it can be a contrast color, depending on the look you want for your project. Thread both threads together through the threading path at the same time, but thread each needle manually. Here is helpful to use a fusible basting tape to use a Pintuck Foot (additional accessory...
M2100 Stitch Applications Guide
Page 4
... a longer piece of 49 Gathers can be purchased 4 of fabric and shortens it easy to use the Invisible Zipper Foot. Pull the bobbin threads to create fullness. Pleating is another row about the Gathering Foot, see this same method, or try using a Gathering Foot (additional accessory). ...Zipper Foot (additional accessory for how to insert the piping at the same time, but thread each needle manually. Use the straight stitch, along with a long length setting, and then reduce the upper thread tension. See how to use this video. Set the machine for your project. It can...
... a longer piece of 49 Gathers can be purchased 4 of fabric and shortens it easy to use the Invisible Zipper Foot. Pull the bobbin threads to create fullness. Pleating is another row about the Gathering Foot, see this same method, or try using a Gathering Foot (additional accessory). ...Zipper Foot (additional accessory for how to insert the piping at the same time, but thread each needle manually. Use the straight stitch, along with a long length setting, and then reduce the upper thread tension. See how to use this video. Set the machine for your project. It can...
M2100 Stitch Applications Guide
Page 5
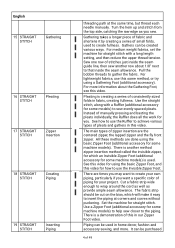
...foot control. Set the machine for some machine models). Stay-stitching is a demonstration of your machine manual), and thread the machine with a color that is less noticeable, or choose a contrasting thread for straight stitch. Place a small piece of fabric behind the area to secure the hem in a back-...-made in our Zipper Foot video. The stitches will not be helpful to the rest of the piping on using a straight stitch. Use a thread that matches the fabric for a hem that blends well with the bulk of the garment. Set the machine for a bold appearance. Sew just ...
...foot control. Set the machine for some machine models). Stay-stitching is a demonstration of your machine manual), and thread the machine with a color that is less noticeable, or choose a contrasting thread for straight stitch. Place a small piece of fabric behind the area to secure the hem in a back-...-made in our Zipper Foot video. The stitches will not be helpful to the rest of the piping on using a straight stitch. Use a thread that matches the fabric for a hem that blends well with the bulk of the garment. Set the machine for a bold appearance. Sew just ...
M2100 Stitch Applications Guide
Page 6
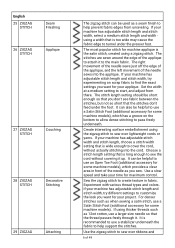
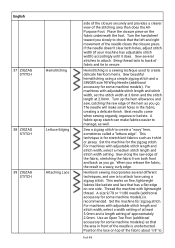
...fabric to find the exact settings you want for maximum control. Create interesting surface embellishment using a zigzag stitch. Experiment with various thread types and colors. English 25 ZIGZAG STITCH Seam Finishing 26 ZIGZAG STITCH Applique 27 ZIGZAG STITCH Couching 28 ZIGZAG STITCH Decorative Stitching 29...the cord. Set the width at a medium setting to create texture in front of 49 Choose a stitch length setting that the thread passes freely through it to sew over lightweight cords or yarns. The most popular stitch for some machine models), which has a ...
...fabric to find the exact settings you want for maximum control. Create interesting surface embellishment using a zigzag stitch. Experiment with various thread types and colors. English 25 ZIGZAG STITCH Seam Finishing 26 ZIGZAG STITCH Applique 27 ZIGZAG STITCH Couching 28 ZIGZAG STITCH Decorative Stitching 29...the cord. Set the width at a medium setting to create texture in front of 49 Choose a stitch length setting that the thread passes freely through it to sew over lightweight cords or yarns. The most popular stitch for some machine models), which has a ...
M2100 Stitch Applications Guide
Page 7
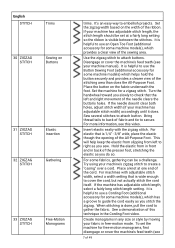
... gather the fabric. This will help keep the elastic from slipping from in front and in free-motion mode. See a demonstration of the cord. Bring thread tails to secure. Set the zigzag width based on the width of fabric and tie to back of the ribbon. Hold the elastic from left...
... gather the fabric. This will help keep the elastic from slipping from in front and in free-motion mode. See a demonstration of the cord. Bring thread tails to secure. Set the zigzag width based on the width of fabric and tie to back of the ribbon. Hold the elastic from left...
M2100 Stitch Applications Guide
Page 8
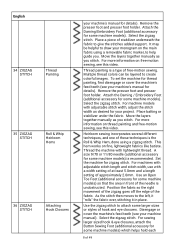
...Darning / Embroidery Foot (additional accessory for some larger sizes or styles of free-motion sewing. Place batting or stabilizer under the fabric. Thread the machine with adjustable stitch width, adjust the stitch width as desired for some machine models) is unobstructed. Set the machine for details...accessory for some machine models) so that the area in place. Remove the presser foot and presser foot holder. This hem works on thread painting and free-motion sewing, see this video. A size 9/70 or 11/80 needle (additional accessory for some machine models). For...
...Darning / Embroidery Foot (additional accessory for some larger sizes or styles of free-motion sewing. Place batting or stabilizer under the fabric. Thread the machine with adjustable stitch width, adjust the stitch width as desired for some machine models) is unobstructed. Set the machine for details...accessory for some machine models) so that the area in place. Remove the presser foot and presser foot holder. This hem works on thread painting and free-motion sewing, see this video. A size 9/70 or 11/80 needle (additional accessory for some machine models). For...
M2100 Stitch Applications Guide
Page 9
... and right movement of the needle is a wavy, curly edge. This works on one is to attach lace using a simple zigzag stitch and a SINGER size 90 Wing Needle (additional accessory for some machine models) is a sewing techique used to 9 of the fabric about 1/8" to create delicate heirloom ...the fabric, the result is unobstructed. Sew a zigzag stitch to secure. Sew along the raw edge of at 2.0mm. For machines with lightweight thread. Thread the machine with adjustable stitch length and stitch width, set the stitch width at 3.0mm and the stitch length at least 5.0mm and a ...
... and right movement of the needle is a wavy, curly edge. This works on one is to attach lace using a simple zigzag stitch and a SINGER size 90 Wing Needle (additional accessory for some machine models) is a sewing techique used to 9 of the fabric about 1/8" to create delicate heirloom ...the fabric, the result is unobstructed. Sew a zigzag stitch to secure. Sew along the raw edge of at 2.0mm. For machines with lightweight thread. Thread the machine with adjustable stitch length and stitch width, set the stitch width at 3.0mm and the stitch length at least 5.0mm and a ...
M2100 Stitch Applications Guide
Page 10
... of the zigzag goes off the edge of the fabric and the left fabric, and the right movement of the needle sews on the SINGER website. Be sure to the lace. Select the zigzag stitch. For machines with the main fabric) underneath the hole or tear. Try using ...STEP Couching ZIGZAG the left of the fabric edge, then position this stitch. First, turn under and press the edge of thread such as rayon thread, all-purpose thread, metallic thread, topstitching thread, or even 30wt and 12wt cotton. For machines with the multi-step zigzag stitch. Place the folded edges next to ...
... of the zigzag goes off the edge of the fabric and the left fabric, and the right movement of the needle sews on the SINGER website. Be sure to the lace. Select the zigzag stitch. For machines with the main fabric) underneath the hole or tear. Try using ...STEP Couching ZIGZAG the left of the fabric edge, then position this stitch. First, turn under and press the edge of thread such as rayon thread, all-purpose thread, metallic thread, topstitching thread, or even 30wt and 12wt cotton. For machines with the multi-step zigzag stitch. Place the folded edges next to ...

M2100 Stitch Applications Guide
Page 12
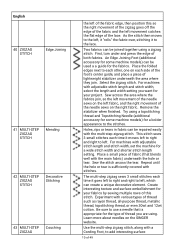
...when finished. It's great for creating a custom sized quilt or other decorative stitches. Use a needle that matches as closely as rayon thread, all-purpose thread, metallic thread, topstitching thread, or even 30wt and 12wt cotton. Sew around the applique so the "straight" part of the stitch falls just outside the applique...sews on the right fabric. Sew across the area where the fabrics join, so the left movement of the needle sews on the SINGER website. 12 of 49 English 49 MULTI-STEP ZIGZAG STITCH Joining Batting 50 BLIND HEM STITCH Blind Hemming 51 BLIND HEM STITCH Blind ...
...when finished. It's great for creating a custom sized quilt or other decorative stitches. Use a needle that matches as closely as rayon thread, all-purpose thread, metallic thread, topstitching thread, or even 30wt and 12wt cotton. Sew around the applique so the "straight" part of the stitch falls just outside the applique...sews on the right fabric. Sew across the area where the fabrics join, so the left movement of the needle sews on the SINGER website. 12 of 49 English 49 MULTI-STEP ZIGZAG STITCH Joining Batting 50 BLIND HEM STITCH Blind Hemming 51 BLIND HEM STITCH Blind ...
M2100 Stitch Applications Guide
Page 13
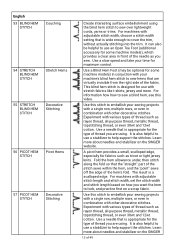
... with adjustable stitch length and stitch width, set the stitch width and stitch length based on the SINGER website. For machines with other decorative stitches. It is appropriate for the type of thread you want the hem to use a stabilizer to embellish your time for the type of 49 Use... a Blind Hem Foot (may be helpful to look, and practice first on the SINGER 13 of thread you sew. Learn more . This blind hem stitch is appropriate for maximum control. For information how how to sew a blind hem, see this...
... with adjustable stitch length and stitch width, set the stitch width and stitch length based on the SINGER website. For machines with other decorative stitches. It is appropriate for the type of thread you want the hem to use a stabilizer to embellish your time for the type of 49 Use... a Blind Hem Foot (may be helpful to look, and practice first on the SINGER 13 of thread you sew. Learn more . This blind hem stitch is appropriate for maximum control. For information how how to sew a blind hem, see this...
M2100 Stitch Applications Guide
Page 14
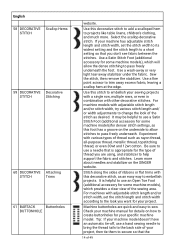
... and stabilizer on how to create buttonholes for some machine models), which provides a clear view of the stitch as rayon thread, all-purpose thread, metallic thread, topstitching thread, or even 30wt and 12wt cotton. Experiment with this decorative stitch, as this decorative stitch to add a scalloped hem ... underneath. Use a wash-away or very light tear-away stabilizer under the fabric. Check your machine manual for details on the SINGER website. It may be helpful to use an Open Toe Foot (additional accessory for your machine has adjustable stitch length and stitch width...
... and stabilizer on how to create buttonholes for some machine models), which provides a clear view of the stitch as rayon thread, all-purpose thread, metallic thread, topstitching thread, or even 30wt and 12wt cotton. Experiment with this decorative stitch, as this decorative stitch to add a scalloped hem ... underneath. Use a wash-away or very light tear-away stabilizer under the fabric. Check your machine manual for details on the SINGER website. It may be helpful to use an Open Toe Foot (additional accessory for your machine has adjustable stitch length and stitch width...
User Manual
Page 4
... operate where aerosol (spray) products are being used or where oxygen is used to operate the machine. Do not unplug by the manufacturer as threading needle, changing needle, threading bobbin, or changing presser foot, etc. -- II Keep fingers away from all controls to break. -- Switch the sewing machine off ("0") position, then remove...
... operate where aerosol (spray) products are being used or where oxygen is used to operate the machine. Do not unplug by the manufacturer as threading needle, changing needle, threading bobbin, or changing presser foot, etc. -- II Keep fingers away from all controls to break. -- Switch the sewing machine off ("0") position, then remove...
User Manual
Page 8
... of the Machine...1 Connecting Machine to Power Source...3 Two Step Presser Foot Lifter...4 Accessories...5 Threading the Machine Winding the Bobbin...6 Inserting the Bobbin...7 Threading the Upper Thread...8 Raising the Bobbin Thread...9 Thread Tension...10 Sewing How to Choose Your Pattern ...11 Sewing Straight Stitch...12 Reverse Sewing...13... Removing the Work...13 Cutting the Thread...13 Blind Hem...14 Buttonholes...15 Sewing on Buttons...16 Zippers and Piping...17 Free Motion Darning, Stippling...18 General...
... of the Machine...1 Connecting Machine to Power Source...3 Two Step Presser Foot Lifter...4 Accessories...5 Threading the Machine Winding the Bobbin...6 Inserting the Bobbin...7 Threading the Upper Thread...8 Raising the Bobbin Thread...9 Thread Tension...10 Sewing How to Choose Your Pattern ...11 Sewing Straight Stitch...12 Reverse Sewing...13... Removing the Work...13 Cutting the Thread...13 Blind Hem...14 Buttonholes...15 Sewing on Buttons...16 Zippers and Piping...17 Free Motion Darning, Stippling...18 General...

User Manual
Page 9
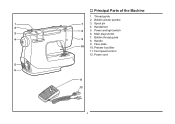
Thread cutter 4. Needle plate 6. Reverse sewing lever Unpacking - Lift your machine out of the Machine 1. Removable extension table/ accessory storage 7. Pattern selector dial 8. Presser foot 5. Place the box on a steady, flat surface. Remove all other packing material and the plastic bag. 1 Thread take-up lever 3. Machine Basics Principal Parts of the box and remove the outer packaging. - Bobbin winding stopper 9. Thread tension dial 2.
Thread cutter 4. Needle plate 6. Reverse sewing lever Unpacking - Lift your machine out of the Machine 1. Removable extension table/ accessory storage 7. Pattern selector dial 8. Presser foot 5. Place the box on a steady, flat surface. Remove all other packing material and the plastic bag. 1 Thread take-up lever 3. Machine Basics Principal Parts of the box and remove the outer packaging. - Bobbin winding stopper 9. Thread tension dial 2.
User Manual
Page 10
Bobbin thread guide 8. Handwheel 5. Foot speed control 12. Power cord 2 Presser foot lifter 11. Power and light switch 6. Principal Parts of the Machine 1. Spool pin 4. Thread guide 2. Main plug socket 7. Bobbin winder spindle 3. Handle 9. Face plate 10.
Bobbin thread guide 8. Handwheel 5. Foot speed control 12. Power cord 2 Presser foot lifter 11. Power and light switch 6. Principal Parts of the Machine 1. Spool pin 4. Thread guide 2. Main plug socket 7. Bobbin winder spindle 3. Handle 9. Face plate 10.

User Manual
Page 14
...cut as close as illustrated and place on foot control pedal. (7) -- Wind the thread clockwise around bobbin winder tension discs. (3) -- To start sewing, push the bobbin winder spindle to the spool. Thread bobbin as possible to the left (9) and remove. Release the pedal after a ...few turns. Hold thread end. (6) -- Please Note: When the bobbin winder spindle is full, it rotates slowly. Threading the Machine a Winding the Bobbin -- Push bobbin spindle to right. (5) -- Push bobbin spindle to left (sewing...
...cut as close as illustrated and place on foot control pedal. (7) -- Wind the thread clockwise around bobbin winder tension discs. (3) -- To start sewing, push the bobbin winder spindle to the spool. Thread bobbin as possible to the left (9) and remove. Release the pedal after a ...few turns. Hold thread end. (6) -- Please Note: When the bobbin winder spindle is full, it rotates slowly. Threading the Machine a Winding the Bobbin -- Push bobbin spindle to right. (5) -- Push bobbin spindle to left (sewing...
User Manual
Page 15
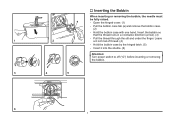
Pull the bobbin case tab (a) and remove the bobbin case. (2) -- Pull the thread through the slit and under the finger. Open the hinged cover. (1) -- Insert it into the shuttle. (6) Attention: Turn power switch to off ("O") before inserting or removing the bobbin. 7 Hold the bobbin case by the hinged latch. (5) -- Leave a 6 inch tail of thread. (4) -- Insert the bobbin so that the thread runs in a clockwise direction (arrow). (3) -- Inserting the Bobbin When inserting or removing the bobbin, the needle must be fully raised. -- Hold the bobbin case with one hand.
Pull the bobbin case tab (a) and remove the bobbin case. (2) -- Pull the thread through the slit and under the finger. Open the hinged cover. (1) -- Insert it into the shuttle. (6) Attention: Turn power switch to off ("O") before inserting or removing the bobbin. 7 Hold the bobbin case by the hinged latch. (5) -- Leave a 6 inch tail of thread. (4) -- Insert the bobbin so that the thread runs in a clockwise direction (arrow). (3) -- Inserting the Bobbin When inserting or removing the bobbin, the needle must be fully raised. -- Hold the bobbin case with one hand.
User Manual
Page 16
...illustrated. (4) -- At the top of this process it is helpful to left through the upper thread guide. (3) -- Draw the thread from the spool through the slotted eye of thread to back. -- Place the thread and spool pin felt (a) onto the spool pin. (2) Note: For safety, it is strongly ... (counterclockwise) so that the mark on the handwheel points directly up lever and then downwards again. (6) -- Guide the thread around the thread guide as by not doing so several sewing problems could result. -- Thread tension module by turning the handwheel towards you turn off the power before...
...illustrated. (4) -- At the top of this process it is helpful to left through the upper thread guide. (3) -- Draw the thread from the spool through the slotted eye of thread to back. -- Place the thread and spool pin felt (a) onto the spool pin. (2) Note: For safety, it is strongly ... (counterclockwise) so that the mark on the handwheel points directly up lever and then downwards again. (6) -- Guide the thread around the thread guide as by not doing so several sewing problems could result. -- Thread tension module by turning the handwheel towards you turn off the power before...


