M2100 Stitch Applications Guide
Page 4
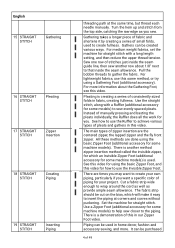
...) to sew evenly spaced pleats. Sew one row of zipper insertion are done using the basic Zipper Foot (additional accessory for your project. Pull the bobbin threads to create your own piping, particularly if you sew. Use the straight stitch, along with a long length setting, and then reduce the upper thread...
...) to sew evenly spaced pleats. Sew one row of zipper insertion are done using the basic Zipper Foot (additional accessory for your project. Pull the bobbin threads to create your own piping, particularly if you sew. Use the straight stitch, along with a long length setting, and then reduce the upper thread...
User Manual
Page 4
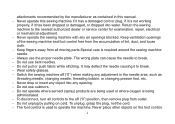
..., if it to operate the machine. Do not unplug by the manufacturer as contained in the needle area, such as threading needle, changing needle, threading bobbin, or changing presser foot, etc. -- The foot control is being administrated. -- II The wrong plate can cause the needle to the nearest authorized dealer or...
..., if it to operate the machine. Do not unplug by the manufacturer as contained in the needle area, such as threading needle, changing needle, threading bobbin, or changing presser foot, etc. -- The foot control is being administrated. -- II The wrong plate can cause the needle to the nearest authorized dealer or...
User Manual
Page 8
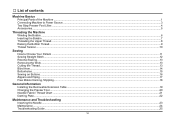
... Principal Parts of the Machine...1 Connecting Machine to Power Source...3 Two Step Presser Foot Lifter...4 Accessories...5 Threading the Machine Winding the Bobbin...6 Inserting the Bobbin...7 Threading the Upper Thread...8 Raising the Bobbin Thread...9 Thread Tension...10 Sewing How to Choose Your Pattern ...11 Sewing Straight Stitch...12 Reverse Sewing...13 Removing the Work...
... Principal Parts of the Machine...1 Connecting Machine to Power Source...3 Two Step Presser Foot Lifter...4 Accessories...5 Threading the Machine Winding the Bobbin...6 Inserting the Bobbin...7 Threading the Upper Thread...8 Raising the Bobbin Thread...9 Thread Tension...10 Sewing How to Choose Your Pattern ...11 Sewing Straight Stitch...12 Reverse Sewing...13 Removing the Work...

User Manual
Page 9
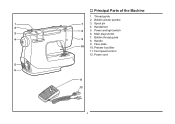
Thread tension dial 2. Needle plate 6. Lift your machine out of the Machine 1. Reverse sewing lever Unpacking - Remove all other packing material and the plastic bag. 1 Thread cutter 4. Presser foot 5. Bobbin winding stopper 9. Thread take-up lever 3. Removable extension table/ accessory storage 7. Machine Basics Principal Parts of the box and remove the outer packaging. - Pattern selector dial 8. Place the box on a steady, flat surface.
Thread tension dial 2. Needle plate 6. Lift your machine out of the Machine 1. Reverse sewing lever Unpacking - Remove all other packing material and the plastic bag. 1 Thread cutter 4. Presser foot 5. Bobbin winding stopper 9. Thread take-up lever 3. Removable extension table/ accessory storage 7. Machine Basics Principal Parts of the box and remove the outer packaging. - Pattern selector dial 8. Place the box on a steady, flat surface.
User Manual
Page 10
Principal Parts of the Machine 1. Handle 9. Presser foot lifter 11. Handwheel 5. Main plug socket 7. Power cord 2 Thread guide 2. Bobbin thread guide 8. Foot speed control 12. Bobbin winder spindle 3. Face plate 10. Spool pin 4. Power and light switch 6.
Principal Parts of the Machine 1. Handle 9. Presser foot lifter 11. Handwheel 5. Main plug socket 7. Power cord 2 Thread guide 2. Bobbin thread guide 8. Foot speed control 12. Bobbin winder spindle 3. Face plate 10. Spool pin 4. Power and light switch 6.
User Manual
Page 13
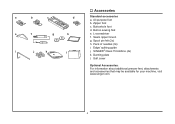
Pack of needles (3x) i. Soft cover Optional Accessories: For information about additional presser feet, attachments and accessories that may be available for your machine, visit www.singer.com. 5 L-screwdriver f. Zipper foot c. Edge/ quilting guide j. Darning plate l. Button sewing foot e. SINGER® Class 15 bobbins (4x) k. Buttonhole foot d. All purpose foot b. Spool pin felt (2x) h. a b c d e f g h i j k l Accessories Standard accessories a. Seam ripper/ brush g.
Pack of needles (3x) i. Soft cover Optional Accessories: For information about additional presser feet, attachments and accessories that may be available for your machine, visit www.singer.com. 5 L-screwdriver f. Zipper foot c. Edge/ quilting guide j. Darning plate l. Button sewing foot e. SINGER® Class 15 bobbins (4x) k. Buttonhole foot d. All purpose foot b. Spool pin felt (2x) h. a b c d e f g h i j k l Accessories Standard accessories a. Seam ripper/ brush g.

User Manual
Page 14
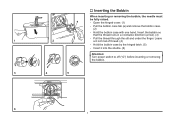
...and spool pin felt (a) onto the spool pin. (1) -- Push bobbin spindle to the left (9) and remove. Thread bobbin as possible to left (sewing position). 6 Push bobbin spindle to the spool. Please Note: When the bobbin winder spindle is full, it rotates slowly. Draw the thread from..." position, the machine will not sew and the hand wheel will not turn. To start sewing, push the bobbin winder spindle to right. (5) -- Wind the thread clockwise around bobbin winder tension discs. (3) -- Release the pedal after a few turns. Press the pedal again. Hold thread end. (6) -- ...
...and spool pin felt (a) onto the spool pin. (1) -- Push bobbin spindle to the left (9) and remove. Thread bobbin as possible to left (sewing position). 6 Push bobbin spindle to the spool. Please Note: When the bobbin winder spindle is full, it rotates slowly. Draw the thread from..." position, the machine will not sew and the hand wheel will not turn. To start sewing, push the bobbin winder spindle to right. (5) -- Wind the thread clockwise around bobbin winder tension discs. (3) -- Release the pedal after a few turns. Press the pedal again. Hold thread end. (6) -- ...
User Manual
Page 15
Hold the bobbin case with one hand. Insert the bobbin so that the thread runs in a clockwise direction (arrow). (3) -- Insert it into the shuttle. (6) Attention: Turn power switch to off ("O") before inserting or removing the bobbin. 7 Open the hinged cover. (1) -- Pull the bobbin case tab (a) and remove the bobbin case. (2) -- Leave a 6 inch tail of thread. (4) -- Pull the thread through the slit and under the finger. Hold the bobbin case by the hinged latch. (5) -- Inserting the Bobbin When inserting or removing the bobbin, the needle must be fully raised. --
Hold the bobbin case with one hand. Insert the bobbin so that the thread runs in a clockwise direction (arrow). (3) -- Insert it into the shuttle. (6) Attention: Turn power switch to off ("O") before inserting or removing the bobbin. 7 Open the hinged cover. (1) -- Pull the bobbin case tab (a) and remove the bobbin case. (2) -- Leave a 6 inch tail of thread. (4) -- Pull the thread through the slit and under the finger. Hold the bobbin case by the hinged latch. (5) -- Inserting the Bobbin When inserting or removing the bobbin, the needle must be fully raised. --

User Manual
Page 17
Gently pull on the upper thread to bring the bobbin thread up through the needle plate hole. (2) Lay both threads to make sure the thread is not trapped by the hinged cover or the Removable Extension Table. Raising the Bobbin Thread Hold the upper thread with the left hand. (1) Turn the handwheel towards you (counterclockwise) lowering, then raising needle. Note: If it is difficult to raise the bobbin thread, check to the back under the presser foot. (3) 9
Gently pull on the upper thread to bring the bobbin thread up through the needle plate hole. (2) Lay both threads to make sure the thread is not trapped by the hinged cover or the Removable Extension Table. Raising the Bobbin Thread Hold the upper thread with the left hand. (1) Turn the handwheel towards you (counterclockwise) lowering, then raising needle. Note: If it is difficult to raise the bobbin thread, check to the back under the presser foot. (3) 9
User Manual
Page 18
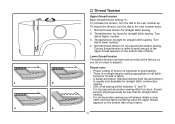
Correct thread tension is no single tension setting appropriate for zig zag and decorative sewing. Lower thread tension The bobbin tension has been set correctly at the factory, so you will be less than for straight stitch sewing. -- Turn dial to adjust it. Thread tension ...
Correct thread tension is no single tension setting appropriate for zig zag and decorative sewing. Lower thread tension The bobbin tension has been set correctly at the factory, so you will be less than for straight stitch sewing. -- Turn dial to adjust it. Thread tension ...

User Manual
Page 32
...the screw driver. (1) Cleaning the feed teeth: Use the brush supplied to clean the whole area. (2) Cleaning and lubricating the hook: Remove the bobbin case. Replace the hook (5). Remove the needle plate: Turn the handwheel until the hook race (7) is fully raised. Turn the handwheel until the... needle is in the left position. Replace the hook race cover and snap back the two hook retaining arms. Insert the bobbin case and bobbin and replace the needle plate. Lubricate at one of our service centers. 24 Maintenance Attention: Disconnect the machine from the electrical supply...
...the screw driver. (1) Cleaning the feed teeth: Use the brush supplied to clean the whole area. (2) Cleaning and lubricating the hook: Remove the bobbin case. Replace the hook (5). Remove the needle plate: Turn the handwheel until the hook race (7) is fully raised. Turn the handwheel until the... needle is in the left position. Replace the hook race cover and snap back the two hook retaining arms. Insert the bobbin case and bobbin and replace the needle plate. Lubricate at one of our service centers. 24 Maintenance Attention: Disconnect the machine from the electrical supply...
User Manual
Page 33
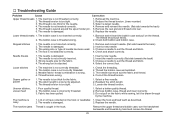
...correctly. Rethread the machine. 2. Select a larger needle. 4. The machine is caught in the hook. Select a finer needle. 2. Remove bobbin case, thread and insert correctly. 3. The machine jams Thread is not correctly threaded. 2. Troubleshooting Guide Problem Cause Correction Upper thread breaks 1....the needle. 4. Remove and reinsert the needle. (flat side towards the back) 2. Replace the needle. The bobbin case is damaged. 2. Check both bobbin and bobbin case. The needle is not inserted correctly. 2. Wrong needle size for the fabric. 4. Insert the needle correctly...
...correctly. Rethread the machine. 2. Select a larger needle. 4. The machine is caught in the hook. Select a finer needle. 2. Remove bobbin case, thread and insert correctly. 3. The machine jams Thread is not correctly threaded. 2. Troubleshooting Guide Problem Cause Correction Upper thread breaks 1....the needle. 4. Remove and reinsert the needle. (flat side towards the back) 2. Replace the needle. The bobbin case is damaged. 2. Check both bobbin and bobbin case. The needle is not inserted correctly. 2. Wrong needle size for the fabric. 4. Insert the needle correctly...


