

Instruction Manual 2
Page 1
H74 Instruction Manual
H74 Instruction Manual

Instruction Manual 2
Page 3
Close attention is necessary when this appliance from outlet. 15. Do not unplug by pulling on the foot controller. 19. Always unplug this appliance is 75dB(A). 17. Return the appliance to break. 9. Keep fingers away from all controls to the off ("O") position, then remove plug from the electric outlet immediately after using and before using this appliance if it has a damaged cord or plug, if it to the nearest authorized dealer or service center for household use only. Do not use outdoors. 13. It may cause the needle to ensure that they have been given ...
Close attention is necessary when this appliance from outlet. 15. Do not unplug by pulling on the foot controller. 19. Always unplug this appliance is 75dB(A). 17. Return the appliance to break. 9. Keep fingers away from all controls to the off ("O") position, then remove plug from the electric outlet immediately after using and before using this appliance if it has a damaged cord or plug, if it to the nearest authorized dealer or service center for household use only. Do not use outdoors. 13. It may cause the needle to ensure that they have been given ...
Instruction Manual 2
Page 4
CONTENTS PRINCIPAL PARTS OF THE MACHINE 1 MACHINE CONTROL BUTTONS 2-3 Operation buttons (see page 24/25/26 2 Function buttons (see page 27/28/29 2 Selection buttons (see page 30/31 3 LCD SCREEN 4-5 PATTERN CHART 6-7 ACCESSORIES 8 CONNECTING THE MACHINE TO THE POWER SOURCE 9 Connecting the machine 9 WINDING THE BOBBIN 10-11 Bobbin winding 10-11 INSERTING THE BOBBIN 12 THREADING THE UPPER THREAD 13-14 USING THE NEEDLE THREADER 15 DRAWING UP THE LOWER THREAD 16 CUTTING THE THREAD 16 TWO-STEP PRESSER FOOT LIFTER 17 ADJUSTING PRESSER FOOT PRESSURE 17 STARTING SEWING 18 Start/...
CONTENTS PRINCIPAL PARTS OF THE MACHINE 1 MACHINE CONTROL BUTTONS 2-3 Operation buttons (see page 24/25/26 2 Function buttons (see page 27/28/29 2 Selection buttons (see page 30/31 3 LCD SCREEN 4-5 PATTERN CHART 6-7 ACCESSORIES 8 CONNECTING THE MACHINE TO THE POWER SOURCE 9 Connecting the machine 9 WINDING THE BOBBIN 10-11 Bobbin winding 10-11 INSERTING THE BOBBIN 12 THREADING THE UPPER THREAD 13-14 USING THE NEEDLE THREADER 15 DRAWING UP THE LOWER THREAD 16 CUTTING THE THREAD 16 TWO-STEP PRESSER FOOT LIFTER 17 ADJUSTING PRESSER FOOT PRESSURE 17 STARTING SEWING 18 Start/...
Instruction Manual 2
Page 5
CONTENTS BLIND HEMS 37 BUTTON SEWING 38 BUTTONHOLE SEWING 39-42 Making corded buttonholes 42 BAR TACK STITCH 43 EYELET STITCH 44 DARNING STITCH 45-46 ZIPPER INSERTION 47-48 Inserting a centered zipper 47 Inserting a lapped zipper 48 NARROW HEMMING 49 CORDING 50 Single cording 50 Triple cording 50 SATIN STITCH SEWING 51 EDGE/QUILTING GUIDE 52 GATHERING 53 SMOCKING 54 FREE MOTION SEWING 55-56 Darning 55 Embroidery 56 Monogramming 56 WALKING FOOT 57 SIDE CUTTER 58 ROLLER FOOT 58 STRAIGHT STITCH FOOT 58 OPEN TOE FOOT 59 1/4" PIECING FOOT 59 EDGE JOINING FOOT 59 ...
CONTENTS BLIND HEMS 37 BUTTON SEWING 38 BUTTONHOLE SEWING 39-42 Making corded buttonholes 42 BAR TACK STITCH 43 EYELET STITCH 44 DARNING STITCH 45-46 ZIPPER INSERTION 47-48 Inserting a centered zipper 47 Inserting a lapped zipper 48 NARROW HEMMING 49 CORDING 50 Single cording 50 Triple cording 50 SATIN STITCH SEWING 51 EDGE/QUILTING GUIDE 52 GATHERING 53 SMOCKING 54 FREE MOTION SEWING 55-56 Darning 55 Embroidery 56 Monogramming 56 WALKING FOOT 57 SIDE CUTTER 58 ROLLER FOOT 58 STRAIGHT STITCH FOOT 58 OPEN TOE FOOT 59 1/4" PIECING FOOT 59 EDGE JOINING FOOT 59 ...
Instruction Manual 2
Page 6
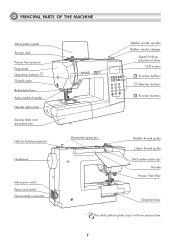
PRINCIPAL PARTS OF THE MACHINE Stitch pattern plate Tension dial Presser foot pressure Face plate Operation buttons A Thread cutter Buttonhole lever Auto needle threader Needle plate cover Sewing table and accessory box Hole for Auxiliary spool pin Handwheel Main power switch Power cord socket Foot controller connector Bobbin winder spindle Bobbin winder stopper Speed limiting adjustment lever LCD screen B Function buttons C Selection buttons B Function buttons Horizontal spool pin Bobbin thread guide Upper thread guide Stitch pattern plate clip* Handle Presser foot lifter Drop feed lever...
PRINCIPAL PARTS OF THE MACHINE Stitch pattern plate Tension dial Presser foot pressure Face plate Operation buttons A Thread cutter Buttonhole lever Auto needle threader Needle plate cover Sewing table and accessory box Hole for Auxiliary spool pin Handwheel Main power switch Power cord socket Foot controller connector Bobbin winder spindle Bobbin winder stopper Speed limiting adjustment lever LCD screen B Function buttons C Selection buttons B Function buttons Horizontal spool pin Bobbin thread guide Upper thread guide Stitch pattern plate clip* Handle Presser foot lifter Drop feed lever...
Instruction Manual 2
Page 7
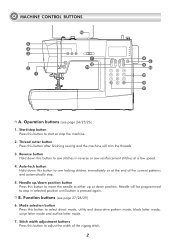
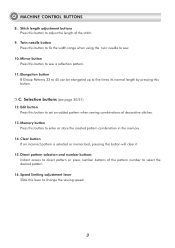
Thread cutter button Press this button to move the needle to either up or down position button Press this button after finishing sewing and the machine will be programmed to adjust the width of the current patterns and automatically stop. 5. Needle up/down position. Mode selection button Press this button to select direct mode, utility and decorative pattern mode, block letter mode, script letter mode and outline letter mode. 7. B. Start/stop button Press this button to start or stop in reverse or sew reinforcement stitches at the end of the zigzag stitch. 2 Auto-lock ...
Thread cutter button Press this button to move the needle to either up or down position button Press this button after finishing sewing and the machine will be programmed to adjust the width of the current patterns and automatically stop. 5. Needle up/down position. Mode selection button Press this button to select direct mode, utility and decorative pattern mode, block letter mode, script letter mode and outline letter mode. 7. B. Start/stop button Press this button to start or stop in reverse or sew reinforcement stitches at the end of the zigzag stitch. 2 Auto-lock ...
Instruction Manual 2
Page 8
Elongation button B Group Patterns 33 to 45 can be elongated up to select the desired pattern. 16. Direct pattern selection and number buttons Instant access to direct pattern or press number buttons of the pattern number to five times its normal length by pressing this button to sew a reflection pattern. 11. Edit button Press this button. Selection buttons (see page 30/31) 12. Clear button If an incorrect pattern is selected or memorized, pressing this button to adjust the length of decorative stitches. 13. Mirror button Press this lever to sew. 10. Speed ...
Elongation button B Group Patterns 33 to 45 can be elongated up to select the desired pattern. 16. Direct pattern selection and number buttons Instant access to direct pattern or press number buttons of the pattern number to five times its normal length by pressing this button to sew a reflection pattern. 11. Edit button Press this button. Selection buttons (see page 30/31) 12. Clear button If an incorrect pattern is selected or memorized, pressing this button to adjust the length of decorative stitches. 13. Mirror button Press this lever to sew. 10. Speed ...
Instruction Manual 2
Page 9
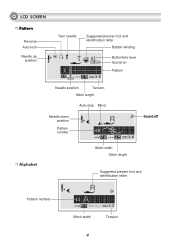
LCD SCREEN Pattern Reverse Auto-lock Needle up position Twin needle Suggested presser foot and identification letter Bobbin winding Buttonhole lever Sound on Pattern Needle position Tension Stitch length Auto-stop Mirror Needle down position Pattern number Sound off Alphabet Stitch width Stitch length Suggested presser foot and identification letter Pattern number Stitch width Tension 4
LCD SCREEN Pattern Reverse Auto-lock Needle up position Twin needle Suggested presser foot and identification letter Bobbin winding Buttonhole lever Sound on Pattern Needle position Tension Stitch length Auto-stop Mirror Needle down position Pattern number Sound off Alphabet Stitch width Stitch length Suggested presser foot and identification letter Pattern number Stitch width Tension 4

Instruction Manual 2
Page 10
LCD SCREEN Memory Editing patterns Edit mode Memory group Number of current unit M EDIT Total number of unit Sewing the memorized pattern Memory mode M Elongation Elongation Pattern to edit Amount of elongation 5
LCD SCREEN Memory Editing patterns Edit mode Memory group Number of current unit M EDIT Total number of unit Sewing the memorized pattern Memory mode M Elongation Elongation Pattern to edit Amount of elongation 5

Instruction Manual 2
Page 11
Patterns A Group Patterns-10 (Direct Patterns) 123 4 5 6 7 8 9 0 B Group Patterns-50 01 02 03 04 05 06 07 08 09 10 11 12 13 14 15 16 17 18 19 20 21 22 23 24 25 26 27 28 29 30 31 32 33 34 35 36 37 38 39 40 41 42 43 44 45 46 47 48 49 50 C Group Patterns-66 01 02 03 04 05 06 07 08 09 10 11 12 13 14 15 16 17 18 19 20 21 22 23 24 25 26 27 28 29 30 31 32 33 34 35 36 37 38 39 40 41 42 43 44 45 46 47 48 49 50 51 52 53 54 55 56 57 58 59 60 61 62 63 64 65 66 6 PATTERN CHART The portions marked in gray (on the chart below) show the single unit of each stitch.
Patterns A Group Patterns-10 (Direct Patterns) 123 4 5 6 7 8 9 0 B Group Patterns-50 01 02 03 04 05 06 07 08 09 10 11 12 13 14 15 16 17 18 19 20 21 22 23 24 25 26 27 28 29 30 31 32 33 34 35 36 37 38 39 40 41 42 43 44 45 46 47 48 49 50 C Group Patterns-66 01 02 03 04 05 06 07 08 09 10 11 12 13 14 15 16 17 18 19 20 21 22 23 24 25 26 27 28 29 30 31 32 33 34 35 36 37 38 39 40 41 42 43 44 45 46 47 48 49 50 51 52 53 54 55 56 57 58 59 60 61 62 63 64 65 66 6 PATTERN CHART The portions marked in gray (on the chart below) show the single unit of each stitch.
Instruction Manual 2
Page 13
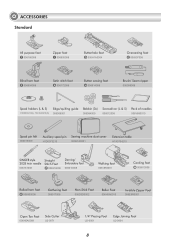
... (L & S) Pack of needles H1D0083210(L) TA10943210(S) 006008001 006084009 006012008 006V880010 Spool pin felt 006015009 Auxiliary spool pin Sewing machine dust cover H1D0073210 020H7A0001 Extension table H7A0754210 SINGER style 2025 twin needle 006161008 Straight Stitch Foot P 006916008 Darning/ Embroidery foot 006016008 Walking foot 0061850081 Cording foot M 006813008 Rolled hem foot K 006900008 Gathering foot...
... (L & S) Pack of needles H1D0083210(L) TA10943210(S) 006008001 006084009 006012008 006V880010 Spool pin felt 006015009 Auxiliary spool pin Sewing machine dust cover H1D0073210 020H7A0001 Extension table H7A0754210 SINGER style 2025 twin needle 006161008 Straight Stitch Foot P 006916008 Darning/ Embroidery foot 006016008 Walking foot 0061850081 Cording foot M 006813008 Rolled hem foot K 006900008 Gathering foot...
Instruction Manual 2
Page 14
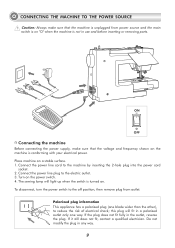
The sewing lamp will fit in a polarized outlet only one blade wider than the other), to the electric outlet. 3. If the plug does not fit fully in any way. 9 Connect the power line plug to reduce the risk of electrical shock; If it still does not fit, contact a qualified electrician. Turn on a stable surface. 1. Polarized plug information This appliance has a polarized plug (one way. this plug will light up when the switch is turned on. Connect the power line cord to the off position, then remove plug from power source and the main switch is on "O" when the machine is ...
The sewing lamp will fit in a polarized outlet only one blade wider than the other), to the electric outlet. 3. If the plug does not fit fully in any way. 9 Connect the power line plug to reduce the risk of electrical shock; If it still does not fit, contact a qualified electrician. Turn on a stable surface. 1. Polarized plug information This appliance has a polarized plug (one way. this plug will light up when the switch is turned on. Connect the power line cord to the off position, then remove plug from power source and the main switch is on "O" when the machine is ...

Instruction Manual 2
Page 15
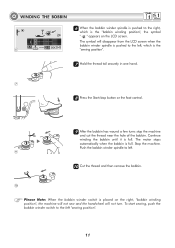
For smaller spools of thread, place the small side of the spool holder toward the right, so the thread doesn't get caught while winding the bobbin. 2 Snap the thread into the thread guide. 2 3 Wind the thread counter-clockwise around the bobbin winder tension disks. 3 4 Place the thread end through one of the inner holes in the bobbin as illustrated and place empty bobbin on the spindle. 4 5 Push the bobbin to right. 5 10 If the thread spool has a thread retaining slit, place this end of the spool holder toward the spool. WINDING THE BOBBIN 2 1 3 4 10 Bobbin winding 1 1 Place the ...
For smaller spools of thread, place the small side of the spool holder toward the right, so the thread doesn't get caught while winding the bobbin. 2 Snap the thread into the thread guide. 2 3 Wind the thread counter-clockwise around the bobbin winder tension disks. 3 4 Place the thread end through one of the inner holes in the bobbin as illustrated and place empty bobbin on the spindle. 4 5 Push the bobbin to right. 5 10 If the thread spool has a thread retaining slit, place this end of the spool holder toward the spool. WINDING THE BOBBIN 2 1 3 4 10 Bobbin winding 1 1 Place the ...
Instruction Manual 2
Page 16
The motor stops automatically when the bobbin is full. Stop the machine. To start sewing, push the bobbin winder switch to the left, which is the "bobbin winding position", the symbol " " appears on the right, "bobbin winding position", the machine will not sew and the handwheel will disappear from the LCD screen when the bobbin winder spindle is pushed to the left . 9 10 Cut the thread and then remove the bobbin. 10 Please Note: When the bobbin winder switch is placed on the LCD screen. Continue winding the bobbin until it is full. The symbol will not turn. Push the bobbin ...
The motor stops automatically when the bobbin is full. Stop the machine. To start sewing, push the bobbin winder switch to the left, which is the "bobbin winding position", the symbol " " appears on the right, "bobbin winding position", the machine will not sew and the handwheel will disappear from the LCD screen when the bobbin winder spindle is pushed to the left . 9 10 Cut the thread and then remove the bobbin. 10 Please Note: When the bobbin winder switch is placed on the LCD screen. Continue winding the bobbin until it is full. The symbol will not turn. Push the bobbin ...
Instruction Manual 2
Page 17
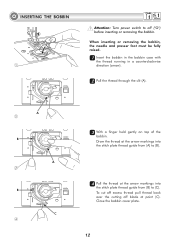
To cut off excess thread pull thread back over the cutting off ("O") before inserting or removing the bobbin. Close the bobbin cover plate. 12 A 2 B A 3 B C 4 33 With a finger held gently on top of the bobbin. When inserting or removing the bobbin, the needle and presser foot must be fully raised. 11 Insert the bobbin in the bobbin case with the thread running in a counterclockwise direction (arrow). 22 Pull the thread through the slit (A). Draw the thread at the arrow markings into the stitch plate thread guide from (A) to (C). INSERTING THE BOBBIN 1 Attention: Turn power ...
To cut off excess thread pull thread back over the cutting off ("O") before inserting or removing the bobbin. Close the bobbin cover plate. 12 A 2 B A 3 B C 4 33 With a finger held gently on top of the bobbin. When inserting or removing the bobbin, the needle and presser foot must be fully raised. 11 Insert the bobbin in the bobbin case with the thread running in a counterclockwise direction (arrow). 22 Pull the thread through the slit (A). Draw the thread at the arrow markings into the stitch plate thread guide from (A) to (C). INSERTING THE BOBBIN 1 Attention: Turn power ...

Instruction Manual 2
Page 18
THREADING THE UPPER THREAD 3 2 1 4 6 5 7 8 Please Note: It is important to release the tension discs. 11 Lift up the spool pin. Place the spool of thread on the spool pin so that the thread comes from the front of the spool, 1 then place the spool cap at the end of the spool pin. 22 Draw the thread from the spool through the upper thread guide. 2 13 Start by raising the needle to its highest point, and also raise the presser foot to carry out the threading correctly as by not doing so several sewing problems could result.
THREADING THE UPPER THREAD 3 2 1 4 6 5 7 8 Please Note: It is important to release the tension discs. 11 Lift up the spool pin. Place the spool of thread on the spool pin so that the thread comes from the front of the spool, 1 then place the spool cap at the end of the spool pin. 22 Draw the thread from the spool through the upper thread guide. 2 13 Start by raising the needle to its highest point, and also raise the presser foot to carry out the threading correctly as by not doing so several sewing problems could result.

Instruction Manual 2
Page 19
Guide the thread through the thread guide located above the needle. 8 Pull the end of the thread through the needle from right to the left through the pre-tension spring as illustrated. 3 44. Use the needle threader to rear, and pull out about 10 cm of this movement, pass the thread from front to thread the needle. (On the next page.) 78 14 At the top of thread. Pass the thread behind the flat, horizontal thread guide. Then, down and around the thread guide pulling the thread through the slotted eye of the take-up lever and then downwards again. 6 77. THREADING THE UPPER ...
Guide the thread through the thread guide located above the needle. 8 Pull the end of the thread through the needle from right to the left through the pre-tension spring as illustrated. 3 44. Use the needle threader to rear, and pull out about 10 cm of this movement, pass the thread from front to thread the needle. (On the next page.) 78 14 At the top of thread. Pass the thread behind the flat, horizontal thread guide. Then, down and around the thread guide pulling the thread through the slotted eye of the take-up lever and then downwards again. 6 77. THREADING THE UPPER ...

Instruction Manual 2
Page 20
The hook will turn and pass the thread through the needle eye. 2 33 Take the thread in front of the needle. 3 44 Hold the thread loosely and release the lever slowly. Raise the needle to its highest position and lower the presser foot. 11 Lower the needle threader lever slowly and draw the thread through the thread guide as illustrated and then to the right. 1 22 The needle threader automatically turns to the off position ("O"). USING THE NEEDLE THREADER Attention: Turn power switch to the threading position and the hook pin passes through the needle eye forming a loop. Pull the thread ...
The hook will turn and pass the thread through the needle eye. 2 33 Take the thread in front of the needle. 3 44 Hold the thread loosely and release the lever slowly. Raise the needle to its highest position and lower the presser foot. 11 Lower the needle threader lever slowly and draw the thread through the thread guide as illustrated and then to the right. 1 22 The needle threader automatically turns to the off position ("O"). USING THE NEEDLE THREADER Attention: Turn power switch to the threading position and the hook pin passes through the needle eye forming a loop. Pull the thread ...
Instruction Manual 2
Page 21
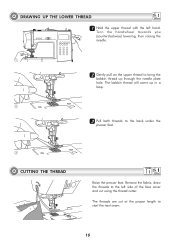
Turn the handwheel towards you (counterclockwise) lowering, then raising the needle. 1 22 Gently pull on the upper thread to bring the bobbin thread up in a loop. 2 33 Pull both threads to the back under the presser foot. 3 CUTTING THE THREAD Raise the presser foot. The threads are cut using the thread cutter. DRAWING UP THE LOWER THREAD 11 Hold the upper thread with the left side of the face cover and cut at the proper length to the left hand. Remove the fabric, draw the threads to start the next seam. 16 The bobbin thread will come up through the needle plate hole.
Turn the handwheel towards you (counterclockwise) lowering, then raising the needle. 1 22 Gently pull on the upper thread to bring the bobbin thread up in a loop. 2 33 Pull both threads to the back under the presser foot. 3 CUTTING THE THREAD Raise the presser foot. The threads are cut using the thread cutter. DRAWING UP THE LOWER THREAD 11 Hold the upper thread with the left side of the face cover and cut at the proper length to the left hand. Remove the fabric, draw the threads to start the next seam. 16 The bobbin thread will come up through the needle plate hole.
Instruction Manual 2
Page 22
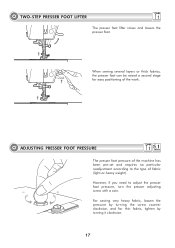
However, if you need to the type of the work. TWO-STEP PRESSER FOOT LIFTER The presser foot lifter raises and lowers the presser foot. For sewing very heavy fabric, loosen the pressure by turning it clockwise. 17 ADJUSTING PRESSER FOOT PRESSURE The presser foot pressure of the machine has been pre-set and requires no particular readjustment according to adjust the presser foot pressure, turn the presser adjusting screw with a coin. When sewing several layers or thick fabrics, the presser foot can be raised a second stage for thin fabric, tighten by turning the screw counter ...
However, if you need to the type of the work. TWO-STEP PRESSER FOOT LIFTER The presser foot lifter raises and lowers the presser foot. For sewing very heavy fabric, loosen the pressure by turning it clockwise. 17 ADJUSTING PRESSER FOOT PRESSURE The presser foot pressure of the machine has been pre-set and requires no particular readjustment according to adjust the presser foot pressure, turn the presser adjusting screw with a coin. When sewing several layers or thick fabrics, the presser foot can be raised a second stage for thin fabric, tighten by turning the screw counter ...
