

Instruction Manual 2
Page 3
... persons (including children) with reduced physical, sensory or mental capabilities, or lack of lint, dust, and loose cloth. 5. Do not pull or push fabric while stitching. Always unplug sewing machine from all moving parts. To disconnect, turn off ("O") position, then remove plug from outlet. 15. Do not allow to be used...
... persons (including children) with reduced physical, sensory or mental capabilities, or lack of lint, dust, and loose cloth. 5. Do not pull or push fabric while stitching. Always unplug sewing machine from all moving parts. To disconnect, turn off ("O") position, then remove plug from outlet. 15. Do not allow to be used...
Instruction Manual 2
Page 4
... button 24 Thread cutter button 24 Reverse button 25 Auto-lock button 25 Needle up/down position button 26 FUNCTION BUTTONS 27-29 Stitch width adjustment button 27 Stitch length adjustment button 28 MODE selection button 28 Elongation button (see page 63 28 Mirror button (see page 64 29 Twin needle ... TIPS 32-33 Sewing corners 32 Reverse 32 Free arm 32 Installing the extension table 33 Sewing on heavy fabric 33 NEEDLE POSITION AND STITCH LENGTH 34 ZIGZAG STITCHES 34 STRETCH STITCHES 35 OVERCASTING STITCHES 36 Using the overcasting foot 36 Using the all purpose foot 36
... button 24 Thread cutter button 24 Reverse button 25 Auto-lock button 25 Needle up/down position button 26 FUNCTION BUTTONS 27-29 Stitch width adjustment button 27 Stitch length adjustment button 28 MODE selection button 28 Elongation button (see page 63 28 Mirror button (see page 64 29 Twin needle ... TIPS 32-33 Sewing corners 32 Reverse 32 Free arm 32 Installing the extension table 33 Sewing on heavy fabric 33 NEEDLE POSITION AND STITCH LENGTH 34 ZIGZAG STITCHES 34 STRETCH STITCHES 35 OVERCASTING STITCHES 36 Using the overcasting foot 36 Using the all purpose foot 36
Instruction Manual 2
Page 5
... INSERTION 47-48 Inserting a centered zipper 47 Inserting a lapped zipper 48 NARROW HEMMING 49 CORDING 50 Single cording 50 Triple cording 50 SATIN STITCH SEWING 51 EDGE/QUILTING GUIDE 52 GATHERING 53 SMOCKING 54 FREE MOTION SEWING 55-56 Darning 55 Embroidery 56 Monogramming 56 WALKING FOOT 57 SIDE... CUTTER 58 ROLLER FOOT 58 STRAIGHT STITCH FOOT 58 OPEN TOE FOOT 59 1/4" PIECING FOOT 59 EDGE JOINING FOOT 59 INVISIBLE ZIPPER FOOT 60 NON-STICK FOOT 60 FAGOTING 61 ...
... INSERTION 47-48 Inserting a centered zipper 47 Inserting a lapped zipper 48 NARROW HEMMING 49 CORDING 50 Single cording 50 Triple cording 50 SATIN STITCH SEWING 51 EDGE/QUILTING GUIDE 52 GATHERING 53 SMOCKING 54 FREE MOTION SEWING 55-56 Darning 55 Embroidery 56 Monogramming 56 WALKING FOOT 57 SIDE... CUTTER 58 ROLLER FOOT 58 STRAIGHT STITCH FOOT 58 OPEN TOE FOOT 59 1/4" PIECING FOOT 59 EDGE JOINING FOOT 59 INVISIBLE ZIPPER FOOT 60 NON-STICK FOOT 60 FAGOTING 61 ...
Instruction Manual 2
Page 6
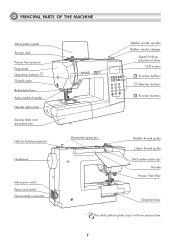
PRINCIPAL PARTS OF THE MACHINE Stitch pattern plate Tension dial Presser foot pressure Face plate Operation buttons A Thread cutter Buttonhole lever Auto needle threader Needle plate cover Sewing table and accessory ... spindle Bobbin winder stopper Speed limiting adjustment lever LCD screen B Function buttons C Selection buttons B Function buttons Horizontal spool pin Bobbin thread guide Upper thread guide Stitch pattern plate clip* Handle Presser foot lifter Drop feed lever * The...
PRINCIPAL PARTS OF THE MACHINE Stitch pattern plate Tension dial Presser foot pressure Face plate Operation buttons A Thread cutter Buttonhole lever Auto needle threader Needle plate cover Sewing table and accessory ... spindle Bobbin winder stopper Speed limiting adjustment lever LCD screen B Function buttons C Selection buttons B Function buttons Horizontal spool pin Bobbin thread guide Upper thread guide Stitch pattern plate clip* Handle Presser foot lifter Drop feed lever * The...
Instruction Manual 2
Page 7
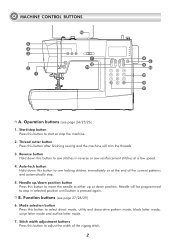
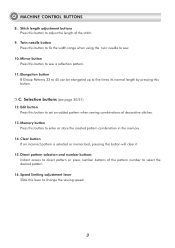
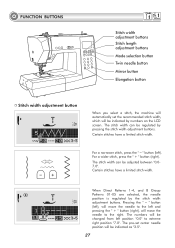
...Mode selection button Press this button to adjust the width of the current patterns and automatically stop in reverse or sew reinforcement stitches at the end of the zigzag stitch. 2 B. Needle up/down position button Press this button to move the needle to either up or down this button to... start or stop button Press this button to sew locking stitches immediately or at a low speed. 4. Stitch width adjustment buttons Press this button to select direct mode, utility and decorative pattern mode, block letter mode, script ...
...Mode selection button Press this button to adjust the width of the current patterns and automatically stop in reverse or sew reinforcement stitches at the end of the zigzag stitch. 2 B. Needle up/down position button Press this button to move the needle to either up or down this button to... start or stop button Press this button to sew locking stitches immediately or at a low speed. 4. Stitch width adjustment buttons Press this button to select direct mode, utility and decorative pattern mode, block letter mode, script ...
Instruction Manual 2
Page 8
Direct pattern selection and number buttons Instant access to direct pattern or press number buttons of the stitch. 9. Clear button If an incorrect pattern is selected or memorized, pressing this button to change the sewing speed. 3 C. Selection buttons (see page 30/31) 12. ... its normal length by pressing this button to adjust the length of the pattern number to set an added pattern when sewing combinations of decorative stitches. 13. Stitch length adjustment buttons Press this button. MACHINE CONTROL BUTTONS 8.
Direct pattern selection and number buttons Instant access to direct pattern or press number buttons of the stitch. 9. Clear button If an incorrect pattern is selected or memorized, pressing this button to change the sewing speed. 3 C. Selection buttons (see page 30/31) 12. ... its normal length by pressing this button to adjust the length of the pattern number to set an added pattern when sewing combinations of decorative stitches. 13. Stitch length adjustment buttons Press this button. MACHINE CONTROL BUTTONS 8.
Instruction Manual 2
Page 9
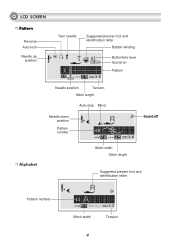
LCD SCREEN Pattern Reverse Auto-lock Needle up position Twin needle Suggested presser foot and identification letter Bobbin winding Buttonhole lever Sound on Pattern Needle position Tension Stitch length Auto-stop Mirror Needle down position Pattern number Sound off Alphabet Stitch width Stitch length Suggested presser foot and identification letter Pattern number Stitch width Tension 4
LCD SCREEN Pattern Reverse Auto-lock Needle up position Twin needle Suggested presser foot and identification letter Bobbin winding Buttonhole lever Sound on Pattern Needle position Tension Stitch length Auto-stop Mirror Needle down position Pattern number Sound off Alphabet Stitch width Stitch length Suggested presser foot and identification letter Pattern number Stitch width Tension 4

Instruction Manual 2
Page 11
Patterns A Group Patterns-10 (Direct Patterns) 123 4 5 6 7 8 9 0 B Group Patterns-50 01 02 03 04 05 06 07 08 09 10 11 12 13 14 15 16 17 18 19 20 21 22 23 24 25 26 27 28 29 30 31 32 33 34 35 36 37 38 39 40 41 42 43 44 45 46 47 48 49 50 C Group Patterns-66 01 02 03 04 05 06 07 08 09 10 11 12 13 14 15 16 17 18 19 20 21 22 23 24 25 26 27 28 29 30 31 32 33 34 35 36 37 38 39 40 41 42 43 44 45 46 47 48 49 50 51 52 53 54 55 56 57 58 59 60 61 62 63 64 65 66 6 PATTERN CHART The portions marked in gray (on the chart below) show the single unit of each stitch.
Patterns A Group Patterns-10 (Direct Patterns) 123 4 5 6 7 8 9 0 B Group Patterns-50 01 02 03 04 05 06 07 08 09 10 11 12 13 14 15 16 17 18 19 20 21 22 23 24 25 26 27 28 29 30 31 32 33 34 35 36 37 38 39 40 41 42 43 44 45 46 47 48 49 50 C Group Patterns-66 01 02 03 04 05 06 07 08 09 10 11 12 13 14 15 16 17 18 19 20 21 22 23 24 25 26 27 28 29 30 31 32 33 34 35 36 37 38 39 40 41 42 43 44 45 46 47 48 49 50 51 52 53 54 55 56 57 58 59 60 61 62 63 64 65 66 6 PATTERN CHART The portions marked in gray (on the chart below) show the single unit of each stitch.
Instruction Manual 2
Page 13
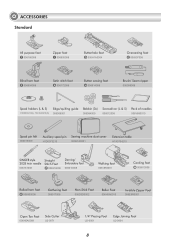
...All purpose foot T 006186008 Zipper foot I 006905008 Buttonhole foot D 006H1A0004 Overcasting foot E 006907008 Blind hem foot F 006904008 Satin stitch foot A 006172008 Button sewing foot H 006914008 Brush/ Seam ripper 006099008 Spool holders (L & S) Edge/quilting guide Bobbin (3x...006V880010 Spool pin felt 006015009 Auxiliary spool pin Sewing machine dust cover H1D0073210 020H7A0001 Extension table H7A0754210 SINGER style 2025 twin needle 006161008 Straight Stitch Foot P 006916008 Darning/ Embroidery foot 006016008 Walking foot 0061850081 Cording foot M 006813008 Rolled hem ...
...All purpose foot T 006186008 Zipper foot I 006905008 Buttonhole foot D 006H1A0004 Overcasting foot E 006907008 Blind hem foot F 006904008 Satin stitch foot A 006172008 Button sewing foot H 006914008 Brush/ Seam ripper 006099008 Spool holders (L & S) Edge/quilting guide Bobbin (3x...006V880010 Spool pin felt 006015009 Auxiliary spool pin Sewing machine dust cover H1D0073210 020H7A0001 Extension table H7A0754210 SINGER style 2025 twin needle 006161008 Straight Stitch Foot P 006916008 Darning/ Embroidery foot 006016008 Walking foot 0061850081 Cording foot M 006813008 Rolled hem ...
Instruction Manual 2
Page 17
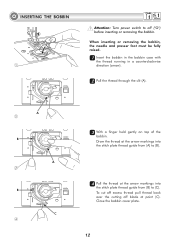
... the cutting off ("O") before inserting or removing the bobbin. Draw the thread at the arrow markings into the stitch plate thread guide from (A) to (B). 44 Pull the thread at the arrow markings into the stitch plate thread guide from (B) to off blade at point (C). INSERTING THE BOBBIN 1 Attention: Turn power switch to...
... the cutting off ("O") before inserting or removing the bobbin. Draw the thread at the arrow markings into the stitch plate thread guide from (A) to (B). 44 Pull the thread at the arrow markings into the stitch plate thread guide from (B) to off blade at point (C). INSERTING THE BOBBIN 1 Attention: Turn power switch to...
Instruction Manual 2
Page 24
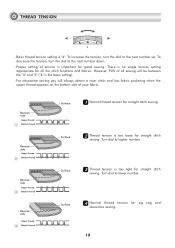
... number. Turn dial to the next number up. Surface 44 Normal thread tension for straight stitch sewing. THREAD TENSION - Proper setting of your fabric. However, 90% of all the stitch functions and fabrics. Turn dial to the next number down. - There is important for...tension is no single tension setting appropriate for good sewing. Surface 33 Thread tension is too loose for straight stitch sewing. Surface 22 Thread tension is too tight for straight stitch sewing. For decorative sewing you will be between the "3" and "5" ("4" is "4". Reverse side Upper ...
... number. Turn dial to the next number up. Surface 44 Normal thread tension for straight stitch sewing. THREAD TENSION - Proper setting of your fabric. However, 90% of all the stitch functions and fabrics. Turn dial to the next number down. - There is important for...tension is no single tension setting appropriate for good sewing. Surface 33 Thread tension is too loose for straight stitch sewing. Surface 22 Thread tension is too tight for straight stitch sewing. For decorative sewing you will be between the "3" and "5" ("4" is "4". Reverse side Upper ...
Instruction Manual 2
Page 26
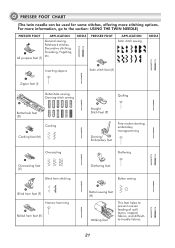
... (H) Walking foot This foot helps to the section: USING THE TWIN NEEDLE) PRESSER FOOT APPLICATION General sewing, Patchwork stitches, Decorative stitching, Smocking, Fagoting, etc. PRESSER FOOT CHART (The twin needle can be used for some stitches, offering more information, go to prevent uneven feeding of quilt layers, napped fabrics, and difficultto-handle fabrics...
... (H) Walking foot This foot helps to the section: USING THE TWIN NEEDLE) PRESSER FOOT APPLICATION General sewing, Patchwork stitches, Decorative stitching, Smocking, Fagoting, etc. PRESSER FOOT CHART (The twin needle can be used for some stitches, offering more information, go to prevent uneven feeding of quilt layers, napped fabrics, and difficultto-handle fabrics...

Instruction Manual 2
Page 30
...01-66 are selected, the machine will display the figure " " until the machine is released. The LCD screen will immediately sew 3 locking stitches when the Auto-lock button is pressed, then automatically stop . OPERATION BUTTONS Reverse button Auto-lock button Select Direct Patterns 1-5, or B Group... Patterns 01-06 and the machine will sew 3 locking stitches at a low speed and machine automatically stops if the reverse button is stopped. When Direct Patterns 1-4, and B Group Patterns 01-05 are...
...01-66 are selected, the machine will display the figure " " until the machine is released. The LCD screen will immediately sew 3 locking stitches when the Auto-lock button is pressed, then automatically stop . OPERATION BUTTONS Reverse button Auto-lock button Select Direct Patterns 1-5, or B Group... Patterns 01-06 and the machine will sew 3 locking stitches at a low speed and machine automatically stops if the reverse button is stopped. When Direct Patterns 1-4, and B Group Patterns 01-05 are...
Instruction Manual 2
Page 32
...to the right. When Direct Patterns 1-4, and B Group Patterns 01-05 are selected, the needle position is regulated by pressing the stitch width adjustment buttons. The numbers will move the needle to the left and pressing the " + " button (right), will be ... by numbers on the LCD screen. The stitch width can be adjusted between "0.07.0". Certain stitches have a limited stitch width. Pressing the " – " button (left), will move the needle to extreme right position "7.0". Certain stitches have a limited stitch width. For a wider stitch, press the " + " button (right...
...to the right. When Direct Patterns 1-4, and B Group Patterns 01-05 are selected, the needle position is regulated by pressing the stitch width adjustment buttons. The numbers will move the needle to the left and pressing the " + " button (right), will be ... by numbers on the LCD screen. The stitch width can be adjusted between "0.07.0". Certain stitches have a limited stitch width. Pressing the " – " button (left), will move the needle to extreme right position "7.0". Certain stitches have a limited stitch width. For a wider stitch, press the " + " button (right...

Instruction Manual 2
Page 33
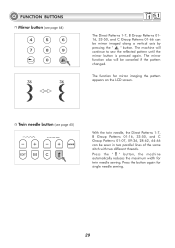
...: Character selection using number buttons. Block letter mode: Character selection using number buttons. The stitch length can be adjusted by pressing the stitch length adjustment buttons. Direct mode stitch selection. MODE selection button Elongation button (see page 63) The LED light will move indicating...the LED light will move from one mode to five times its normal length by numbers on . FUNCTION BUTTONS Stitch length adjustment buttons When you select a stitch the machine will automatically set at Direct mode " " when the machine is first turned on the LCD ...
...: Character selection using number buttons. Block letter mode: Character selection using number buttons. The stitch length can be adjusted by pressing the stitch length adjustment buttons. Direct mode stitch selection. MODE selection button Elongation button (see page 63) The LED light will move indicating...the LED light will move from one mode to five times its normal length by numbers on . FUNCTION BUTTONS Stitch length adjustment buttons When you select a stitch the machine will automatically set at Direct mode " " when the machine is first turned on the LCD ...
Instruction Manual 2
Page 34
... 01-16, 33-50, and C Group Patterns 01-07, 09-26, 28-62, 64-66 can be sewn in two parallel lines of the same stitch with two different threads.
... 01-16, 33-50, and C Group Patterns 01-07, 09-26, 28-62, 64-66 can be sewn in two parallel lines of the same stitch with two different threads.

Instruction Manual 2
Page 35
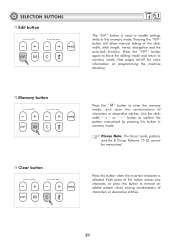
... button Memory button Clear button Direct pattern selection and number buttons Direct pattern selection and number buttons Direct pattern selection Press the buttons to select stitch patterns.
... button Memory button Clear button Direct pattern selection and number buttons Direct pattern selection and number buttons Direct pattern selection Press the buttons to select stitch patterns.
Instruction Manual 2
Page 36
Please Note: The Direct mode patterns and the B Group Patterns 17-32 cannot be memorized. Press this button in the memory mode. Use the stitch width " + " or " – " button to remove an added pattern when sewing combinations of this button erases one character, or press this button to confirm... by pressing this button when the incorrect character is used to modify settings while in memory mode. Each press of characters or decorative stitches. 31 Press the " " button again to leave the editing mode and return to enter the memory mode, and store the combinations of the...
Please Note: The Direct mode patterns and the B Group Patterns 17-32 cannot be memorized. Press this button in the memory mode. Use the stitch width " + " or " – " button to remove an added pattern when sewing combinations of this button erases one character, or press this button to confirm... by pressing this button when the incorrect character is used to modify settings while in memory mode. Each press of characters or decorative stitches. 31 Press the " " button again to leave the editing mode and return to enter the memory mode, and store the combinations of the...
Instruction Manual 2
Page 37
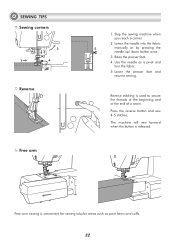
... or by pressing the needle up/ down button once. 3. Lower the presser foot and resume sewing. Press the reverse button and sew 4-5 stitches. Free-arm sewing is released. Reverse stitching is used to secure the threads at the beginning and at the end of a seam. SEWING TIPS Sewing corners 3 2 1 4 Reverse Free arm...
... or by pressing the needle up/ down button once. 3. Lower the presser foot and resume sewing. Press the reverse button and sew 4-5 stitches. Free-arm sewing is released. Reverse stitching is used to secure the threads at the beginning and at the end of a seam. SEWING TIPS Sewing corners 3 2 1 4 Reverse Free arm...
Instruction Manual 2
Page 38
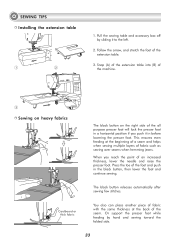
... the foot and push in before lowering the presser foot. When you push it to the left. 2. The black button releases automatically after sewing few stitches. Snap (A) of the extension table into (B) of the machine. 3 Sewing on heavy fabrics The black button on the right side of the all purpose presser...
... the foot and push in before lowering the presser foot. When you push it to the left. 2. The black button releases automatically after sewing few stitches. Snap (A) of the extension table into (B) of the machine. 3 Sewing on heavy fabrics The black button on the right side of the all purpose presser...


