
Instruction Manual 2
Page 4
... THE THREAD 16 TWO-STEP PRESSER FOOT LIFTER 17 ADJUSTING PRESSER FOOT PRESSURE 17 STARTING SEWING 18 Start/stop button 18 Foot control 18 THREAD TENSION 19 CHANGING THE PRESSER FOOT 20 PRESSER FOOT CHART 21 MATCHING NEEDLE/ FABRIC/ THREAD 22 REPLACING THE NEEDLE 23 RAISE OR LOWER FEED DOGS 23...
... THE THREAD 16 TWO-STEP PRESSER FOOT LIFTER 17 ADJUSTING PRESSER FOOT PRESSURE 17 STARTING SEWING 18 Start/stop button 18 Foot control 18 THREAD TENSION 19 CHANGING THE PRESSER FOOT 20 PRESSER FOOT CHART 21 MATCHING NEEDLE/ FABRIC/ THREAD 22 REPLACING THE NEEDLE 23 RAISE OR LOWER FEED DOGS 23...
Instruction Manual 2
Page 6
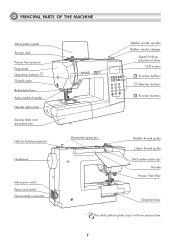
PRINCIPAL PARTS OF THE MACHINE Stitch pattern plate Tension dial Presser foot pressure Face plate Operation buttons A Thread cutter Buttonhole lever Auto needle threader Needle plate cover Sewing table and accessory box Hole for ...
PRINCIPAL PARTS OF THE MACHINE Stitch pattern plate Tension dial Presser foot pressure Face plate Operation buttons A Thread cutter Buttonhole lever Auto needle threader Needle plate cover Sewing table and accessory box Hole for ...
Instruction Manual 2
Page 9
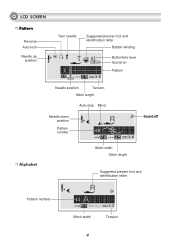
LCD SCREEN Pattern Reverse Auto-lock Needle up position Twin needle Suggested presser foot and identification letter Bobbin winding Buttonhole lever Sound on Pattern Needle position Tension Stitch length Auto-stop Mirror Needle down position Pattern number Sound off Alphabet Stitch width Stitch length Suggested presser foot and identification letter Pattern number Stitch width Tension 4
LCD SCREEN Pattern Reverse Auto-lock Needle up position Twin needle Suggested presser foot and identification letter Bobbin winding Buttonhole lever Sound on Pattern Needle position Tension Stitch length Auto-stop Mirror Needle down position Pattern number Sound off Alphabet Stitch width Stitch length Suggested presser foot and identification letter Pattern number Stitch width Tension 4

Instruction Manual 2
Page 15
... the thread doesn't get caught while winding the bobbin. 2 Snap the thread into the thread guide. 2 3 Wind the thread counter-clockwise around the bobbin winder tension disks. 3 4 Place the thread end through one of the spool holder toward the spool, or use the small spool holder.
... the thread doesn't get caught while winding the bobbin. 2 Snap the thread into the thread guide. 2 3 Wind the thread counter-clockwise around the bobbin winder tension disks. 3 4 Place the thread end through one of the spool holder toward the spool, or use the small spool holder.

Instruction Manual 2
Page 18
Start by not doing so several sewing problems could result. THREADING THE UPPER THREAD 3 2 1 4 6 5 7 8 Please Note: It is important to carry out the threading correctly as by raising the needle to its highest point, and also raise the presser foot to release the tension discs. 11 Lift up the spool pin. Place the spool of thread on the spool pin so that the thread comes from the front of the spool, 1 then place the spool cap at the end of the spool pin. 22 Draw the thread from the spool through the upper thread guide. 2 13
Start by not doing so several sewing problems could result. THREADING THE UPPER THREAD 3 2 1 4 6 5 7 8 Please Note: It is important to carry out the threading correctly as by raising the needle to its highest point, and also raise the presser foot to release the tension discs. 11 Lift up the spool pin. Place the spool of thread on the spool pin so that the thread comes from the front of the spool, 1 then place the spool cap at the end of the spool pin. 22 Draw the thread from the spool through the upper thread guide. 2 13

Instruction Manual 2
Page 19
... through the thread guide located above the needle. 8 Pull the end of the thread through the needle from right to the left through the pre-tension spring as illustrated. 3 44. Then, down and around the thread guide pulling the thread through the slotted eye of thread. Use the needle threader to... again. 6 77. At the top of this movement, pass the thread from front to thread the needle. (On the next page.) 78 14 Thread the tension module by passing the thread between the silver discs. 4 55. THREADING THE UPPER THREAD 33 Guide the thread around the check spring holder. 5 66.
... through the thread guide located above the needle. 8 Pull the end of the thread through the needle from right to the left through the pre-tension spring as illustrated. 3 44. Then, down and around the thread guide pulling the thread through the slotted eye of thread. Use the needle threader to... again. 6 77. At the top of this movement, pass the thread from front to thread the needle. (On the next page.) 78 14 Thread the tension module by passing the thread between the silver discs. 4 55. THREADING THE UPPER THREAD 33 Guide the thread around the check spring holder. 5 66.
Instruction Manual 2
Page 24
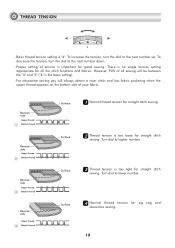
... Upper thread 4 Bobbin thread Surface 11 Normal thread tension for all sewing will be between the "3" and "5" ("4" is no single tension setting appropriate for straight stitch sewing. Surface 33 Thread tension is important for straight stitch sewing. However, 90% of your fabric. THREAD TENSION - Basic thread tension setting is too loose for zig zag and...
... Upper thread 4 Bobbin thread Surface 11 Normal thread tension for all sewing will be between the "3" and "5" ("4" is no single tension setting appropriate for straight stitch sewing. Surface 33 Thread tension is important for straight stitch sewing. However, 90% of your fabric. THREAD TENSION - Basic thread tension setting is too loose for zig zag and...
Instruction Manual 2
Page 58
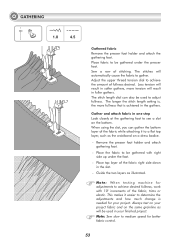
... and attach the gathering foot. Place fabric to be gathered under the foot. - Adjust the upper thread tension dial to adjust fullness. Less tension will result in softer gathers, more fullness that is , the more tension will be used in one step Look closely at the gathering foot to determine the adjustments and...
... and attach the gathering foot. Place fabric to be gathered under the foot. - Adjust the upper thread tension dial to adjust fullness. Less tension will result in softer gathers, more fullness that is , the more tension will be used in one step Look closely at the gathering foot to determine the adjustments and...
Instruction Manual 2
Page 59
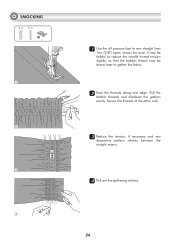
It may be helpful to reduce the needle thread tension slightly, so that the bobbin thread may be drawn later to sew straight lines 1cm (3/8") apart, across the area. Secure the threads at the other end. 33 Reduce the tension, if necessary and sew decorative pattern stitches between the straight seams. 44 Pull out the gathering stitches. 54 SMOCKING B-14 B-15 A 1 2 3 4 11 Use the all purpose foot to gather the fabric. 22 Knot the threads along one edge. Pull the bobbin threads and distribute the gathers evenly.
It may be helpful to reduce the needle thread tension slightly, so that the bobbin thread may be drawn later to sew straight lines 1cm (3/8") apart, across the area. Secure the threads at the other end. 33 Reduce the tension, if necessary and sew decorative pattern stitches between the straight seams. 44 Pull out the gathering stitches. 54 SMOCKING B-14 B-15 A 1 2 3 4 11 Use the all purpose foot to gather the fabric. 22 Knot the threads along one edge. Pull the bobbin threads and distribute the gathers evenly.
Instruction Manual 2
Page 80
...suit the thread and fabric. Loose stitches 2.The bobbin case is not correctly threaded. 3.Needle/fabric/thread combination is wrong. 4.Thread tension is damaged. 6.Replace the needle. Skipped stitches 3.The wrong size needle has been used is not 6.Attach the presser foot that...Select a finer needle. 2.Readjust the stitch length. 3.Loosen the thread tension. TROUBLE SHOOTING GUIDE Before calling for service, check the following items. If the problem still persists, contact Singer at www.singer.com Problem Cause Correction Reference 1.The machine is damaged. 1.Remove and reinsert...
...suit the thread and fabric. Loose stitches 2.The bobbin case is not correctly threaded. 3.Needle/fabric/thread combination is wrong. 4.Thread tension is damaged. 6.Replace the needle. Skipped stitches 3.The wrong size needle has been used is not 6.Attach the presser foot that...Select a finer needle. 2.Readjust the stitch length. 3.Loosen the thread tension. TROUBLE SHOOTING GUIDE Before calling for service, check the following items. If the problem still persists, contact Singer at www.singer.com Problem Cause Correction Reference 1.The machine is damaged. 1.Remove and reinsert...
Instruction Manual 2
Page 81
...The sewing machine doesn't operate 1.The correct presser foot is not used. 1.Select the correct foot. 2.The needle thread tension is too tight. 2.Loosen the thread tension. 3.The stitch length is not threaded 2.Rethread the machine. correctly. 3.The needle is connected. foot controller is damaged....feed dogs are packed with lint. TROUBLE SHOOTING GUIDE Problem Seam puckering Cause Correction Reference 1.The needle thread tension is too tight. 1.Loosen the thread tension. 2.The needle thread is not suitable for the fabric 3.Choose a needle to the electric outlet.
...The sewing machine doesn't operate 1.The correct presser foot is not used. 1.Select the correct foot. 2.The needle thread tension is too tight. 2.Loosen the thread tension. 3.The stitch length is not threaded 2.Rethread the machine. correctly. 3.The needle is connected. foot controller is damaged....feed dogs are packed with lint. TROUBLE SHOOTING GUIDE Problem Seam puckering Cause Correction Reference 1.The needle thread tension is too tight. 1.Loosen the thread tension. 2.The needle thread is not suitable for the fabric 3.Choose a needle to the electric outlet.


