Instruction Manual
Page 31
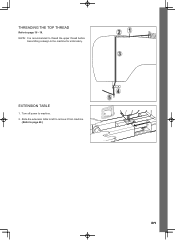
Turn off power to page 49.) 31 EXTENSION TABLE 1. Slide the extension table to left to remove it from machine. (Refer to machine. 2. THREADING THE TOP THREAD Refer to the machine for embroidery. NOTE: It is recommended to thread the upper thread before transmitting a design to page 16 - 19.
Turn off power to page 49.) 31 EXTENSION TABLE 1. Slide the extension table to left to remove it from machine. (Refer to machine. 2. THREADING THE TOP THREAD Refer to the machine for embroidery. NOTE: It is recommended to thread the upper thread before transmitting a design to page 16 - 19.

Instruction Manual
Page 38
...installation procedure is finalizing all the selections made during the installation set-up the Futura Software. 4. Turn off your computer and sewing machine. 1. Finally you are now ready to select and transmit a design to your sewing machine and connect the USB cable between your machine, close.... CORRECT START-UP PROCEDURE WHEN EMBROIDERING The following steps must be stored. It will prompt you to the given directory on your embroidery unit. 3. Wait for proper start the copy and installation of available space on your sewing machine. Simply click on your hard ...
...installation procedure is finalizing all the selections made during the installation set-up the Futura Software. 4. Turn off your computer and sewing machine. 1. Finally you are now ready to select and transmit a design to your sewing machine and connect the USB cable between your machine, close.... CORRECT START-UP PROCEDURE WHEN EMBROIDERING The following steps must be stored. It will prompt you to the given directory on your embroidery unit. 3. Wait for proper start the copy and installation of available space on your sewing machine. Simply click on your hard ...
Instruction Manual
Page 39
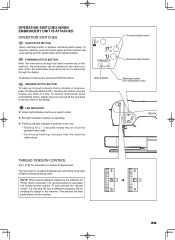
... by checking the box in progress, press the Reverse Stitch button. FORWARD STITCH BUTTON After the embroidery design has been transferred to start /stop button is advancing through a design that is recommended to decrease the thread tension toward "0" and activate the "Speed limiter", by the software for 2 ... performance of the machine. 39 Design may wish to re-adjust thread tension according to loosen thread tension. You may be advanced one stitch at a time. Note: The embroidery hoop will stop sewing and the needle stops at "E" for embroidery to the type of fabric and...
... by checking the box in progress, press the Reverse Stitch button. FORWARD STITCH BUTTON After the embroidery design has been transferred to start /stop button is advancing through a design that is recommended to decrease the thread tension toward "0" and activate the "Speed limiter", by the software for 2 ... performance of the machine. 39 Design may wish to re-adjust thread tension according to loosen thread tension. You may be advanced one stitch at a time. Note: The embroidery hoop will stop sewing and the needle stops at "E" for embroidery to the type of fabric and...
Instruction Manual
Page 44
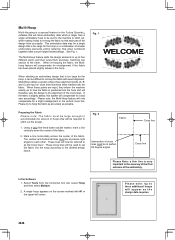
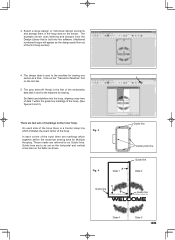
... and horizontal lines must be at precise right angles to each part of smaller embroidery elements and/or lettering, that when combined together make a much larger finished design. Fig. 1 When stitching an embroidery design that is too large for misalignment if the fabric has been placed slightly askew in... that have been marked onto the fabric. Multi-Hoop Multi-Hooping is a special feature in the Futura QuartetTM software that will allow embroidery data which is larger than a single embroidery hoop to be sent to the machine to stitch out, while making it easy to re-hoop ...
... and horizontal lines must be at precise right angles to each part of smaller embroidery elements and/or lettering, that when combined together make a much larger finished design. Fig. 1 When stitching an embroidery design that is too large for misalignment if the fabric has been placed slightly askew in... that have been marked onto the fabric. Multi-Hoop Multi-Hooping is a special feature in the Futura QuartetTM software that will allow embroidery data which is larger than a single embroidery hoop to be sent to the machine to stitch out, while making it easy to re-hoop ...
Instruction Manual
Page 45
...hoop section). 4. Select a large design or individual design elements and arrange them in the hoop area on the fabric as Guide lines. The grey area (#1 Hoop) is the first of the hoop. Guide lines are markings which indicates the exact center of the embroidery data that is sent to the ...machine for sewing one section at a time. On each corner of the hoop. (See figures 2 and 3). The design data is built into the hoop, aligning cross lines of data 1 within...
...hoop section). 4. Select a large design or individual design elements and arrange them in the hoop area on the fabric as Guide lines. The grey area (#1 Hoop) is the first of the hoop. Guide lines are markings which indicates the exact center of the embroidery data that is sent to the ...machine for sewing one section at a time. On each corner of the hoop. (See figures 2 and 3). The design data is built into the hoop, aligning cross lines of data 1 within...


