Instruction Manual
Page 2
... when plugged in this appliance from all controls to the nearest authorized dealer or service center for its intended use as threading needle, changing needle, threading bobbin, or changing presser foot, and the like. 10. Use only attachments recommended by pulling on cord. Never ...is intended for household use outdoors. 13. Return the appliance to the off ("O") when making any object into water. Always use bent needles. 8. Do not unplug by the manufacturer as contained in the instruction manual. 11. WARNING- Keep fingers away from the electric outlet ...
... when plugged in this appliance from all controls to the nearest authorized dealer or service center for its intended use as threading needle, changing needle, threading bobbin, or changing presser foot, and the like. 10. Use only attachments recommended by pulling on cord. Never ...is intended for household use outdoors. 13. Return the appliance to the off ("O") when making any object into water. Always use bent needles. 8. Do not unplug by the manufacturer as contained in the instruction manual. 11. WARNING- Keep fingers away from the electric outlet ...
Instruction Manual
Page 5
... Adjusting presser foot pressure...9 Attaching the presser foot holder ...10 Winding the bobbin ...11 Inserting the bobbin...12 Inserting and changing needles ...13 Threading the upper thread...14 Thread tension ...16 Raising the bobbin thread ...18 Reverse sewing/ Remove the work/ Cutting the thread ......19 Matching needle/ fabric/ thread...20 How to choose your pattern ...22 Straight stitch and twin needle ...23 Zigzag stitching ...24 Blind hem/ lingerie stitch ...25 Sewing on buttons...26 Sew 4-step ...
... Adjusting presser foot pressure...9 Attaching the presser foot holder ...10 Winding the bobbin ...11 Inserting the bobbin...12 Inserting and changing needles ...13 Threading the upper thread...14 Thread tension ...16 Raising the bobbin thread ...18 Reverse sewing/ Remove the work/ Cutting the thread ......19 Matching needle/ fabric/ thread...20 How to choose your pattern ...22 Straight stitch and twin needle ...23 Zigzag stitching ...24 Blind hem/ lingerie stitch ...25 Sewing on buttons...26 Sew 4-step ...
Instruction Manual
Page 19
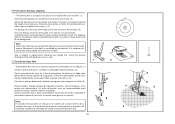
...spring as shown. Draw thread from front to spool.(2) - Trim thread to release the tension discs. Start by leading thread down to the needle which should be threaded from spool through the upper thread guide (3) and pulling thread through the slotted eye of thread on the holder with... next to back. Note: For safety, it is strongly suggested you turn off the spool as illustrated. - Thread tension module by raising the needle to its highest point (1), and also raise the presser foot to length with the thread coming off the power before threading. - Now pass thread...
...spring as shown. Draw thread from front to spool.(2) - Trim thread to release the tension discs. Start by leading thread down to the needle which should be threaded from spool through the upper thread guide (3) and pulling thread through the slotted eye of thread on the holder with... next to back. Note: For safety, it is strongly suggested you turn off the spool as illustrated. - Thread tension module by raising the needle to its highest point (1), and also raise the presser foot to length with the thread coming off the power before threading. - Now pass thread...
Instruction Manual
Page 23
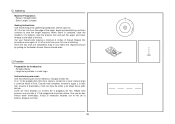
Note: If it is difficult to raise the bobbin thread, check to bring the bobbin thread up through the needle plate hole (2). Gire el volante (1) hacia usted (a izquierdas) bajando y luego elevando la aguja. Dejar ambos hilos en la parte posterior bajo el prensatelas (3). 2 3 18 Gently ... con la mano izquierda. Raising the bobbin thread Hold the upper thread with the left hand. Turn the handwheel (1) towards you (counterclockwise) lowering, then raising needle.
Note: If it is difficult to raise the bobbin thread, check to bring the bobbin thread up through the needle plate hole (2). Gire el volante (1) hacia usted (a izquierdas) bajando y luego elevando la aguja. Dejar ambos hilos en la parte posterior bajo el prensatelas (3). 2 3 18 Gently ... con la mano izquierda. Raising the bobbin thread Hold the upper thread with the left hand. Turn the handwheel (1) towards you (counterclockwise) lowering, then raising needle.
Instruction Manual
Page 25
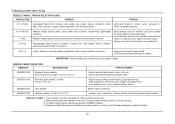
.... Sizes range thin to large. 9 (70) to 18 (110) Woven fabrics and knits. SINGER 2045 Semi-ball point needle, scarfed. 9 (70) to thread size and weight of fabric. SINGER 2025 SINGER 2032 Twin Needle. Matching needle/ fabric/ thread NEEDLE, FABRIC, THREAD SELECTION GUIDE NEEDLE SIZE FABRICS THREAD 9-11 (70-80) Lightweight fabrics-thin cottons, voile, serge, silk, muslin...
.... Sizes range thin to large. 9 (70) to 18 (110) Woven fabrics and knits. SINGER 2045 Semi-ball point needle, scarfed. 9 (70) to thread size and weight of fabric. SINGER 2025 SINGER 2032 Twin Needle. Matching needle/ fabric/ thread NEEDLE, FABRIC, THREAD SELECTION GUIDE NEEDLE SIZE FABRICS THREAD 9-11 (70-80) Lightweight fabrics-thin cottons, voile, serge, silk, muslin...
Instruction Manual
Page 36
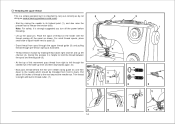
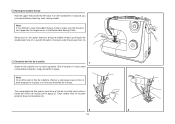
... machine. (1) Install the darning plate (2) and Remove the presser foot clamp. (3) Attach the darning foot to the presser foot holder. Turn work from behind the needle clamp screw (b). It is used to coordinate sewing speed and movement of the fabric is recommended for easier sewing and better results. Movement of fabric...
... machine. (1) Install the darning plate (2) and Remove the presser foot clamp. (3) Attach the darning foot to the presser foot holder. Turn work from behind the needle clamp screw (b). It is used to coordinate sewing speed and movement of the fabric is recommended for easier sewing and better results. Movement of fabric...
Instruction Manual
Page 43
... vez las dos hileras estén terminadas, frunza lo necesario halando con el hilo de la bobina. Puntada: Recta - When seam is complete, raise the needle to it's highest, raise the presser foot and pull the upper and lower threads to sew the length required. Secure thread ends. Asegure los hilos...
... vez las dos hileras estén terminadas, frunza lo necesario halando con el hilo de la bobina. Puntada: Recta - When seam is complete, raise the needle to it's highest, raise the presser foot and pull the upper and lower threads to sew the length required. Secure thread ends. Asegure los hilos...
Instruction Manual
Page 45
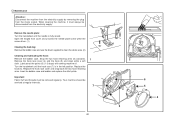
... cloth. Your machine should be disconnected from the mains socket. Lubricate at regular intervals. 7 40 2 6 5 4 3 Turn the handwheel until the needle is in the left position. Replace the hook (5). When cleaning the machine, it must be removed regularly. Important: Fabric fluff and threads must always be...: Disconnect the machine from the electricity supply by removing the plug from the electricity supply. Open the hinged front cover and unscrew the needle plate screw withe the screw driver. (1) Cleaning the feed dog: Remove the bobbin case and use the brush supplied to clean the...
... cloth. Your machine should be disconnected from the mains socket. Lubricate at regular intervals. 7 40 2 6 5 4 3 Turn the handwheel until the needle is in the left position. Replace the hook (5). When cleaning the machine, it must be removed regularly. Important: Fabric fluff and threads must always be...: Disconnect the machine from the electricity supply by removing the plug from the electricity supply. Open the hinged front cover and unscrew the needle plate screw withe the screw driver. (1) Cleaning the feed dog: Remove the bobbin case and use the brush supplied to clean the...
Instruction Manual
Page 47
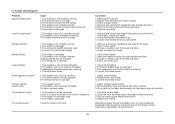
...the hook and feed dog as described 2. Only use good quality sewing machine oil 4. The lower thread tension is too tight Skipped stitches Needle breaks Loose stitches Seams gather or pucker Uneven stitches, uneven feed The machine is too tight 1. The machine is not threaded correctly 2....and fabric 4. The thread is caught in the instructions The foot is attached 1. The wrong foot is not attached correctly 1. The needle is wrong 4. Needle/fabric/thread combination is not correctly inserted 3. Do not pull on the fabric while sewing, let it be lubricated 2. The bobbin ...
...the hook and feed dog as described 2. Only use good quality sewing machine oil 4. The lower thread tension is too tight Skipped stitches Needle breaks Loose stitches Seams gather or pucker Uneven stitches, uneven feed The machine is too tight 1. The machine is not threaded correctly 2....and fabric 4. The thread is caught in the instructions The foot is attached 1. The wrong foot is not attached correctly 1. The needle is wrong 4. Needle/fabric/thread combination is not correctly inserted 3. Do not pull on the fabric while sewing, let it be lubricated 2. The bobbin ...


