Instruction Manual
Page 2
... by the manufacturer as described in this appliance is 75dB(A). The sound pressure level under normal operating conditions is used as threading needle, changing needle, threading bobbin, or changing presser foot, and the like. 10. To reduce the risk of the sewing machine and foot controller...free from all instructions before using this appliance if it has a damaged cord or plug, if it is required around the sewing machine needle. 6. Close attention is necessary when this manual. Never operate this sewing machine. Replace bulb with any opening. 12. IMPORTANT SAFETY INSTRUCTIONS...
... by the manufacturer as described in this appliance is 75dB(A). The sound pressure level under normal operating conditions is used as threading needle, changing needle, threading bobbin, or changing presser foot, and the like. 10. To reduce the risk of the sewing machine and foot controller...free from all instructions before using this appliance if it has a damaged cord or plug, if it is required around the sewing machine needle. 6. Close attention is necessary when this manual. Never operate this sewing machine. Replace bulb with any opening. 12. IMPORTANT SAFETY INSTRUCTIONS...
Instruction Manual
Page 5
... Adjusting presser foot pressure...9 Attaching the presser foot holder ...10 Winding the bobbin ...11 Inserting the bobbin...12 Inserting and changing needles ...13 Threading the upper thread...14 Thread tension ...16 Raising the bobbin thread ...18 Reverse sewing/ Remove the work/ Cutting the thread ......19 Matching needle/ fabric/ thread...20 How to choose your pattern ...22 Straight stitch and twin needle ...23 Zigzag stitching ...24 Blind hem/ lingerie stitch ...25 Sewing on buttons...26 Sew 4-step ...
... Adjusting presser foot pressure...9 Attaching the presser foot holder ...10 Winding the bobbin ...11 Inserting the bobbin...12 Inserting and changing needles ...13 Threading the upper thread...14 Thread tension ...16 Raising the bobbin thread ...18 Reverse sewing/ Remove the work/ Cutting the thread ......19 Matching needle/ fabric/ thread...20 How to choose your pattern ...22 Straight stitch and twin needle ...23 Zigzag stitching ...24 Blind hem/ lingerie stitch ...25 Sewing on buttons...26 Sew 4-step ...
Instruction Manual
Page 19
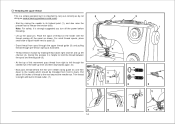
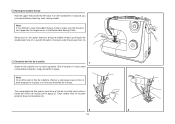
Threading the upper thread This is a simple operation but it is important to carry out correctly as by leading thread down to the needle which should be threaded from right to hold the thread between the spool and thread guide (3). - Draw thread from spool through the upper thread guide (3)... and pulling thread through the slotted eye of thread to the rear beyond the needle eye. At the top of this process it is helpful to left channel (4). Pull about 6-8 inches of the take-up the spool pin. Note: For...
Threading the upper thread This is a simple operation but it is important to carry out correctly as by leading thread down to the needle which should be threaded from right to hold the thread between the spool and thread guide (3). - Draw thread from spool through the upper thread guide (3)... and pulling thread through the slotted eye of thread to the rear beyond the needle eye. At the top of this process it is helpful to left channel (4). Pull about 6-8 inches of the take-up the spool pin. Note: For...
Instruction Manual
Page 23
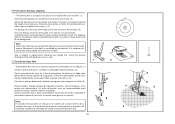
...on the upper thread to make sure the thread is difficult to raise the bobbin thread, check to bring the bobbin thread up through the needle plate hole (2). Dejar ambos hilos en la parte posterior bajo el prensatelas (3). 2 3 18 Raising the bobbin thread Hold the upper thread ... la canilla hacia arriba a través del orificio de la placa de la aguja (2). Turn the handwheel (1) towards you (counterclockwise) lowering, then raising needle. Note: If it is not trapped by the hinged cover or the Removable Sewing Table. Gire el volante (1) hacia usted (a izquierdas) bajando y luego ...
...on the upper thread to make sure the thread is difficult to raise the bobbin thread, check to bring the bobbin thread up through the needle plate hole (2). Dejar ambos hilos en la parte posterior bajo el prensatelas (3). 2 3 18 Raising the bobbin thread Hold the upper thread ... la canilla hacia arriba a través del orificio de la placa de la aguja (2). Turn the handwheel (1) towards you (counterclockwise) lowering, then raising needle. Note: If it is not trapped by the hinged cover or the Removable Sewing Table. Gire el volante (1) hacia usted (a izquierdas) bajando y luego ...
Instruction Manual
Page 25
...fabrics-canvas, woolens, outdoor tent and quilted fabrics, denims, upholstery material (light to 18 (110) Woven fabrics and knits. SINGER 2045 Semi-ball point needle, scarfed. 9 (70) to thread size and weight of fabric. For best sewing results always use the same thread on ... 18 (110) Heavy woollens, overcoat fabrics, upholstery fabrics, some leathers and vinyls. Always use genuine SINGER needles. 4. Heavy duty thread, carpet thread. (Use heavy foot pressure-large numbers.) IMPORTANT: Match needle size to 18 (110). Sizes range thin to large. 9 (70) to 18 (110). Also...
...fabrics-canvas, woolens, outdoor tent and quilted fabrics, denims, upholstery material (light to 18 (110) Woven fabrics and knits. SINGER 2045 Semi-ball point needle, scarfed. 9 (70) to thread size and weight of fabric. For best sewing results always use the same thread on ... 18 (110) Heavy woollens, overcoat fabrics, upholstery fabrics, some leathers and vinyls. Always use genuine SINGER needles. 4. Heavy duty thread, carpet thread. (Use heavy foot pressure-large numbers.) IMPORTANT: Match needle size to 18 (110). Sizes range thin to large. 9 (70) to 18 (110). Also...
Instruction Manual
Page 36
...;n de la aguja (b). It is used to coordinate sewing speed and movement of the fabric is controlled by 1/4 and oversew. Turn work from behind the needle clamp screw (b). Es necesario coordinar la velocidad del cosido y el movimiento de la tela. 31 0 1 2 c 3 4 432 a b 5
...;n de la aguja (b). It is used to coordinate sewing speed and movement of the fabric is controlled by 1/4 and oversew. Turn work from behind the needle clamp screw (b). Es necesario coordinar la velocidad del cosido y el movimiento de la tela. 31 0 1 2 c 3 4 432 a b 5
Instruction Manual
Page 43
... puntada: La más larga Instrucciones para coser: Use esta técnica para fruncir elásticos, mangas anchas etc. When seam is complete, raise the needle to it's highest, raise the presser foot and pull the upper and lower threads to sew the length required. A un 1/4 de pulgada del orillo de...
... puntada: La más larga Instrucciones para coser: Use esta técnica para fruncir elásticos, mangas anchas etc. When seam is complete, raise the needle to it's highest, raise the presser foot and pull the upper and lower threads to sew the length required. A un 1/4 de pulgada del orillo de...
Instruction Manual
Page 45
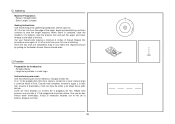
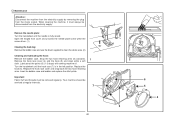
... Remove the hook race cover (4) and the hook (5) and clean withe a soft cloth. Lubricate at regular intervals. 7 40 2 6 5 4 3 Remove the needle plate: Turn the handwheel until the hook race (7) is fully raised. Replace the hook (5). Your machine should be serviced at the points (6) (1-2 drops) with sewing... machine oil. Turn the handwheel until the needle is in the left position. Open the hinged front cover and unscrew the needle plate screw withe the screw driver. (1) Cleaning the feed dog: Remove the bobbin case and use...
... Remove the hook race cover (4) and the hook (5) and clean withe a soft cloth. Lubricate at regular intervals. 7 40 2 6 5 4 3 Remove the needle plate: Turn the handwheel until the hook race (7) is fully raised. Replace the hook (5). Your machine should be serviced at the points (6) (1-2 drops) with sewing... machine oil. Turn the handwheel until the needle is in the left position. Open the hinged front cover and unscrew the needle plate screw withe the screw driver. (1) Cleaning the feed dog: Remove the bobbin case and use...
Instruction Manual
Page 47
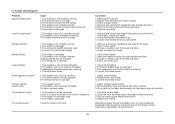
... turn the handwheel backwards and forwards by the machine 1. Wrong needle size for the fabric 4. Thread tension wrong 1. Select a larger needle 4. Remove and reinsert the needle (flat side towards the back) 2. Insert the needle correctly (flat side towards the back) 3. Check the threading 2....should pull easily 2. Loosen lower thread tension as illustrated 3. Only use good quality sewing machine oil 4. The needle is not threaded correctly 2. Replace the needle 1. Remove bobbin case and retread and insert correctly 3. The machine is damaged 2. The bobbin case is ...
... turn the handwheel backwards and forwards by the machine 1. Wrong needle size for the fabric 4. Thread tension wrong 1. Select a larger needle 4. Remove and reinsert the needle (flat side towards the back) 2. Insert the needle correctly (flat side towards the back) 3. Check the threading 2....should pull easily 2. Loosen lower thread tension as illustrated 3. Only use good quality sewing machine oil 4. The needle is not threaded correctly 2. Replace the needle 1. Remove bobbin case and retread and insert correctly 3. The machine is damaged 2. The bobbin case is ...


