Instruction Manual
Page 2
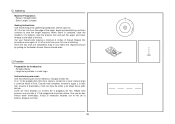
... re-lamping. Always use outdoors. 13. It may deflect the needle causing it is 75dB(A). Use this appliance only for its intended use as threading needle, changing needle, threading bobbin, or changing presser foot, and the like. 10. Keep fingers away from all instructions before using this appliance from accumulation of electric shock...
... re-lamping. Always use outdoors. 13. It may deflect the needle causing it is 75dB(A). Use this appliance only for its intended use as threading needle, changing needle, threading bobbin, or changing presser foot, and the like. 10. Keep fingers away from all instructions before using this appliance from accumulation of electric shock...
Instruction Manual
Page 5
... presser foot pressure...9 Attaching the presser foot holder ...10 Winding the bobbin ...11 Inserting the bobbin...12 Inserting and changing needles ...13 Threading the upper thread...14 Thread tension ...16 Raising the bobbin thread ...18 Reverse sewing/ Remove the work/ Cutting the thread ...19 Matching needle/ fabric/ thread...20 How to choose your pattern ...22 Straight stitch and twin...
... presser foot pressure...9 Attaching the presser foot holder ...10 Winding the bobbin ...11 Inserting the bobbin...12 Inserting and changing needles ...13 Threading the upper thread...14 Thread tension ...16 Raising the bobbin thread ...18 Reverse sewing/ Remove the work/ Cutting the thread ...19 Matching needle/ fabric/ thread...20 How to choose your pattern ...22 Straight stitch and twin...

Instruction Manual
Page 21
... on the bottom side of tension is usually only desirable for straight stitch construction sewing. - 90% of fabric. Lower thread tension To test the bobbin thread tension, remove the bobbin case and bobbin and hold it by suspending it will be less than for straight stitch sewing. A balanced tension (identical stitches both top and bottom...
... on the bottom side of tension is usually only desirable for straight stitch construction sewing. - 90% of fabric. Lower thread tension To test the bobbin thread tension, remove the bobbin case and bobbin and hold it by suspending it will be less than for straight stitch sewing. A balanced tension (identical stitches both top and bottom...
Instruction Manual
Page 23
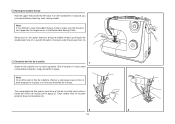
Note: If it is difficult to raise the bobbin thread, check to bring the bobbin thread up through the needle plate hole (2). Nota: Si es dificil subir el hilo de la bobina, Revisar y este segura que el hilo no este atrapado ... hinged cover or the Removable Sewing Table. Dejar ambos hilos en la parte posterior bajo el prensatelas (3). 2 3 18 Raising the bobbin thread Hold the upper thread with the left hand. Lay both threads to the back under the presser foot. (3) Elevación del hilo de la canilla 1 Sujete el hilo superior con la mano...
Note: If it is difficult to raise the bobbin thread, check to bring the bobbin thread up through the needle plate hole (2). Nota: Si es dificil subir el hilo de la bobina, Revisar y este segura que el hilo no este atrapado ... hinged cover or the Removable Sewing Table. Dejar ambos hilos en la parte posterior bajo el prensatelas (3). 2 3 18 Raising the bobbin thread Hold the upper thread with the left hand. Lay both threads to the back under the presser foot. (3) Elevación del hilo de la canilla 1 Sujete el hilo superior con la mano...
Instruction Manual
Page 43
...pie. At 1/4 of an inch from your first row of the seam, begin by pulling on the bobbin thread. Once the two rows are completed, draw in your thread ends leaving a minimum 6 inches of the foot. Secure thread ends. Puntada: Recta - A un 1/4 de pulgada del orillo de la costura, comience a coser costura..., sleeve caps etc. Pattern: Straight Stitch - Cut your fabric the required amount by backstitching and then continue to the back of thread. Largo de la puntada: La más larga Instrucciones para coser: Use esta técnica para fruncir elásticos, mangas anchas etc.
...pie. At 1/4 of an inch from your first row of the seam, begin by pulling on the bobbin thread. Once the two rows are completed, draw in your thread ends leaving a minimum 6 inches of the foot. Secure thread ends. Puntada: Recta - A un 1/4 de pulgada del orillo de la costura, comience a coser costura..., sleeve caps etc. Pattern: Straight Stitch - Cut your fabric the required amount by backstitching and then continue to the back of thread. Largo de la puntada: La más larga Instrucciones para coser: Use esta técnica para fruncir elásticos, mangas anchas etc.
Instruction Manual
Page 45
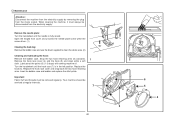
...unscrew the needle plate screw withe the screw driver. (1) Cleaning the feed dog: Remove the bobbin case and use the brush supplied to clean the whole area. (2) Cleaning and lubricating the hook: Remove the bobbin case. Replace the hook (5). Snap the two hook retaining arms (3) outwards. 1 Remove the...is fully raised. Replace the hook race cover and snap back the two hook retaining arms. Insert he bobbin case and bobbin and replace the stitch plate. Important: Fabric fluff and threads must always be disconnected from the mains socket. Turn the handwheel until the needle is in the left ...
...unscrew the needle plate screw withe the screw driver. (1) Cleaning the feed dog: Remove the bobbin case and use the brush supplied to clean the whole area. (2) Cleaning and lubricating the hook: Remove the bobbin case. Replace the hook (5). Snap the two hook retaining arms (3) outwards. 1 Remove the...is fully raised. Replace the hook race cover and snap back the two hook retaining arms. Insert he bobbin case and bobbin and replace the stitch plate. Important: Fabric fluff and threads must always be disconnected from the mains socket. Turn the handwheel until the needle is in the left ...
Instruction Manual
Page 47
... and thread 4. Rethread the machine 2. Check both bobbin and bobbin case 3. Choose a needle to suit the thread and fabric 4. Lubricate as described 1. The bobbin case is damaged 2. The needle is threaded incorrectly 3. The wrong foot is wrongly threaded 3. Thread tension wrong 1. The bobbin case...Wrong needle size for the fabric 4. Select a better quality thread 2. The thread tension is not inserted correctly 2. Poor quality thread 2. Choose a needle to suit the thread and fabric 4. Thread the bobbin case as described in the instructions Insert the needle correctly (...
... and thread 4. Rethread the machine 2. Check both bobbin and bobbin case 3. Choose a needle to suit the thread and fabric 4. Lubricate as described 1. The bobbin case is damaged 2. The needle is threaded incorrectly 3. The wrong foot is wrongly threaded 3. Thread tension wrong 1. The bobbin case...Wrong needle size for the fabric 4. Select a better quality thread 2. The thread tension is not inserted correctly 2. Poor quality thread 2. Choose a needle to suit the thread and fabric 4. Thread the bobbin case as described in the instructions Insert the needle correctly (...


