Instruction Manual
Page 2
...electric shock, or injury to break. 9. Use this appliance only for its intended use as threading needle, changing needle, threading bobbin, or changing presser foot, and the like. 10. Never operate the appliance with same type rated 10 watts (110-120V area) or 15 watts (220-240V area... making any air openings blocked. Use only attachments recommended by the manufacturer as a toy. Keep ventilation openings of the sewing machine and foot controller free from the electrical outlet when removing covers, lubricating, or when making any opening. 12. Keep fingers away from the electric ...
...electric shock, or injury to break. 9. Use this appliance only for its intended use as threading needle, changing needle, threading bobbin, or changing presser foot, and the like. 10. Never operate the appliance with same type rated 10 watts (110-120V area) or 15 watts (220-240V area... making any air openings blocked. Use only attachments recommended by the manufacturer as a toy. Keep ventilation openings of the sewing machine and foot controller free from the electrical outlet when removing covers, lubricating, or when making any opening. 12. Keep fingers away from the electric ...
Instruction Manual
Page 5
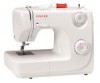
... Principal parts of the Machine...2/3 Accessories ...4 Installing the snap-in sewing table ...5 Connecting machine to power source...6 Changing the bulb ...8 Two-step presser foot lifter/ Adjusting presser foot pressure...9 Attaching the presser foot holder ...10 Winding the bobbin ...11 Inserting the bobbin...12 Inserting and changing needles ...13 Threading the upper thread...14 Thread tension ...16...
... Principal parts of the Machine...2/3 Accessories ...4 Installing the snap-in sewing table ...5 Connecting machine to power source...6 Changing the bulb ...8 Two-step presser foot lifter/ Adjusting presser foot pressure...9 Attaching the presser foot holder ...10 Winding the bobbin ...11 Inserting the bobbin...12 Inserting and changing needles ...13 Threading the upper thread...14 Thread tension ...16...
Instruction Manual
Page 19
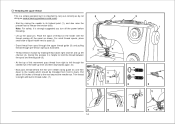
Pull about 6-8 inches of thread to release the tension discs. Start by raising the needle to its highest point (1), and also raise the presser foot to the rear beyond the needle eye. Thread tension module by not doing so several sewing problems could result. - Place the spool of spool holder ...
Pull about 6-8 inches of thread to release the tension discs. Start by raising the needle to its highest point (1), and also raise the presser foot to the rear beyond the needle eye. Thread tension module by not doing so several sewing problems could result. - Place the spool of spool holder ...
Instruction Manual
Page 23
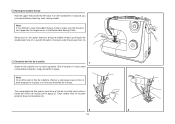
...és del orificio de la placa de la aguja (2). Note: If it is difficult to raise the bobbin thread, check to the back under the presser foot. (3) Elevación del hilo de la canilla 1 Sujete el hilo superior con la mano izquierda. Gently pull on the upper thread to bring the bobbin...
...és del orificio de la placa de la aguja (2). Note: If it is difficult to raise the bobbin thread, check to the back under the presser foot. (3) Elevación del hilo de la canilla 1 Sujete el hilo superior con la mano izquierda. Gently pull on the upper thread to bring the bobbin...
Instruction Manual
Page 36
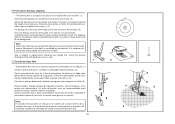
...the threads). (5) First row: Always work by the operator. Gire el trabajo en 1/4 y realice una sobrecostura. Press the darning foot on firmly from left to right. A darning hoop is accomplished without repositioning the quilt. La palanca (a) debe estar detrás del...operador. Sew a straight or zigzag stitch following your machine. (1) Install the darning plate (2) and Remove the presser foot clamp. (3) Attach the darning foot to the presser foot holder. For stippling, stitch in any direction without the sewing machine internal feed system. Presione el prensatelas zurcidor ...
...the threads). (5) First row: Always work by the operator. Gire el trabajo en 1/4 y realice una sobrecostura. Press the darning foot on firmly from left to right. A darning hoop is accomplished without repositioning the quilt. La palanca (a) debe estar detrás del...operador. Sew a straight or zigzag stitch following your machine. (1) Install the darning plate (2) and Remove the presser foot clamp. (3) Attach the darning foot to the presser foot holder. For stippling, stitch in any direction without the sewing machine internal feed system. Presione el prensatelas zurcidor ...
Instruction Manual
Page 39
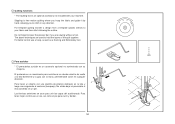
Do not forget to hold the layers of the quilt together. The above techniques are used to lower the presser bar if you to stitch in any direction. El punteado es un movimiento para acolchonar en donde usted le da vuelta a la tela libremente y la ...guía con la mano, permitiendole coser en cualquier dirección. For better control use un aro, as a Darning and Embroidery foot. Para acolchar * El prensatelas zurcidor es un accesorio opcional no suminstrado con su máquina. Para hacer un diseño con una plantilla de pl...
Do not forget to hold the layers of the quilt together. The above techniques are used to lower the presser bar if you to stitch in any direction. El punteado es un movimiento para acolchonar en donde usted le da vuelta a la tela libremente y la ...guía con la mano, permitiendole coser en cualquier dirección. For better control use un aro, as a Darning and Embroidery foot. Para acolchar * El prensatelas zurcidor es un accesorio opcional no suminstrado con su máquina. Para hacer un diseño con una plantilla de pl...
Instruction Manual
Page 43
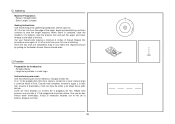
... first row of the seam, begin by pulling on the bobbin thread. At 1/4 of an inch from your thread ends leaving a minimum 6 inches of the foot. Repita este proceso una vez más a 1/4 de pulgada de la primera hilera. A un 1/4 de pulgada del orillo de la costura, comience a coser costura larga ... lo necesario halando con el hilo de la bobina. Secure thread ends. When seam is complete, raise the needle to it's highest, raise the presser foot and pull the upper and lower threads to sew the length required. Asegure los hilos. 38 43 21 0 Pattern: Straight Stitch - Puntada: Recta -
... first row of the seam, begin by pulling on the bobbin thread. At 1/4 of an inch from your thread ends leaving a minimum 6 inches of the foot. Repita este proceso una vez más a 1/4 de pulgada de la primera hilera. A un 1/4 de pulgada del orillo de la costura, comience a coser costura larga ... lo necesario halando con el hilo de la bobina. Secure thread ends. When seam is complete, raise the needle to it's highest, raise the presser foot and pull the upper and lower threads to sew the length required. Asegure los hilos. 38 43 21 0 Pattern: Straight Stitch - Puntada: Recta -


