Instruction Manual
Page 2
...before using this appliance is used or where oxygen is intended for examination, repair, electrical or mechanical adjustment. 4. Always unplug sewing machine from outlet. 15. Do not operate where aerosol spray products are being administered. 14. To unplug, grasp the plug, not...user servicing adjustments mentioned in . 2. Do not use only. DANGER- WARNING- Keep fingers away from accumulation of the sewing machine and foot controller free from all instructions before re-lamping. Special care is 75dB(A). IMPORTANT SAFETY INSTRUCTIONS When using an electrical appliance...
...before using this appliance is used or where oxygen is intended for examination, repair, electrical or mechanical adjustment. 4. Always unplug sewing machine from outlet. 15. Do not operate where aerosol spray products are being administered. 14. To unplug, grasp the plug, not...user servicing adjustments mentioned in . 2. Do not use only. DANGER- WARNING- Keep fingers away from accumulation of the sewing machine and foot controller free from all instructions before re-lamping. Special care is 75dB(A). IMPORTANT SAFETY INSTRUCTIONS When using an electrical appliance...

Instruction Manual
Page 5
List of contents Principal parts of the Machine...2/3 Accessories ...4 Installing the snap-in sewing table ...5 Connecting machine to power source...6 Changing the bulb ...8 Two-step presser foot lifter/ Adjusting presser foot pressure...9 Attaching the presser foot holder ...10 Winding the bobbin ...11 ...
List of contents Principal parts of the Machine...2/3 Accessories ...4 Installing the snap-in sewing table ...5 Connecting machine to power source...6 Changing the bulb ...8 Two-step presser foot lifter/ Adjusting presser foot pressure...9 Attaching the presser foot holder ...10 Winding the bobbin ...11 ...
Instruction Manual
Page 11
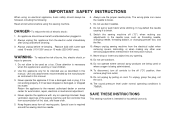
...plug in doubt as illustrated. (1) This appliance is equipped with a polarized plug which must be grounded 2 3 6 Unplug power cord when machine is wider than the other). To reduce the risk of electric shock, this plug is not in the outlet, reverse the plug. Foot control...foot control pedal regulates the sewing speed. (3) Attention: Consult a qualified electrician if in any way. Connecting machine to power source Connect the machine to a power source as to connect machine to power source. If it still does not fit, contact a qualified electrician to install the proper outlet....
...plug in doubt as illustrated. (1) This appliance is equipped with a polarized plug which must be grounded 2 3 6 Unplug power cord when machine is wider than the other). To reduce the risk of electric shock, this plug is not in the outlet, reverse the plug. Foot control...foot control pedal regulates the sewing speed. (3) Attention: Consult a qualified electrician if in any way. Connecting machine to power source Connect the machine to a power source as to connect machine to power source. If it still does not fit, contact a qualified electrician to install the proper outlet....
Instruction Manual
Page 13
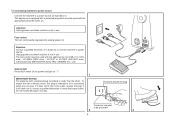
...;n principal retirando el conector desde la toma de corriente. Should there be any problem, ask your local dealer for advice. Changing the bulb Disconnect the machine from the power supply by removing the plug from the main socket! Remove the face plate (B). - Replace the face plate and tighten screw. Afloje el...
...;n principal retirando el conector desde la toma de corriente. Should there be any problem, ask your local dealer for advice. Changing the bulb Disconnect the machine from the power supply by removing the plug from the main socket! Remove the face plate (B). - Replace the face plate and tighten screw. Afloje el...
Instruction Manual
Page 36
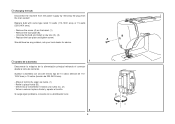
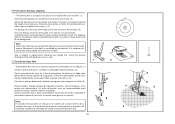
..., desde detrás con el dedo índice y apriete el tornillo (c) (4). For stippling, stitch in any direction without the sewing machine internal feed system. Sew a straight or zigzag stitch following your machine. (1) Install the darning plate (2) and Remove the presser foot clamp. (3) Attach the darning foot to coordinate sewing speed and movement...
..., desde detrás con el dedo índice y apriete el tornillo (c) (4). For stippling, stitch in any direction without the sewing machine internal feed system. Sew a straight or zigzag stitch following your machine. (1) Install the darning plate (2) and Remove the presser foot clamp. (3) Attach the darning foot to coordinate sewing speed and movement...
Instruction Manual
Page 39
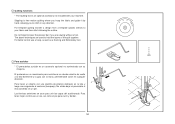
.... Quilting functions * The Quilting foot is free motion quilting where you hoop the fabric and guide it by hand, allowing you are used to your machine. For better control use un aro, as a Darning and Embroidery foot. Para tener mejor control use a hoop, as well as í como el pie para...
.... Quilting functions * The Quilting foot is free motion quilting where you hoop the fabric and guide it by hand, allowing you are used to your machine. For better control use un aro, as a Darning and Embroidery foot. Para tener mejor control use a hoop, as well as í como el pie para...
Instruction Manual
Page 43
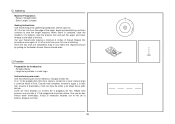
... the bobbin thread. Secure thread ends. Fruncido Preparación de la máquina: - Corte los hilos dejando un mínimo de 6 pulgadas de hilo. Gathering Machine Preparation: - A un 1/4 de pulgada del orillo de la costura, comience a coser costura larga y continúe hasta el final. Cut your fabric the required amount by...
... the bobbin thread. Secure thread ends. Fruncido Preparación de la máquina: - Corte los hilos dejando un mínimo de 6 pulgadas de hilo. Gathering Machine Preparation: - A un 1/4 de pulgada del orillo de la costura, comience a coser costura larga y continúe hasta el final. Cut your fabric the required amount by...
Instruction Manual
Page 45
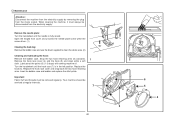
... the mains socket. Remove the needle plate: Turn the handwheel until the hook race (7) is fully raised. Maintenance Attention: Disconnect the machine from the electricity supply by removing the plug from the electricity supply. Replace the hook (5). Open the hinged front cover and unscrew the... and replace the stitch plate. Turn the handwheel until the needle is in the left position. When cleaning the machine, it must be serviced at the points (6) (1-2 drops) with sewing machine oil. Snap the two hook retaining arms (3) outwards. 1 Remove the hook race cover (4) and the hook ...
... the mains socket. Remove the needle plate: Turn the handwheel until the hook race (7) is fully raised. Maintenance Attention: Disconnect the machine from the electricity supply by removing the plug from the electricity supply. Replace the hook (5). Open the hinged front cover and unscrew the... and replace the stitch plate. Turn the handwheel until the needle is in the left position. When cleaning the machine, it must be serviced at the points (6) (1-2 drops) with sewing machine oil. Snap the two hook retaining arms (3) outwards. 1 Remove the hook race cover (4) and the hook ...
Instruction Manual
Page 47
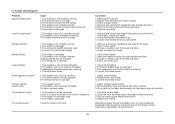
...towards the back) 3. Check and attach correctly 1. Select a better quality thread 2. The bobbin case is not attached correctly 1. Rethread the machine 2. Reduce the thread tension (lower number) 3. Loosen lower thread tension as described 2. Choose a needle to suit the thread and fabric...Fluff or oil have collected on the thread. The thread should pull easily 2. Select the correct foot 1. Only use good quality sewing machine oil 4. The thread is not correctly threaded 2. The needle is damaged 2. The needle is not inserted correctly 2. Select a larger ...
...towards the back) 3. Check and attach correctly 1. Select a better quality thread 2. The bobbin case is not attached correctly 1. Rethread the machine 2. Reduce the thread tension (lower number) 3. Loosen lower thread tension as described 2. Choose a needle to suit the thread and fabric...Fluff or oil have collected on the thread. The thread should pull easily 2. Select the correct foot 1. Only use good quality sewing machine oil 4. The thread is not correctly threaded 2. The needle is damaged 2. The needle is not inserted correctly 2. Select a larger ...


