Instruction Manual
Page 3
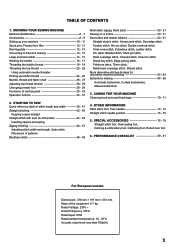
... - 13 Converting to free-arm sewing 14 - 15 Large extension table 14 - 15 Winding the bobbin 16 - 17 Threading the bobbin thread 18 - 19 Threading the top thread 20 - 23 Using automatic needle threader Picking up bobbin thread 24 - 25 Needle, thread and fabric chart 26 - 27 Adjusting top thread tension 28 - 29...
... - 13 Converting to free-arm sewing 14 - 15 Large extension table 14 - 15 Winding the bobbin 16 - 17 Threading the bobbin thread 18 - 19 Threading the top thread 20 - 23 Using automatic needle threader Picking up bobbin thread 24 - 25 Needle, thread and fabric chart 26 - 27 Adjusting top thread tension 28 - 29...
Instruction Manual
Page 6
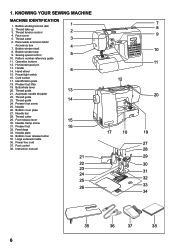
...control 2 4. Operation buttons 12. Horizontal spool pin 13. Presser foot lifter 19. Thread guide 23. Thread guide 14 24. Presser foot 16 32. Bobbin cover release button 35. Foot control 38. Instruction manual 21 22 23 24 25 26 12 17 18 7 8 9 10 11 20 19 27 ...28 29 30 31 32 33 34 35 36 37 38 6 Bobbin winding tension disk 1 2. Sewing speed control 5 10. Thread guide 13 21. Bobbin cover plate 27. Needle plate 34. Thread cutter 3 6. Removable extension table/ Accessory box 4 7. Buttonhole lever 20. ...
...control 2 4. Operation buttons 12. Horizontal spool pin 13. Presser foot lifter 19. Thread guide 23. Thread guide 14 24. Presser foot 16 32. Bobbin cover release button 35. Foot control 38. Instruction manual 21 22 23 24 25 26 12 17 18 7 8 9 10 11 20 19 27 ...28 29 30 31 32 33 34 35 36 37 38 6 Bobbin winding tension disk 1 2. Sewing speed control 5 10. Thread guide 13 21. Bobbin cover plate 27. Needle plate 34. Thread cutter 3 6. Removable extension table/ Accessory box 4 7. Buttonhole lever 20. ...
Instruction Manual
Page 8
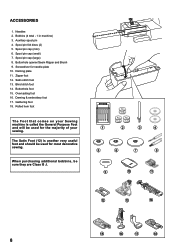
... & embroidery foot 17. The Satin Foot (12) is called the General Purpose Foot and will be used for most decorative sewing. ACCESSORIES 1. When purchasing additional bobbins, be used for needle plate 10. Spool pin cap (small) 7. Spool pin cap (large) 8. Blind stitch foot 14. Buttonhole foot 15. Overcasting foot 16. Buttonhole...
... & embroidery foot 17. The Satin Foot (12) is called the General Purpose Foot and will be used for most decorative sewing. ACCESSORIES 1. When purchasing additional bobbins, be used for needle plate 10. Spool pin cap (small) 7. Spool pin cap (large) 8. Blind stitch foot 14. Buttonhole foot 15. Overcasting foot 16. Buttonhole...
Instruction Manual
Page 16
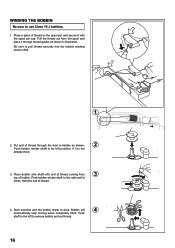
...the spool and place it is not already there. 3. Hold the end of thread through thread guides as shown in bobbin as shown. 2 Push bobbin winder shaft to wind. Bobbin will 4 automatically stop turning when completely filled. Push shaft to the left position, if it through the hole in ...illustration. WINDING THE BOBBIN Be sure to remove bobbin and cut thread. 16 Place a spool of thread on the spool pin, and secure it clicks. Be sure to the right...
...the spool and place it is not already there. 3. Hold the end of thread through thread guides as shown in bobbin as shown. 2 Push bobbin winder shaft to wind. Bobbin will 4 automatically stop turning when completely filled. Push shaft to the left position, if it through the hole in ...illustration. WINDING THE BOBBIN Be sure to remove bobbin and cut thread. 16 Place a spool of thread on the spool pin, and secure it clicks. Be sure to the right...
Instruction Manual
Page 18
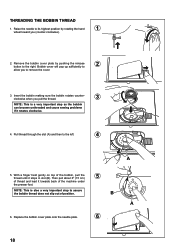
...Then pull about 6" (15 cm) 5 of thread and lead it towards back of the bobbin, pull the thread until it rotates clockwise. 4. Replace the bobbin cover plate onto the needle plate. 6 18 Bobbin cover will pop up sufficiently to 2 allow you to its highest position by pushing the release ...unthreaded and cause sewing problems if it stops in slot (B). Pull thread through the slot (A) and then to assure the bobbin thread does not slip out of position. B A 6. Remove the bobbin cover plate by rotating the hand 1 wheel toward you pull the thread. 3 NOTE: This is also a very ...
...Then pull about 6" (15 cm) 5 of thread and lead it towards back of the bobbin, pull the thread until it rotates clockwise. 4. Replace the bobbin cover plate onto the needle plate. 6 18 Bobbin cover will pop up sufficiently to 2 allow you to its highest position by pushing the release ...unthreaded and cause sewing problems if it stops in slot (B). Pull thread through the slot (A) and then to assure the bobbin thread does not slip out of position. B A 6. Remove the bobbin cover plate by rotating the hand 1 wheel toward you pull the thread. 3 NOTE: This is also a very ...

Instruction Manual
Page 24
... needle comes to its highest position. Holding needle thread loosely with the needle "fully up . Lightly pull up the top thread, and pick up the bobbin thread is one of the features of the machine under the presser foot, leaving about 6" 4 (15 cm) clear. 24 NOTE: A quick way to pick... up bobbin thread, 3 which will perform one down-up cycle and stop with the needle up " is , with your computer sewing machine. 3. Raise the presser foot lifter. 1 ...
... needle comes to its highest position. Holding needle thread loosely with the needle "fully up . Lightly pull up the top thread, and pick up the bobbin thread is one of the features of the machine under the presser foot, leaving about 6" 4 (15 cm) clear. 24 NOTE: A quick way to pick... up bobbin thread, 3 which will perform one down-up cycle and stop with the needle up " is , with your computer sewing machine. 3. Raise the presser foot lifter. 1 ...
Instruction Manual
Page 26
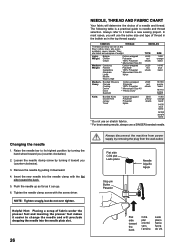
The following table is a practical guide to it can be of weight. In most cases, you will use a SINGER branded needle. FABRICS THREAD The fabrics below can go. 6. Corduroy Weight Flannel Gabardine Gingham Linen Muslin Wool Crepe Cotton-wrapped Polyester 100% Polyester...plano Needle Aiguille Aguja Stop pin Butée Pasador Flat side toward you (counter-clockwise). 2. Helpful Hint: Placing a scrap of thread in the bobbin as it before a new sewing project. NEEDLE, THREAD AND FABRIC CHART Your fabric will preclude dropping the needle into the needle clamp with the screw...
The following table is a practical guide to it can be of weight. In most cases, you will use a SINGER branded needle. FABRICS THREAD The fabrics below can go. 6. Corduroy Weight Flannel Gabardine Gingham Linen Muslin Wool Crepe Cotton-wrapped Polyester 100% Polyester...plano Needle Aiguille Aguja Stop pin Butée Pasador Flat side toward you (counter-clockwise). 2. Helpful Hint: Placing a scrap of thread in the bobbin as it before a new sewing project. NEEDLE, THREAD AND FABRIC CHART Your fabric will preclude dropping the needle into the needle clamp with the screw...
Instruction Manual
Page 28
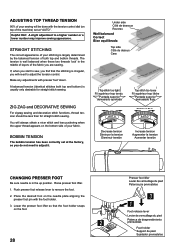
... du pied Sujetador prensatelas Make any adjustments with the foot holder. 3. A balanced tension (identical stitches both top and bobbin threads. The tension is usually only desirable for straight stitch sewing. BOBBIN TENSION The bobbin tension has been correctly set at the factory, so you do not need to sew, you will be less...
... du pied Sujetador prensatelas Make any adjustments with the foot holder. 3. A balanced tension (identical stitches both top and bobbin threads. The tension is usually only desirable for straight stitch sewing. BOBBIN TENSION The bobbin tension has been correctly set at the factory, so you do not need to sew, you will be less...
Instruction Manual
Page 32
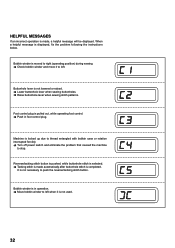
... switch and eliminate the problem that caused the machine to stop. Machine is displayed, fix the problem following the instructions below. Bobbin winder is in foot control plug. Foot control plug is not used. 32 Buttonhole lever is completed. Reverse/tacking stitch button is... Lower buttonhole lever when sewing buttonholes. Raise buttonhole lever when sewing stitch patterns. Bobbin winder is moved to right (operating position) during sewing. Check bobbin winder and move it is pulled out, while operating foot control. Push in operation. &#...
... switch and eliminate the problem that caused the machine to stop. Machine is displayed, fix the problem following the instructions below. Bobbin winder is in foot control plug. Foot control plug is not used. 32 Buttonhole lever is completed. Reverse/tacking stitch button is... Lower buttonhole lever when sewing buttonholes. Raise buttonhole lever when sewing stitch patterns. Bobbin winder is moved to right (operating position) during sewing. Check bobbin winder and move it is pulled out, while operating foot control. Push in operation. &#...
Instruction Manual
Page 42
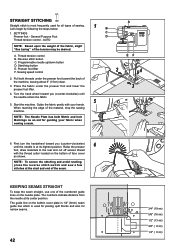
... the edge of the tension may be desired. KEEPING SEAMS STRAIGHT To keep the seam straight, use one of the numbered guide lines on the bobbin cover plate is 1/4" (6mm) seam guide line which is at the start and end of face cover as an aid for all types of the...
... the edge of the tension may be desired. KEEPING SEAMS STRAIGHT To keep the seam straight, use one of the numbered guide lines on the bobbin cover plate is 1/4" (6mm) seam guide line which is at the start and end of face cover as an aid for all types of the...
Instruction Manual
Page 46
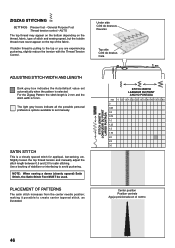
...The top thread may appear on the bottom depending on the thread, fabric, type of stitch and sewing speed, but the bobbin thread must never appear on the top of stabilizer or interfacing to create center tapered stitch, as illustrated. The light grey ...PUNTADA mm 0 0.5 1.0 1.5 2.0 2.5 3.0 3.5 4.0 4.5 5.0 5.5 6.0 0 0.25 0.5 0.75 1.0 1.25 1.5 1.75 2.0 2.5 3.0 Center position Position centrale Aguja posicionada en el centro 46 If bobbin thread is selected. Under side Côté de dessous Reverso Top side Côté de dessus Cara ADJUSTING STITCH WIDTH AND LENGTH Dark grey box...
...The top thread may appear on the bottom depending on the thread, fabric, type of stitch and sewing speed, but the bobbin thread must never appear on the top of stabilizer or interfacing to create center tapered stitch, as illustrated. The light grey ...PUNTADA mm 0 0.5 1.0 1.5 2.0 2.5 3.0 3.5 4.0 4.5 5.0 5.5 6.0 0 0.25 0.5 0.75 1.0 1.25 1.5 1.75 2.0 2.5 3.0 Center position Position centrale Aguja posicionada en el centro 46 If bobbin thread is selected. Under side Côté de dessous Reverso Top side Côté de dessus Cara ADJUSTING STITCH WIDTH AND LENGTH Dark grey box...
Instruction Manual
Page 62
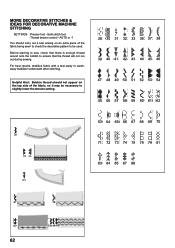
... washaway stabilizer underneath when stitching. AUTO or -1 You should not appear on an extra piece of the fabric, so it may be used. Helpful Hint: Bobbin thread should carry out a test sewing on the top side of the fabric being sewn to check the decorative pattern to be necessary to ensure... that there is enough thread wound onto the bobbin to slightly lower the tension setting. 62 Before starting to sew, check that the thread will not run out during sewing. Satin stitch foot :Thread...
... washaway stabilizer underneath when stitching. AUTO or -1 You should not appear on an extra piece of the fabric, so it may be used. Helpful Hint: Bobbin thread should carry out a test sewing on the top side of the fabric being sewn to check the decorative pattern to be necessary to ensure... that there is enough thread wound onto the bobbin to slightly lower the tension setting. 62 Before starting to sew, check that the thread will not run out during sewing. Satin stitch foot :Thread...
Instruction Manual
Page 66
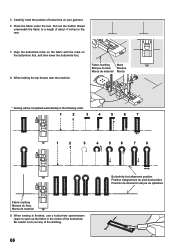
..., use a buttonhole opener/seam ripper to open up the fabric in the following order. 1 2 3 4 5 6 7 1 2 3 4 5 6 7 8 Fabric marking Marque du tissu Marca de material 9. 5. Pull out the bobbin thread underneath the fabric to a length of about 4 inches to cut any of the buttonhole.
..., use a buttonhole opener/seam ripper to open up the fabric in the following order. 1 2 3 4 5 6 7 1 2 3 4 5 6 7 8 Fabric marking Marque du tissu Marca de material 9. 5. Pull out the bobbin thread underneath the fabric to a length of about 4 inches to cut any of the buttonhole.
Instruction Manual
Page 70
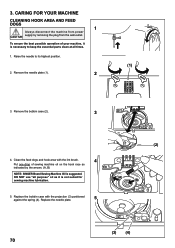
... the essential parts clean at all purpose" oil as indicated by removing the plug from power CAUTION supply by the arrows. (A, B) NOTE: SINGER Brand Sewing Machine Oil is necessary to its highest position. 2. DO NOT use "all times. 1. CARING FOR YOUR MACHINE CLEANING HOOK AREA ... 1 Always disconnect the machine from the wall-outlet. Replace the needle plate. 5 (2) (A) (B) (3) (4) 70 Remove the needle plate (1). (1) 2 3. Replace the bobbin case with the lint brush. 4 Put one drop of your machine, it is not suited for sewing machine lubrication. 5. Remove the...
... the essential parts clean at all purpose" oil as indicated by removing the plug from power CAUTION supply by the arrows. (A, B) NOTE: SINGER Brand Sewing Machine Oil is necessary to its highest position. 2. DO NOT use "all times. 1. CARING FOR YOUR MACHINE CLEANING HOOK AREA ... 1 Always disconnect the machine from the wall-outlet. Replace the needle plate. 5 (2) (A) (B) (3) (4) 70 Remove the needle plate (1). (1) 2 3. Replace the bobbin case with the lint brush. 4 Put one drop of your machine, it is not suited for sewing machine lubrication. 5. Remove the...
Instruction Manual
Page 72
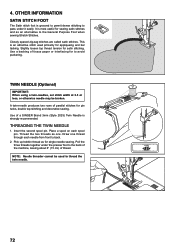
... to thread the twin needle. 72 It is an attractive stitch used to the General Purpose Foot when sewing Stretch Stitches. Use of a SINGER Brand 3mm (Style 2025) Twin Needle is grooved to permit dense stitching to pass under the presser foot to avoid puckering. Pull the three...needle produces two rows of tissue paper or interfacing for pin tucks, double top stitching and decorative sewing. Insert the second spool pin. Pick up bobbin thread as one thread through each spool pin. Use a backing of parallel stitches for to the back of the machine, leaving about 6" (15 ...
... to thread the twin needle. 72 It is an attractive stitch used to the General Purpose Foot when sewing Stretch Stitches. Use of a SINGER Brand 3mm (Style 2025) Twin Needle is grooved to permit dense stitching to pass under the presser foot to avoid puckering. Pull the three...needle produces two rows of tissue paper or interfacing for pin tucks, double top stitching and decorative sewing. Insert the second spool pin. Pick up bobbin thread as one thread through each spool pin. Use a backing of parallel stitches for to the back of the machine, leaving about 6" (15 ...
Instruction Manual
Page 80
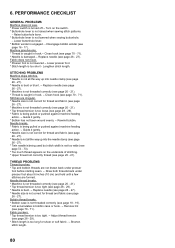
...set too wide (see page 72 - 73). * Too much thread appears on the switch. * Buttonhole lever is caught in hook. - Bobbin thread breaks. * Bobbin case is caught in hook.- Clean hook (see page 26 - 27). * Needle is damaged.- STITCHING PROBLEMS Machine skips stitches. * Needle is... 17). Turn on the underside of stitching. * Upper thread not correctly thread (see page 18 - 19). * Lint accumulates in bobbin case or hook. - Disengage bobbin winder (see page 70 - 71). PERFORMANCE CHECKLIST GENERAL PROBLEMS Machine does not sew. * Power switch is too tight. - Lengthen...
...set too wide (see page 72 - 73). * Too much thread appears on the switch. * Buttonhole lever is caught in hook. - Bobbin thread breaks. * Bobbin case is caught in hook.- Clean hook (see page 26 - 27). * Needle is damaged.- STITCHING PROBLEMS Machine skips stitches. * Needle is... 17). Turn on the underside of stitching. * Upper thread not correctly thread (see page 18 - 19). * Lint accumulates in bobbin case or hook. - Disengage bobbin winder (see page 70 - 71). PERFORMANCE CHECKLIST GENERAL PROBLEMS Machine does not sew. * Power switch is too tight. - Lengthen...
Instruction Manual
Page 84
...appliance has a polarized plug (one way. "Always unplug before using this sewing machine from the accumulation of The Singer Company Limited or its affiliates. ©2008 The Singer Company Limited or its intended use , or equivalent." To reduce the risk of electric shock:" 1. Return the ...This product is required around the sewing machine needle." 11. Use only attachments recommended by the manufacturer as threading needle, changing needle, threading bobbin, or changing presser foot, etc." 15. "Never drop or insert any adjustments in the needle area, such as contained in a ...
...appliance has a polarized plug (one way. "Always unplug before using this sewing machine from the accumulation of The Singer Company Limited or its affiliates. ©2008 The Singer Company Limited or its intended use , or equivalent." To reduce the risk of electric shock:" 1. Return the ...This product is required around the sewing machine needle." 11. Use only attachments recommended by the manufacturer as threading needle, changing needle, threading bobbin, or changing presser foot, etc." 15. "Never drop or insert any adjustments in the needle area, such as contained in a ...


