Singer 7258 Stylist Support Question
Singer 7258 Stylist Support Question
Find answers below for this question about Singer 7258 Stylist.Need a Singer 7258 Stylist manual? We have 1 online manual for this item!
Question posted by Anonymous-123220 on October 24th, 2013
What Is The Meaning For Error Code E2 On Singer Stylist Model 7258
Trying wind a bobbin and after about 3 turns it stops and give an E2 error code. Why?
Current Answers
Answer #1: Posted by TheWiz on October 24th, 2013 2:24 PM
TheWiz

Member since:
October 13th, 2011 Points: 25,383,424

Member since:
October 13th, 2011 Points: 25,383,424
An E2 error can mean different things on different machines. For your machine, we suggest the following: The problem may be that the foot control is not connected correctly to your sewing machine. The receptacle for the foot control is recessed rather than flush with the casing of the machine. When you insert the pin of the foot control you need to make sure that it is pushed all the way in. You can feel it lock or click into place twice. If you stop after the first lock or click you will think that the foot control is connected, however the connection is not complete. As a result the foot control will not react to the pressure of the foot and the machine will not run.
Try pushing the pin of the foot control into the side of the machine.
This error can also indicate an electrical problem. Check the following before you take it in for service.
Remove all thread from bobbin and upper tension area. Remove bobbin case from bobbin area and check for loose thread in that area.
Is the power cord plugged all the way in?
Is the foot control pin pushed all the way in, it must sit flush with the side of the machine.
Are you using a surge protector?
· TURN OFF THE MACHINE
· HOLD DOWN THE BACKSTITCH BUTTON WHILE POWERING ON THE MACHINE.
· YOU MAY OBTAIN ANOTHER ERROR MESSAGE, SUCH AS E 7.
· UNPLUG AND THEN REINSERT THE FOOT CONTROL.
· POWER MACHINE OFF AND THEN BACK ON AGAIN.
If the problem persists, please take your machine in for service.
Related Singer 7258 Stylist Manual Pages
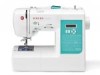
Instruction Manual - Page 3
... position 74 - 75
5. TABLE OF CONTENTS
1. KNOWING YOUR SEWING MACHINE Machine identification 6 - 7 Accessories 8 - 9 Setting up your machine 10 - 11 Spool pins, Presser foot lifter 12 - 13 Darning plate 12 - 13 Converting to free-arm sewing 14 - 15 Large extension table 14 - 15 Winding the bobbin 16 - 17 Threading the bobbin thread 18 - 19 Threading the top thread 20...
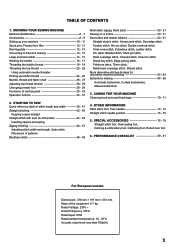
Instruction Manual - Page 6
...
38
6 Hand wheel
6
15. Bobbin cover plate
27. Sewing speed control
5
10. Handle 14. Thread cutter
29. Feed dogs
33. 1. Presser foot screw
25. Needle plate
34. Thread guide
13
21. Foot release lever
15
30. Horizontal spool pin
13. Removable extension table/
Accessory box
4
7. KNOWING YOUR SEWING MACHINE
MACHINE IDENTIFICATION
1. Power/light switch
16...
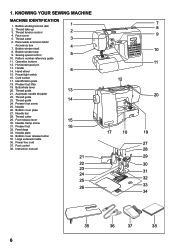
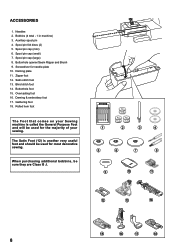
Instruction Manual - Page 8
... J.
1
2
3
4
5
6
7
8
9
10
11
12
13
14
15
16
17
18
8 Screwdriver for needle plate 10. ACCESSORIES
1. Needles 2. Darning plate 11. Overcasting foot 16. When purchasing additional bobbins, be used for the majority of your sewing. Bobbins (4 total - 1 in machine) 3. Auxiliary spool pin 4. Spool pin cap (small) 7. Blind stitch foot 14. Gathering foot 18.
Instruction Manual - Page 10
...
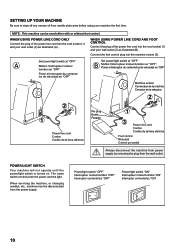
Connect the plug of the power line cord into the cord socket (1) and your wall outlet (2) as illustrated (A).
POWER/LIGHT SWITCH
Your machine will not operate until the power/light switch is turned on.
SETTING UP YOUR MACHINE
Be sure to wipe off any excess oil from needle plate area before using your...
Instruction Manual - Page 12
... foot.
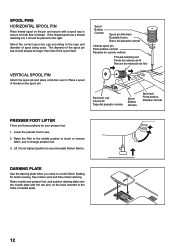
1. Raise the lifter to the middle position to insert or remove fabric, and to sew.
2. DARNING PLATE
Use the darning plate when you need to the type and diameter of thread... Carrete
Spool pin Porte-bobine Pasador carrete
PRESSER FOOT LIFTER
There are three positions for button sewing, free motion work and free motion darning.
Lift it .
Lower the presser foot to change...
Instruction Manual - Page 14
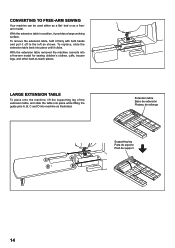
... used either as illustrated.
To replace, slide the extension table back into a free-arm model for sewing children's clothes, cuffs, trouser legs, and other hard-to the left as a freearm model. LARGE EXTENSION TABLE
To place onto the machine, lift the supporting leg of the extension table, and slide the table into place while...
Instruction Manual - Page 16
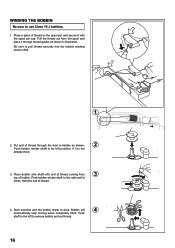
... secure it through the hole in bobbin as shown in illustration. Hold the end of bobbin. WINDING THE BOBBIN
Be sure to far left to pull thread securely into the bobbin winding tension disk.
1
2. Push bobbin winder shaft to wind. Start machine and the bobbin starts to the right until it
clicks. Bobbin will
4
automatically stop turning when completely filled. Push
shaft to...
Instruction Manual - Page 18
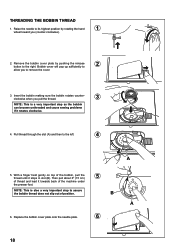
... the bobbin thread does not slip out of the machine under
the presser foot. Pull thread through the slot (A) and then to remove the cover.
3.
Remove the bobbin cover ... step as the bobbin can become unthreaded and cause sewing problems if it stops in slot (B). Replace the bobbin cover plate onto the needle plate.
6
18
THREADING THE BOBBIN THREAD
1. Bobbin cover will pop ...
Instruction Manual - Page 20

...-up (4) from right to left
of the Automatic Needle Threader.)
IMPORTANT:
To verify that the machine is not raised, correct thread tension cannot be obtained.)
B. Always be sure to raise the ... With the presser foot raised and the needle unthreaded, pull the thread. Turn the hand wheel toward you do this means you should detect only a slight resistance and little or no deflection of ...
Instruction Manual - Page 22
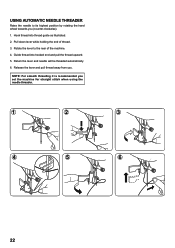
Release the lever and pull thread away from you set the machine for straight stitch when using the needle threader.
1
2
3
4
5
6
22 Rotate the lever to...For smooth threading it is recommended you .
Pull down lever while holding the end of the machine.
4. Return the lever and needle will be threaded automatically.
6. USING AUTOMATIC NEEDLE THREADER
Raise the needle to the rear of...
Instruction Manual - Page 24

... the presser foot, leaving about 6"
4
(15 cm) clear.
24
Pull both top and bobbin threads together toward you (counter-clockwise) with the needle up cycle and stop with your computer sewing machine.
3. PICKING UP BOBBIN THREAD
1. NOTE: A quick way to its highest position. Holding needle thread loosely with straight stitch selected, touch and release the...
Instruction Manual - Page 26
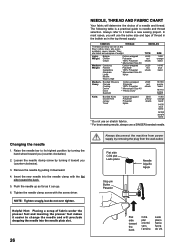
... into the needle plate slot.
26
Always disconnect the machine from power supply by turning the hand wheel toward the back. 5. Tighten the needle clamp screw with the flat
side toward you (counter-clockwise).
3.
Flat side Côté plat Lado plano
Needle Aiguille Aguja
Stop pin Butée Pasador
Flat side toward you...
Instruction Manual - Page 28
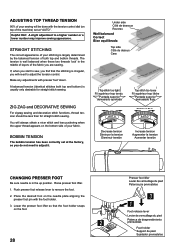
... by the balanced tension of both top and bobbin threads. BOBBIN TENSION
The bobbin tension has been correctly set at the factory, so you are sewing. Place the desired foot on the foot.
...will always obtain a nicer stitch and less puckering when the upper thread appears on top of the machine) set at "AUTO" . Under side Côté de dessous Reverso
Well balanced Correct Bien equilibrada...
Instruction Manual - Page 30
...número de puntada
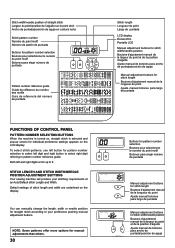
FUNCTIONS OF CONTROL PANEL
PATTERN NUMBER SELECTION BUTTONS
When the machine is turned on, straight stitch is selected and pop-up to 9.
NOTE: Some patterns offer... on the display. STITCH LENGTH AND STITCH WIDTH/NEEDLE POSITION ADJUSTMENT BUTTONS
Your sewing machine will produce your preference pushing manual adjustment buttons.
Stitch width/needle position of stitch...
Instruction Manual - Page 32
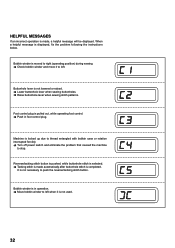
...stop.
Machine is locked up due to thread entangled with bobbin case or rotation interrupted forcibly. Turn off power switch and eliminate the problem that caused the machine... buttonhole lever when sewing buttonholes. Raise buttonhole lever when sewing stitch patterns.
Bobbin winder is moved to right (operating position) during sewing. Check bobbin winder and move ...
Instruction Manual - Page 34
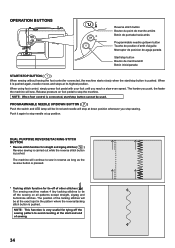
...;t Botón inicio/parada
START/STOP BUTTON ( )
When sewing without having the foot controller connected, the machine starts slowly when the start /stop button cannot be lit red and needle will sew. NOTE: This function is pushed again, needle moves and stops at the start and end of other stitches ( ) The sewing machine makes 4 tiny tacking stitches to...
Instruction Manual - Page 54
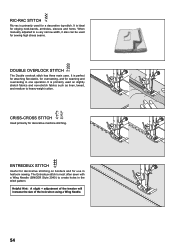
...manually adjusted to a very narrow width, it also can be used on borders and for sewing high stress seams.
DOUBLE OVERLOCK STITCH
The Double overlock stitch has three main uses. The Entredeux ...often sewn with a Wing Needle (SINGER Style 2040) to create holes in one operation. It is perfect for attaching flat elastic, for overcasting, and for decorative machine stitching. RIC-RAC STITCH
Ric-rac...
Instruction Manual - Page 70
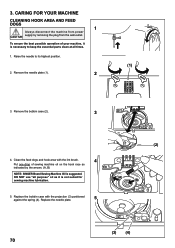
... power CAUTION supply by the arrows. (A, B)
NOTE: SINGER Brand Sewing Machine Oil is suggested. Remove the bobbin case (2).
3
4. Replace the bobbin case with the lint brush.
4
Put one drop of your machine, it is necessary to its highest position. 2. To ensure the best possible operation of sewing machine oil on the hook race as it is not suited...
Instruction Manual - Page 72
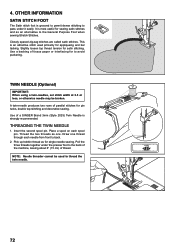
... double top stitching and decorative sewing.
A twin-needle produces two rows of tissue paper or interfacing for appliqueing and bar tacking.
THREADING THE TWIN NEEDLE
1. Pick up bobbin thread as an alternative to ...three threads together under the presser foot to the back of the machine, leaving about 6" (15 cm) of a SINGER Brand 3mm (Style 2025) Twin Needle is an attractive stitch ...
Instruction Manual - Page 84
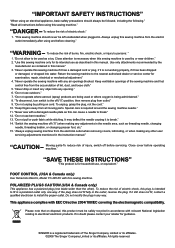
...bobbin, or changing presser foot, etc." 15. "Never operate the sewing machine with same type rated DC 6.5 V 2.8 Watts." "CAUTION-- Close
cover
before cleaning."
2. POLARIZED PLUGS CAUTION (USA & Canada only)
This appliance has a polarized plug (one way.
SINGER is being administered." 8.
"This sewing machine...for guidance. "To disconnect, turn switch to the nearest authorized ...
Similar Questions

How Do I Clear E7 Error Code On Singer Fashion Mate Model 7256 Sewing Machine
(Posted by cathyhowden1 2 years ago)


I Get E7 Error Message On My Singer Model 7258 Sewing Machine. There Is No Refe
Error message E7 is up on my Singer Stylist model 7258 sewing machine. It is not working at all. I t...
Error message E7 is up on my Singer Stylist model 7258 sewing machine. It is not working at all. I t...
(Posted by ebellamybellamy9 5 years ago)

Singer Stylist Model 7258, When Trying To Do A Buttonhole It Is Showing C2
I was making a buttonhole and machine is showing C2 error.
I was making a buttonhole and machine is showing C2 error.
(Posted by stelita729 8 years ago)