Instruction Manual
Page 2
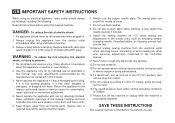
... aerosol spray products are being administered. 14.To disconnect, turn all controls to the off ("O") position, then remove plug from all instructions before using this appliance if it has a damaged cord or plug, if it is not properly operated. Switch the sewing machine off...not working properly, if it to persons: 1. Return the appliance to break. 7. To reduce the risk of electric shock: 1. SAVE THESE INSTRUCTIONS This sewing machine is required around the sewing machine needle. 6. Use only attachments recommended by or near children. 2. Keep ventilation openings of ...
... aerosol spray products are being administered. 14.To disconnect, turn all controls to the off ("O") position, then remove plug from all instructions before using this appliance if it has a damaged cord or plug, if it is not properly operated. Switch the sewing machine off...not working properly, if it to persons: 1. Return the appliance to break. 7. To reduce the risk of electric shock: 1. SAVE THESE INSTRUCTIONS This sewing machine is required around the sewing machine needle. 6. Use only attachments recommended by or near children. 2. Keep ventilation openings of ...
Instruction Manual
Page 31
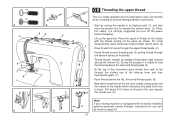
... 26. 24 Start by leading thread down to the needle which should be found on the holder with the factory installed optional automatic needle threader, instructions for use can be threaded from front to back. For small thread spools, place small side of the take thread behind the flat, horizontal thread...
... 26. 24 Start by leading thread down to the needle which should be found on the holder with the factory installed optional automatic needle threader, instructions for use can be threaded from front to back. For small thread spools, place small side of the take thread behind the flat, horizontal thread...

Instruction Manual
Page 75
Turn stitch selector to the desired length. - Turn stitch length dial to straight stitch, center needle position. - Position the fabric to be darned under the presser foot together with the under laying fabric to be used. - For reverse sewing instructions, see page 32. 68 Lower the presser foot and alternately sew forward or reverse using the lever. - Repeat this motion until the area to be darned is filled with rows of stitching. GB Darning -
Turn stitch selector to the desired length. - Turn stitch length dial to straight stitch, center needle position. - Position the fabric to be darned under the presser foot together with the under laying fabric to be used. - For reverse sewing instructions, see page 32. 68 Lower the presser foot and alternately sew forward or reverse using the lever. - Repeat this motion until the area to be darned is filled with rows of stitching. GB Darning -


