
Instruction Manual
Page 2
... operate this manual. Do not pull or push fabric while stitching. Do not use only. SAVE THESE INSTRUCTIONS This sewing machine is not intended for their safety. 21. GB IMPORTANT SAFETY INSTRUCTIONS When using an electrical appliance, basic safety should ..., repair, electrical or mechanical adjustment. 4. WARNING - An appliance should never be left unattended when plugged in this sewing machine. Always unplug sewing machine from the electrical outlet when removing covers, lubricating, or when making any air openings blocked. The sound pressure level under...
... operate this manual. Do not pull or push fabric while stitching. Do not use only. SAVE THESE INSTRUCTIONS This sewing machine is not intended for their safety. 21. GB IMPORTANT SAFETY INSTRUCTIONS When using an electrical appliance, basic safety should ..., repair, electrical or mechanical adjustment. 4. WARNING - An appliance should never be left unattended when plugged in this sewing machine. Always unplug sewing machine from the electrical outlet when removing covers, lubricating, or when making any air openings blocked. The sound pressure level under...
Instruction Manual
Page 6
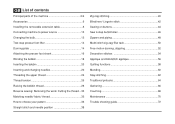
... parts of the machine 2/4 Accessories 6 Installing the removable extension table 8 Connecting machine to power source ...10 Changing the bulb 12 Two-step presser foot lifter 14 Darning plate 14 Attaching the presser foot shank 16 Winding the bobbin 18 Inserting the bobbin 20 Inserting and changing needles 22 Threading the upper thread 24 Thread tension 26 Raising the bobbin thread 28 Reverse sewing... position 38 Zig-zag stitching 40 Blind hem/ Lingerie stitch 42 Sewing on buttons 44 Sew 4-step buttonholes 46 Zippers and piping 48 Mutlti-stitch zig-zag/...
... parts of the machine 2/4 Accessories 6 Installing the removable extension table 8 Connecting machine to power source ...10 Changing the bulb 12 Two-step presser foot lifter 14 Darning plate 14 Attaching the presser foot shank 16 Winding the bobbin 18 Inserting the bobbin 20 Inserting and changing needles 22 Threading the upper thread 24 Thread tension 26 Raising the bobbin thread 28 Reverse sewing... position 38 Zig-zag stitching 40 Blind hem/ Lingerie stitch 42 Sewing on buttons 44 Sew 4-step buttonholes 46 Zippers and piping 48 Mutlti-stitch zig-zag/...

Instruction Manual
Page 9
Thread take-up lever 1 8 3. Bobbin stopper 4 9. GB Principal parts of the machine 1. Reverse sewing lever 10 8. Pattern selector dial 5 6 2 Thread tension dial 7 2. Thread cutter 2 9 4. Presser foot 5. Removable extension table/ accessory storage 3 7. Needle plate 6. Stitch length dial 10.
Thread take-up lever 1 8 3. Bobbin stopper 4 9. GB Principal parts of the machine 1. Reverse sewing lever 10 8. Pattern selector dial 5 6 2 Thread tension dial 7 2. Thread cutter 2 9 4. Presser foot 5. Removable extension table/ accessory storage 3 7. Needle plate 6. Stitch length dial 10.

Instruction Manual
Page 13
Button sewing foot e. Overcasting foot o. Hemmer foot p. Second spool pin t. Pack of needles I. Darning plate l. Spool holder Optional accessories (2) (These 8 accessories are however available as special accessories from your local dealer.) m. they are not supplied with this machine; Satin stitch foot r. Buttonhole foot d. Seam ripper/ brush g. Spool pin felt 6 Bobbin (3x) j. 1 Standard accessories...
Button sewing foot e. Overcasting foot o. Hemmer foot p. Second spool pin t. Pack of needles I. Darning plate l. Spool holder Optional accessories (2) (These 8 accessories are however available as special accessories from your local dealer.) m. they are not supplied with this machine; Satin stitch foot r. Buttonhole foot d. Seam ripper/ brush g. Spool pin felt 6 Bobbin (3x) j. 1 Standard accessories...

Instruction Manual
Page 17
Foot control The foot control pedal regulates the sewing speed. (3) Attention: Consult a qualified electrician if in the outlet, reverse the plug. If it still does not fit, contact a qualified electrician to be grounded 10 a. Unplug power cord when machine is not in any way. The foot control ...2902 (220-240V area) manufactured by ZHEJIANG FOUNDER MOTOR CORPORATION LTD. (China) Sewing light Press main switch (A) to " l " for power and light. Polarized attachment plug b. To reduce the risk of how to connect machine to power source. If it does not fit fully in doubt of electric ...
Foot control The foot control pedal regulates the sewing speed. (3) Attention: Consult a qualified electrician if in the outlet, reverse the plug. If it still does not fit, contact a qualified electrician to be grounded 10 a. Unplug power cord when machine is not in any way. The foot control ...2902 (220-240V area) manufactured by ZHEJIANG FOUNDER MOTOR CORPORATION LTD. (China) Sewing light Press main switch (A) to " l " for power and light. Polarized attachment plug b. To reduce the risk of how to connect machine to power source. If it does not fit fully in doubt of electric ...

Instruction Manual
Page 25
... 5 6 7 8 9 10 Please Note: When the bobbin winder spindle is in "bobbin winding" position, the machine will not sew and the hand wheel will not turn. To start sewing, push the bobbin winder spindle to spool pin. (1/2) - Wind thread counter clockwise around bobbin winder tension discs. ...(4) - Thread bobbin as illustrated and place on foot control pedal. (8) - Push bobbin spindle to left (sewing position). 18 Hold thread end. (7) - Snap thread into thread guide. (3) - GB Winding the bobbin - Cut thread. (9) - Push bobbin spindle to right...
... 5 6 7 8 9 10 Please Note: When the bobbin winder spindle is in "bobbin winding" position, the machine will not sew and the hand wheel will not turn. To start sewing, push the bobbin winder spindle to spool pin. (1/2) - Wind thread counter clockwise around bobbin winder tension discs. ...(4) - Thread bobbin as illustrated and place on foot control pedal. (8) - Push bobbin spindle to left (sewing position). 18 Hold thread end. (7) - Snap thread into thread guide. (3) - GB Winding the bobbin - Cut thread. (9) - Push bobbin spindle to right...
Instruction Manual
Page 37
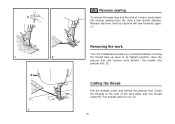
... secure the beginning and the end of the face plate and into thread cutter (B). Release the lever and the machine will sew forwards again. (1) Removing the work Turn the handwheel toward you (counterclockwise) to bring the thread take up lever to cut. (3) 30 Guide the threads to ...
... secure the beginning and the end of the face plate and into thread cutter (B). Release the lever and the machine will sew forwards again. (1) Removing the work Turn the handwheel toward you (counterclockwise) to bring the thread take up lever to cut. (3) 30 Guide the threads to ...

Instruction Manual
Page 55
Change to sew. Set stitch length control between "2.5" - The zipper foot can be attached right or left, depending on " ". It is also possible to sew a length of fabric). "4" (according to form a "welt" or piping. (2) 1 2 48 Dial selector on which side of the foot you are going to sew. (1) To sew past the zipper tab, lower the needle into a bias strip to thickness of cord into the fabric, raise the presser foot and push the zipper tab behind the presser foot. Lower the foot and continue to zipper foot. GB Zippers and piping Set the machine as illustrated.
Change to sew. Set stitch length control between "2.5" - The zipper foot can be attached right or left, depending on " ". It is also possible to sew a length of fabric). "4" (according to form a "welt" or piping. (2) 1 2 48 Dial selector on which side of the foot you are going to sew. (1) To sew past the zipper tab, lower the needle into a bias strip to thickness of cord into the fabric, raise the presser foot and push the zipper tab behind the presser foot. Lower the foot and continue to zipper foot. GB Zippers and piping Set the machine as illustrated.

Instruction Manual
Page 59
...of fabric and batting together. 52 Stippling: Sew a straight stitch. Darning: Install the darning plate. (2) Remove the presser foot shank. (3) Attach the darning foot to the presser foot holder. A darning hoop is accomplished without the sewing machine internal feed system. Press the darning foot ...on firmly from left to right. Movement of the fabric is controlled by 90° and sew over previous stitching. Note: Free motion darning is recommended for...
...of fabric and batting together. 52 Stippling: Sew a straight stitch. Darning: Install the darning plate. (2) Remove the presser foot shank. (3) Attach the darning foot to the presser foot holder. A darning hoop is accomplished without the sewing machine internal feed system. Press the darning foot ...on firmly from left to right. Movement of the fabric is controlled by 90° and sew over previous stitching. Note: Free motion darning is recommended for...

Instruction Manual
Page 65
The quilting guide supplied with your machine will help you sew straight, perfectly parallel lines. 58 This foot is an optional accessory not included with your machine. GB Quilting functions * The Quilting foot is used to produce perfect 1/4" seams. Use it to seam squares or patches and for channel quilting.
The quilting guide supplied with your machine will help you sew straight, perfectly parallel lines. 58 This foot is an optional accessory not included with your machine. GB Quilting functions * The Quilting foot is used to produce perfect 1/4" seams. Use it to seam squares or patches and for channel quilting.
Instruction Manual
Page 67
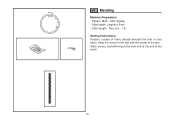
Stitch width: Largest 4.5mm - Pattern: Multi - Stitch length: Fine (0.5 - 1.0) Sewing Instructions: Position a piece of the seam. 60 Stitch across, backstitching at the start and at the end of fabric directly beneath the tear in your fabric. Align the center of the foot with the center of the tear. stitch Zigzag - GB Mending Machine Preparation: -
Stitch width: Largest 4.5mm - Pattern: Multi - Stitch length: Fine (0.5 - 1.0) Sewing Instructions: Position a piece of the seam. 60 Stitch across, backstitching at the start and at the end of fabric directly beneath the tear in your fabric. Align the center of the foot with the center of the tear. stitch Zigzag - GB Mending Machine Preparation: -

Instruction Manual
Page 69
GB Stay-stitching Machine Preparation: - Stay stitch along the edge of the area 1/4 of an inch from the edge of the seam. 62 Stitch length: 1.5mm (fine) Sewing Instructions: Stay-stitching is used to reinforce curves such as armholes, seams in stretch fabrics, and other areas to prevent stretching. Pattern: Straight Stitch -
GB Stay-stitching Machine Preparation: - Stay stitch along the edge of the area 1/4 of an inch from the edge of the seam. 62 Stitch length: 1.5mm (fine) Sewing Instructions: Stay-stitching is used to reinforce curves such as armholes, seams in stretch fabrics, and other areas to prevent stretching. Pattern: Straight Stitch -

Instruction Manual
Page 71
GB Traditional pintucks Machine Preparation: - Pattern: Straight - Stitch Length: 2 - 3 Sewing Instructions: To mark pintucks in the same direction for each tuck. Repeat, sewing in your fabric, either pull a thread to mark the fold or mark with chalk or marking pencil. Fold and press wrong sides together on pulled thread line or marked lines. Press flat. 64 Stitch 1/8 of an inch from fold line.
GB Traditional pintucks Machine Preparation: - Pattern: Straight - Stitch Length: 2 - 3 Sewing Instructions: To mark pintucks in the same direction for each tuck. Repeat, sewing in your fabric, either pull a thread to mark the fold or mark with chalk or marking pencil. Fold and press wrong sides together on pulled thread line or marked lines. Press flat. 64 Stitch 1/8 of an inch from fold line.

Instruction Manual
Page 73
...inches of stitching. When seam is complete, raise the needle to it's highest, raise the presser foot and pull the upper and lower threads to sew the length required. GB Gathering Machine Preparation: - Once the two rows are completed, draw in your tension for gathering waistbands, sleeve caps etc.... Sewing Instructons: Use this procedure once again at 1/4 of an inch from the edge of the seam, begin by pulling on the bobbin thread. ...
...inches of stitching. When seam is complete, raise the needle to it's highest, raise the presser foot and pull the upper and lower threads to sew the length required. GB Gathering Machine Preparation: - Once the two rows are completed, draw in your tension for gathering waistbands, sleeve caps etc.... Sewing Instructons: Use this procedure once again at 1/4 of an inch from the edge of the seam, begin by pulling on the bobbin thread. ...

Instruction Manual
Page 75
Stitch width: Variable (Set according to the right and left of your foot and zigzag over a fine cord. With a marking pencil, draw a design on jackets and other sewing projects. Lay the cord under the center opening of the decorative cord. Pattern: Zig-zag - Stitch length: Variable Sewing Instructions: Couching is simply the technique of zig-zagging over the cord so that the needle falls just to width of your fabric. As you sew, follow the lines of cord) - Use as a decorative touch on your design. 68 GB Couching Machine Preparation: -
Stitch width: Variable (Set according to the right and left of your foot and zigzag over a fine cord. With a marking pencil, draw a design on jackets and other sewing projects. Lay the cord under the center opening of the decorative cord. Pattern: Zig-zag - Stitch length: Variable Sewing Instructions: Couching is simply the technique of zig-zagging over the cord so that the needle falls just to width of your fabric. As you sew, follow the lines of cord) - Use as a decorative touch on your design. 68 GB Couching Machine Preparation: -
Instruction Manual
Page 77
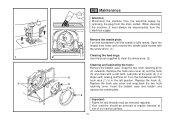
... the electrical supply by removing the plug from the electrical supply. Remove the hook race cover (4) and the hook (5) and clean with sewing machine oil. Replace the hook (5). 7 5 Replace the hook race cover and snap back the two hook retaining arms. Insert the bobbin case and ...bobbin and replace the needle plate. 4 Important: 3 Fabric lint and threads must always be disconnected from the main socket. When cleaning the machine, it must be serviced at regular intervals at the point (6) (1-2 6 drops) with a soft cloth. Open the hinged front cover and unscrew the ...
... the electrical supply by removing the plug from the electrical supply. Remove the hook race cover (4) and the hook (5) and clean with sewing machine oil. Replace the hook (5). 7 5 Replace the hook race cover and snap back the two hook retaining arms. Insert the bobbin case and ...bobbin and replace the needle plate. 4 Important: 3 Fabric lint and threads must always be disconnected from the main socket. When cleaning the machine, it must be serviced at regular intervals at the point (6) (1-2 6 drops) with a soft cloth. Open the hinged front cover and unscrew the ...
Instruction Manual
Page 79
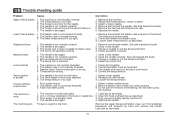
...3. The needle is wound around the spool holder pin. 6. The machine is incorrectly adjusted. 3. The stitch length is not correctly threaded. 2. Fabric has been pulled. 1. Do not pull on the fabric while sewing, let it be lubricated. 1. Clean the hook and feed dog ... The bobbin case is caught in the hook. Only use good quality sewing machine oil. 4. Thread is not correctly threaded. 3. The wrong foot is not threaded correctly. 2. The machine must suit the fabric and thread. 4. The machine is attached. 1. The thread tension is damaged. 1. The needle is ...
...3. The needle is wound around the spool holder pin. 6. The machine is incorrectly adjusted. 3. The stitch length is not correctly threaded. 2. Fabric has been pulled. 1. Do not pull on the fabric while sewing, let it be lubricated. 1. Clean the hook and feed dog ... The bobbin case is caught in the hook. Only use good quality sewing machine oil. 4. Thread is not correctly threaded. 3. The wrong foot is not threaded correctly. 2. The machine must suit the fabric and thread. 4. The machine is attached. 1. The thread tension is damaged. 1. The needle is ...


