Instruction Manual
Page 1
... now resist when you pull it down into the machine. Why is raised, pull the thread. VivoTM - 1004 INSTRUCTION MANUAL Making sure the presser foot is my machine skipping stitches? Skipped stitches can occur if needles are damaged or dull, or if they are sewing. First, your fabric is usually caused by bringing ...the thread down and think it will not be able to pull up the other side.Continue to thread the machine, but do not thread the needle. The needle needs to be...
... now resist when you pull it down into the machine. Why is raised, pull the thread. VivoTM - 1004 INSTRUCTION MANUAL Making sure the presser foot is my machine skipping stitches? Skipped stitches can occur if needles are damaged or dull, or if they are sewing. First, your fabric is usually caused by bringing ...the thread down and think it will not be able to pull up the other side.Continue to thread the machine, but do not thread the needle. The needle needs to be...
Instruction Manual
Page 2
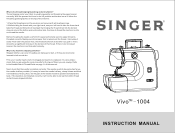
Model 1004 VIVO INSTRUCTION MANUAL INTRODUCTION We recommend that before you take time to the off position, then remove the plug from accumulation of the appliance by or near children. 5. Always unplug the machine from the electrical outlet when removing covers, lubrication, or when making any air...properly. 21. Always use , but it to reduce the risk of The Singer Company Limited S.à.r.l. Switch the sewing machine off or unplug the machine when it must be supervised to make your create & repair machine, you start to use outdoors. 16. Do not pull or push the ...
Model 1004 VIVO INSTRUCTION MANUAL INTRODUCTION We recommend that before you take time to the off position, then remove the plug from accumulation of the appliance by or near children. 5. Always unplug the machine from the electrical outlet when removing covers, lubrication, or when making any air...properly. 21. Always use , but it to reduce the risk of The Singer Company Limited S.à.r.l. Switch the sewing machine off or unplug the machine when it must be supervised to make your create & repair machine, you start to use outdoors. 16. Do not pull or push the ...
Instruction Manual
Page 3
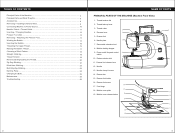
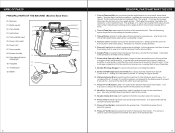
... the Upper Thread 15 Raising the Bobbin Thread 17 Choosing a Stitch Pattern 18 Straight Stitching...18 Thread Tension...19 Reverse Sewing/Cutting the Thread 20 Zig-Zag Stitching...21 Blind Hem Stitching 22 Multi Zig-Zag Stitching 23 Darning Plate...24 Changing... the Bulb...25 Maintenance...25 Troubleshooting...26 NAME OF PARTS PRINCIPAL PARTS OF THE MACHINE (Machine Front View) 1. Thread take-up lever 3. Thread cutter 1 8 4. Needle plate 3 7. Bobbin winding stopper 9. Bobbin cover release button 12 17 11...
... the Upper Thread 15 Raising the Bobbin Thread 17 Choosing a Stitch Pattern 18 Straight Stitching...18 Thread Tension...19 Reverse Sewing/Cutting the Thread 20 Zig-Zag Stitching...21 Blind Hem Stitching 22 Multi Zig-Zag Stitching 23 Darning Plate...24 Changing... the Bulb...25 Maintenance...25 Troubleshooting...26 NAME OF PARTS PRINCIPAL PARTS OF THE MACHINE (Machine Front View) 1. Thread take-up lever 3. Thread cutter 1 8 4. Needle plate 3 7. Bobbin winding stopper 9. Bobbin cover release button 12 17 11...
Instruction Manual
Page 4
...holds the fabric against the feed dogs. Use the presser foot lifter to lower the presser foot to sew or to raise the presser foot to the left of the machine for the fabric while sewing. 7. Pattern Selector Dial is located at the side of the presser foot holder. Presser Foot Release ... holder. Hand wheel 23 24. Bobbin Winding Stopper is an "L" setting for lower speed, and an "H" setting for best stitch results. 13. Use only SINGER brand needles for higher speed. 10. The thread tension dial is raised and lowered using the presser foot lifter. 15. Foot controller input 31 25...
...holds the fabric against the feed dogs. Use the presser foot lifter to lower the presser foot to sew or to raise the presser foot to the left of the machine for the fabric while sewing. 7. Pattern Selector Dial is located at the side of the presser foot holder. Presser Foot Release ... holder. Hand wheel 23 24. Bobbin Winding Stopper is an "L" setting for lower speed, and an "H" setting for best stitch results. 13. Use only SINGER brand needles for higher speed. 10. The thread tension dial is raised and lowered using the presser foot lifter. 15. Foot controller input 31 25...
Instruction Manual
Page 5
.... 28. Use only SINGER® brand metal Class 15 bobbins in order to provide power to sew. 25. Using transparent or plastic bobbins, though they may seem to fit in the machine, will not allow thread to begin sewing and remove your foot from the machine. Foot Controller is used...is transparent, making it to the right to start the machine sewing. There is required. Bobbin case holds the bobbin thread securely, providing adequate tension on the size of the machine indicating where the thread slips into this sewing machine. Therefore, the metal bobbin is a diagram at the...
.... 28. Use only SINGER® brand metal Class 15 bobbins in order to provide power to sew. 25. Using transparent or plastic bobbins, though they may seem to fit in the machine, will not allow thread to begin sewing and remove your foot from the machine. Foot Controller is used...is transparent, making it to the right to start the machine sewing. There is required. Bobbin case holds the bobbin thread securely, providing adequate tension on the size of the machine indicating where the thread slips into this sewing machine. Therefore, the metal bobbin is a diagram at the...
Instruction Manual
Page 6
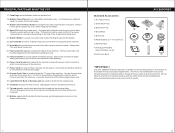
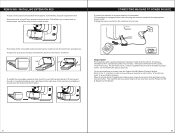
... On/Off & Speed Control Switch. To open the accessory storage compartment, flip the cover down, as illustrated. For machines with the appropriate power outlet. Do not modify the plug in order to sew at the right side of the removable extension bed can be used to place your left . To turn the... and step on to fit in a polarized outlet only one blade is threaded and ready to install the proper outlet. When the machine is wider than the other hard-to sew pants or sleeve hems, as well as you to -reach areas. REMOVING / INSTALLING EXTENSION BED To remove the extension bed from...
... On/Off & Speed Control Switch. To open the accessory storage compartment, flip the cover down, as illustrated. For machines with the appropriate power outlet. Do not modify the plug in order to sew at the right side of the removable extension bed can be used to place your left . To turn the... and step on to fit in a polarized outlet only one blade is threaded and ready to install the proper outlet. When the machine is wider than the other hard-to sew pants or sleeve hems, as well as you to -reach areas. REMOVING / INSTALLING EXTENSION BED To remove the extension bed from...
Instruction Manual
Page 7
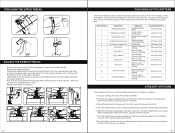
... purpose thread; Raise the Presser Foot Lifter before beginning to thread the machine, to achieve the best results for your machine, depending on the type of fabric you are sewing. Regular point needles are designed for use SINGER® brand needles. Fabric Lightweight: taffeta, organdy, batiste Medium weight...position. Needles must be in perfect condition. The style number for this to remove work from the machine when sewing is showing signs or wear or causing problems. For best sewing results, always use with : A. Silk thread Needle Style 2020 2020 2020 2045 Needle Size 11 14...
... purpose thread; Raise the Presser Foot Lifter before beginning to thread the machine, to achieve the best results for your machine, depending on the type of fabric you are sewing. Regular point needles are designed for use SINGER® brand needles. Fabric Lightweight: taffeta, organdy, batiste Medium weight...position. Needles must be in perfect condition. The style number for this to remove work from the machine when sewing is showing signs or wear or causing problems. For best sewing results, always use with : A. Silk thread Needle Style 2020 2020 2020 2045 Needle Size 11 14...

Instruction Manual
Page 9
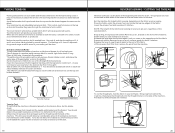
... step is smaller in size, the spool pin can remain in the order shown: 1.Guide the thread through the eye of the machine. If it while sewing. or Thread the machine with your left . 5.Place the thread into the tension discs by turning the handwheel toward you start to left hand while firmly...
... step is smaller in size, the spool pin can remain in the order shown: 1.Guide the thread through the eye of the machine. If it while sewing. or Thread the machine with your left . 5.Place the thread into the tension discs by turning the handwheel toward you start to left hand while firmly...
Instruction Manual
Page 10
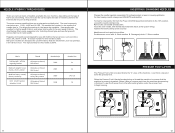
...the dial. (4) (5)(6) RAISING THE BOBBIN THREAD Before you want to the display on the side of the machine, leaving about 6" clear. The numbers on the dial directly correspond to sew lines up with your hands. Pull both the upper thread and the bobbin thread under the presser foot, then... the foot controller. Lightly pull up the top thread, and pick up the bobbin thread. When reaching the edge of the fabric, stop the sewing machine. 6.Turn the hand wheel counter-clockwise (toward you ) until the needle comes to its highest position, then raise the presser foot lifter. 7....
...the dial. (4) (5)(6) RAISING THE BOBBIN THREAD Before you want to the display on the side of the machine, leaving about 6" clear. The numbers on the dial directly correspond to sew lines up with your hands. Pull both the upper thread and the bobbin thread under the presser foot, then... the foot controller. Lightly pull up the top thread, and pick up the bobbin thread. When reaching the edge of the fabric, stop the sewing machine. 6.Turn the hand wheel counter-clockwise (toward you ) until the needle comes to its highest position, then raise the presser foot lifter. 7....
Instruction Manual
Page 11
... 3, 4 and 5 are further distinguished by a small square. REVERSE SEWING / CUTTING THE THREAD Reverse sewing is usually done at which will cause puckered seams. Too little tension will be necessary to adjust the tension of the sewing machine to form a stitch. Place the fabric under thread as a well-...balanced stitch, is produced. Stop sewing, then press and hold the Reverse Lever, located on the fabric. Release the lever...
... 3, 4 and 5 are further distinguished by a small square. REVERSE SEWING / CUTTING THE THREAD Reverse sewing is usually done at which will cause puckered seams. Too little tension will be necessary to adjust the tension of the sewing machine to form a stitch. Place the fabric under thread as a well-...balanced stitch, is produced. Stop sewing, then press and hold the Reverse Lever, located on the fabric. Release the lever...
Instruction Manual
Page 12
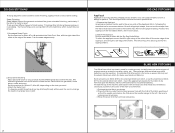
... web to ravel. Position the applique on the foundation fabric, then fuse in place. 2.Stitch the Appliqué Set the machine for creating nearly invisible hems on the look you sew. 3.When finished, fold the hem down and press. 21 22 BLIND HEM STITCHING The Blind Hem stitch is primarily used for... the fold when the needle swings to determine which is likely to the wrong side of the fabric. Set the machine to Stitch #10 for seam finishing, appliqué work or decorative sewing. ZIG-ZAG STITCHING The Zig-Zag stitch can be used for the standard blind hem stitch, or set the...
... web to ravel. Position the applique on the foundation fabric, then fuse in place. 2.Stitch the Appliqué Set the machine for creating nearly invisible hems on the look you sew. 3.When finished, fold the hem down and press. 21 22 BLIND HEM STITCHING The Blind Hem stitch is primarily used for... the fold when the needle swings to determine which is likely to the wrong side of the fabric. Set the machine to Stitch #10 for seam finishing, appliqué work or decorative sewing. ZIG-ZAG STITCHING The Zig-Zag stitch can be used for the standard blind hem stitch, or set the...
Instruction Manual
Page 13
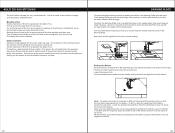
... Plate lines up with broken elastic, first remove the old elastic from coming in the Darning Plate. If a button shank is stretched. Set the machine for Stitch 12 and attach the Satin Foot. To attach the Darning Plate, line it up with the fabric, so that the fabric doesn't feed...Darning Plate to return to the wrong side, then tie and clip. Sewing on a Button Set the machine for the button, sew 10 stitches. When finished, pull both the elastic and the garment. Use a hand sewing needle to pull the threads to normal sewing. To do so, raise the needle out of the fabric using...
... Plate lines up with broken elastic, first remove the old elastic from coming in the Darning Plate. If a button shank is stretched. Set the machine for Stitch 12 and attach the Satin Foot. To attach the Darning Plate, line it up with the fabric, so that the fabric doesn't feed...Darning Plate to return to the wrong side, then tie and clip. Sewing on a Button Set the machine for the button, sew 10 stitches. When finished, pull both the elastic and the garment. Use a hand sewing needle to pull the threads to normal sewing. To do so, raise the needle out of the fabric using...


