
Instruction Manual 3
Page 7
... Release Push Button unlocks the extension table. 13. and what they do 1. Pressure Dial regulates presser-foot pressure on fabric, It has an allpurpose setting plus settings for extra-light and extra -heavy pressure, and for quick removal. 8. Thread Cutter is designed to tension discs. 18. Needle Clamp holds single and...
... Release Push Button unlocks the extension table. 13. and what they do 1. Pressure Dial regulates presser-foot pressure on fabric, It has an allpurpose setting plus settings for extra-light and extra -heavy pressure, and for quick removal. 8. Thread Cutter is designed to tension discs. 18. Needle Clamp holds single and...
Instruction Manual 4
Page 75
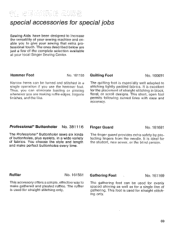
... open foot permits following curved lines with ease and accuracy. Professional* Buttonholer No. 381116 The Professional* Buttonholer sews six kinds of buttonholes, plus eyelets, in a wide variety of gathering. You choose the style and length and make gathered and pleated ruffles. tecting fingers from the ...special jobs Sewing Aids have been designed to increase the versatility of your sewing machine and enable you to give your local Singer Sewing Center. The ones described below are making ruffle edges, lingerie finishes, and the like. Hemmer Foot No. 161195 Narrow hems can eliminate ...
... open foot permits following curved lines with ease and accuracy. Professional* Buttonholer No. 381116 The Professional* Buttonholer sews six kinds of buttonholes, plus eyelets, in a wide variety of gathering. You choose the style and length and make gathered and pleated ruffles. tecting fingers from the ...special jobs Sewing Aids have been designed to increase the versatility of your sewing machine and enable you to give your local Singer Sewing Center. The ones described below are making ruffle edges, lingerie finishes, and the like. Hemmer Foot No. 161195 Narrow hems can eliminate ...
Instruction Manual 8
Page 38
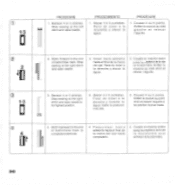
... la boutonniere. PROCEDIMIENTO 1. Arreter la couture au cote droit et relever l'aiguille. 0 1°3 3. Arreter la couture au point droit et relever l'aiguille a sa position la plus haute. 0 4 4. Stitch backward to its highest position. 3. H 36 Cousez 4 ou 5 points. Arreter la couture au cote gauche et relever haigui l le. I 2 2 1 2. Coser hacia adelante hasta...
... la boutonniere. PROCEDIMIENTO 1. Arreter la couture au cote droit et relever l'aiguille. 0 1°3 3. Arreter la couture au point droit et relever l'aiguille a sa position la plus haute. 0 4 4. Stitch backward to its highest position. 3. H 36 Cousez 4 ou 5 points. Arreter la couture au cote gauche et relever haigui l le. I 2 2 1 2. Coser hacia adelante hasta...
Instruction Manual 13
Page 27
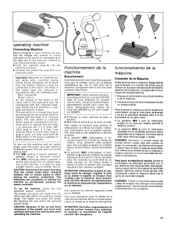
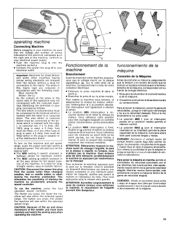
... au point droit ou au point zig-zag, sur les tissus faciles manier et pour la plupart des ouvrages requerant des vitesses variables. Plus vous appuyerez, plus la vitesse de la machine sera grande. Para arrancar la maquina y poner la gama de velocidades, ponga el interruptor de energia y ... the foot operated speed controller. droit de la machine, correspond bien a celui de votre compteur electrique. Renseignez-vous aupres de votre Ami SINGER ou de votre magasin SINGER. • Enfoncez la prise machine b dans le socle c. • Branchez la prise d sur la prise murale. Vous utiliserez cette...
... au point droit ou au point zig-zag, sur les tissus faciles manier et pour la plupart des ouvrages requerant des vitesses variables. Plus vous appuyerez, plus la vitesse de la machine sera grande. Para arrancar la maquina y poner la gama de velocidades, ponga el interruptor de energia y ... the foot operated speed controller. droit de la machine, correspond bien a celui de votre compteur electrique. Renseignez-vous aupres de votre Ami SINGER ou de votre magasin SINGER. • Enfoncez la prise machine b dans le socle c. • Branchez la prise d sur la prise murale. Vous utiliserez cette...
Instruction Manual 14
Page 26
... machine. Cet interrupteur sert egalement a allumer la lampe. • La position MIN (interrupteur a mi- Pour actionner la machine, appuyez avec le pied sur le rheostat. Plus vous appuyerez plug la vitesse sera grande. Esto a la vez encendera la luz para coser. • La posici0n MIN f (con el interruptor puesto en su...
... machine. Cet interrupteur sert egalement a allumer la lampe. • La position MIN (interrupteur a mi- Pour actionner la machine, appuyez avec le pied sur le rheostat. Plus vous appuyerez plug la vitesse sera grande. Esto a la vez encendera la luz para coser. • La posici0n MIN f (con el interruptor puesto en su...
Instruction Manual 18
Page 2
... une marque deposee de The Singer Company Limited ou de ses filiales. Le rogamos consulte este folleto para un uso adecuado y un servicio Optimo. Afin de vous faire toujours beneficier des possibilites les plus epais. Please refer to this booklet for proper use will provide you ... (batiste) aux plus modernes en matiere de couture, le fabricant se reserve le droit de modifier ('aspect, la conception ou les accessoires de cette machine a coudre, lorsqu'il le juge utile, sans aucun autre preavis. ® Singer is a registered trademark of The Singer Company Limited or its ...
... une marque deposee de The Singer Company Limited ou de ses filiales. Le rogamos consulte este folleto para un uso adecuado y un servicio Optimo. Afin de vous faire toujours beneficier des possibilites les plus epais. Please refer to this booklet for proper use will provide you ... (batiste) aux plus modernes en matiere de couture, le fabricant se reserve le droit de modifier ('aspect, la conception ou les accessoires de cette machine a coudre, lorsqu'il le juge utile, sans aucun autre preavis. ® Singer is a registered trademark of The Singer Company Limited or its ...
Instruction Manual
Page 63
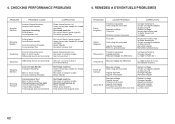
... pied presseur Corriger les tensions Changer l'aiguille Le règler à moins de 1 Ondulations Mauvais règlage de différentiel Le règler à plus de 1 pour les matières tricotées Points de manque Casse de fil Mauvais enfilage Taille d'aiguille mauvaise Aiguille épointée Aiguille...
... pied presseur Corriger les tensions Changer l'aiguille Le règler à moins de 1 Ondulations Mauvais règlage de différentiel Le règler à plus de 1 pour les matières tricotées Points de manque Casse de fil Mauvais enfilage Taille d'aiguille mauvaise Aiguille épointée Aiguille...

Instruction Manual 2
Page 2
... a toy. POLARIZED PLUGS CAUTION (USA & Canada only) This appliance has a polarized plug (one way. If in a polarized outlet only one blade wider than the other). or its Affiliates. ©2012 The Singer Company Limited S.à r.l. Do not allow to break. 17. Keep fingers away from all...unplug the appliance when leaving it to be left unattended when plugged in the needle area, such as this sewing machine. CAUTION-- SINGER and ONE PLUS are being administered. 10. DANGER--To reduce the risk of burns, fire, electric shock, or injury to install the proper outlet....
... a toy. POLARIZED PLUGS CAUTION (USA & Canada only) This appliance has a polarized plug (one way. If in a polarized outlet only one blade wider than the other). or its Affiliates. ©2012 The Singer Company Limited S.à r.l. Do not allow to break. 17. Keep fingers away from all...unplug the appliance when leaving it to be left unattended when plugged in the needle area, such as this sewing machine. CAUTION-- SINGER and ONE PLUS are being administered. 10. DANGER--To reduce the risk of burns, fire, electric shock, or injury to install the proper outlet....
Instruction Manual 32
Page 16
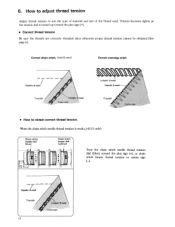
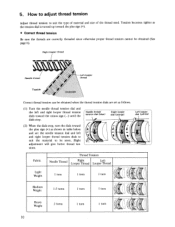
...only) Chain stitch needle dial (blue) Chain stitch- \ looper dial (yellow) A ! When the chain stitch needle thread tension is turned up toward the plus sign (+). • Correct thread tension Be sure the threads are correctly threaded since otherwise proper thread tension cannot be obtained (See page 6). LIII I® ...IIII ICI ID Turn the chain stitch needle thread tension dial (blue) toward the plus sign (+), or chain stitch looper thread tension to minus sign 00 0 Needle thread Topside 14 LOoper ti,read Underside
...only) Chain stitch needle dial (blue) Chain stitch- \ looper dial (yellow) A ! When the chain stitch needle thread tension is turned up toward the plus sign (+). • Correct thread tension Be sure the threads are correctly threaded since otherwise proper thread tension cannot be obtained (See page 6). LIII I® ...IIII ICI ID Turn the chain stitch needle thread tension dial (blue) toward the plus sign (+), or chain stitch looper thread tension to minus sign 00 0 Needle thread Topside 14 LOoper ti,read Underside
Instruction Manual 32
Page 17
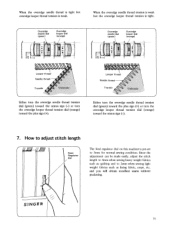
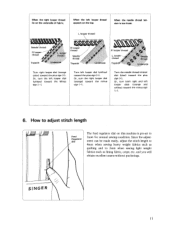
... easily, adjust the stitch length to 4mm when sewing heavy weight fabrics such as quilting and to 3mm for normal sewing condition. SINGER 15 How to adjust stitch length r L ,--11 Feed Regulator dial The feed regulator dial on this machine is tight. Looper ...thread Needle thread Topside Underside Either turn the overedge looper thread tension dial (orange) toward the plus sign (+). and you will obtain excellent seams without puckering. Overedge needle dial (green) Overedge looper dial (orange) A 1 V ID Overedge ...
... easily, adjust the stitch length to 4mm when sewing heavy weight fabrics such as quilting and to 3mm for normal sewing condition. SINGER 15 How to adjust stitch length r L ,--11 Feed Regulator dial The feed regulator dial on this machine is tight. Looper ...thread Needle thread Topside Underside Either turn the overedge looper thread tension dial (orange) toward the plus sign (+). and you will obtain excellent seams without puckering. Overedge needle dial (green) Overedge looper dial (orange) A 1 V ID Overedge ...
Instruction Manual 33
Page 12
...the dials stop , turn , 1 I 1 turn 1 A 1 - 1 Medium Weight Heavy Weight 1.5 turns 2 turns 1 turn 1 turn 1 turn IlI AI - 1 turn the dials toward the plus sign (+) as shown in table below A and set as follows. (1) Turn the needle thread tension dial and the left and right looper thread tension dials... toward the plus sign (+). • Correct thread tension Be sure the threads are set the needle tension dial and left and right looper thread tension ...
...the dials stop , turn , 1 I 1 turn 1 A 1 - 1 Medium Weight Heavy Weight 1.5 turns 2 turns 1 turn 1 turn 1 turn IlI AI - 1 turn the dials toward the plus sign (+) as shown in table below A and set as follows. (1) Turn the needle thread tension dial and the left and right looper thread tension dials... toward the plus sign (+). • Correct thread tension Be sure the threads are set the needle tension dial and left and right looper thread tension ...
Instruction Manual 33
Page 13
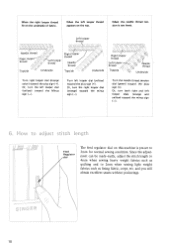
..., When the left looper dials (orange and yellow) toward the minus sign (-). 6. Or, turn the right looper dial (orange) toward the plus sign (+). Since the adjustment can be made easily, adjust the stitch length to 4mm when sewing heavy weight fabrics such as lining fabric, crepe,... etc. SINGER 11 Or, turn the left looper dial (yellow) toward the minus sign (-). Turn the needle thread tension dial (blue) toward the plus sign (+). and you will obtain excellent seams without puckerings. Turn left looper dial...
..., When the left looper dials (orange and yellow) toward the minus sign (-). 6. Or, turn the right looper dial (orange) toward the plus sign (+). Since the adjustment can be made easily, adjust the stitch length to 4mm when sewing heavy weight fabrics such as lining fabric, crepe,... etc. SINGER 11 Or, turn the left looper dial (yellow) toward the minus sign (-). Turn the needle thread tension dial (blue) toward the plus sign (+). and you will obtain excellent seams without puckerings. Turn left looper dial...
Instruction Manual 35
Page 12
... loose. Or, turn the left looper dial (yellow) toward the minus sign (-). When the left looper dials (orange and yellow) toward the plus sign (+). L Feed Regulator dial The feed regulator dial on the underside of fabric. Or, turn the right looper dial (orange) toward the... plus sign (+). thread Topside Needle thread Underside Turn right looper dial (orange color) toward the Minus sign (-). and you will obtain excellent seams ...
... loose. Or, turn the left looper dial (yellow) toward the minus sign (-). When the left looper dials (orange and yellow) toward the plus sign (+). L Feed Regulator dial The feed regulator dial on the underside of fabric. Or, turn the right looper dial (orange) toward the... plus sign (+). thread Topside Needle thread Underside Turn right looper dial (orange color) toward the Minus sign (-). and you will obtain excellent seams ...
Instruction Manual 35
Page 14
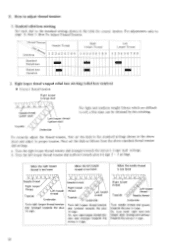
... tension dial (yellow) towards the minus (-) sign. Or, turn both right and left looper thread tension dial (yellow) towards the plus (+) sign. Next set the dials to proper tension. Needle thread Right looper - How to the standard settings shown in the above ...looper thread is too loose Needle thread Right looper thread Topside Left looper thread Underside Turn right looper thread tension dial (orange) towards the plus (+) sign 2 - 3 settings. Standard rolled hem stitching Set each dial to adjust thread tension 1. Thread Tension Needle Thread Stitching t ...
... tension dial (yellow) towards the minus (-) sign. Or, turn both right and left looper thread tension dial (yellow) towards the plus (+) sign. Next set the dials to proper tension. Needle thread Right looper - How to the standard settings shown in the above ...looper thread is too loose Needle thread Right looper thread Topside Left looper thread Underside Turn right looper thread tension dial (orange) towards the plus (+) sign 2 - 3 settings. Standard rolled hem stitching Set each dial to adjust thread tension 1. Thread Tension Needle Thread Stitching t ...


