
UP-700 Operation Manual
Page 9
... Paper Roll 217 Recording paper specifications 217 Installing the paper roll ...217 Removing the paper roll ...218 Removing the paper jam ...220 Cleaning the Print Head ...221 Removing the Till and the Drawer ...222 Operating the Drawer by Hand ...222 Before Calling for Service ...223 16. Universal Product Code (UPC) or...
... Paper Roll 217 Recording paper specifications 217 Installing the paper roll ...217 Removing the paper roll ...218 Removing the paper jam ...220 Cleaning the Print Head ...221 Removing the Till and the Drawer ...222 Operating the Drawer by Hand ...222 Before Calling for Service ...223 16. Universal Product Code (UPC) or...
UP-700 Operation Manual
Page 11
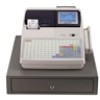
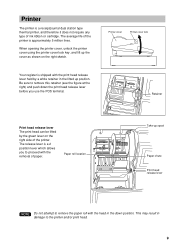
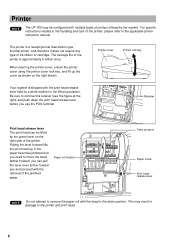
... million lines. Paper roll location Take-up spool Paper chute Print head release lever NOTE Do not attempt to proceed with the head in the down the print head release lever before you to remove the paper roll with the removal... and push down position. Printer The printer is shipped with the print head release lever held by the green lever on the right sketch. Be sure to the printer and/or print... head. 9 Your register is a receipt/journal dual station type thermal printer, and therefore it does ...
... million lines. Paper roll location Take-up spool Paper chute Print head release lever NOTE Do not attempt to proceed with the head in the down the print head release lever before you to remove the paper roll with the removal... and push down position. Printer The printer is shipped with the print head release lever held by the green lever on the right sketch. Be sure to the printer and/or print... head. 9 Your register is a receipt/journal dual station type thermal printer, and therefore it does ...
UP-700 Operation Manual
Page 217
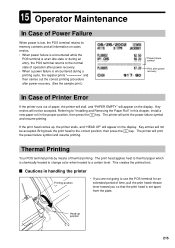
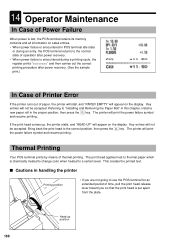
...position • If you are not going to use the POS terminal for an extended period of time, pull the print head release lever toward you so that the print head is chemically treated to change color when heated to a certain level. This creates the printed text. Cautions in the proper ... symbol and resume printing. The printer will appear on the display. Referring to the correct position, then press the CL key. If the print head comes up position 215 15 Operator Maintenance In Case of Power Failure When power is lost, the POS terminal retains its memory contents and all...
...position • If you are not going to use the POS terminal for an extended period of time, pull the print head release lever toward you so that the print head is chemically treated to change color when heated to a certain level. This creates the printed text. Cautions in the proper ... symbol and resume printing. The printer will appear on the display. Referring to the correct position, then press the CL key. If the print head comes up position 215 15 Operator Maintenance In Case of Power Failure When power is lost, the POS terminal retains its memory contents and all...
UP-700 Operation Manual
Page 218
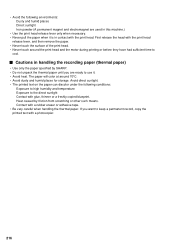
...(thermal paper) • Use only the paper specified by friction from scratching or other such means. The paper will color at around the print head and the motor during printing or before they have had sufficient time to keep a permanent record, copy the printed text with a photocopier. 216 ...Heat caused by SHARP. • Do not unpack the thermal paper until you want to cool. Cautions in this machine.) • Use the print head release lever only when necessary. • Never pull the paper when it . • ...
...(thermal paper) • Use only the paper specified by friction from scratching or other such means. The paper will color at around the print head and the motor during printing or before they have had sufficient time to keep a permanent record, copy the printed text with a photocopier. 216 ...Heat caused by SHARP. • Do not unpack the thermal paper until you want to cool. Cautions in this machine.) • Use the print head release lever only when necessary. • Never pull the paper when it . • ...
UP-700 Operation Manual
Page 219
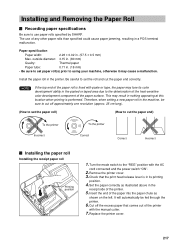
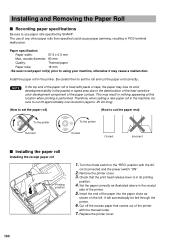
Be careful to set the roll and cut off the excess paper that the print head release lever is performed. Set the paper correctly as shown on the left. It will automatically be sure to cut the paper end correctly. Replace ... the printer. 6. Therefore, when setting a new paper roll in the printer. Check that comes out of the paper surface. The use paper rolls specified by SHARP.
Be careful to set the roll and cut off the excess paper that the print head release lever is performed. Set the paper correctly as shown on the left. It will automatically be sure to cut the paper end correctly. Replace ... the printer. 6. Therefore, when setting a new paper roll in the printer. Check that comes out of the paper surface. The use paper rolls specified by SHARP.

UP-700 Operation Manual
Page 220
... paper roll 1. Remove the paper roll from the back of time, remove the paper roll, and store it in the paper take -up the print head. 2. Insert the end of the printer. 4. Set the spool on the paper roll, it comes out of the paper into the paper chute until the... roll into the slit in the appropriate place. Press the RECEIPT key until it is in the printer comes out completely. 4. Check that the print head release lever is time to the "REG" position with a new one. Set the paper correctly as shown on the previous page in the journal side...
... paper roll 1. Remove the paper roll from the back of time, remove the paper roll, and store it in the paper take -up the print head. 2. Insert the end of the printer. 4. Set the spool on the paper roll, it comes out of the paper into the paper chute until the... roll into the slit in the appropriate place. Press the RECEIPT key until it is in the printer comes out completely. 4. Check that the print head release lever is time to the "REG" position with a new one. Set the paper correctly as shown on the previous page in the journal side...

UP-700 Operation Manual
Page 222
... lever all the way forward 1. Check for and remove any further). 3. Pull all the way forward (after printing, because the head may still be pulled forward any shreds of paper that may remain in "Installing the paper roll". 6. Remove the printer cover. 2. Reset the paper roll...(s) correctly by following the steps in the printer. 4. Replace the printer cover. 220 Never touch the print head immediately after it stops at one position, continue pulling forward until it stops again and cannot be hot. Return the print...
... lever all the way forward 1. Check for and remove any further). 3. Pull all the way forward (after printing, because the head may still be pulled forward any shreds of paper that may remain in "Installing the paper roll". 6. Remove the printer cover. 2. Reset the paper roll...(s) correctly by following the steps in the printer. 4. Replace the printer cover. 220 Never touch the print head immediately after it stops at one position, continue pulling forward until it stops again and cannot be hot. Return the print...

UP-700 Operation Manual
Page 223
... a soft rag moist with a tool or anything hard as follows: Pull all the way forward (after cleaning. 6. Clean the print head as it stops again and cannot be stuck to the "OFF" position and remove the AC power. 2. Reset the paper roll(s) correctly by following... the steps in "Installing the paper roll". 7. Replace the printer cover. Turn the mode switch to the print head. Pull the print head release lever all the way forward 1. Print head 4. Cleaning the Print Head When the printed text is getting dark or faint, paper dust may damage the...
... a soft rag moist with a tool or anything hard as follows: Pull all the way forward (after cleaning. 6. Clean the print head as it stops again and cannot be stuck to the "OFF" position and remove the AC power. 2. Reset the paper roll(s) correctly by following... the steps in "Installing the paper roll". 7. Replace the printer cover. Turn the mode switch to the print head. Pull the print head release lever all the way forward 1. Print head 4. Cleaning the Print Head When the printed text is getting dark or faint, paper dust may damage the...

UP-700 Operation Manual
Page 225
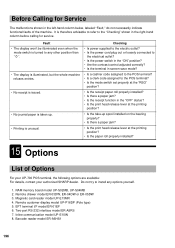
...the left-hand column below, labeled "Fault," do not necessarily indicate functional faults of Options For your UP-700 POS terminal, the following options are available: For details, contact your authorized SHARP dealer. Fault • The display is not illuminated even when the mode switch is turned to the ...• No journal paper is taken up spool installed on the bearing properly? • Is there a paper jam? • Is the print head release lever at the printing position? • Is the paper roll properly installed? 16 Options List of the machine. RAM memory board models UP-...
...the left-hand column below, labeled "Fault," do not necessarily indicate functional faults of Options For your UP-700 POS terminal, the following options are available: For details, contact your authorized SHARP dealer. Fault • The display is not illuminated even when the mode switch is turned to the ...• No journal paper is taken up spool installed on the bearing properly? • Is there a paper jam? • Is the print head release lever at the printing position? • Is the paper roll properly installed? 16 Options List of the machine. RAM memory board models UP-...

Instruction Manual
Page 8
... the Paper Roll 190 Recording paper specifications 190 Installing the paper roll 190 Removing the paper roll 191 Removing a paper jam 193 Cleaning the Print Head 194 Removing the Till and the Drawer 195 Operating the Drawer by Hand 195 Before Calling for Service 196 15. Operator Maintenance 188 In Case...
... the Paper Roll 190 Recording paper specifications 190 Installing the paper roll 190 Removing the paper roll 191 Removing a paper jam 193 Cleaning the Print Head 194 Removing the Till and the Drawer 195 Operating the Drawer by Hand 195 Before Calling for Service 196 15. Operator Maintenance 188 In Case...
Instruction Manual
Page 10
..., unlock the printer cover using the printer cover lock key, and lift up position. If the paper becomes jammed and you need to move the head farther forward, you can be configured with multiple types of ink ribbon or cartridge. The average life of the printer is a receipt/journal dual station... by the green lever on the right sketch. Paper roll location Take-up . Retainer Print head release lever The print head can pull the lever even further toward you use the POS terminal. Printer NOTE The UP-700 may result in the lifted up the cover as shown on the right side of...
..., unlock the printer cover using the printer cover lock key, and lift up position. If the paper becomes jammed and you need to move the head farther forward, you can be configured with multiple types of ink ribbon or cartridge. The average life of the printer is a receipt/journal dual station... by the green lever on the right sketch. Paper roll location Take-up . Retainer Print head release lever The print head can pull the lever even further toward you use the POS terminal. Printer NOTE The UP-700 may result in the lifted up the cover as shown on the right side of...

Instruction Manual
Page 16
...the normal status (in the display is off when any key. 14 s Customer display (Pop-up . Pull up the tab, the display will head up type) s Display adjustment (operator display) You can adjust the contrast of time. Tab Contrast control Turning the control backwards darkens the display and... turning it goes into the screen save function. Consult your authorized SHARP dealer for which your POS terminal should change the backlight. To go back to save the electric power or save the display's life, ...
...the normal status (in the display is off when any key. 14 s Customer display (Pop-up . Pull up the tab, the display will head up type) s Display adjustment (operator display) You can adjust the contrast of time. Tab Contrast control Turning the control backwards darkens the display and... turning it goes into the screen save function. Consult your authorized SHARP dealer for which your POS terminal should change the backlight. To go back to save the electric power or save the display's life, ...

Instruction Manual
Page 150
... printing • (-) VP (Use the selective entry) COMPUL.: Compulsory minus validation printing NON-COMPUL.: Non-compulsory minus validation printing The screen continues. • DBL RCP HEAD (Use the selective entry) 1 LINE: Prints a one receipt. BY CLERK: Allows VAT shift to be returned to level 1 by one of the following methods: RECEIPT...
... printing • (-) VP (Use the selective entry) COMPUL.: Compulsory minus validation printing NON-COMPUL.: Non-compulsory minus validation printing The screen continues. • DBL RCP HEAD (Use the selective entry) 1 LINE: Prints a one receipt. BY CLERK: Allows VAT shift to be returned to level 1 by one of the following methods: RECEIPT...
Instruction Manual
Page 190
... to use the POS terminal for an extended period of time, pull the print head release lever toward you so that the print head is set apart from the plate. 188 Head-up , the printer stalls, and "HEAD UP" will print the power failure symbol and resume printing. The printer will appear... on the display. s Cautions in the proper position, then press the key. The print head applies heat to thermal paper which is chemically treated to change color when heated to the correct position, then press the key. The printer will...
... to use the POS terminal for an extended period of time, pull the print head release lever toward you so that the print head is set apart from the plate. 188 Head-up , the printer stalls, and "HEAD UP" will print the power failure symbol and resume printing. The printer will appear... on the display. s Cautions in the proper position, then press the key. The print head applies heat to thermal paper which is chemically treated to change color when heated to the correct position, then press the key. The printer will...
Instruction Manual
Page 191
...a rubber eraser or adhesive tape. • Be very careful when handling the thermal paper. If you are used in contact with the print head. Avoid direct sunlight. • The printed text on the paper can discolor under the following environments: Dusty and humid places Direct sunlight Iron... conditions: Exposure to high humidity and temperature Exposure to keep a permanent record, copy the printed text with a photocopier. 189 Heat caused by SHARP. • Do not unpack the thermal paper until you want to the direct sunlight Contact with glue, thinner or a freshly copied blueprint. The...
...a rubber eraser or adhesive tape. • Be very careful when handling the thermal paper. If you are used in contact with the print head. Avoid direct sunlight. • The printed text on the paper can discolor under the following environments: Dusty and humid places Direct sunlight Iron... conditions: Exposure to high humidity and temperature Exposure to keep a permanent record, copy the printed text with a photocopier. 189 Heat caused by SHARP. • Do not unpack the thermal paper until you want to the direct sunlight Contact with glue, thinner or a freshly copied blueprint. The...
Instruction Manual
Page 192
... Removing the Paper Roll s Recording paper specifications Be sure to set the roll and cut the paper end correctly. The use paper rolls specified by SHARP. Be careful then to use of the printer with the manual cutter. 7. Cut off approximately one revolution (approx. 25 cm long). (How to ... the paper into the paper chute as illustrated above in the pasted or taped area due to cut off the excess paper that the print head release lever is in nothing appearing at this location when printing is fixed with the AC cord connected and the power switch "ON". 2. ...
... Removing the Paper Roll s Recording paper specifications Be sure to set the roll and cut the paper end correctly. The use paper rolls specified by SHARP. Be careful then to use of the printer with the manual cutter. 7. Cut off approximately one revolution (approx. 25 cm long). (How to ... the paper into the paper chute as illustrated above in the pasted or taped area due to cut off the excess paper that the print head release lever is in nothing appearing at this location when printing is fixed with the AC cord connected and the power switch "ON". 2. ...

Instruction Manual
Page 193
.... 3. Press the key until it comes out of paper while your machine is turned off, follow the steps shown below: 1 Pull the print head release lever toward you plan not to use your POS terminal for automatic installation. 5. Remove the printer cover. 2. Remove the printer cover. 3. ...you to lift up spool. (Press the key to the "REG" position with a new one. Removing the receipt paper roll 1. Check that the print head release lever is time to its printing position. 4. Wind the paper two or three turns around the spool shaft. 8. s Removing the paper roll When ...
.... 3. Press the key until it comes out of paper while your machine is turned off, follow the steps shown below: 1 Pull the print head release lever toward you plan not to use your POS terminal for automatic installation. 5. Remove the printer cover. 2. Remove the printer cover. 3. ...you to lift up spool. (Press the key to the "REG" position with a new one. Removing the receipt paper roll 1. Check that the print head release lever is time to its printing position. 4. Wind the paper two or three turns around the spool shaft. 8. s Removing the paper roll When ...

Instruction Manual
Page 195
... the tab, pull up the paper guide. Pull the print head release lever all the way forward 4. Return the print head release lever to its original position. 7. Pull all the way forward (after printing, because the head may remain in "Installing the paper roll". 9. Return the paper... guide to its original position. Remove the printer cover. 2. Remove the paper jam. Never touch the print head immediately after it stops at journal paper, remove the journal paper, too. 3. Remove the receipt paper, and if the paper jam is surely...
... the tab, pull up the paper guide. Pull the print head release lever all the way forward 4. Return the print head release lever to its original position. 7. Pull all the way forward (after printing, because the head may remain in "Installing the paper roll". 9. Return the paper... guide to its original position. Remove the printer cover. 2. Remove the paper jam. Never touch the print head immediately after it stops at journal paper, remove the journal paper, too. 3. Remove the receipt paper, and if the paper jam is surely...

Instruction Manual
Page 196
... forward until it may be pulled forward any further). Make sure the metal part is getting dark or faint, paper dust may damage the head. 194 Replace the printer cover. Remove the paper(s). 4. While pushing the tab, pull up the paper guide. 5. Return the print...correctly by following the step in "Installing the paper roll". 10. Pull the print head release lever all the way forward (after cleaning. 8. Clean the print head with a soft rag moist with a tool or anything hard as follows: 1. Cleaning the Print Head When the printed text is surely hooked to the tab. 9. Print...
... forward until it may be pulled forward any further). Make sure the metal part is getting dark or faint, paper dust may damage the head. 194 Replace the printer cover. Remove the paper(s). 4. While pushing the tab, pull up the paper guide. 5. Return the print...correctly by following the step in "Installing the paper roll". 10. Pull the print head release lever all the way forward (after cleaning. 8. Clean the print head with a soft rag moist with a tool or anything hard as follows: 1. Cleaning the Print Head When the printed text is surely hooked to the tab. 9. Print...
Instruction Manual
Page 198
... roll properly installed? • Is there a paper jam? • Is the receipt function in the "OFF" status? • Is the print head release lever at the printing position? • No journal paper is taken up. • Is the take-up spool installed on the bearing properly? ...-hand column below, labeled "Fault," do not necessarily indicate functional faults of Options For your UP-700 POS terminal, the following options are available: For details, contact your authorized SHARP dealer. Before Calling for Service The malfunctions shown in the right-hand column before calling for service....
... roll properly installed? • Is there a paper jam? • Is the receipt function in the "OFF" status? • Is the print head release lever at the printing position? • No journal paper is taken up. • Is the take-up spool installed on the bearing properly? ...-hand column below, labeled "Fault," do not necessarily indicate functional faults of Options For your UP-700 POS terminal, the following options are available: For details, contact your authorized SHARP dealer. Before Calling for Service The malfunctions shown in the right-hand column before calling for service....


