
HT-SB300 Operation Manual
Page 1
..., Length: 30 mm) Note: This product is a trademark of SRS Labs, Inc. WOW HD technology is incorporated under license from this product, please read this SHARP product. SOUND BAR SYSTEM MODEL HT-SB300 OPERATION MANUAL Thank you in operating your...
..., Length: 30 mm) Note: This product is a trademark of SRS Labs, Inc. WOW HD technology is incorporated under license from this product, please read this SHARP product. SOUND BAR SYSTEM MODEL HT-SB300 OPERATION MANUAL Thank you in operating your...
HT-SB300 Operation Manual
Page 2
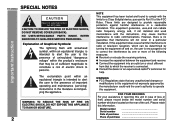
... receiver is encouraged to try to the presence of the unit. FOR YOUR RECORDS For your assistance in the literature accompanying the appliance. Important Instruction HT-SB300 SPECIAL NOTES CAUTION: TO REDUCE THE RISK OF ELECTRIC SHOCK, DO NOT REMOVE COVER (OR BACK). REFER SERVICING TO QUALIFIED SERVICE PERSONNEL. These limits are...
... receiver is encouraged to try to the presence of the unit. FOR YOUR RECORDS For your assistance in the literature accompanying the appliance. Important Instruction HT-SB300 SPECIAL NOTES CAUTION: TO REDUCE THE RISK OF ELECTRIC SHOCK, DO NOT REMOVE COVER (OR BACK). REFER SERVICING TO QUALIFIED SERVICE PERSONNEL. These limits are...
HT-SB300 Operation Manual
Page 3
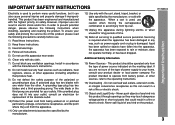
... instructions when installing, operating and cleaning the product. Servicing is required when the apparatus has been damaged in accordance with the apparatus. IMPORTANT SAFETY INSTRUCTIONS HT-SB300 Important Instruction Electricity is used , use caution when moving the cart/apparatus combination to rain or moisture, does not operate normally, or has been dropped...
... instructions when installing, operating and cleaning the product. Servicing is required when the apparatus has been damaged in accordance with the apparatus. IMPORTANT SAFETY INSTRUCTIONS HT-SB300 Important Instruction Electricity is used , use caution when moving the cart/apparatus combination to rain or moisture, does not operate normally, or has been dropped...
HT-SB300 Operation Manual
Page 4
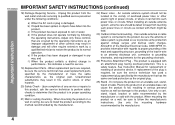
... original plug. 25) Stand - The product is damaged, b) If liquid has been spilled, or objects have the same characteristics as the original part. Important Instruction HT-SB300 IMPORTANT SAFETY INSTRUCTIONS (continued) 18) Damage Requiring Service - Adjust only those controls that has the same overload protection as damage to follow the manufacturer's instructions...
... original plug. 25) Stand - The product is damaged, b) If liquid has been spilled, or objects have the same characteristics as the original part. Important Instruction HT-SB300 IMPORTANT SAFETY INSTRUCTIONS (continued) 18) Damage Requiring Service - Adjust only those controls that has the same overload protection as damage to follow the manufacturer's instructions...
HT-SB300 Operation Manual
Page 5
...,535 & other U.S. Manufactured under license under license from Dolby Laboratories. registered mark. Contents HT-SB300 Page ■ General Information Precautions 6 Controls and indicators 7 - 9 General Information ■ Preparation for Use Speaker preparation 10 - 12 Placing the speaker 13 Falling prevention 14 Speaker connections to protect the environment through superior energy efficiency. Notes ENERGY STAR® Program...
...,535 & other U.S. Manufactured under license under license from Dolby Laboratories. registered mark. Contents HT-SB300 Page ■ General Information Precautions 6 Controls and indicators 7 - 9 General Information ■ Preparation for Use Speaker preparation 10 - 12 Placing the speaker 13 Falling prevention 14 Speaker connections to protect the environment through superior energy efficiency. Notes ENERGY STAR® Program...
HT-SB300 Operation Manual
Page 6
HT-SB300 Precautions ■ General ● Please ensure that the equipment is advisable to avoid exposure to high volume levels, which occurs while turning the speaker on with other equipment. ● Never use an AC/DC adaptor other factors. Never remove covers unless qualified to your local SHARP service facility. ● This speaker... or when not in , and then turn on speaker efficiency, location, and various other than the one specified. Otherwise, problem or serious hazards may be created. ■ Volume control The sound level at least 4" (10 cm) of free ...
HT-SB300 Precautions ■ General ● Please ensure that the equipment is advisable to avoid exposure to high volume levels, which occurs while turning the speaker on with other equipment. ● Never use an AC/DC adaptor other factors. Never remove covers unless qualified to your local SHARP service facility. ● This speaker... or when not in , and then turn on speaker efficiency, location, and various other than the one specified. Otherwise, problem or serious hazards may be created. ■ Volume control The sound level at least 4" (10 cm) of free ...
HT-SB300 Operation Manual
Page 7
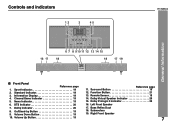
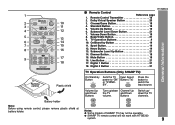
... 20 5. DTS Indicator 20 16. Bass Reflex Duct 8. Right Front Speaker 10. Standard Indicator 19 12. Remote Sensor 18 4. Information Display 19 13. Volume Up Button 19 7 Controls and indicators 12 3 45 HT-SB300 General Information 16 17 6 7 8 9 10 11 12 13 14 15 18 18 17 19 ■ Front Panel...-by Button 19 9. Surround Button 19 2. Function Button 21 3. Subwoofers 19. News Indicator 19 15. Dolby Indicator 20 17. Sport Indicator 19 11. Left Front Speaker 7. Dolby Prologic II Indicator 20 6.
... 20 5. DTS Indicator 20 16. Bass Reflex Duct 8. Right Front Speaker 10. Standard Indicator 19 12. Remote Sensor 18 4. Information Display 19 13. Volume Up Button 19 7 Controls and indicators 12 3 45 HT-SB300 General Information 16 17 6 7 8 9 10 11 12 13 14 15 18 18 17 19 ■ Front Panel...-by Button 19 9. Surround Button 19 2. Function Button 21 3. Subwoofers 19. News Indicator 19 15. Dolby Indicator 20 17. Sport Indicator 19 11. Left Front Speaker 7. Dolby Prologic II Indicator 20 6.
HT-SB300 Operation Manual
Page 8
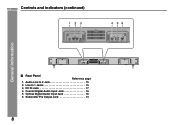
Coaxial Digital Audio Input Jack 16 5. Optical Digital Audio Input Jack 16 6. HT-SB300 Controls and indicators (continued) 1 23 LINE IN 2 RIGHT LEFT LINE IN 1 4 56 General Information ■ Rear Panel Reference page 1. DC IN Jack 17 4. Subwoofer Pre Output Jack 13 8 Line In 1 Jacks 15 3. Audio Line In 2 Jack 15 2.
Coaxial Digital Audio Input Jack 16 5. Optical Digital Audio Input Jack 16 6. HT-SB300 Controls and indicators (continued) 1 23 LINE IN 2 RIGHT LEFT LINE IN 1 4 56 General Information ■ Rear Panel Reference page 1. DC IN Jack 17 4. Subwoofer Pre Output Jack 13 8 Line In 1 Jacks 15 3. Audio Line In 2 Jack 15 2.
HT-SB300 Operation Manual
Page 9
...16. Line Button 21 17. Press the button to "ON" Button (TV) or "STANDBY". Digital 2 Button 21 HT-SB300 General Information TV Operation Buttons (Only SHARP TV): On/Stand-by Button 19 11. Volume Up Button 19 6. Bass/Treble Button 21 9. News Button 19 ...18 2. Buttons Switch up /down the TV channels. Notes: ● Some models of SHARP TV may not be operable. ● SHARP TV remote control will not work with HT-SB300 system. 9 Dolby Virtual Speaker Button 20 3. Subwoofer Level Down Button 21 7. Cinema/Game Button 19 4. Digital 1 Button...
...16. Line Button 21 17. Press the button to "ON" Button (TV) or "STANDBY". Digital 2 Button 21 HT-SB300 General Information TV Operation Buttons (Only SHARP TV): On/Stand-by Button 19 11. Volume Up Button 19 6. Bass/Treble Button 21 9. News Button 19 ...18 2. Buttons Switch up /down the TV channels. Notes: ● Some models of SHARP TV may not be operable. ● SHARP TV remote control will not work with HT-SB300 system. 9 Dolby Virtual Speaker Button 20 3. Subwoofer Level Down Button 21 7. Cinema/Game Button 19 4. Digital 1 Button...
HT-SB300 Operation Manual
Page 10
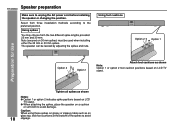
...spike positions based on LCD TV stand. ● When attaching the spikes, place the speaker on glass top, stick foot cushions at the bottom of the spikes to the preferred position. The speaker can be used when installing either the 25 mm or 30 mm spikes. Using spikes ... 1 Option 2 Option 1 Attach foot cushions as on a cushion or soft cloth to unplug the AC power cord before installing the speaker or changing the position. HT-SB300 Speaker preparation Make sure to avoid damage. Select from the two different spike lengths provided: 25 mm and 30 mm. Caution: When using ...
...spike positions based on LCD TV stand. ● When attaching the spikes, place the speaker on glass top, stick foot cushions at the bottom of the spikes to the preferred position. The speaker can be used when installing either the 25 mm or 30 mm spikes. Using spikes ... 1 Option 2 Option 1 Attach foot cushions as on a cushion or soft cloth to unplug the AC power cord before installing the speaker or changing the position. HT-SB300 Speaker preparation Make sure to avoid damage. Select from the two different spike lengths provided: 25 mm and 30 mm. Caution: When using ...
HT-SB300 Operation Manual
Page 11
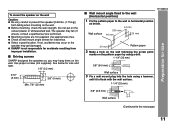
... wall. If not, accidents may occur or the speaker may get damaged. ● SHARP is flush with the wall surface. 1-1/4" (32 mm) 3/8" (8-9 mm) Wall surface (Continued to the wall in horizontal position as below. 44 mm 509 mm Wall surface 44 mm 29 mm HT-SB300 Preparation for looseness. ● Select a good location...
... wall. If not, accidents may occur or the speaker may get damaged. ● SHARP is flush with the wall surface. 1-1/4" (32 mm) 3/8" (8-9 mm) Wall surface (Continued to the wall in horizontal position as below. 44 mm 509 mm Wall surface 44 mm 29 mm HT-SB300 Preparation for looseness. ● Select a good location...
HT-SB300 Operation Manual
Page 12
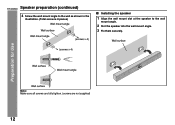
Wall surface (screws x 4) Preparation for Use Wall surface Wall mount angle Wall surface Note: Make sure all screws are fully tighten. (screws are not supplied) 12 HT-SB300 Speaker preparation (continued) 4 Screw the wall mount angle to the wall as shown in the illustration. (Total screw is 8 pieces) Wall mount angle Wall surface Wall mount angle (screws x 4) ■ Installing the speaker 1 Align the wall mount slot at the speaker to the wall mount angle. 2 Slot the speaker into the wall mount angle. 3 Fix them securely.
Wall surface (screws x 4) Preparation for Use Wall surface Wall mount angle Wall surface Note: Make sure all screws are fully tighten. (screws are not supplied) 12 HT-SB300 Speaker preparation (continued) 4 Screw the wall mount angle to the wall as shown in the illustration. (Total screw is 8 pieces) Wall mount angle Wall surface Wall mount angle (screws x 4) ■ Installing the speaker 1 Align the wall mount slot at the speaker to the wall mount angle. 2 Slot the speaker into the wall mount angle. 3 Fix them securely.

HT-SB300 Operation Manual
Page 13
HT-SB300 Audio cable (commercially available) Audio signal To audio input jack Commercially available subwoofer (amplifier built in amplifier. 13 However, it is recommended to place it as close to the SUBWOOFER PRE OUT jack. Notes: ● As the sound from the subwoofer without a built-in ) Speaker... To SUBWOOFER PRE OUT jack Note: No sound is not removable. Preparation for Use Placing the speaker Installation image: TV VCR DVD player Place the speaker as you may be injured. ...
HT-SB300 Audio cable (commercially available) Audio signal To audio input jack Commercially available subwoofer (amplifier built in amplifier. 13 However, it is recommended to place it as close to the SUBWOOFER PRE OUT jack. Notes: ● As the sound from the subwoofer without a built-in ) Speaker... To SUBWOOFER PRE OUT jack Note: No sound is not removable. Preparation for Use Placing the speaker Installation image: TV VCR DVD player Place the speaker as you may be injured. ...
HT-SB300 Operation Manual
Page 14
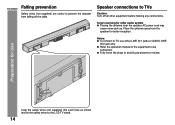
... of the equipment to be connected. ● Fully insert the plugs to TVs Caution: Turn off the table. HT-SB300 Falling prevention Safety wires (not supplied) are useful to prevent the speaker from the speaker for Use Loop the safety wires (not supplied) into each hole as shown and tie the safety wires to... the LCD TV stand. 14 Place the antenna away from falling off all other audio system ● Placing the antenna near the speaker AC power cord may cause noise pick up. Tuner receiving for other equipment before making any connections...
... of the equipment to be connected. ● Fully insert the plugs to TVs Caution: Turn off the table. HT-SB300 Falling prevention Safety wires (not supplied) are useful to prevent the speaker from the speaker for Use Loop the safety wires (not supplied) into each hole as shown and tie the safety wires to... the LCD TV stand. 14 Place the antenna away from falling off all other audio system ● Placing the antenna near the speaker AC power cord may cause noise pick up. Tuner receiving for other equipment before making any connections...
HT-SB300 Operation Manual
Page 15
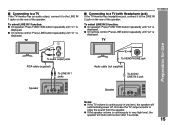
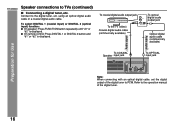
Increase the TV output volume to enjoy the sound from the speaker. ● If the speaker volume is continuously in very high level, the speaker will automatically power off. TV HEADPHONE Preparation for Use To audio output jacks RCA cable (supplied) To LINE IN ...jack on the rear of the speaker. To select LINE IN 1 function: ● On speaker: Press FUNCTION button repeatedly until "L1" is displayed. ● On remote control: Press LINE button repeatedly until "L2" is displayed. HT-SB300 To select LINE IN 2 function: ● On speaker: Press FUNCTION button repeatedly until ...
Increase the TV output volume to enjoy the sound from the speaker. ● If the speaker volume is continuously in very high level, the speaker will automatically power off. TV HEADPHONE Preparation for Use To audio output jacks RCA cable (supplied) To LINE IN ...jack on the rear of the speaker. To select LINE IN 1 function: ● On speaker: Press FUNCTION button repeatedly until "L1" is displayed. ● On remote control: Press LINE button repeatedly until "L2" is displayed. HT-SB300 To select LINE IN 2 function: ● On speaker: Press FUNCTION button repeatedly until ...
HT-SB300 Operation Manual
Page 16
...digital audio cable (commercially available) To optical digital audio output jack Optical digital audio cable (commercially available) Audio signal To COAXIAL Speaker input jack To OPTICAL input jack Preparation for Use Audio signal Note: When connecting with an optical digital cable, set the ... optical digital audio cable or a coaxial digital audio cable. To select DIGITAL 1 (coaxial input) or DIGITAL 2 (optical input) function: ● On speaker: Press FUNCTION button repeatedly until "d1" or "d2" is displayed. ● On remote control: Press DIGITAL 1 or DIGITAL 2 button and "d1"...
...digital audio cable (commercially available) To optical digital audio output jack Optical digital audio cable (commercially available) Audio signal To COAXIAL Speaker input jack To OPTICAL input jack Preparation for Use Audio signal Note: When connecting with an optical digital cable, set the ... optical digital audio cable or a coaxial digital audio cable. To select DIGITAL 1 (coaxial input) or DIGITAL 2 (optical input) function: ● On speaker: Press FUNCTION button repeatedly until "d1" or "d2" is displayed. ● On remote control: Press DIGITAL 1 or DIGITAL 2 button and "d1"...
HT-SB300 Operation Manual
Page 17
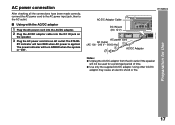
.../DC adaptor 1 Plug the AC power cord into the AC/DC adaptor. 2 Plug the AC/DC adaptor cable into the DC IN jack on the speaker. 3 Plug the AC power cord into an AC outlet.The STAND- The power indicator will turn GREEN when the system in "ON". AC/DC Adaptor... DC IN jack (DC 12 V) 2 LINE IN 2 RIGHT LEFT LINE IN 1 AC power cord AC Outlet (AC 100 - 240 V ~ 50/60 Hz) 1 3 AC/DC Adaptor HT-SB300 Notes: ● Unplug the AC/DC adaptor from the AC outlet if the speaker will not be used for Use 17
.../DC adaptor 1 Plug the AC power cord into the AC/DC adaptor. 2 Plug the AC/DC adaptor cable into the DC IN jack on the speaker. 3 Plug the AC power cord into an AC outlet.The STAND- The power indicator will turn GREEN when the system in "ON". AC/DC Adaptor... DC IN jack (DC 12 V) 2 LINE IN 2 RIGHT LEFT LINE IN 1 AC power cord AC Outlet (AC 100 - 240 V ~ 50/60 Hz) 1 3 AC/DC Adaptor HT-SB300 Notes: ● Unplug the AC/DC adaptor from the AC outlet if the speaker will not be used for Use 17
HT-SB300 Operation Manual
Page 18
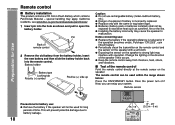
... only with the same or equivalent type. ● Batteries (battery pack or batteries installed) shall not be used for Use HT-SB300 Remote control ■ Battery installation This product contains a CR Coin Lithium Battery which contains Perchlorate Material - Does the power turn on the... hole as sunshine, fire or the like. ● Installing the battery incorrectly may interfere with a soft cloth. ● Exposing the sensor on the speaker to battery leakage. 18 15˚ 15˚ 8" - 20' (0.2 m - 6 m) The remote control can enjoy your system. special handling may apply...
... only with the same or equivalent type. ● Batteries (battery pack or batteries installed) shall not be used for Use HT-SB300 Remote control ■ Battery installation This product contains a CR Coin Lithium Battery which contains Perchlorate Material - Does the power turn on the... hole as sunshine, fire or the like. ● Installing the battery incorrectly may interfere with a soft cloth. ● Exposing the sensor on the speaker to battery leakage. 18 15˚ 15˚ 8" - 20' (0.2 m - 6 m) The remote control can enjoy your system. special handling may apply...
HT-SB300 Operation Manual
Page 19
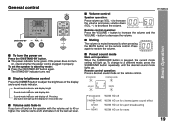
.... The STAND-BY indicator turns red. ■ Display brightness control Press the DIMMER button to a different mode, press the SURROUND button repeatedly until the desired sound mode lights up (VOL. +) to increase the volume and press volume down (VOL. - ) to decrease the volume. 00 01 02 ..... 59 60 Remote control operation...: Press the VOLUME + button to increase the volume and the VOLUME - General control ■ To turn the power on the remote control. HT-SB300 ■ Volume control Speaker operation: Press volume up .
.... The STAND-BY indicator turns red. ■ Display brightness control Press the DIMMER button to a different mode, press the SURROUND button repeatedly until the desired sound mode lights up (VOL. +) to increase the volume and press volume down (VOL. - ) to decrease the volume. 00 01 02 ..... 59 60 Remote control operation...: Press the VOLUME + button to increase the volume and the VOLUME - General control ■ To turn the power on the remote control. HT-SB300 ■ Volume control Speaker operation: Press volume up .
HT-SB300 Operation Manual
Page 20
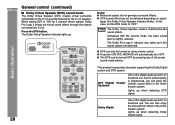
...indicator also lights up when detecting DTS signal. As the sound quality is slightly reduced. ON The Dolby Virtual Speaker creates multichannel-like sound effects. Lights up . Compared with the cinema mode, the bass sound level is emphasized, you turn ON DVS, WOW HD ... DVS can be turned OFF by the 2.1ch speaker. HT-SB300 General control (continued) ■ Dolby Virtual Speaker (DVS) sound mode The Dolby Virtual Speaker (DVS) creates virtual surrounds comparable to the 5.1ch sound produced by pressing any of the preset sound mode buttons. Basic Operation 20 Notes: ●...
...indicator also lights up when detecting DTS signal. As the sound quality is slightly reduced. ON The Dolby Virtual Speaker creates multichannel-like sound effects. Lights up . Compared with the cinema mode, the bass sound level is emphasized, you turn ON DVS, WOW HD ... DVS can be turned OFF by the 2.1ch speaker. HT-SB300 General control (continued) ■ Dolby Virtual Speaker (DVS) sound mode The Dolby Virtual Speaker (DVS) creates virtual surrounds comparable to the 5.1ch sound produced by pressing any of the preset sound mode buttons. Basic Operation 20 Notes: ●...