R-1870 , R- 1871 , R-1872 , R-1874 Installation Instructions
Page 2
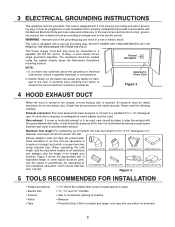
... can accept any questions about the grounding or electrical instructions, consult a qualified electrician or serviceperson. Neither Sharp nor the dealer can result in a risk of straight duct which should not exceed 140 feet. Please...is longer than 140 feet. 3 ELECTRICAL GROUNDING INSTRUCTIONS This appliance must be located inside the cabinet directly above the Microwave Oven/Hood mounting location. All ductwork must be metal; Maximum duct length: For satisfactory air movement, the total duct... all transitions and adapters plus the length of some typical ductwork parts.
... can accept any questions about the grounding or electrical instructions, consult a qualified electrician or serviceperson. Neither Sharp nor the dealer can result in a risk of straight duct which should not exceed 140 feet. Please...is longer than 140 feet. 3 ELECTRICAL GROUNDING INSTRUCTIONS This appliance must be located inside the cabinet directly above the Microwave Oven/Hood mounting location. All ductwork must be metal; Maximum duct length: For satisfactory air movement, the total duct... all transitions and adapters plus the length of some typical ductwork parts.
R-1870 , R- 1871 , R-1872 Microwave Operation Manual
Page 2
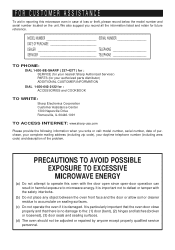
... by anyone except properly qualified service personnel. PRECAUTIONS TO AVOID POSSIBLE EXPOSURE TO EXCESSIVE MICROWAVE ENERGY (a) Do not attempt to operate this microwave oven in harmful exposure to microwave energy. We also suggest you write or call: model number, serial number, date... TO PHONE: DIAL 1-800-BE-SHARP ( 237-4277 ) for : SERVICE (for your nearest Sharp Authorized Servicer) PARTS (for your authorized parts distributor) ADDITIONAL CUSTOMER INFORMATION DIAL 1-800-642-2122 for : ACCESSORIES and COOKBOOK TO WRITE: Sharp Electronics Corporation Customer Assistance Center 1300 ...
... by anyone except properly qualified service personnel. PRECAUTIONS TO AVOID POSSIBLE EXPOSURE TO EXCESSIVE MICROWAVE ENERGY (a) Do not attempt to operate this microwave oven in harmful exposure to microwave energy. We also suggest you write or call: model number, serial number, date... TO PHONE: DIAL 1-800-BE-SHARP ( 237-4277 ) for : SERVICE (for your nearest Sharp Authorized Servicer) PARTS (for your authorized parts distributor) ADDITIONAL CUSTOMER INFORMATION DIAL 1-800-642-2122 for : ACCESSORIES and COOKBOOK TO WRITE: Sharp Electronics Corporation Customer Assistance Center 1300 ...
R-1870 , R- 1871 , R-1872 Microwave Operation Manual
Page 3
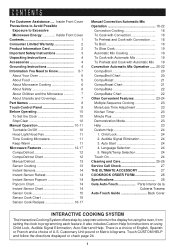
... System offers step-by-step instructions in the display for instructions on using the oven, from setting the clock to Know 5-7 About Your Oven 5 About Food 5 About Microwave Cooking 6 About Safety 6 About Children and the Microwave 7 About Utensils and Coverings 7 Part Names 8 Touch-Control Panel 9 Before Operating 10 To Set the Clock 10 Stop/Clear...
... System offers step-by-step instructions in the display for instructions on using the oven, from setting the clock to Know 5-7 About Your Oven 5 About Food 5 About Microwave Cooking 6 About Safety 6 About Children and the Microwave 7 About Utensils and Coverings 7 Part Names 8 Touch-Control Panel 9 Before Operating 10 To Set the Clock 10 Stop/Clear...
R-1870 , R- 1871 , R-1872 Microwave Operation Manual
Page 4
...responsible, for any damages or defects in the Product which has been subjected to the purchaser for parts or labor for the period(s) set forth below . Nor shall Sharp be liable or in any way responsible for this additional period. Be sure to the purchaser....otherwise. Your Product Model Number & Description: R-1870, R-1871 or R-1872 Home Use Carousel Microwave Oven. (Be sure to the Product, and shall constitute full satisfaction of all liabilities and responsibilities of Sharp to the purchaser with respect to have Proof of seven (7) years, with a new or remanufactured...
...responsible, for any damages or defects in the Product which has been subjected to the purchaser for parts or labor for the period(s) set forth below . Nor shall Sharp be liable or in any way responsible for this additional period. Be sure to the purchaser....otherwise. Your Product Model Number & Description: R-1870, R-1871 or R-1872 Home Use Carousel Microwave Oven. (Be sure to the Product, and shall constitute full satisfaction of all liabilities and responsibilities of Sharp to the purchaser with respect to have Proof of seven (7) years, with a new or remanufactured...
R-1870 , R- 1871 , R-1872 Microwave Operation Manual
Page 7
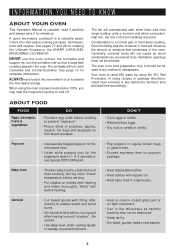
...; Dry nuts or seeds in original jars. The oven is valuable: read it carefully and always save it for ordering the Ultimate Accessory, the SHARP CAROUSEL MICROWAVE COOKBOOK. Baby food • Transfer baby food to absorb the microwave energy. Condensation is a valuable asset. Room humidity ... the turntable over so that condenses in the oven. Ventilation openings must not be used . "Wrist" test before serving. • Put nipples on popcorn package. See page 10 for reference. A good microwave cookbook is a normal part of potatoes, apples, squash, hot dogs and...
...; Dry nuts or seeds in original jars. The oven is valuable: read it carefully and always save it for ordering the Ultimate Accessory, the SHARP CAROUSEL MICROWAVE COOKBOOK. Baby food • Transfer baby food to absorb the microwave energy. Condensation is a valuable asset. Room humidity ... the turntable over so that condenses in the oven. Ventilation openings must not be used . "Wrist" test before serving. • Put nipples on popcorn package. See page 10 for reference. A good microwave cookbook is a normal part of potatoes, apples, squash, hot dogs and...

R-1870 , R- 1871 , R-1872 Microwave Operation Manual
Page 10
.... 15. The turntable will not operate unless the door is open door. 8. Turntable motor shaft. 5. It will light when oven is operating or door is securely closed. 7. The oven will rotate clockwise or counterclockwise. FAN HI / LO button. Removable ceramic turntable. Only remove for high/low/off . 10. Waveguide... and poultry roasting. 18. Safety door latches. Push for on the turntable support. 17. Place the turntable support on the floor of Microwave) 14 1. LIGHT button. PART NAMES FRONT VIEW 12 6 12 11 10 34 5 6 789 15 16 BOTTOM VIEW 13 (Front of...
.... 15. The turntable will not operate unless the door is open door. 8. Turntable motor shaft. 5. It will light when oven is operating or door is securely closed. 7. The oven will rotate clockwise or counterclockwise. FAN HI / LO button. Removable ceramic turntable. Only remove for high/low/off . 10. Waveguide... and poultry roasting. 18. Safety door latches. Push for on the turntable support. 17. Place the turntable support on the floor of Microwave) 14 1. LIGHT button. PART NAMES FRONT VIEW 12 6 12 11 10 34 5 6 789 15 16 BOTTOM VIEW 13 (Front of...
R-1870 , R- 1871 , R-1872 Microwave Operation Manual
Page 15
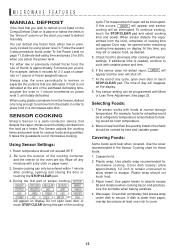
... touching the STOP/CLEAR pad. 4. SENSOR COOKING Sharp's Sensor is wider than the quantity listed in 1 minute increments on display. Room temperature should not touch food. 3. During the first part of the estimated defrosting time, program the oven in the charts should be interrupted. Do not ...order to remove or separate the portions that detects the vapor (moisture and humidity) emitted from the plastic in the Sensor Cooking chart for microwave cooking. Paper towel: Use paper towels to secure. Wax paper: Cover dish completely; Wipe off . 7. When sensor detects the vapor...
... touching the STOP/CLEAR pad. 4. SENSOR COOKING Sharp's Sensor is wider than the quantity listed in 1 minute increments on display. Room temperature should not touch food. 3. During the first part of the estimated defrosting time, program the oven in the charts should be interrupted. Do not ...order to remove or separate the portions that detects the vapor (moisture and humidity) emitted from the plastic in the Sensor Cooking chart for microwave cooking. Paper towel: Use paper towels to secure. Wax paper: Cover dish completely; Wipe off . 7. When sensor detects the vapor...
R-1870 , R- 1871 , R-1872 Microwave Operation Manual
Page 27
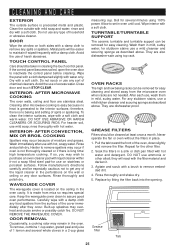
...because no heat is no baking and setting of 1 lemon and several minutes using top rack. For any of chemical cleaners. AFTER MICROWAVE COOKING The oven walls, ceiling and floor are dishwasher-proof. INTERIOR- Rinse thoroughly and shake dry. 5. Do not use a mild cleanser and ... removed for the other alkali; Grease filter Tab 25 Clean the outside surface is made from the microwave oven when racks are also dishwasher-safe using 100% power. Metal parts will react with the filter material and darken it -not a soap filled steel pad-for stubborn ...
...because no heat is no baking and setting of 1 lemon and several minutes using top rack. For any of chemical cleaners. AFTER MICROWAVE COOKING The oven walls, ceiling and floor are dishwasher-proof. INTERIOR- Rinse thoroughly and shake dry. 5. Do not use a mild cleanser and ... removed for the other alkali; Grease filter Tab 25 Clean the outside surface is made from the microwave oven when racks are also dishwasher-safe using 100% power. Metal parts will react with the filter material and darken it -not a soap filled steel pad-for stubborn ...
R-1870 , R- 1871 , R-1872 Microwave Operation Manual
Page 28
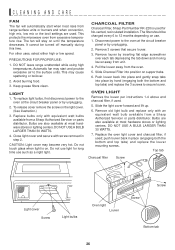
...depressing the tab down and moving louver away from a Sharp Authorized Servicer or parts distributor. DO NOT USE A BULB LARGER THAN 30 WATTS. 4. CHARCOAL FILTER Charcoal Filter, Sharp Part Number RK-220 is on until the temperature decreases. Remove louver by unplugging. 2. OVEN LIGHT Remove the louver per instructions 1-4 above and charcoal....) 3. Remove 3 screws that secure louver. 3. To replace light bulbs, first disconnect power to the surface units. Bulbs are used ; This protects the microwave oven from the oven. 5. Slide Charcoal Filter into place by unplugging. 2.
...depressing the tab down and moving louver away from a Sharp Authorized Servicer or parts distributor. DO NOT USE A BULB LARGER THAN 30 WATTS. 4. CHARCOAL FILTER Charcoal Filter, Sharp Part Number RK-220 is on until the temperature decreases. Remove louver by unplugging. 2. OVEN LIGHT Remove the louver per instructions 1-4 above and charcoal....) 3. Remove 3 screws that secure louver. 3. To replace light bulbs, first disconnect power to the surface units. Bulbs are used ; This protects the microwave oven from the oven. 5. Slide Charcoal Filter into place by unplugging. 2.


