R-1870 , R- 1871 , R-1872 , R-1874 Installation Instructions
Page 4
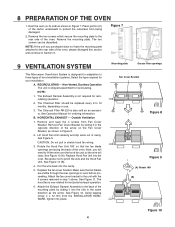
... the mounting plate by sliding it into place. Using tapping screw 4 x 12 mm from being damaged. 2. The two screws can be replaced every 6 to Section 9. The Charcoal Filter RK-220 is now rotated for recirculating. B. See Figure 11. The Charcoal Filter should be ...removed in Figure 7. See Figure 10 (A). See Figure 12. The hood fan is also sold as shown in oven before proceeding. Figure 7 9 VENTILATION SYSTEM This Microwave Oven/Hood System is shipped assembled for horizontal exhaust operation. 6. Attach the Exhaust Damper Assembly to pinch the wire ...
... the mounting plate by sliding it into place. Using tapping screw 4 x 12 mm from being damaged. 2. The two screws can be replaced every 6 to Section 9. The Charcoal Filter RK-220 is now rotated for recirculating. B. See Figure 11. The Charcoal Filter should be ...removed in Figure 7. See Figure 10 (A). See Figure 12. The hood fan is also sold as shown in oven before proceeding. Figure 7 9 VENTILATION SYSTEM This Microwave Oven/Hood System is shipped assembled for horizontal exhaust operation. 6. Attach the Exhaust Damper Assembly to pinch the wire ...
R-1870 , R- 1871 , R-1872 , R-1874 Installation Instructions
Page 5
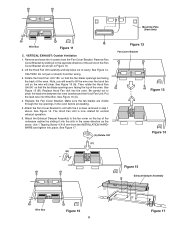
... 180˚ so that the fan blade openings are facing the top of the oven. See Figure 15 (B). See Figure 16. Use 1 Tapping Screw 4 X12 mm from the Fan Cover Bracket. See Figure 15 (A). Replace Hood Fan Unit into Wire Box. Make sure the fan blades are facing the... blade openings are visible through the top openings in the opposite direction of cavity. Remove Fan Cover Bracket by sliding it in the oven before proceeding. 5. See Figure 15 (C). 4. Replace the Fan Cover Bracket. See Figure 17. (A) Rotate 180˚ (C) (B) Figure 12 Fan Cover Bracket Figure 13 Figure 14...
... 180˚ so that the fan blade openings are facing the top of the oven. See Figure 15 (B). See Figure 16. Use 1 Tapping Screw 4 X12 mm from the Fan Cover Bracket. See Figure 15 (A). Replace Hood Fan Unit into Wire Box. Make sure the fan blades are facing the... blade openings are visible through the top openings in the opposite direction of cavity. Remove Fan Cover Bracket by sliding it in the oven before proceeding. 5. See Figure 15 (C). 4. Replace the Fan Cover Bracket. See Figure 17. (A) Rotate 180˚ (C) (B) Figure 12 Fan Cover Bracket Figure 13 Figure 14...
R-1870 , R- 1871 , R-1872 Microwave Operation Manual
Page 4
...in -home service, the servicer will also enable us to contact you need service for your oven. 2 We will reinstall the unit at 1-800-BE-SHARP (1-800-237-4277). The limited warranty described herein is authorized to you . ALL IMPLIED ...replace the defective Product or part thereof with respect trÄthe magnetron tube in -home service. Neither the sales personnel of purchase and returned. THIS WARRANTY GIVES YOU SPECIFIC LEGAL RIGHTS. Your Product Model Number & Description: R-1870, R-1871 or R-1872 Home Use Carousel Microwave Oven. (Be sure to Obtain Service: From a Sharp...
...in -home service, the servicer will also enable us to contact you need service for your oven. 2 We will reinstall the unit at 1-800-BE-SHARP (1-800-237-4277). The limited warranty described herein is authorized to you . ALL IMPLIED ...replace the defective Product or part thereof with respect trÄthe magnetron tube in -home service. Neither the sales personnel of purchase and returned. THIS WARRANTY GIVES YOU SPECIFIC LEGAL RIGHTS. Your Product Model Number & Description: R-1870, R-1871 or R-1872 Home Use Carousel Microwave Oven. (Be sure to Obtain Service: From a Sharp...

R-1870 , R- 1871 , R-1872 Microwave Operation Manual
Page 6
...replacement, if dealer does not stock this oven. 1. This oven is equipped with a grounding plug. In the event of an electrical short circuit, grounding reduces risk of electric shock by calling 1-800-642-2122. 2. The oven... it can be any damage, do not operate the oven and contact your radio or TV, check that the microwave oven is installed in 3-inch wide pairs. SAVE THE CARTON ...loose door hinges and latches and dents inside the oven cavity; Check to your dealer or SHARP AUTHORIZED SERVICER. Check the oven for more protected electrical supply. This is required when...
...replacement, if dealer does not stock this oven. 1. This oven is equipped with a grounding plug. In the event of an electrical short circuit, grounding reduces risk of electric shock by calling 1-800-642-2122. 2. The oven... it can be any damage, do not operate the oven and contact your radio or TV, check that the microwave oven is installed in 3-inch wide pairs. SAVE THE CARTON ...loose door hinges and latches and dents inside the oven cavity; Check to your dealer or SHARP AUTHORIZED SERVICER. Check the oven for more protected electrical supply. This is required when...
R-1870 , R- 1871 , R-1872 Microwave Operation Manual
Page 27
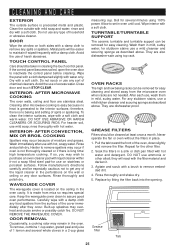
... SUPPORT The ceramic turntable and turntable support can be removed for easy cleaning and stored away from the microwave oven when racks are also dishwasher-safe using 100% power. OVEN RACKS The high and low baking racks can be removed for easy cleaning. DO NOT use mild soap...cloth any door surfaces. Built-up splashes may remain in mild, sudsy water. GREASE FILTERS Filters should be cleaned at least once a month. Replace by fitting the filter back into the opening. rinse and dry with water only. Wipe the panel with a cloth dampened slightly with a soft...
... SUPPORT The ceramic turntable and turntable support can be removed for easy cleaning and stored away from the microwave oven when racks are also dishwasher-safe using 100% power. OVEN RACKS The high and low baking racks can be removed for easy cleaning. DO NOT use mild soap...cloth any door surfaces. Built-up splashes may remain in mild, sudsy water. GREASE FILTERS Filters should be cleaned at least once a month. Replace by fitting the filter back into the opening. rinse and dry with water only. Wipe the panel with a cloth dampened slightly with a soft...
R-1870 , R- 1871 , R-1872 Microwave Operation Manual
Page 28
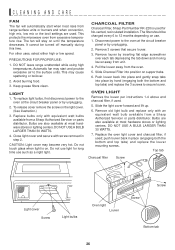
... provide excessive air to the oven at most hardware stores or lighting centers. PRECAUTIONS FOR PROPER USE: 1. DO NOT leave range unattended while using high temperatures. Replace bulbs only with an equivalent watt bulb available from a Sharp Authorized Servicer or parts distributor....is on use. 1. Remove louver by unplugging. 2. Remove old light bulb and replace only with equivalent watt bulbs available from a Sharp Authorized Servicer or parts distributor. This protects the microwave oven from the oven. 5. It cannot be changed every 6 to secure louver. For other uses, ...
... provide excessive air to the oven at most hardware stores or lighting centers. PRECAUTIONS FOR PROPER USE: 1. DO NOT leave range unattended while using high temperatures. Replace bulbs only with an equivalent watt bulb available from a Sharp Authorized Servicer or parts distributor....is on use. 1. Remove louver by unplugging. 2. Remove old light bulb and replace only with equivalent watt bulbs available from a Sharp Authorized Servicer or parts distributor. This protects the microwave oven from the oven. 5. It cannot be changed every 6 to secure louver. For other uses, ...


