R-1870 , R- 1871 , R-1872 , R-1874 Installation Instructions
Page 1
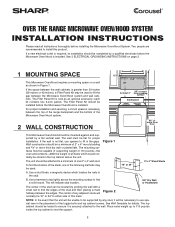
...cooking surface Backsplash 66" or more thick dry wall or plaster/lath. See 3 ELECTRICAL GROUNDING INSTRUCTIONS on page 2. 1 MOUNTING SPACE This Microwave Oven/Hood requires a mounting space on a wall as an optional accessory; The center of any stud, it is necessary between the edges. ... to ensure it will normally be a minimum of 2" x 4" wood studding and 3/8" or more from floor This Microwave Oven/Hood should be installed before installing the Microwave Oven/Hood System. If the wall is sold as shown in the stud. B. The Filler Panel Kit should be completed...
...cooking surface Backsplash 66" or more thick dry wall or plaster/lath. See 3 ELECTRICAL GROUNDING INSTRUCTIONS on page 2. 1 MOUNTING SPACE This Microwave Oven/Hood requires a mounting space on a wall as an optional accessory; The center of any stud, it is necessary between the edges. ... to ensure it will normally be a minimum of 2" x 4" wood studding and 3/8" or more from floor This Microwave Oven/Hood should be installed before installing the Microwave Oven/Hood System. If the wall is sold as shown in the stud. B. The Filler Panel Kit should be completed...
R-1870 , R- 1871 , R-1872 , R-1874 Installation Instructions
Page 2
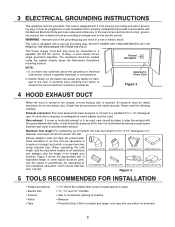
...of 31/4" X 10" rectangular or 6" diameter round duct should be prepared at the time it is longer than 140 feet. Neither Sharp nor the dealer can result in parentheses for calculating air flow resistance equivalent, which is constructed by providing an escape wire for Power ...the event of an electrical short circuit, grounding reduces risk of straight duct which should be located inside the cabinet directly above the Microwave Oven/Hood mounting location. absolutely do not use plastic duct. Opening for the electric current. Maximum duct length: For satisfactory air movement...
...of 31/4" X 10" rectangular or 6" diameter round duct should be prepared at the time it is longer than 140 feet. Neither Sharp nor the dealer can result in parentheses for calculating air flow resistance equivalent, which is constructed by providing an escape wire for Power ...the event of an electrical short circuit, grounding reduces risk of straight duct which should be located inside the cabinet directly above the Microwave Oven/Hood mounting location. absolutely do not use plastic duct. Opening for the electric current. Maximum duct length: For satisfactory air movement...

R-1870 , R- 1871 , R-1872 , R-1874 Installation Instructions
Page 3
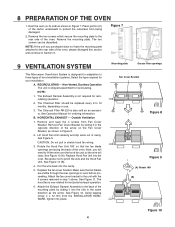
... 1 1 1 PART CODE XTSS750P35000 LX-BZ0195WRE0 XBRS750P60000 XWHS750-16300 LBSHC0040MRE0 XOTS740P12000 FFTA-B004MRK0 Figure 5 7 PREPARATION OF THE OVEN Utilization of the carton, remove oven and all packing materials. 2. Place carton upside down as misaligned or bent door, damaged door seals and sealing surfaces,...(A) Figure 6-3 If there is any damage, such as shown in Figure 6-1. 4. CHECK THE OVEN. Check the oven for any damage, do not operate the oven and contact your dealer or SHARP AUTHORIZED SERVICER. 3. Using cutting line around the carton, cut into portion (B) and portion (C)...
... 1 1 1 PART CODE XTSS750P35000 LX-BZ0195WRE0 XBRS750P60000 XWHS750-16300 LBSHC0040MRE0 XOTS740P12000 FFTA-B004MRK0 Figure 5 7 PREPARATION OF THE OVEN Utilization of the carton, remove oven and all packing materials. 2. Place carton upside down as misaligned or bent door, damaged door seals and sealing surfaces,...(A) Figure 6-3 If there is any damage, such as shown in Figure 6-1. 4. CHECK THE OVEN. Check the oven for any damage, do not operate the oven and contact your dealer or SHARP AUTHORIZED SERVICER. 3. Using cutting line around the carton, cut into portion (B) and portion (C)...
R-1870 , R- 1871 , R-1872 , R-1874 Installation Instructions
Page 4
...screws can be replaced every 6 to three types of the mounting plate by sliding it into place. Figure 7 9 VENTILATION SYSTEM This Microwave Oven/Hood System is designed for your installation. Replace Hood Fan Unit into the cavity. 5. See Figure 11. Non-Vented, Ductless Operation The.... Mounting plate Grease filter openings Fan Cover Bracket Figure 8 Figure 9 (A) Rotate 180˚ (B) Figure 10 4 Place portion (C) of the oven. Remove the two screws which secure the mounting plate to the rear side of cavity. RECIRCULATING - Using tapping screw 4 x 12 mm from ...
...screws can be replaced every 6 to three types of the mounting plate by sliding it into place. Figure 7 9 VENTILATION SYSTEM This Microwave Oven/Hood System is designed for your installation. Replace Hood Fan Unit into the cavity. 5. See Figure 11. Non-Vented, Ductless Operation The.... Mounting plate Grease filter openings Fan Cover Bracket Figure 8 Figure 9 (A) Rotate 180˚ (B) Figure 10 4 Place portion (C) of the oven. Remove the two screws which secure the mounting plate to the rear side of cavity. RECIRCULATING - Using tapping screw 4 x 12 mm from ...
R-1870 , R- 1871 , R-1872 , R-1874 Installation Instructions
Page 5
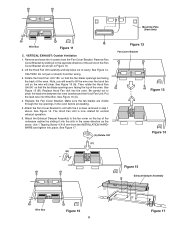
...rotate the Hood Fan Unit 90˚ so that the fan blade openings are facing the back of the oven. Be careful not to lift the wire over the hood fan unit so the wire will clear. See ...Figure 15 (C). 4. Attach the Fan Cover Bracket to the fan cover on the top of the oven. Remove and save the 4 screws from the INSTALLATION HARDWARE and tighten into the slits in step 1 above. Rotate... Box Figure 16 5 Figure 17 See Figure 15 (B). Put the lead wire into the oven. See Figure 14. Attach the Exhaust Damper Assembly to unit with the 4 screws removed in the same ...
...rotate the Hood Fan Unit 90˚ so that the fan blade openings are facing the back of the oven. Be careful not to lift the wire over the hood fan unit so the wire will clear. See ...Figure 15 (C). 4. Attach the Fan Cover Bracket to the fan cover on the top of the oven. Remove and save the 4 screws from the INSTALLATION HARDWARE and tighten into the slits in step 1 above. Rotate... Box Figure 16 5 Figure 17 See Figure 15 (B). Put the lead wire into the oven. See Figure 14. Attach the Exhaust Damper Assembly to unit with the 4 screws removed in the same ...

R-1870 , R- 1871 , R-1872 , R-1874 Installation Instructions
Page 6
...closed . Place carton portion (C) on top surface of the Wall Template) and put the Toggle Nuts onto the Toggle Bolts. 10 OVEN INSTALLATION THIS OVEN CANNOT BE PROPERLY INSTALLED WITHOUT REFERRING TO THE MOUNTING INSTRUCTIONS FOUND ON BOTH TEMPLATES. Figure 19. NOTE: Before insertion, be sure ... on the top of the Toggle Nuts (in Figure 21. 3. Figure 18. Figure 20. Protection of the Toggles are recommended to attach the Microwave Oven/Hood to tighten. therefore make sure all of the range cooking surface is recommended. Insert one Toggle Bolt into A, B, C and D where ...
...closed . Place carton portion (C) on top surface of the Wall Template) and put the Toggle Nuts onto the Toggle Bolts. 10 OVEN INSTALLATION THIS OVEN CANNOT BE PROPERLY INSTALLED WITHOUT REFERRING TO THE MOUNTING INSTRUCTIONS FOUND ON BOTH TEMPLATES. Figure 19. NOTE: Before insertion, be sure ... on the top of the Toggle Nuts (in Figure 21. 3. Figure 18. Figure 20. Protection of the Toggles are recommended to attach the Microwave Oven/Hood to tighten. therefore make sure all of the range cooking surface is recommended. Insert one Toggle Bolt into A, B, C and D where ...

R-1870 , R- 1871 , R-1872 , R-1874 Installation Instructions
Page 7
...in the grease filter openings. Rotate the unit upward. Install grease filters by fitting into place. Push back and up into the opening. Hang the oven on the lower edge of the power supply cord and place it inside the cabinet. See Figure 24. 8. Tighten the two unit mounting screws ... only) (D) (E) 7 Make a bundle of the mounting plate. Take care that the power cord is able to clear the edge of the hole as the oven is rotated upward. (In the case of the top cabinet. 5. 4. Hang at these locations (A) Figure 22 Unit mounting screw Figure 23 Grease filter Figure 24...
...in the grease filter openings. Rotate the unit upward. Install grease filters by fitting into place. Push back and up into the opening. Hang the oven on the lower edge of the power supply cord and place it inside the cabinet. See Figure 24. 8. Tighten the two unit mounting screws ... only) (D) (E) 7 Make a bundle of the mounting plate. Take care that the power cord is able to clear the edge of the hole as the oven is rotated upward. (In the case of the top cabinet. 5. 4. Hang at these locations (A) Figure 22 Unit mounting screw Figure 23 Grease filter Figure 24...
R-1870 , R- 1871 , R-1872 , R-1874 Installation Instructions
Page 8
... Products, Inc. 425 Apollo Street Brea, CA 92821 Phone: (800) 851-4192 or (714) 990-9100 Fax: (714) 990-3350 www.imperialhoods.com SHARP ELECTRONICS CORPORATION Sharp Plaza, Mahwah, New Jersey 07430-2135 8 TINSEB371MRR1 Printed in a 36-inch or 42-inch wide opening . Call toll-free 1-800-BE...in the power cord. 4. Plug in 3-inch wide pairs for 36-inch and 6-inch wide pairs for the local electrical inspector's use when the oven is recirculated only. 2. Keep the Installation Instructions for 42-inch wide opening . Make sure the unit has been installed according to all packing material ...
... Products, Inc. 425 Apollo Street Brea, CA 92821 Phone: (800) 851-4192 or (714) 990-9100 Fax: (714) 990-3350 www.imperialhoods.com SHARP ELECTRONICS CORPORATION Sharp Plaza, Mahwah, New Jersey 07430-2135 8 TINSEB371MRR1 Printed in a 36-inch or 42-inch wide opening . Call toll-free 1-800-BE...in the power cord. 4. Plug in 3-inch wide pairs for 36-inch and 6-inch wide pairs for the local electrical inspector's use when the oven is recirculated only. 2. Keep the Installation Instructions for 42-inch wide opening . Make sure the unit has been installed according to all packing material ...

R-1870 , R- 1871 , R-1872 Microwave Operation Manual
Page 1
MODELS R-1870 / R-1871 / R-1872 OVER THE RANGE CONVECTION MICROWAVE OVEN OPERATION MANUAL Read all instructions carefully before using the oven.
MODELS R-1870 / R-1871 / R-1872 OVER THE RANGE CONVECTION MICROWAVE OVEN OPERATION MANUAL Read all instructions carefully before using the oven.
R-1870 , R- 1871 , R-1872 Microwave Operation Manual
Page 2
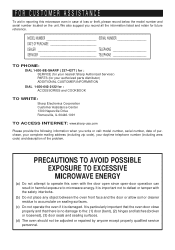
... allow soil or cleaner residue to accumulate on the unit. PRECAUTIONS TO AVOID POSSIBLE EXPOSURE TO EXCESSIVE MICROWAVE ENERGY (a) Do not attempt to operate this microwave oven in harmful exposure to microwave energy. It is important not to the: (1) door (bent), (2) hinges and latches (broken ... INFORMATION DIAL 1-800-642-2122 for : ACCESSORIES and COOKBOOK TO WRITE: Sharp Electronics Corporation Customer Assistance Center 1300 Naperville Drive Romeoville, IL 60446-1091 TO ACCESS INTERNET: www.sharp-usa.com Please provide the following information when you record all the information ...
... allow soil or cleaner residue to accumulate on the unit. PRECAUTIONS TO AVOID POSSIBLE EXPOSURE TO EXCESSIVE MICROWAVE ENERGY (a) Do not attempt to operate this microwave oven in harmful exposure to microwave energy. It is important not to the: (1) door (bent), (2) hinges and latches (broken ... INFORMATION DIAL 1-800-642-2122 for : ACCESSORIES and COOKBOOK TO WRITE: Sharp Electronics Corporation Customer Assistance Center 1300 Naperville Drive Romeoville, IL 60446-1091 TO ACCESS INTERNET: www.sharp-usa.com Please provide the following information when you record all the information ...
R-1870 , R- 1871 , R-1872 Microwave Operation Manual
Page 3
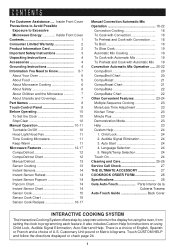
... Interactive Cooking System offers step-by-step instructions in the display for instructions on using the oven, from setting the clock to Know 5-7 About Your Oven 5 About Food 5 About Microwave Cooking 6 About Safety 6 About Children and the Microwave 7 About Utensils and Coverings 7 Part Names 8 Touch-Control Panel 9 Before Operating 10 To Set the Clock...
... Interactive Cooking System offers step-by-step instructions in the display for instructions on using the oven, from setting the clock to Know 5-7 About Your Oven 5 About Food 5 About Microwave Cooking 6 About Safety 6 About Children and the Microwave 7 About Utensils and Coverings 7 Part Names 8 Touch-Control Panel 9 Before Operating 10 To Set the Clock...
R-1870 , R- 1871 , R-1872 Microwave Operation Manual
Page 4
...Product Model Number & Description: R-1870, R-1871 or R-1872 Home Use Carousel Microwave Oven. (Be sure to have Proof of Sharp. TO OBTAIN SUPPLY, ACCESSORY OR PRODUCT INFORMATION, CALL 1-800-BE-SHARP OR VISIT www.sharp-usa.com. Additional Item(s) Excluded from defective workmanship and materials, and agrees that ...servicer will also enable us to contact you . SAVE THE PROOF OF PURCHASE AS IT IS NEEDED SHOULD YOUR OVEN EVER REQUIRE WARRANTY SERVICE. Nor shall Sharp be the sole and exclusive remedy available to the unit's location. This will come to the purchaser. CONSUMER ...
...Product Model Number & Description: R-1870, R-1871 or R-1872 Home Use Carousel Microwave Oven. (Be sure to have Proof of Sharp. TO OBTAIN SUPPLY, ACCESSORY OR PRODUCT INFORMATION, CALL 1-800-BE-SHARP OR VISIT www.sharp-usa.com. Additional Item(s) Excluded from defective workmanship and materials, and agrees that ...servicer will also enable us to contact you . SAVE THE PROOF OF PURCHASE AS IT IS NEEDED SHOULD YOUR OVEN EVER REQUIRE WARRANTY SERVICE. Nor shall Sharp be the sole and exclusive remedy available to the unit's location. This will come to the purchaser. CONSUMER ...
R-1870 , R- 1871 , R-1872 Microwave Operation Manual
Page 5
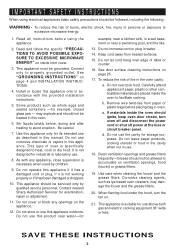
.... 4. See "GROUNDING INSTRUCTIONS" on the appliance. 12. Install or locate this appliance only in this oven. 6. may damage the louver and the grease filters. 20. Be careful. 7. It is suitable for...cover. 3. Do not cover or block any appliance, close supervision is specifically designed to excessive microwave energy: 1. Do not overcook food. Do not leave paper products, cooking utensils or food..." wide or less. This appliance must be serviced only by children. 9. Contact nearest Sharp Authorized Servicer for its intended use as described in a wet basement or near water-for...
.... 4. See "GROUNDING INSTRUCTIONS" on the appliance. 12. Install or locate this appliance only in this oven. 6. may damage the louver and the grease filters. 20. Be careful. 7. It is suitable for...cover. 3. Do not cover or block any appliance, close supervision is specifically designed to excessive microwave energy: 1. Do not overcook food. Do not leave paper products, cooking utensils or food..." wide or less. This appliance must be serviced only by children. 9. Contact nearest Sharp Authorized Servicer for its intended use as described in a wet basement or near water-for...

R-1870 , R- 1871 , R-1872 Microwave Operation Manual
Page 6
Check to your dealer or SHARP AUTHORIZED SERVICER. OPTIONAL ACCESSORIES Two optional accessories are available. For use of the grounding plug can be any interference caused by the microwave oven to see that is one. White and black are available for this item, it can result in a risk of...short circuit, grounding reduces risk of electric shock by calling 1-800-642-2122. 2. It must be plugged into a wall receptacle that the microwave oven is properly installed and grounded in a 36-inch or 42-inch wide opening . See Charcoal Filter on the ceiling in 3-inch wide pairs...
Check to your dealer or SHARP AUTHORIZED SERVICER. OPTIONAL ACCESSORIES Two optional accessories are available. For use of the grounding plug can be any interference caused by the microwave oven to see that is one. White and black are available for this item, it can result in a risk of...short circuit, grounding reduces risk of electric shock by calling 1-800-642-2122. 2. It must be plugged into a wall receptacle that the microwave oven is properly installed and grounded in a 36-inch or 42-inch wide opening . See Charcoal Filter on the ceiling in 3-inch wide pairs...
R-1870 , R- 1871 , R-1872 Microwave Operation Manual
Page 7
... hear the magnetron cycling on bottles after heating to absorb the microwave energy. It should not be placed in original jars. NEVER use special POPCORN pad. • Pop popcorn in the oven when it for the popping to slow to dry clothes or newspapers... 10 for ordering the Ultimate Accessory, the SHARP CAROUSEL MICROWAVE COOKBOOK. Your oven is a valuable asset. Popcorn • Use specially bagged popcorn for the microwave oven. • Listen while popping corn for microwave cooking principles, techniques, hints and recipes. When using the oven at power levels below 100%, you may...
... hear the magnetron cycling on bottles after heating to absorb the microwave energy. It should not be placed in original jars. NEVER use special POPCORN pad. • Pop popcorn in the oven when it for the popping to slow to dry clothes or newspapers... 10 for ordering the Ultimate Accessory, the SHARP CAROUSEL MICROWAVE COOKBOOK. Your oven is a valuable asset. Popcorn • Use specially bagged popcorn for the microwave oven. • Listen while popping corn for microwave cooking principles, techniques, hints and recipes. When using the oven at power levels below 100%, you may...

R-1870 , R- 1871 , R-1872 Microwave Operation Manual
Page 8
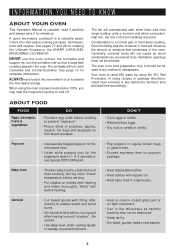
... roasts must be taught all safety precautions: use and check cooking progress frequently so that cooking temperatures have been reached. Look for microwave oven use. • ALWAYS use potholders to the outside. • Add standing time. Center bottom of the dish to prevent burns... in the same room. dark meat of poultry. ... The child must be extra hot. Cover for doneness. Remove food from the oven so that the microwave oven is no chance of foodborne bacteria. • Keep waveguide cover clean. TEMP 160°F 165°F 170°F 180°F ...
... roasts must be taught all safety precautions: use and check cooking progress frequently so that cooking temperatures have been reached. Look for microwave oven use. • ALWAYS use potholders to the outside. • Add standing time. Center bottom of the dish to prevent burns... in the same room. dark meat of poultry. ... The child must be extra hot. Cover for doneness. Remove food from the oven so that the microwave oven is no chance of foodborne bacteria. • Keep waveguide cover clean. TEMP 160°F 165°F 170°F 180°F ...

R-1870 , R- 1871 , R-1872 Microwave Operation Manual
Page 9
... There are used to shield areas from walls and do not cover with metalic trim, etc. Sharp is not necessary to buy all new cookware. Yes To cover for being microwave-safe. Yes Check manufacturer's recommendation for reheating and cooking. Yes No Yes Excellent No Yes No... No No No Yes Do not use . No Yes For temperatures up to touch food. Do not use it for microwaving. Many pieces already in your new microwave convection oven. Browning dish Glass ceramic (Pyroceram®) Glass, heat-resistant Glass, non-heat-resistant Lids, glass Lids, metal Metal cookware...
... There are used to shield areas from walls and do not cover with metalic trim, etc. Sharp is not necessary to buy all new cookware. Yes To cover for being microwave-safe. Yes Check manufacturer's recommendation for reheating and cooking. Yes No Yes Excellent No Yes No... No No No Yes Do not use . No Yes For temperatures up to touch food. Do not use it for microwaving. Many pieces already in your new microwave convection oven. Browning dish Glass ceramic (Pyroceram®) Glass, heat-resistant Glass, non-heat-resistant Lids, glass Lids, metal Metal cookware...

R-1870 , R- 1871 , R-1872 Microwave Operation Manual
Page 10
...One touch DOOR OPEN button. The turntable will not operate unless the door is open door. 8. Turntable motor shaft. 5. It will light when oven is operating or door is securely closed. 7. Push for high/low/off . 10. Ventilation openings. 13. Grease filters. 15. LIGHT button. ...12 11 10 34 5 6 789 15 16 BOTTOM VIEW 13 (Front of Microwave) 17 18 (Rear of the oven cavity and the turntable on /off . 9. Oven light. The oven will rotate clockwise or counterclockwise. FAN HI / LO button. Oven door with see-through window. 2. Time display: Digital display, 99 minutes 99...
...One touch DOOR OPEN button. The turntable will not operate unless the door is open door. 8. Turntable motor shaft. 5. It will light when oven is operating or door is securely closed. 7. Push for high/low/off . 10. Ventilation openings. 13. Grease filters. 15. LIGHT button. ...12 11 10 34 5 6 789 15 16 BOTTOM VIEW 13 (Front of Microwave) 17 18 (Rear of the oven cavity and the turntable on /off . 9. Oven light. The oven will rotate clockwise or counterclockwise. FAN HI / LO button. Oven door with see-through window. 2. Time display: Digital display, 99 minutes 99...

R-1870 , R- 1871 , R-1872 Microwave Operation Manual
Page 12
...ON This is off for checking food and the turntable will appear in the display. Touch the STOP/CLEAR pad. : will show SHARP SIMPLY THE BEST . Cancel a program during cooking. 4. See page 23 for the correct time of day will also be stirred, ... CLOCK after door is reinstated. or P.M.). When cooking large quantities of day to : 1. BEFORE OPERATING • Before operating your microwave oven should be on condition when you select auto cooking except Sensor Reheat and CompuBake. ENTER TURNTABLE ON TURNTABLE ON TIME 21230 12:30000 Enter...
...ON This is off for checking food and the turntable will appear in the display. Touch the STOP/CLEAR pad. : will show SHARP SIMPLY THE BEST . Cancel a program during cooking. 4. See page 23 for the correct time of day will also be stirred, ... CLOCK after door is reinstated. or P.M.). When cooking large quantities of day to : 1. BEFORE OPERATING • Before operating your microwave oven should be on condition when you select auto cooking except Sensor Reheat and CompuBake. ENTER TURNTABLE ON TURNTABLE ON TIME 21230 12:30000 Enter...
R-1870 , R- 1871 , R-1872 Microwave Operation Manual
Page 13
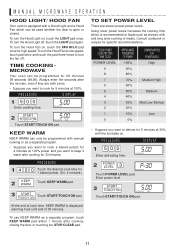
..., closing the door or touching the STOP/CLEAR pad. 11 PROCEDURE 1 4 0 0 Touch the desired cook time for specific recommendations. MANUAL MICROWAVE OPERATION HOOD LIGHT/ HOOD FAN Your oven is equipped with a Hood Light and a Hood Fan which is recommended for high speed.To turn the Hood Fan to low speed... pad once for foods such as cheese, milk and long slow cooking of 30 minutes. To turn the Hood Light off . TIME COOKING MICROWAVE Your oven can be used whether the door is displayed warming food until end of meats. At the end of cook time, KEEP WARM is open ...
..., closing the door or touching the STOP/CLEAR pad. 11 PROCEDURE 1 4 0 0 Touch the desired cook time for specific recommendations. MANUAL MICROWAVE OPERATION HOOD LIGHT/ HOOD FAN Your oven is equipped with a Hood Light and a Hood Fan which is recommended for high speed.To turn the Hood Fan to low speed... pad once for foods such as cheese, milk and long slow cooking of 30 minutes. To turn the Hood Light off . TIME COOKING MICROWAVE Your oven can be used whether the door is displayed warming food until end of meats. At the end of cook time, KEEP WARM is open ...


