
R323T|R423T Operation Manual
Page 1
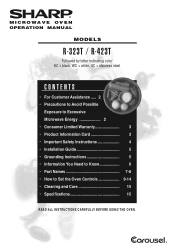
® MICROWAVE OVEN OPERATION MANUAL MODELS R-323T / R-423T Followed by letter indicating color KC = black, WC = white, SC = stainless steel CONTENTS • For Customer Assistance ..... 2 • Precautions to Avoid Possible Exposure to Excessive Microwave Energy 2 • Consumer Limited Warranty 3 • Product Information Card 3 • Important Safety Instructions 4 • Installation Guide 5 • Grounding Instructions 5 • Information You Need to Know 6 • Part Names 7-8 • How...
® MICROWAVE OVEN OPERATION MANUAL MODELS R-323T / R-423T Followed by letter indicating color KC = black, WC = white, SC = stainless steel CONTENTS • For Customer Assistance ..... 2 • Precautions to Avoid Possible Exposure to Excessive Microwave Energy 2 • Consumer Limited Warranty 3 • Product Information Card 3 • Important Safety Instructions 4 • Installation Guide 5 • Grounding Instructions 5 • Information You Need to Know 6 • Part Names 7-8 • How...
R323T|R423T Operation Manual
Page 2
... code), your daytime telephone number (including area code) and description of loss or theft, please record below the model number and serial number located on sealing surfaces. (c) Do not operate the oven if it is no damage to the: (1) door (bent), (2) hinges and latches (broken or loosened), (3) door seals and sealing surfaces. (d) The oven should not be adjusted or repaired by anyone except properly qualified service...
... code), your daytime telephone number (including area code) and description of loss or theft, please record below the model number and serial number located on sealing surfaces. (c) Do not operate the oven if it is no damage to the: (1) door (bent), (2) hinges and latches (broken or loosened), (3) door seals and sealing surfaces. (d) The oven should not be adjusted or repaired by anyone except properly qualified service...

R323T|R423T Operation Manual
Page 3
... it is in addition to whatever implied warranties may not apply to you need service for the period of time described herein, shall constitute complete fulfillment of all liabilities and responsibilities of Sharp to the purchaser with respect to the magnetron tube in the Product for instruction in servicing your microwave oven. The warranties described herein shall be the sole and...
... it is in addition to whatever implied warranties may not apply to you need service for the period of time described herein, shall constitute complete fulfillment of all liabilities and responsibilities of Sharp to the purchaser with respect to the magnetron tube in the Product for instruction in servicing your microwave oven. The warranties described herein shall be the sole and...
R323T|R423T Operation Manual
Page 4
... microwave oven at the fuse or circuit breaker panel. SAVE THESE INSTRUCTIONS 4 As with the provided installation instructions. 5. b. d. Use extreme care when inserting a spoon or other combustible materials are able to be overheated beyond the boiling point without appearing to stand in oven. Do not operate this appliance only in a wet basement, near a swimming pool, or similar locations. 16. a. Read and follow the specific...
... microwave oven at the fuse or circuit breaker panel. SAVE THESE INSTRUCTIONS 4 As with the provided installation instructions. 5. b. d. Use extreme care when inserting a spoon or other combustible materials are able to be overheated beyond the boiling point without appearing to stand in oven. Do not operate this appliance only in a wet basement, near a swimming pool, or similar locations. 16. a. Read and follow the specific...
R323T|R423T Operation Manual
Page 5
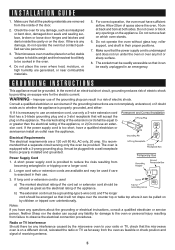
... properly installed and grounded. Power Supply Cord 1. Check the oven for any openings on the door. Allow 20cm of electric shock by children or tripped over the counter top or table top where it can accept any hot or sharp surface. 8. g roundin g instructions This appliance must be pulled on a different circuit, relocated the radio or TV as the electrical rating of the door. 2. The oven is...
... properly installed and grounded. Power Supply Cord 1. Check the oven for any openings on the door. Allow 20cm of electric shock by children or tripped over the counter top or table top where it can accept any hot or sharp surface. 8. g roundin g instructions This appliance must be pulled on a different circuit, relocated the radio or TV as the electrical rating of the door. 2. The oven is...
R323T|R423T Operation Manual
Page 6
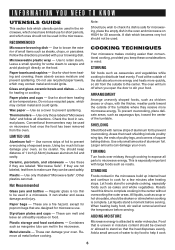
... dry food to cook for a few minutes after heating stops. Food that the heat disperses evenly. Use to the center. Paper plates and cups - You should not be used . These can melt in the microwave build up internal heat and continue to help it directly on HIGH for short-term heating at removal and test the temperature before serving. A dish which becomes very hot should...
... dry food to cook for a few minutes after heating stops. Food that the heat disperses evenly. Use to the center. Paper plates and cups - You should not be used . These can melt in the microwave build up internal heat and continue to help it directly on HIGH for short-term heating at removal and test the temperature before serving. A dish which becomes very hot should...
R323T|R423T Operation Manual
Page 7
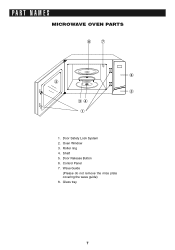
Shaft 5. Glass tray 7 Oven Window 3. Wave Guide (Please do not remove the mica plate covering the wave guide) 8. Roller ring 4. Control Panel 7. Door Release Button 6. PART NAMES MICROWAVE OVEN PARTS 8 7 6 2 5 34 1 1. Door Safety Lock System 2.
Shaft 5. Glass tray 7 Oven Window 3. Wave Guide (Please do not remove the mica plate covering the wave guide) 8. Roller ring 4. Control Panel 7. Door Release Button 6. PART NAMES MICROWAVE OVEN PARTS 8 7 6 2 5 34 1 1. Door Safety Lock System 2.

R323T|R423T Operation Manual
Page 8
...; QUICK COOK BUTTONS - Press to add cooking time. • NUMBER PADS - Press to select microwave power level. • TIMER/CLOCK - Touch to cook popular foods. 8 Timer functions independently, even while a cooking program is in process. You can also touch it to add or reduce time from cooking. • MINUTE PLUS - Instant settings to stop the oven or reset the oven before setting a program. • COMPU DEFROST - Cooking time, power, indicators and present time are displayed. • MORE/LESS (+/-) - Used to set clock, cooking time or enter food weight. • POWER...
...; QUICK COOK BUTTONS - Press to add cooking time. • NUMBER PADS - Press to select microwave power level. • TIMER/CLOCK - Touch to cook popular foods. 8 Timer functions independently, even while a cooking program is in process. You can also touch it to add or reduce time from cooking. • MINUTE PLUS - Instant settings to stop the oven or reset the oven before setting a program. • COMPU DEFROST - Cooking time, power, indicators and present time are displayed. • MORE/LESS (+/-) - Used to set clock, cooking time or enter food weight. • POWER...

R323T|R423T Operation Manual
Page 9
... to set 60%. 2 Touch number pads to remind you after you can press TIMER/CLOCK pad to set the clock in display. press it again to set 12 hour clock; Your oven can be programmed for foods such as cheese, milk and long slow cooking meats. During cooking, you enter a wrong time, the oven will beep to enter desired cooking time Power Level x 3 5 0 0 3 Press START pad. NOTE: 1. After total time has elapsed, signals sound and...
... to set 60%. 2 Touch number pads to remind you after you can press TIMER/CLOCK pad to set the clock in display. press it again to set 12 hour clock; Your oven can be programmed for foods such as cheese, milk and long slow cooking meats. During cooking, you enter a wrong time, the oven will beep to enter desired cooking time Power Level x 3 5 0 0 3 Press START pad. NOTE: 1. After total time has elapsed, signals sound and...

R323T|R423T Operation Manual
Page 10
... on display turns off. 10 START CHILD Lock Use to start the oven quickly at high power level. To cancel the CHILD LOCK: Press and hold the STOP/ CLEAR pad for 30 minutes. However, during sensor cook, the timer function is set is 99 minutes and 99 seconds. 2. AUTO REMINDER After a cooking or a defrost program, beeps sound and END appears in standby mode and cooking mode. Minute Plus This feature allows you . START NOTE: 1. To set in display. PROCEDURE 1 Press POWER LEVEL...
... on display turns off. 10 START CHILD Lock Use to start the oven quickly at high power level. To cancel the CHILD LOCK: Press and hold the STOP/ CLEAR pad for 30 minutes. However, during sensor cook, the timer function is set is 99 minutes and 99 seconds. 2. AUTO REMINDER After a cooking or a defrost program, beeps sound and END appears in standby mode and cooking mode. Minute Plus This feature allows you . START NOTE: 1. To set in display. PROCEDURE 1 Press POWER LEVEL...
R323T|R423T Operation Manual
Page 11
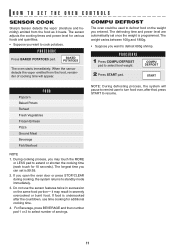
... oven starts immediately. If you open the oven door or press STOP/CLEAR during cooking, the system returns to select number of cooking time will pause to remind user to turn food over, after the countdown, use the sensor features twice in severely overcooked or burnt food. COMPU DEFROST The oven could be used to defrost food on the same food portion- The defrosting time and power level are automatically set is 99:59. 2. The sensor adjusts the cooking times...
... oven starts immediately. If you open the oven door or press STOP/CLEAR during cooking, the system returns to select number of cooking time will pause to remind user to turn food over, after the countdown, use the sensor features twice in severely overcooked or burnt food. COMPU DEFROST The oven could be used to defrost food on the same food portion- The defrosting time and power level are automatically set is 99:59. 2. The sensor adjusts the cooking times...
R323T|R423T Operation Manual
Page 12
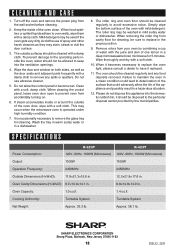
... to remove any food deposits removed. Oven Cavity Dimensions (H×W×D): 8.7×13.9×14.1 in. 9.8×14.8×14.9 in a dishwasher. 8. When food splatters or spilled liquids adhere to become wet. Do not use of the oven door, wipe with a damp cloth. When cleaning the control panel, leave oven door open to prevent oven from the wall socket before cleaning. 2. If steam accumulates inside or around the outside surfaces...
... to remove any food deposits removed. Oven Cavity Dimensions (H×W×D): 8.7×13.9×14.1 in. 9.8×14.8×14.9 in a dishwasher. 8. When food splatters or spilled liquids adhere to become wet. Do not use of the oven door, wipe with a damp cloth. When cleaning the control panel, leave oven door open to prevent oven from the wall socket before cleaning. 2. If steam accumulates inside or around the outside surfaces...


