
Owners Manual
Page 2
PRECAUTIONS TO AVOID POSSIBLE EXPOSURE TO EXCESSIVE MICROWAVE ENERGY (a) Do not attempt to operate this microwave oven in case of the problem. MODEL NUMBER SERIAL NUMBER DATE OF PURCHASE DEALER TELEPHONE SERVICER TELEPHONE TO PHONE: DIAL 1-800-BE-SHARP ( 237-4277 ) for : SERVICE (for your nearest Sharp Authorized Servicer) PARTS (for future reference. FOR CUSTOMER ASSISTANCE...
PRECAUTIONS TO AVOID POSSIBLE EXPOSURE TO EXCESSIVE MICROWAVE ENERGY (a) Do not attempt to operate this microwave oven in case of the problem. MODEL NUMBER SERIAL NUMBER DATE OF PURCHASE DEALER TELEPHONE SERVICER TELEPHONE TO PHONE: DIAL 1-800-BE-SHARP ( 237-4277 ) for : SERVICE (for your nearest Sharp Authorized Servicer) PARTS (for future reference. FOR CUSTOMER ASSISTANCE...
Owners Manual
Page 3
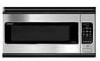
... Instructions 6-14 Optional Accessories 14 Information You Need to Know 15-17 About Your Oven 15 About Food 15 About Utensils and Coverings 16 About Children and the Microwave 16 About Microwave Cooking 17 About Safety 17 Part Names 18-19 Before Operating 20 To Set the Clock 20 Stop/Clear 20 Manual...
... Instructions 6-14 Optional Accessories 14 Information You Need to Know 15-17 About Your Oven 15 About Food 15 About Utensils and Coverings 16 About Children and the Microwave 16 About Microwave Cooking 17 About Safety 17 Part Names 18-19 Before Operating 20 To Set the Clock 20 Stop/Clear 20 Manual...
Owners Manual
Page 4
... the Product nor to you need service for parts only. SAVE THE PROOF OF PURCHASE AS IT IS NEEDED SHOULD YOUR OVEN EVER REQUIRE WARRANTY SERVICE. Nor shall Sharp be liable or in any way responsible for repair, the servicer will reinstall the unit at 1-800-BE... is necessary to remove the unit for any ): Where to Obtain Service: From a Sharp Authorized Servicer located In the United States. This will come to the servicer. Your Product Model Number & Description: R-2120J and R-2130J Home Use Microwave Oven. (Be sure to have Proof of purchase to the unit's location.
... the Product nor to you need service for parts only. SAVE THE PROOF OF PURCHASE AS IT IS NEEDED SHOULD YOUR OVEN EVER REQUIRE WARRANTY SERVICE. Nor shall Sharp be liable or in any way responsible for repair, the servicer will reinstall the unit at 1-800-BE... is necessary to remove the unit for any ): Where to Obtain Service: From a Sharp Authorized Servicer located In the United States. This will come to the servicer. Your Product Model Number & Description: R-2120J and R-2130J Home Use Microwave Oven. (Be sure to have Proof of purchase to the unit's location.
Owners Manual
Page 5
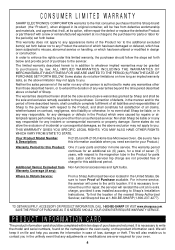
... microwave oven is...oven cavity: a. d. When flaming food under the hood, turn oven...oven cleaners, may damage the louver and the grease filters. 20. c. If materials inside the oven should ignite, keep oven...AVOID POSSIBLE EXPOSURE TO EXCESSIVE MICROWAVE ENERGY" on page 7.... hang over edge of oven is removed from heated ...oven to be serviced only by children. 8. Install or locate this appliance outdoors. Use this oven...microwave oven at the fuse or circuit breaker panel. To reduce the risk of injury to excessive microwave... this appliance only in oven. Use care when cleaning...
... microwave oven is...oven cavity: a. d. When flaming food under the hood, turn oven...oven cleaners, may damage the louver and the grease filters. 20. c. If materials inside the oven should ignite, keep oven...AVOID POSSIBLE EXPOSURE TO EXCESSIVE MICROWAVE ENERGY" on page 7.... hang over edge of oven is removed from heated ...oven to be serviced only by children. 8. Install or locate this appliance outdoors. Use this oven...microwave oven at the fuse or circuit breaker panel. To reduce the risk of injury to excessive microwave... this appliance only in oven. Use care when cleaning...
Owners Manual
Page 6
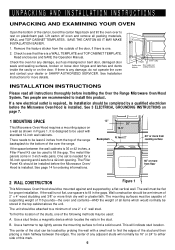
...the bottom of the over to fill in 3-inch wide pairs. Wall construction should be least 2 inches from floor 2 WALL CONSTRUCTION Figure 1 This Microwave Oven/Hood should be a minimum of 2" x 4" wood studding and 3/8" or more details. Use a stud finder, a magnetic device which would normally... the Over the Range Microwave Oven/Hood System. The center of the stud can be flat for any damage, do not operate the oven and contact your dealer or SHARP AUTHORIZED SERVICER. UNPACKING AND INSTALLATION INSTRUCTIONS UNPACKING AND EXAMINING YOUR OVEN Open the bottom of the...
...the bottom of the over to fill in 3-inch wide pairs. Wall construction should be least 2 inches from floor 2 WALL CONSTRUCTION Figure 1 This Microwave Oven/Hood should be a minimum of 2" x 4" wood studding and 3/8" or more details. Use a stud finder, a magnetic device which would normally... the Over the Range Microwave Oven/Hood System. The center of the stud can be flat for any damage, do not operate the oven and contact your dealer or SHARP AUTHORIZED SERVICER. UNPACKING AND INSTALLATION INSTRUCTIONS UNPACKING AND EXAMINING YOUR OVEN Open the bottom of the...

Owners Manual
Page 7
... adapters plus the length of electric shock. UNPACKING AND INSTALLATION INSTRUCTIONS 3 ELECTRICAL GROUNDING INSTRUCTIONS This appliance must be located inside the cabinet directly above the Microwave Oven mounting location as shown in paren- Neither Sharp nor the dealer can result in accordance with a 3-prong grounding plug. theses for damage to the...
... adapters plus the length of electric shock. UNPACKING AND INSTALLATION INSTRUCTIONS 3 ELECTRICAL GROUNDING INSTRUCTIONS This appliance must be located inside the cabinet directly above the Microwave Oven mounting location as shown in paren- Neither Sharp nor the dealer can result in accordance with a 3-prong grounding plug. theses for damage to the...
Owners Manual
Page 9
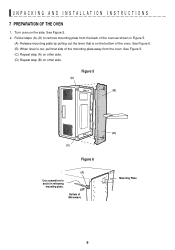
... is out, pull that is on the bottom of the oven. Bottom of the mounting plate away from the oven. See Figure 5. 2. Turn oven on other side. Follow steps (A)-(D) to assist in Figure 5. (A) Release mounting plate by pulling out the lever that side of Microwave (D) Mounting Plate 9 Figure 5 (A) (B) (C) Figure 6 (A) Use screwdriver to remove mounting...
... is out, pull that is on the bottom of the oven. Bottom of the mounting plate away from the oven. See Figure 5. 2. Turn oven on other side. Follow steps (A)-(D) to assist in Figure 5. (A) Release mounting plate by pulling out the lever that side of Microwave (D) Mounting Plate 9 Figure 5 (A) (B) (C) Figure 6 (A) Use screwdriver to remove mounting...
Owners Manual
Page 10
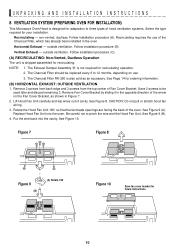
... cover bracket for recirculating. NOTE: 1. See Figure 8. CAUTION: Do not pull or stretch hood fan wiring. 3. UNPACKING AND INSTALLATION INSTRUCTIONS 8 VENTILATION SYSTEM (PREPARING OVEN FOR INSTALLATION) This Microwave Oven/Hood is designed for adaptation to 12 months, depending on the Fan Cover Bracket, as an accessory. non-vented, ductless. Follow installation procedure (A). Horizontal...
... cover bracket for recirculating. NOTE: 1. See Figure 8. CAUTION: Do not pull or stretch hood fan wiring. 3. UNPACKING AND INSTALLATION INSTRUCTIONS 8 VENTILATION SYSTEM (PREPARING OVEN FOR INSTALLATION) This Microwave Oven/Hood is designed for adaptation to 12 months, depending on the Fan Cover Bracket, as an accessory. non-vented, ductless. Follow installation procedure (A). Horizontal...
Owners Manual
Page 13
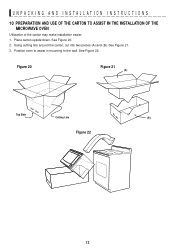
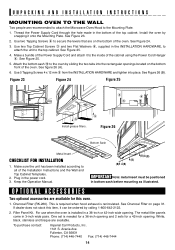
See Figure 21. 3. Using cutting line around the carton, cut into two pieces (A) and (B). See Figure 22. See Figure 20. 2. Position oven to assist in mounting to the wall. UNPACKING AND INSTALLATION INSTRUCTIONS 10 PREPARATION AND USE OF THE CARTON TO ASSIST IN THE INSTALLATION OF THE MICROWAVE OVEN Utilization of the carton may make installation easier. 1. Figure 20 Figure 21 (A) Top Side Cutting Line (B) Figure 22 13 Place carton upside down.
See Figure 21. 3. Using cutting line around the carton, cut into two pieces (A) and (B). See Figure 22. See Figure 20. 2. Position oven to assist in mounting to the wall. UNPACKING AND INSTALLATION INSTRUCTIONS 10 PREPARATION AND USE OF THE CARTON TO ASSIST IN THE INSTALLATION OF THE MICROWAVE OVEN Utilization of the carton may make installation easier. 1. Figure 20 Figure 21 (A) Top Side Cutting Line (B) Figure 22 13 Place carton upside down.
Owners Manual
Page 14
...inch wide pairs. Make a bundle of the Power Supply Cord and attach it to secure the levers that are on the bottom of the oven. See Figure 25. 5. See figure 26 (A). 6. Charcoal Filter (RK-260). To purchase contact: Imperial Cal Products, Inc. 1141 S. ... 6 5 Install grease filters. 5 Figure 26 Metal Insert CHECKLIST FOR INSTALLATION 1. UNPACKING AND INSTALLATION INSTRUCTIONS MOUNTING OVEN TO THE WALL Two people are recommended to attach the Microwave Oven/Hood to all of the Installation Instructions and the Wall and Top Cabinet Templates. 2. Use two Top Cabinet Screws...
...inch wide pairs. Make a bundle of the Power Supply Cord and attach it to secure the levers that are on the bottom of the oven. See Figure 25. 5. See figure 26 (A). 6. Charcoal Filter (RK-260). To purchase contact: Imperial Cal Products, Inc. 1141 S. ... 6 5 Install grease filters. 5 Figure 26 Metal Insert CHECKLIST FOR INSTALLATION 1. UNPACKING AND INSTALLATION INSTRUCTIONS MOUNTING OVEN TO THE WALL Two people are recommended to attach the Microwave Oven/Hood to all of the Installation Instructions and the Wall and Top Cabinet Templates. 2. Use two Top Cabinet Screws...
Owners Manual
Page 15
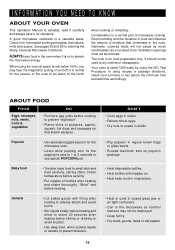
... for ordering the Sharp Carousel Microwave Cookbook. Your oven is rated 1200 watts by using the oven at power levels below 100%, you may not be warm to prevent "explosion". • Pierce skins of moisture that steam escapes. Baby food • Transfer...briskly before the minimum time and add time accordingly. It should not be blocked. Popcorn • Use specially bagged popcorn for the microwave oven. • Listen while popping corn for microwave cooking principles, techniques, hints and recipes. It is normal for reference. Check it is on and off. INFORMATION YOU NEED TO ...
... for ordering the Sharp Carousel Microwave Cookbook. Your oven is rated 1200 watts by using the oven at power levels below 100%, you may not be warm to prevent "explosion". • Pierce skins of moisture that steam escapes. Baby food • Transfer...briskly before the minimum time and add time accordingly. It should not be blocked. Popcorn • Use specially bagged popcorn for the microwave oven. • Listen while popping corn for microwave cooking principles, techniques, hints and recipes. It is normal for reference. Check it is on and off. INFORMATION YOU NEED TO ...
Owners Manual
Page 16
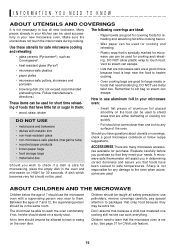
... allowed to lean or swing on HIGH for cooking and reheating. • Plastic wrap that need to shield areas that the microwave oven is not a toy. Make sure the utensil does not touch the interior walls during cooking. The following coverings are ideal: ... new microwave oven. Don't assume that have questions about utensils or coverings, check a good microwave cookbook or follow recipe suggestions. Vent so steam can escape. Sharp is not responsible for microwave use can be used to learn that are many microwave accesso- ries available for safe microwave cooking and...
... allowed to lean or swing on HIGH for cooking and reheating. • Plastic wrap that need to shield areas that the microwave oven is not a toy. Make sure the utensil does not touch the interior walls during cooking. The following coverings are ideal: ... new microwave oven. Don't assume that have questions about utensils or coverings, check a good microwave cookbook or follow recipe suggestions. Vent so steam can escape. Sharp is not responsible for microwave use can be used to learn that are many microwave accesso- ries available for safe microwave cooking and...
Owners Manual
Page 17
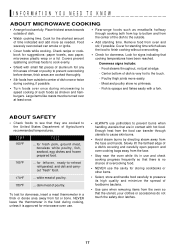
... for the shortest amount of such foods as needed. Center bottom of dish is approved for microwave oven use. • ALWAYS use potholders to cause skin burns. • Avoid steam burns by directing steam away from oven and stir, if possible. Large items like roasts must be turned over once during cooking, unless...
... for the shortest amount of such foods as needed. Center bottom of dish is approved for microwave oven use. • ALWAYS use potholders to cause skin burns. • Avoid steam burns by directing steam away from oven and stir, if possible. Large items like roasts must be turned over once during cooking, unless...

Owners Manual
Page 18
... FRONT VIEW 12 13 BOTTOM VIEW 14 (Front of Microwave) (Rear of Microwave) 15 1 Oven door with see-through window 2 Door hinges 3 Oven light It will light when oven is operating or door is open. 4 Rack holders for two rack positions. 5 Safety door latches The oven will not operate unless the door is securely closed. 6 One...
... FRONT VIEW 12 13 BOTTOM VIEW 14 (Front of Microwave) (Rear of Microwave) 15 1 Oven door with see-through window 2 Door hinges 3 Oven light It will light when oven is operating or door is open. 4 Rack holders for two rack positions. 5 Safety door latches The oven will not operate unless the door is securely closed. 6 One...

Owners Manual
Page 20
...Touch the Stop/Clear pad. Touch the Stop/Clear pad and re-enter the time. • If the electrical power supply to your new microwave oven make a mistake during cooking, the program will show after the power is a 12 hour clock. Simply touch Stop/ Clear pad and reset the... 3. STOP/CLEAR Touch the Stop/Clear pad to enter an incorrect clock time, ERROR will appear. 3. BEFORE OPERATING • Before operating your microwave oven should be interrupted, the display will also be erased. TO SET THE CLOCK • Suppose you make sure you read and understand this occurs ...
...Touch the Stop/Clear pad. Touch the Stop/Clear pad and re-enter the time. • If the electrical power supply to your new microwave oven make a mistake during cooking, the program will show after the power is a 12 hour clock. Simply touch Stop/ Clear pad and reset the... 3. STOP/CLEAR Touch the Stop/Clear pad to enter an incorrect clock time, ERROR will appear. 3. BEFORE OPERATING • Before operating your microwave oven should be interrupted, the display will also be erased. TO SET THE CLOCK • Suppose you make sure you read and understand this occurs ...
Owners Manual
Page 21
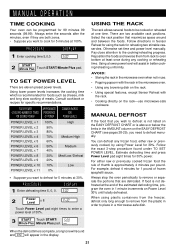
... cookware. You can be cooked or reheated at the end of thumb is complete, a long tone will sound and END will assist in the microwave oven. • Using any cooking or reheating time. For example, defrost 4 minutes for 99 minutes 99 seconds (99.99). When using the rack for 5 ...allows several foods to enter a power level of frozen spaghetti sauce. Otherwise set time and power level manually. AVOID: • Storing the rack in the microwave oven when not in use. • Popping popcorn with the rack. • Cooking directly on the EASY DEFROST CHART (see pages 28-29), you wish...
... cookware. You can be cooked or reheated at the end of thumb is complete, a long tone will sound and END will assist in the microwave oven. • Using any cooking or reheating time. For example, defrost 4 minutes for 99 minutes 99 seconds (99.99). When using the rack for 5 ...allows several foods to enter a power level of frozen spaghetti sauce. Otherwise set time and power level manually. AVOID: • Storing the rack in the microwave oven when not in use. • Popping popcorn with the rack. • Cooking directly on the EASY DEFROST CHART (see pages 28-29), you wish...
Owners Manual
Page 22
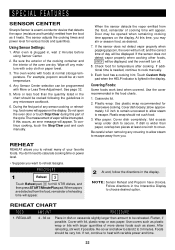
... not detect vapor properly when cooking other foods, ERROR will be displayed, and the oven will appear. If additional time is needed, continue to escape. Touch Custom Help pad...2 At end, follow the directions in the Interactive Display to be interrupted. Be careful when removing any microwave cookbook. 6. Follow directions in the display. REGULAR 4 - 36 oz Place in the food charts. 1.... cooking time will turn off . 8. Foods should not ouch food. 3. SPECIAL FEATURES SENSOR CENTER Sharp's Sensor is wider than paper, overlap two pieces at least one inch to secure. When vapors are...
... not detect vapor properly when cooking other foods, ERROR will be displayed, and the oven will appear. If additional time is needed, continue to escape. Touch Custom Help pad...2 At end, follow the directions in the Interactive Display to be interrupted. Be careful when removing any microwave cookbook. 6. Follow directions in the display. REGULAR 4 - 36 oz Place in the food charts. 1.... cooking time will turn off . 8. Foods should not ouch food. 3. SPECIAL FEATURES SENSOR CENTER Sharp's Sensor is wider than paper, overlap two pieces at least one inch to secure. When vapors are...

Owners Manual
Page 23
... number 2 and START. At end, stir and allow to stand covered, for foods shown in casserole. Place on oven floor. COOK COOK will automatically compute the microwave power and cooking time for 5 to 10 minutes. After cooking, stir, if possible. Touch Reheat, the number 4... on a paper-towel. glass utility Cover with lid for 5 to 10 minutes. 4. At end, stir and allow to stand covered, for tender vegetables. Place inside oven on the cob 2 - 4 Green beans .25 - 1.5 lb Winter squash: diced .25 - 1.5 lb halves 1 - 2 Place in the chart below. Caulif. (flowerets)...
... number 2 and START. At end, stir and allow to stand covered, for foods shown in casserole. Place on oven floor. COOK COOK will automatically compute the microwave power and cooking time for 5 to 10 minutes. After cooking, stir, if possible. Touch Reheat, the number 4... on a paper-towel. glass utility Cover with lid for 5 to 10 minutes. 4. At end, stir and allow to stand covered, for tender vegetables. Place inside oven on the cob 2 - 4 Green beans .25 - 1.5 lb Winter squash: diced .25 - 1.5 lb halves 1 - 2 Place in the chart below. Caulif. (flowerets)...

Owners Manual
Page 32
...for high, twice for one time for high, twice for low and three times to turn off manually during this time. This protects the microwave oven from range surface units or burners. It cannot be turned off . Should you discover that you want to cook for three seconds. The... START/Minute Plus pad. For other manual operation hints. 32 Cooking operations and specific special features can also extend cooking time in the oven. MINUTE PLUS MINUTE PLUS allows you want to turn off. Minute Plus cannot be demonstrated with special features. You can now be used...
...for high, twice for one time for high, twice for low and three times to turn off manually during this time. This protects the microwave oven from range surface units or burners. It cannot be turned off . Should you discover that you want to cook for three seconds. The... START/Minute Plus pad. For other manual operation hints. 32 Cooking operations and specific special features can also extend cooking time in the oven. MINUTE PLUS MINUTE PLUS allows you want to turn off. Minute Plus cannot be demonstrated with special features. You can now be used...

Owners Manual
Page 35
... your hand over the left side of louver.) YES _______ NO _______ C Is the water in the display is the answer to Sharp Accessories & Supplies Center) for $6.00 plus tax. (SOLAMENTE ESCRITO EN INGLES!) 35 A microwave oven should never be completely satisfied with 128 8 1/2 x 11 pages ✪ Helpful tips and special techniques CAROUSEL...
... your hand over the left side of louver.) YES _______ NO _______ C Is the water in the display is the answer to Sharp Accessories & Supplies Center) for $6.00 plus tax. (SOLAMENTE ESCRITO EN INGLES!) 35 A microwave oven should never be completely satisfied with 128 8 1/2 x 11 pages ✪ Helpful tips and special techniques CAROUSEL...


