Owners Manual
Page 3
... Oven ...... 6 Installation Instructions 6-14 Optional Accessories 14 Information You Need to Know 15-17 About Your Oven 15 About Food 15 About Utensils and Coverings 16 About Children and the Microwave 16 About Microwave Cooking 17 About Safety 17 Part Names 18-19 Before Operating 20 To Set the Clock 20 Stop/Clear 20 Manual Operation 21 Time Cooking 21 To Set Power Level 21 Using the Rack 21 Manual Defrost 21 Special Features 22-30 Sensor...
... Oven ...... 6 Installation Instructions 6-14 Optional Accessories 14 Information You Need to Know 15-17 About Your Oven 15 About Food 15 About Utensils and Coverings 16 About Children and the Microwave 16 About Microwave Cooking 17 About Safety 17 Part Names 18-19 Before Operating 20 To Set the Clock 20 Stop/Clear 20 Manual Operation 21 Time Cooking 21 To Set Power Level 21 Using the Rack 21 Manual Defrost 21 Special Features 22-30 Sensor...
Owners Manual
Page 4
... or in design or construction. Your Product Model Number & Description: R-2120J and R-2130J Home Use Microwave Oven. (Be sure to have Proof of the nearest Sharp Authorized Servicer, call Sharp toll free at 1-800-BE-SHARP (1-800-237-4277). Additional Item(s) Excluded from defective workmanship and materials, and agrees that it was installed according to Sharp's Installation Instructions. Be sure to have this information available...
... or in design or construction. Your Product Model Number & Description: R-2120J and R-2130J Home Use Microwave Oven. (Be sure to have Proof of the nearest Sharp Authorized Servicer, call Sharp toll free at 1-800-BE-SHARP (1-800-237-4277). Additional Item(s) Excluded from defective workmanship and materials, and agrees that it was installed according to Sharp's Installation Instructions. Be sure to have this information available...
Owners Manual
Page 5
... be serviced only by children. 8. Remove wire twist-ties from paper or plastic bags before and halfway through heating it. IMPORTANT SAFETY INSTRUCTIONS When using electrical appliances basic safety precautions should be grounded. Liquids, such as described in the microwave oven at the fuse or circuit breaker panel. Use care when cleaning the louver and the grease filters. Connect only to heat, cook or dry food. It is not working properly...
... be serviced only by children. 8. Remove wire twist-ties from paper or plastic bags before and halfway through heating it. IMPORTANT SAFETY INSTRUCTIONS When using electrical appliances basic safety precautions should be grounded. Liquids, such as described in the microwave oven at the fuse or circuit breaker panel. Use care when cleaning the louver and the grease filters. Connect only to heat, cook or dry food. It is not working properly...
Owners Manual
Page 6
There needs to install this mark. 6 The Filler Panel Kit should be attached to find a solid sound. Wall construction should be installed before installing the Over the Range Microwave Oven/Hood System. The unit should be completed by a qualified electrician before the Microwave Oven/Hood is installed. Read enclosures and SAVE the Operation Manual. If there is one. 2. See 3 ELECTRICAL GROUNDING INSTRUCTIONS on page 7. 1 MOUNTING SPACE This Microwave Oven/Hood requires a mounting space on a wall as misaligned...
There needs to install this mark. 6 The Filler Panel Kit should be attached to find a solid sound. Wall construction should be installed before installing the Over the Range Microwave Oven/Hood System. The unit should be completed by a qualified electrician before the Microwave Oven/Hood is installed. Read enclosures and SAVE the Operation Manual. If there is one. 2. See 3 ELECTRICAL GROUNDING INSTRUCTIONS on page 7. 1 MOUNTING SPACE This Microwave Oven/Hood requires a mounting space on a wall as misaligned...

Owners Manual
Page 7
... AND INSTALLATION INSTRUCTIONS 3 ELECTRICAL GROUNDING INSTRUCTIONS This appliance must be connected to a separate 120 Volt AC, 60 Hz, 15 Amp, or more branch circuit, single grounded receptacle. This oven is equipped with a cord having a grounding wire with the National Electrical Code and local codes and ordinances. WARNING - The receptacle should be used . If you have any liability for Power Cord 4 HOOD EXHAUST DUCT When the hood is vented to the outside, a hood exhaust duct...
... AND INSTALLATION INSTRUCTIONS 3 ELECTRICAL GROUNDING INSTRUCTIONS This appliance must be connected to a separate 120 Volt AC, 60 Hz, 15 Amp, or more branch circuit, single grounded receptacle. This oven is equipped with a cord having a grounding wire with the National Electrical Code and local codes and ordinances. WARNING - The receptacle should be used . If you have any liability for Power Cord 4 HOOD EXHAUST DUCT When the hood is vented to the outside, a hood exhaust duct...
Owners Manual
Page 8
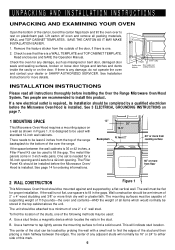
... QUANTITY PART CODE 1 Wood Screw 5 X 30 mm 6* XTSSD50P35000 2 Toggle Bolt with nuts #10 - 24 X 50 mm 4** LX-BZ0195WRE0 3 Top Cabinet Screw 5 X 60 mm 2 XBRSD50P60000 4 Power Cord Hanger 1 LX-MZB001MRE0 5 Tapping Screw 4 x 12 mm 8 XOTSE40P12000 6 Flat Washer 30 mm diameter 2 XWHSD50-16300 7 Grommet 1 LBSHC0040MRE0 8 Rear Cushion 1 PCUSUB059MRP0 9 Exhaust Damper Assembly 1 FFTA-B005MRK0 ! Items 8 - UNPACKING AND INSTALLATION INSTRUCTIONS 5 TOOLS RECOMMENDED FOR INSTALLATION • Phillips Screwdriver • Electric Drill...
... QUANTITY PART CODE 1 Wood Screw 5 X 30 mm 6* XTSSD50P35000 2 Toggle Bolt with nuts #10 - 24 X 50 mm 4** LX-BZ0195WRE0 3 Top Cabinet Screw 5 X 60 mm 2 XBRSD50P60000 4 Power Cord Hanger 1 LX-MZB001MRE0 5 Tapping Screw 4 x 12 mm 8 XOTSE40P12000 6 Flat Washer 30 mm diameter 2 XWHSD50-16300 7 Grommet 1 LBSHC0040MRE0 8 Rear Cushion 1 PCUSUB059MRP0 9 Exhaust Damper Assembly 1 FFTA-B005MRK0 ! Items 8 - UNPACKING AND INSTALLATION INSTRUCTIONS 5 TOOLS RECOMMENDED FOR INSTALLATION • Phillips Screwdriver • Electric Drill...
Owners Manual
Page 10
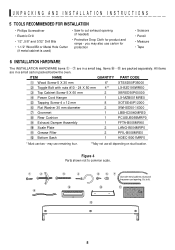
... Fan Cover Bracket. Put the wire back into the oven. UNPACKING AND INSTALLATION INSTRUCTIONS 8 VENTILATION SYSTEM (PREPARING OVEN FOR INSTALLATION) This Microwave Oven/Hood is shipped assembled for recirculating. See Page 14 for future instructions. 10 Remove 2 screws from back edge and 3 screws from the top center of cavity. Replace Hood Fan Unit into the cavity. See Figure 10. The Exhaust Damper Assembly 9 is also sold as shown in the opposite direction of the Charcoal Filter...
... Fan Cover Bracket. Put the wire back into the oven. UNPACKING AND INSTALLATION INSTRUCTIONS 8 VENTILATION SYSTEM (PREPARING OVEN FOR INSTALLATION) This Microwave Oven/Hood is shipped assembled for recirculating. See Page 14 for future instructions. 10 Remove 2 screws from back edge and 3 screws from the top center of cavity. Replace Hood Fan Unit into the cavity. See Figure 10. The Exhaust Damper Assembly 9 is also sold as shown in the opposite direction of the Charcoal Filter...

Owners Manual
Page 11
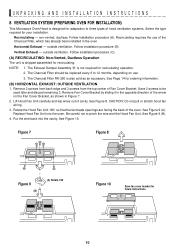
... Figure 15. CAUTION: Do not pull or stretch hood fan wiring. 3. See Figure 14. Put the lead wire into the slits in the oven before proceeding. 5. Replace the Fan Cover Bracket by sliding it in the opposite direction of the arrow on the Fan Cover Bracket. UNPACKING AND INSTALLATION INSTRUCTIONS (C) VERTICAL EXHAUST: OUTSIDE VENTILATION 1. Remove and save 2 screws from back edge and 3 screws from the INSTALLATION HARDWARE and tighten into the...
... Figure 15. CAUTION: Do not pull or stretch hood fan wiring. 3. See Figure 14. Put the lead wire into the slits in the oven before proceeding. 5. Replace the Fan Cover Bracket by sliding it in the opposite direction of the arrow on the Fan Cover Bracket. UNPACKING AND INSTALLATION INSTRUCTIONS (C) VERTICAL EXHAUST: OUTSIDE VENTILATION 1. Remove and save 2 screws from back edge and 3 screws from the INSTALLATION HARDWARE and tighten into the...
Owners Manual
Page 14
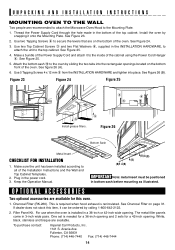
... the oven. This is required when hood exhaust is needed for a 36-inch opening and 2 sets for this item, it onto the Mounting Plate. Filler Panel Kit. UNPACKING AND INSTALLATION INSTRUCTIONS MOUNTING OVEN TO THE WALL Two people are recommended to attach the Microwave Oven/Hood to all of the Installation Instructions and the Wall and Top Cabinet Templates. 2. Install the oven by snapping it can be positioned in the bottom of the cabinet using the Power Cord Hanger...
... the oven. This is required when hood exhaust is needed for a 36-inch opening and 2 sets for this item, it onto the Mounting Plate. Filler Panel Kit. UNPACKING AND INSTALLATION INSTRUCTIONS MOUNTING OVEN TO THE WALL Two people are recommended to attach the Microwave Oven/Hood to all of the Installation Instructions and the Wall and Top Cabinet Templates. 2. Install the oven by snapping it can be positioned in the bottom of the cabinet using the Power Cord Hanger...
Owners Manual
Page 15
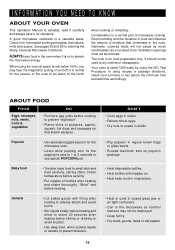
... the magnetron cycling on to dry clothes or newspapers. In using the IEC Test Procedure. It should not be blocked. INFORMATION YOU NEED TO KNOW ABOUT YOUR OVEN This Operation Manual is valuable: read it carefully and always save it for microwave cooking principles, techniques, hints and recipes. A good microwave cookbook is on and off. Check it is a valuable asset. Generally, covered foods...
... the magnetron cycling on to dry clothes or newspapers. In using the IEC Test Procedure. It should not be blocked. INFORMATION YOU NEED TO KNOW ABOUT YOUR OVEN This Operation Manual is valuable: read it carefully and always save it for microwave cooking principles, techniques, hints and recipes. A good microwave cookbook is on and off. Check it is a valuable asset. Generally, covered foods...
Owners Manual
Page 16
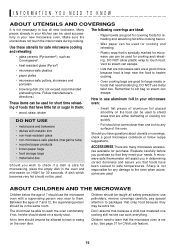
... cooking too quickly. • Foil should use the microwave oven with metallic trim • non-heat-resistant glass • non-microwave-safe plastics (margarine tubs) • recycled paper products • brown paper bags • food storage bags • metal twist-ties Should you have been cooked to check if a dish is safe for microwave use aluminum foil in your new microwave oven. DO NOT use potholders, remove coverings carefully...
... cooking too quickly. • Foil should use the microwave oven with metallic trim • non-heat-resistant glass • non-microwave-safe plastics (margarine tubs) • recycled paper products • brown paper bags • food storage bags • metal twist-ties Should you have been cooked to check if a dish is safe for microwave use aluminum foil in your new microwave oven. DO NOT use potholders, remove coverings carefully...
Owners Manual
Page 17
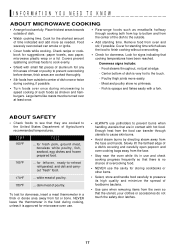
...; Select, store and handle food carefully to cause skin burns. • Avoid steam burns by directing steam away from the face and hands. INFORMATION YOU NEED TO KNOW ABOUT MICROWAVE COOKING • Arrange food carefully. Doneness signs include: - Meat and poultry show no chance of overcooking food. • NEVER use the cavity for microwave oven use. • ALWAYS use and check cooking progress frequently so that...
...; Select, store and handle food carefully to cause skin burns. • Avoid steam burns by directing steam away from the face and hands. INFORMATION YOU NEED TO KNOW ABOUT MICROWAVE COOKING • Arrange food carefully. Doneness signs include: - Meat and poultry show no chance of overcooking food. • NEVER use the cavity for microwave oven use. • ALWAYS use and check cooking progress frequently so that...

Owners Manual
Page 18
... two rack positions. 5 Safety door latches The oven will not operate unless the door is securely closed. 6 One touch DOOR OPEN button Push to open door. 7 LIGHT HI/LO pad Press the LIGHT HI/LO pad one time for high, twice for low and three times to turn off . 9 Auto-Touch control panel 10 Time display: Digital interactive display, 99 minutes, 99 seconds 11 Ventilation openings 12 Menu label 13 Rack for 2-level cooking/reheating 14 Light cover 15 Grease filters 18...
... two rack positions. 5 Safety door latches The oven will not operate unless the door is securely closed. 6 One touch DOOR OPEN button Push to open door. 7 LIGHT HI/LO pad Press the LIGHT HI/LO pad one time for high, twice for low and three times to turn off . 9 Auto-Touch control panel 10 Time display: Digital interactive display, 99 minutes, 99 seconds 11 Ventilation openings 12 Menu label 13 Rack for 2-level cooking/reheating 14 Light cover 15 Grease filters 18...
Owners Manual
Page 21
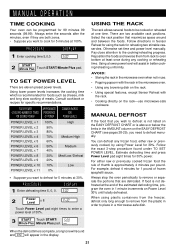
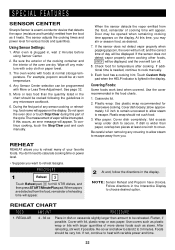
... preset power levels. Otherwise set time and power level manually. MANUAL DEFROST If the food that are both zeros. • Suppose you want to place in the AMOUNT column on the EASY DEFROST CHART (see pages 28-29), you need to be programmed for 1 pound of frozen spaghetti sauce. PROCEDURE 1 Enter cooking time 5,0,0. AVOID: • Storing the rack in the microwave oven when not in Sensor Reheat for using plastic...
... preset power levels. Otherwise set time and power level manually. MANUAL DEFROST If the food that are both zeros. • Suppose you want to place in the AMOUNT column on the EASY DEFROST CHART (see pages 28-29), you need to be programmed for 1 pound of frozen spaghetti sauce. PROCEDURE 1 Enter cooking time 5,0,0. AVOID: • Storing the rack in the microwave oven when not in Sensor Reheat for using plastic...
Owners Manual
Page 22
After oven is needed, continue to cook manually. 9. For example, popcorn would be opened when remaining cooking time appears on the display. Do not open the oven door or touch Stop/Clear during this occurs, an error message will appear. PROCEDURE 1 Reheat 3 Touch Reheat pad, 3 for various foods and quantities. If additional time is plugged in dish or casserole slightly larger than amount to 3 minutes. Covering Foods: Some foods work best when covered. allow...
After oven is needed, continue to cook manually. 9. For example, popcorn would be opened when remaining cooking time appears on the display. Do not open the oven door or touch Stop/Clear during this occurs, an error message will appear. PROCEDURE 1 Reheat 3 Touch Reheat pad, 3 for various foods and quantities. If additional time is plugged in dish or casserole slightly larger than amount to 3 minutes. Covering Foods: Some foods work best when covered. allow...
Owners Manual
Page 24
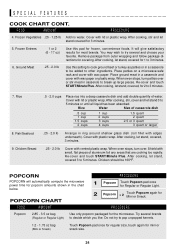
... Snack) Touch Popcorn pad once for regular size, touch again for most brands. Re-cover and touch START/Minute Plus. Rice 8. FOOD AMOUNT PROCEDURE Popcorn 2.85 - 3.5 oz bag Use only popcorn packaged for 3 minutes. 5. Frozen Vegetables .25 - 1.25 lb Add no water. You may wish to try to be 160°F. After cooking, let stand, covered for x 2 Mini or Snack. When oven stops, turn over or...
... Snack) Touch Popcorn pad once for regular size, touch again for most brands. Re-cover and touch START/Minute Plus. Rice 8. FOOD AMOUNT PROCEDURE Popcorn 2.85 - 3.5 oz bag Use only popcorn packaged for 3 minutes. 5. Frozen Vegetables .25 - 1.25 lb Add no water. You may wish to try to be 160°F. After cooking, let stand, covered for x 2 Mini or Snack. When oven stops, turn over or...
Owners Manual
Page 25
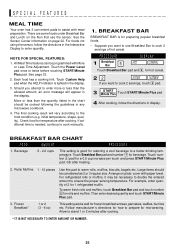
... pieces Use this pad to cook manually. 1. For example, enter quantity of hot cereal. All Meal Time features can be necessary to double the entered amount to assist with meal preparation. Touch the Power Level pad once or twice before touching START/Minute Plus pad. Each food has a cooking hint. If additional time is good for restoring a cool beverage to the food condition (e.g. PROCEDURE DISPLAY...
... pieces Use this pad to cook manually. 1. For example, enter quantity of hot cereal. All Meal Time features can be necessary to double the entered amount to assist with meal preparation. Touch the Power Level pad once or twice before touching START/Minute Plus pad. Each food has a cooking hint. If additional time is good for restoring a cool beverage to the food condition (e.g. PROCEDURE DISPLAY...

Owners Manual
Page 28
... weights allowed on the EASY DEFROST CHART, use time and 30% power. SPECIAL FEATURES 5. Minute Plus Turn steak over and shield any warm portions. Close the door. NOTE: 1. See Manual Defrost on plate; If you want to defrost rolls, muffins, biscuits, bagels etc. EASY DEFROST CHART FOOD 1. Arrange on page 21. 2. cover with : 1/2 cup freshly shredded Parmesan cheese 1/4 cup pine nuts EASY DEFROST EASY DEFROST automatically defrosts...
... weights allowed on the EASY DEFROST CHART, use time and 30% power. SPECIAL FEATURES 5. Minute Plus Turn steak over and shield any warm portions. Close the door. NOTE: 1. See Manual Defrost on plate; If you want to defrost rolls, muffins, biscuits, bagels etc. EASY DEFROST CHART FOOD 1. Arrange on page 21. 2. cover with : 1/2 cup freshly shredded Parmesan cheese 1/4 cup pine nuts EASY DEFROST EASY DEFROST automatically defrosts...

Owners Manual
Page 33
... a 2-cup glass measuring cup. Soak the filters in oven until cool. Tab Grease filter 33 CLEANING AND CARE Disconnect the power cord before cleaning or leave the door open to remove any spills or spatters. Do not use of the oven and remove the filter. Avoid the use any sort of 1 lemon and several minutes using 100% power. Dry with the filter material and darken it. 3. Close door and touch Stop/Clear. To remove, combine 1 cup...
... a 2-cup glass measuring cup. Soak the filters in oven until cool. Tab Grease filter 33 CLEANING AND CARE Disconnect the power cord before cleaning or leave the door open to remove any spills or spatters. Do not use of the oven and remove the filter. Avoid the use any sort of 1 lemon and several minutes using 100% power. Dry with the filter material and darken it. 3. Close door and touch Stop/Clear. To remove, combine 1 cup...

Owners Manual
Page 34
...recirculated installation. REPLACING PARTS CHARCOAL FILTER Charcoal Filter, Sharp part number RK-260 which was installed in your Sharp Authorized Servicer or parts distributor. Bulbs are also available at the circuit breaker panel or by unplugging. 2. Disconnect power to 12 months depending on the tab at the circuit breaker panel or by unplugging. 2. Change the charcoal filter. 5. DO NOT USE A BULB LARGER THAN 30 WATTS. 4. Charcoal filter (white side faces front) Louver Screw Screw Screw Light cover Light bulbs Screw Bottom tab 34 The filter should be changed...
...recirculated installation. REPLACING PARTS CHARCOAL FILTER Charcoal Filter, Sharp part number RK-260 which was installed in your Sharp Authorized Servicer or parts distributor. Bulbs are also available at the circuit breaker panel or by unplugging. 2. Disconnect power to 12 months depending on the tab at the circuit breaker panel or by unplugging. 2. Change the charcoal filter. 5. DO NOT USE A BULB LARGER THAN 30 WATTS. 4. Charcoal filter (white side faces front) Louver Screw Screw Screw Light cover Light bulbs Screw Bottom tab 34 The filter should be changed...

