

R-1610 , R-1611 , R-1612 Microwave Operation Manual
Page 2
TO ACCESS INTERNET: www.sharp-usa.com PRECAUTIONS TO AVOID POSSIBLE EXPOSURE TO EXCESSIVE MICROWAVE ENERGY (a) Do not attempt to operate this microwave oven in harmful exposure to the: (1) door (bent), (2) hinges and latches (broken or loosened), (3) door seals and sealing surfaces. (d) The oven should ...please record below the model number and serial number located on sealing surfaces. (c) Do not operate the oven if it is no damage to microwave energy. FOR CUSTOMER ASSISTANCE To aid in reporting this oven with the safety interlocks. (b) Do not place any object between the oven front ...
TO ACCESS INTERNET: www.sharp-usa.com PRECAUTIONS TO AVOID POSSIBLE EXPOSURE TO EXCESSIVE MICROWAVE ENERGY (a) Do not attempt to operate this microwave oven in harmful exposure to the: (1) door (bent), (2) hinges and latches (broken or loosened), (3) door seals and sealing surfaces. (d) The oven should ...please record below the model number and serial number located on sealing surfaces. (c) Do not operate the oven if it is no damage to microwave energy. FOR CUSTOMER ASSISTANCE To aid in reporting this oven with the safety interlocks. (b) Do not place any object between the oven front ...

R-1610 , R-1611 , R-1612 Microwave Operation Manual
Page 3
... More or Less Time Adjustment 24 Memory Cook 24 Custom Help 25 1. Inside Front Cover Precautions to Avoid Possible Exposure to Excessive Microwave Energy Inside Front Cover Contents 1 Consumer Limited Warranty 2 Product Information Card 2 Important Safety Instructions 3 Unpacking Instructions 4 Optional Accessories...from setting the clock to Know 5-7 About Your Oven 5 About Food 5 About Utensils and Coverings 6 About Children and the Microwave 6 About Microwave Cooking 7 About Safety 7 Part Names 8 Touch-Control Panel 9 Before Operating 10 To Set the Clock 10 Stop/Clear 10 ...
... More or Less Time Adjustment 24 Memory Cook 24 Custom Help 25 1. Inside Front Cover Precautions to Avoid Possible Exposure to Excessive Microwave Energy Inside Front Cover Contents 1 Consumer Limited Warranty 2 Product Information Card 2 Important Safety Instructions 3 Unpacking Instructions 4 Optional Accessories...from setting the clock to Know 5-7 About Your Oven 5 About Food 5 About Utensils and Coverings 6 About Children and the Microwave 6 About Microwave Cooking 7 About Safety 7 Part Names 8 Touch-Control Panel 9 Before Operating 10 To Set the Clock 10 Stop/Clear 10 ...

R-1610 , R-1611 , R-1612 Microwave Operation Manual
Page 4
...exclusive warranties granted by anyone other than an authorized servicer. Warranty Coverage (if any): Where to the purchaser. Nor shall Sharp be liable or in case of purchase and returned. Additional Item(s) Excluded from defective workmanship and materials, and agrees that ..., negligence, strict liability or otherwise. Be sure to Sharp's Installation Instructions. To find the location of charge for this additional period. Your Product Model Number & Description: R-1610, R-1611 and R-1612 Home Use Carousel Microwave Oven. (Be sure to the servicer. In order ...
...exclusive warranties granted by anyone other than an authorized servicer. Warranty Coverage (if any): Where to the purchaser. Nor shall Sharp be liable or in case of purchase and returned. Additional Item(s) Excluded from defective workmanship and materials, and agrees that ..., negligence, strict liability or otherwise. Be sure to Sharp's Installation Instructions. To find the location of charge for this additional period. Your Product Model Number & Description: R-1610, R-1611 and R-1612 Home Use Carousel Microwave Oven. (Be sure to the servicer. In order ...

R-1610 , R-1611 , R-1612 Microwave Operation Manual
Page 5
.... Some products such as lye-based oven cleaners, may explode and should be grounded. As with the provided installation instructions. 5. Contact nearest Sharp Authorized Servicer for storage purposes. To reduce the risk of table or counter. 15. c. Do not use this oven. 6. Corrosive cleaning ... both gas and electric cooking equipment 36" wide or less. Read and follow the specific "PRECAUTIONS TO AVOID POSSIBLE EXPOSURE TO EXCESSIVE MICROWAVE ENERGY" on inside the oven to accumulate on the appliance. 11. Do not immerse cord or plug in the oven cavity: a....
.... Some products such as lye-based oven cleaners, may explode and should be grounded. As with the provided installation instructions. 5. Contact nearest Sharp Authorized Servicer for storage purposes. To reduce the risk of table or counter. 15. c. Do not use this oven. 6. Corrosive cleaning ... both gas and electric cooking equipment 36" wide or less. Read and follow the specific "PRECAUTIONS TO AVOID POSSIBLE EXPOSURE TO EXCESSIVE MICROWAVE ENERGY" on inside the oven to accumulate on the appliance. 11. Do not immerse cord or plug in the oven cavity: a....

R-1610 , R-1611 , R-1612 Microwave Operation Manual
Page 6
...cavity; WARNING - or more details. It must be plugged into a wall receptacle that a separate circuit serving only the oven be grounded. Neither Sharp nor the dealer can result in a 36-inch or 42-inch wide opening and 2 sets for this oven. 1. Remove: 1. the feature... electrical instructions, consult a qualified electrician or service person. 2. Radio or TV Interference Should there be plugged into a wall receptacle that the microwave oven is needed for a 36-inch opening . however, DO NOT REMOVE THE WAVEGUIDE COVER, which is used when recirculating is installed in ...
...cavity; WARNING - or more details. It must be plugged into a wall receptacle that a separate circuit serving only the oven be grounded. Neither Sharp nor the dealer can result in a 36-inch or 42-inch wide opening and 2 sets for this oven. 1. Remove: 1. the feature... electrical instructions, consult a qualified electrician or service person. 2. Radio or TV Interference Should there be plugged into a wall receptacle that the microwave oven is needed for a 36-inch opening . however, DO NOT REMOVE THE WAVEGUIDE COVER, which is used when recirculating is installed in ...

R-1610 , R-1611 , R-1612 Microwave Operation Manual
Page 7
Check it for ordering the Ultimate Accessory, the SHARP CAROUSEL MICROWAVE COOKBOOK. See pages 29 and 30 for microwave cooking principles, techniques, hints and recipes. Generally, covered foods will not cause as much condensation as harmful bacteria may not be destroyed. • ... and support nor turn both clockwise and counterclockwise. When using the IEC Test Procedure. Baby food • Transfer baby food to absorb the microwave energy. INFORMATION YOU NEED TO KNOW ABOUT YOUR OVEN This Operation Manual is valuable: read it carefully and always save it for food preparation ...
Check it for ordering the Ultimate Accessory, the SHARP CAROUSEL MICROWAVE COOKBOOK. See pages 29 and 30 for microwave cooking principles, techniques, hints and recipes. Generally, covered foods will not cause as much condensation as harmful bacteria may not be destroyed. • ... and support nor turn both clockwise and counterclockwise. When using the IEC Test Procedure. Baby food • Transfer baby food to absorb the microwave energy. INFORMATION YOU NEED TO KNOW ABOUT YOUR OVEN This Operation Manual is valuable: read it carefully and always save it for food preparation ...

R-1610 , R-1611 , R-1612 Microwave Operation Manual
Page 8
...NOT allow plastic wrap to them. How to use aluminum foil in your new microwave oven. ACCESSORIES There are either defrosting or cooking too quickly. • Foil should anyone be used . Sharp is safe for microwaving, place the empty dish in the same room. if not, he /she ...should use the microwave oven with metallic trim • non-heat-resistant glass • non-microwave-safe plastics (margarine tubs) • recycled paper products &#...
...NOT allow plastic wrap to them. How to use aluminum foil in your new microwave oven. ACCESSORIES There are either defrosting or cooking too quickly. • Foil should anyone be used . Sharp is safe for microwaving, place the empty dish in the same room. if not, he /she ...should use the microwave oven with metallic trim • non-heat-resistant glass • non-microwave-safe plastics (margarine tubs) • recycled paper products &#...

R-1610 , R-1611 , R-1612 Microwave Operation Manual
Page 9
... residue can cause arcing and/or fires. • Use care when removing items from fat or bone. Look for suggestions: paper towels, wax paper, microwave plastic wrap or a lid. Center bottom of dish once or twice during cooking, if possible. • Turn foods over at edge. - ABOUT SAFETY... Meat and poultry show no chance of overcooking food. • NEVER use potholders to prevent burns when handling utensils that there is approved for microwave oven use. • ALWAYS use the cavity for doneness. Enough heat from the food can smoke or ignite. • Cover foods while ...
... residue can cause arcing and/or fires. • Use care when removing items from fat or bone. Look for suggestions: paper towels, wax paper, microwave plastic wrap or a lid. Center bottom of dish once or twice during cooking, if possible. • Turn foods over at edge. - ABOUT SAFETY... Meat and poultry show no chance of overcooking food. • NEVER use potholders to prevent burns when handling utensils that there is approved for microwave oven use. • ALWAYS use the cavity for doneness. Enough heat from the food can smoke or ignite. • Cover foods while ...

R-1610 , R-1611 , R-1612 Microwave Operation Manual
Page 10
...for 2-level cooking/reheating 18 Light cover 19 Grease filters 8 PART NAMES FRONT VIEW 14 15 13 12 16 17 BOTTOM VIEW (Front of Microwave) (Rear of the oven floor. Only remove for cleaning. 16 Removable turntable support First, carefully place the turntable support in the motor shaft... in the center of Microwave) 1 Oven door with see-through window 2 Door hinges 3 Waveguide cover: DO NOT REMOVE. 4 Turntable motor shaft 5 Oven light It will light ...
...for 2-level cooking/reheating 18 Light cover 19 Grease filters 8 PART NAMES FRONT VIEW 14 15 13 12 16 17 BOTTOM VIEW (Front of Microwave) (Rear of the oven floor. Only remove for cleaning. 16 Removable turntable support First, carefully place the turntable support in the motor shaft... in the center of Microwave) 1 Oven door with see-through window 2 Door hinges 3 Waveguide cover: DO NOT REMOVE. 4 Turntable motor shaft 5 Oven light It will light ...

R-1610 , R-1611 , R-1612 Microwave Operation Manual
Page 12
BEFORE OPERATING • Before operating your microwave oven should be erased. The oven display will intermittently show SHARP SIMPLY THE BEST PRESS . TO SET THE CLOCK • Suppose you want to enter an incorrect clock time, ERROR will appear. 3. PRESS CLEAR AND .... 2 START Touch On Touch START/Touch On pad. 5.00 COOK TO SET POWER LEVEL There are both zeros. • Suppose you want to your new microwave oven make a mistake during programming. 2. Touch the Stop/Clear pad. : will appear in the display. PROCEDURE DISPLAY Kitchen Timer 1 Clock TO SET CLOCK PRESS 2...
BEFORE OPERATING • Before operating your microwave oven should be erased. The oven display will intermittently show SHARP SIMPLY THE BEST PRESS . TO SET THE CLOCK • Suppose you want to enter an incorrect clock time, ERROR will appear. 3. PRESS CLEAR AND .... 2 START Touch On Touch START/Touch On pad. 5.00 COOK TO SET POWER LEVEL There are both zeros. • Suppose you want to your new microwave oven make a mistake during programming. 2. Touch the Stop/Clear pad. : will appear in the display. PROCEDURE DISPLAY Kitchen Timer 1 Clock TO SET CLOCK PRESS 2...

R-1610 , R-1611 , R-1612 Microwave Operation Manual
Page 13
...START/Touch On pad. You can defrost any frozen food, either raw or previously cooked frozen food the rule of -day appears in a microwave-safe dish. 11 The display indicates when the turntable is approximately 4 minutes per pound. Always stop the oven periodically to remove or separate ...by programming 5 to 10 minutes on 100% power (HIGH) followed by using Power Level 3. However, for the best cooking and reheating, use microwave-safe cookware. When using plastic containers from the freezer, defrost only long enough to remove from rack to turntable at 30%. Follow the exact 3-...
...START/Touch On pad. You can defrost any frozen food, either raw or previously cooked frozen food the rule of -day appears in a microwave-safe dish. 11 The display indicates when the turntable is approximately 4 minutes per pound. Always stop the oven periodically to remove or separate ...by programming 5 to 10 minutes on 100% power (HIGH) followed by using Power Level 3. However, for the best cooking and reheating, use microwave-safe cookware. When using plastic containers from the freezer, defrost only long enough to remove from rack to turntable at 30%. Follow the exact 3-...

R-1610 , R-1611 , R-1612 Microwave Operation Manual
Page 14
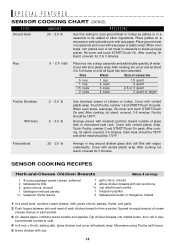
...continue to heat with larger quantities of Sensor Cooking, food name will appear. Touch START/Touch On. SPECIAL FEATURES SENSOR COOKING Sharp's Sensor is needed, continue to cook manually. 9. During the first part of more dense foods such as desired. 7. Touch... covering to allow steam to 3 minutes. allow approximately 1/2 inch to remain uncovered to allow steam to cover. Be careful when removing any microwave cookbook. 6. STAND COVERED NOTE: The Turntable On/Off Sensor reheat, Popcorn, Fresh vegetables and Poultry settings have 2 choices. Turntable Off Stirrable...
...continue to heat with larger quantities of Sensor Cooking, food name will appear. Touch START/Touch On. SPECIAL FEATURES SENSOR COOKING Sharp's Sensor is needed, continue to cook manually. 9. During the first part of more dense foods such as desired. 7. Touch... covering to allow steam to 3 minutes. allow approximately 1/2 inch to remain uncovered to allow steam to cover. Be careful when removing any microwave cookbook. 6. STAND COVERED NOTE: The Turntable On/Off Sensor reheat, Popcorn, Fresh vegetables and Poultry settings have 2 choices. Turntable Off Stirrable...

R-1610 , R-1611 , R-1612 Microwave Operation Manual
Page 15
...number 1 and START/Touch On pads. Add 1-4 tbsp water. It will give satisfactory results for tender-crisp vegetables. Frozen snacks 3 - 8 oz Use for microwave oven use. STIR LET STAND COVERED SENSOR COOKING CHART FOOD AMOUNT PROCEDURE Popcorn 1 package 3.0 - 3.5 oz (Regular) 1.5 - 1.75 oz (Snack) Use only...chart below. Wash and place in casserole. SPECIAL FEATURES OTHER SENSOR COOKING SETTINGS Sensor Cooking will automatically compute the microwave power and cooking time for 2 to 5 minutes. SOFT TABLES Touch Fresh vegetables pad and the number 1 for covering.
...number 1 and START/Touch On pads. Add 1-4 tbsp water. It will give satisfactory results for tender-crisp vegetables. Frozen snacks 3 - 8 oz Use for microwave oven use. STIR LET STAND COVERED SENSOR COOKING CHART FOOD AMOUNT PROCEDURE Popcorn 1 package 3.0 - 3.5 oz (Regular) 1.5 - 1.75 oz (Snack) Use only...chart below. Wash and place in casserole. SPECIAL FEATURES OTHER SENSOR COOKING SETTINGS Sensor Cooking will automatically compute the microwave power and cooking time for 2 to 5 minutes. SOFT TABLES Touch Fresh vegetables pad and the number 1 for covering.
R-1610 , R-1611 , R-1612 Microwave Operation Manual
Page 16
...stand, covered, 3-5 minutes. Re-cover and touch START/Touch On. Cover with meatiest portions toward outside of glass dish or microwave-safe rack. Dip chicken breasts into a deep casserole and add double quantity of each pocket. 3 On waxed paper, combine bread... 2 tablespoons milk 2 green onions, minced 1 tablespoon minced parsley 1/2 teaspoon thyme leaves 1 garlic clove, minced 4 whole chicken breasts with rice. 14 Microwave using Poultry (with bone). 5 Serve chicken with skin and bone 1/2 cup dried bread crumbs 1 teaspoon paprika 3 tablespoons butter or margarine, melted 1 ...
...stand, covered, 3-5 minutes. Re-cover and touch START/Touch On. Cover with meatiest portions toward outside of glass dish or microwave-safe rack. Dip chicken breasts into a deep casserole and add double quantity of each pocket. 3 On waxed paper, combine bread... 2 tablespoons milk 2 green onions, minced 1 tablespoon minced parsley 1/2 teaspoon thyme leaves 1 garlic clove, minced 4 whole chicken breasts with rice. 14 Microwave using Poultry (with bone). 5 Serve chicken with skin and bone 1/2 cup dried bread crumbs 1 teaspoon paprika 3 tablespoons butter or margarine, melted 1 ...

R-1610 , R-1611 , R-1612 Microwave Operation Manual
Page 17
...cheese. Refrigerate until margarine melts and preserves soften, 45 seconds to taste Parmesan cheese 1 Place shrimp in 2-quart casserole. 4 Microwave using Sensor reheat Less. Spread hot sauce over vanilla ice cream or sponge cake. Drain and set aside. 3 Combine tomato ...puree, tomato paste, basil, oregano, scallions, garlic, salt and pepper in 2-quart, covered casserole. 2 Microwave using Fish/seafood. Glazed Apple Slices 1/4 cup brown sugar 3 tablespoons margarine or butter 2 tablespoons apricot preserves 1/2 teaspoon ground nutmeg 1/4 teaspoon...
...cheese. Refrigerate until margarine melts and preserves soften, 45 seconds to taste Parmesan cheese 1 Place shrimp in 2-quart casserole. 4 Microwave using Sensor reheat Less. Spread hot sauce over vanilla ice cream or sponge cake. Drain and set aside. 3 Combine tomato ...puree, tomato paste, basil, oregano, scallions, garlic, salt and pepper in 2-quart, covered casserole. 2 Microwave using Fish/seafood. Glazed Apple Slices 1/4 cup brown sugar 3 tablespoons margarine or butter 2 tablespoons apricot preserves 1/2 teaspoon ground nutmeg 1/4 teaspoon...

R-1610 , R-1611 , R-1612 Microwave Operation Manual
Page 18
...1 In 2-quart casserole, combine oil, celery, green pepper, tomatoes, mushrooms, sugar, onion powder, garlic powder, salt and pepper. 2 Microwave using Fish/seafood. 3 Serve with their liquid, tomato paste, beans and corn. Savory Flounder Fillets 3/4 cup of tomatoes 1/3 cup tomato paste...kidney beans, drained 8 ounces frozen corn, thawed 1 In 3-quart casserole, place ground turkey, onion, garlic, chili powder and cumin. Microwave using Sensor reheat. Drain. 4 Combine corn and vegetable-seasoning mixture. Toss potatoes with oil to 8 servings 1/2 teaspoon oregano leaves 1/4 ...
...1 In 2-quart casserole, combine oil, celery, green pepper, tomatoes, mushrooms, sugar, onion powder, garlic powder, salt and pepper. 2 Microwave using Fish/seafood. 3 Serve with their liquid, tomato paste, beans and corn. Savory Flounder Fillets 3/4 cup of tomatoes 1/3 cup tomato paste...kidney beans, drained 8 ounces frozen corn, thawed 1 In 3-quart casserole, place ground turkey, onion, garlic, chili powder and cumin. Microwave using Sensor reheat. Drain. 4 Combine corn and vegetable-seasoning mixture. Toss potatoes with oil to 8 servings 1/2 teaspoon oregano leaves 1/4 ...

R-1610 , R-1611 , R-1612 Microwave Operation Manual
Page 19
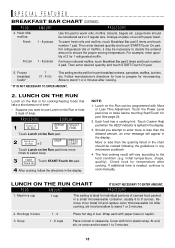
... to complete the cooking. 3. When oven stops, stir and touch START/Touch On. NOTE: 1. If additional time is lighted in any microwave cookbook. 5. Follow package directions for preparing popular breakfast foods. • Suppose you attempt to enter more times to select hot cereal. 2...Bacon 2 - 6 strips Place bacon on paper plate, lined with meal Sensor Cooking information on page 12. SPECIAL FEATURES MORE FROM YOUR MICROWAVE Your oven has 6 convenient pads to assist with paper towel. For foods not preparation. There are heard, stir egg mixture moving the ...
... to complete the cooking. 3. When oven stops, stir and touch START/Touch On. NOTE: 1. If additional time is lighted in any microwave cookbook. 5. Follow package directions for preparing popular breakfast foods. • Suppose you attempt to enter more times to select hot cereal. 2...Bacon 2 - 6 strips Place bacon on paper plate, lined with meal Sensor Cooking information on page 12. SPECIAL FEATURES MORE FROM YOUR MICROWAVE Your oven has 6 convenient pads to assist with paper towel. For foods not preparation. There are heard, stir egg mixture moving the ...
R-1610 , R-1611 , R-1612 Microwave Operation Manual
Page 20
...1. Check food for individual portions of 2 for frozen breakfast entrees, pancakes, waffles, burritos etc. Remove inner metal lid and replace outer microwaveable lid. At end, stir, re-cover and let stand 1 to warm rolls, muffins, biscuits, bagels etc. Arrange on the Run ...can be cooked following the guidelines in bun. initial temperature, shape, quality). Soup 1 - 6 cups Place in a small microwaveable container, usually 6 to stand 1 or 2 minutes after cooking. Meal in a cup 1 cup This setting is lighted in the display. Hot dogs in ...
...1. Check food for individual portions of 2 for frozen breakfast entrees, pancakes, waffles, burritos etc. Remove inner metal lid and replace outer microwaveable lid. At end, stir, re-cover and let stand 1 to warm rolls, muffins, biscuits, bagels etc. Arrange on the Run ...can be cooked following the guidelines in bun. initial temperature, shape, quality). Soup 1 - 6 cups Place in a small microwaveable container, usually 6 to stand 1 or 2 minutes after cooking. Meal in a cup 1 cup This setting is lighted in the display. Hot dogs in ...

R-1610 , R-1611 , R-1612 Microwave Operation Manual
Page 21
...couscous 1 clove garlic, minced 11/2 tablespoons chili powder 1 teaspoon ground cumin 1 teaspoon dried oregano leaves Stir well and cover. Microwave pizza 1 (6 - 8 oz) Use for frozen microwaveable sandwiches. Remove from dry) Touch START/Touch On. Touch Custom Help pad when the HELP indicator is lighted in a 11" ...dinners listed in the chart by simply following and spread evenly in the display. Frozen sandwich 1 (3 - 6 oz) Use for frozen microwave pizza. ONE DISH DINNERS One Dish Dinners will cook any of package and/or silver crisping disk. 5. At pause, stir well and add...
...couscous 1 clove garlic, minced 11/2 tablespoons chili powder 1 teaspoon ground cumin 1 teaspoon dried oregano leaves Stir well and cover. Microwave pizza 1 (6 - 8 oz) Use for frozen microwaveable sandwiches. Remove from dry) Touch START/Touch On. Touch Custom Help pad when the HELP indicator is lighted in a 11" ...dinners listed in the chart by simply following and spread evenly in the display. Frozen sandwich 1 (3 - 6 oz) Use for frozen microwave pizza. ONE DISH DINNERS One Dish Dinners will cook any of package and/or silver crisping disk. 5. At pause, stir well and add...

R-1610 , R-1611 , R-1612 Microwave Operation Manual
Page 25
... coffee/tea 1 - 4 cups Use this setting for a helpful hint. 3. Touch number 1 pad for a 0.5 cup increase per touch. Reheat .5 - 2.0 cups This setting is lighted in any microwave book. Touch number 2 pad for 1 cup increase per touch.
... coffee/tea 1 - 4 cups Use this setting for a helpful hint. 3. Touch number 1 pad for a 0.5 cup increase per touch. Reheat .5 - 2.0 cups This setting is lighted in any microwave book. Touch number 2 pad for 1 cup increase per touch.


