

PN-E603 | PN-E703 Quick Start Guide
Page 10
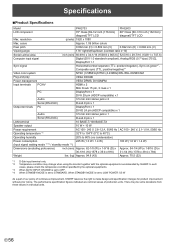
...to 80% (no condensation) 225 W inch (mm) Approx. 62-1/8 (W) x 1-9/16 (D) x 36-1/16 (H) (1578 x 39.4 x 916) lbs. (kg) Approx. 94.8 (43) PN-E603 AC 100 - 240 V, 2.1-1.0 A, 50/60 Hz 180 W Approx. 54-1/4 (W) x 1-9/16 (D) x 31-1/4 (H) (1378 x 39.4 x 794) Approx. 70.5 (32) * Temperature condition... mounting bracket, use any screw holes other than the thickness of continuous improvement, SHARP reserves the right to make design and specification changes for installation. Mounting Precautions (For SHARP dealers and service engineers) • When installing, removing or moving the monitor,...
...to 80% (no condensation) 225 W inch (mm) Approx. 62-1/8 (W) x 1-9/16 (D) x 36-1/16 (H) (1578 x 39.4 x 916) lbs. (kg) Approx. 94.8 (43) PN-E603 AC 100 - 240 V, 2.1-1.0 A, 50/60 Hz 180 W Approx. 54-1/4 (W) x 1-9/16 (D) x 31-1/4 (H) (1378 x 39.4 x 794) Approx. 70.5 (32) * Temperature condition... mounting bracket, use any screw holes other than the thickness of continuous improvement, SHARP reserves the right to make design and specification changes for installation. Mounting Precautions (For SHARP dealers and service engineers) • When installing, removing or moving the monitor,...
PN-E603 | PN-E703 Operation Manual
Page 56
... values in individual units. When STANDBY MODE is set to LOW POWER: 0.5 W As a part of our policy of production units. E 56 Specifications nProduct Specifications Model PN-E703 PN-E603 LCD component 70" Class [69-1/2 inch (176.6cm) 60" Class [60-1/16 inch (152.5cm) diagonal] TFT LCD diagonal] TFT LCD Max. In such...
... values in individual units. When STANDBY MODE is set to LOW POWER: 0.5 W As a part of our policy of production units. E 56 Specifications nProduct Specifications Model PN-E703 PN-E603 LCD component 70" Class [69-1/2 inch (176.6cm) 60" Class [60-1/16 inch (152.5cm) diagonal] TFT LCD diagonal] TFT LCD Max. In such...
PN-E603 | PN-E703 Operation Manual
Page 57
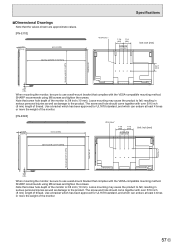
...PN-E603] 1-9/16 [39.4] 54-1/4 [1378] VESA holes * 7-7/8 [200] 7-7/8 [200] 3-15/16 3-15/16 [100] [100] Unit: inch [mm] Opening width (52-3/4 [1340]) 7/16 [11.2] Opening height (29-3/4 [755]) 7-7/8 [200] 31-1/4 [794] When mounting the monitor, be sure to use a wall-mount bracket that complies with the VESA-compatible mounting method. SHARP...mounting may cause the product to fall , resulting in serious personal injuries as well as damage to the product. SHARP recommends using M6 screws and tighten the screws. Note that screw hole depth of thread. The screw and hole ...
...PN-E603] 1-9/16 [39.4] 54-1/4 [1378] VESA holes * 7-7/8 [200] 7-7/8 [200] 3-15/16 3-15/16 [100] [100] Unit: inch [mm] Opening width (52-3/4 [1340]) 7/16 [11.2] Opening height (29-3/4 [755]) 7-7/8 [200] 31-1/4 [794] When mounting the monitor, be sure to use a wall-mount bracket that complies with the VESA-compatible mounting method. SHARP...mounting may cause the product to fall , resulting in serious personal injuries as well as damage to the product. SHARP recommends using M6 screws and tighten the screws. Note that screw hole depth of thread. The screw and hole ...

PN-E603 | PN-E703 Operation Manual
Page 62
...the material and the structure. • To attach a VESA-compliant mounting bracket, use M6 screws that this is carried out by at least 3 people. (PN-E603: at least 4 times or more the weight of the mounting bracket. • Do not use an impact driver. • When moving the monitor, ... wall which can endure at least 2 people.) • Be sure to use any screw holes other than VESA holes for installation. E 62 Mounting Precautions (For SHARP dealers and service engineers) • When installing, removing or moving the monitor, ensure that are 5/16 inch (8 mm) to 3/8 inch (10 mm) longer...
...the material and the structure. • To attach a VESA-compliant mounting bracket, use M6 screws that this is carried out by at least 3 people. (PN-E603: at least 4 times or more the weight of the mounting bracket. • Do not use an impact driver. • When moving the monitor, ... wall which can endure at least 2 people.) • Be sure to use any screw holes other than VESA holes for installation. E 62 Mounting Precautions (For SHARP dealers and service engineers) • When installing, removing or moving the monitor, ensure that are 5/16 inch (8 mm) to 3/8 inch (10 mm) longer...


