

PG-F211X , PG-F261X Operation Manual
Page 2
... of the carton thoroughly against the list of "Supplied accessories" on page 10. Carefully read through the operation instructions before operating the projector. Lea cuidadosamente las instrucciones de operación antes de utilizar el proyector. IMPORTANT • For your assistance in reporting the loss ...or theft of your Projector, please record the Model and Serial Number located on the bottom of the projector and retain this product is marked with the letter L or coloured red. Never use the plug...
... of the carton thoroughly against the list of "Supplied accessories" on page 10. Carefully read through the operation instructions before operating the projector. Lea cuidadosamente las instrucciones de operación antes de utilizar el proyector. IMPORTANT • For your assistance in reporting the loss ...or theft of your Projector, please record the Model and Serial Number located on the bottom of the projector and retain this product is marked with the letter L or coloured red. Never use the plug...

PG-F211X , PG-F261X Operation Manual
Page 3
... uninsulated "dangerous voltage" within a triangle is to assure that children do not expose this product to your new SHARP Projector, using the projector, please read this equipment. DO NOT REMOVE SCREWS EXCEPT SPECIFIED USER SERVICE SCREW. Introduction Before using the REGISTRATION CARD packed... with the projector. 1. WARRANTY This is intended to alert the user to operate this operation manual carefully. The lightning flash with ...
... uninsulated "dangerous voltage" within a triangle is to assure that children do not expose this product to your new SHARP Projector, using the projector, please read this equipment. DO NOT REMOVE SCREWS EXCEPT SPECIFIED USER SERVICE SCREW. Introduction Before using the REGISTRATION CARD packed... with the projector. 1. WARRANTY This is intended to alert the user to operate this operation manual carefully. The lightning flash with ...

PG-F211X , PG-F261X Operation Manual
Page 4
... interference at his own expense. This equipment generates, uses, and can radiate radio frequency energy and, if not installed and used with the device. This SHARP projector uses a DLP® chip. ONLY 2 ONLY WARNING: This is likely to cause harmful interference, in a commercial environment. Disposal of the unit. These limits are located in...
... interference at his own expense. This equipment generates, uses, and can radiate radio frequency energy and, if not installed and used with the device. This SHARP projector uses a DLP® chip. ONLY 2 ONLY WARNING: This is likely to cause harmful interference, in a commercial environment. Disposal of the unit. These limits are located in...
PG-F211X , PG-F261X Operation Manual
Page 5
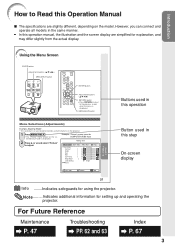
...". • This operation can connect and operate all models in this operation manual, the illustration and the screen display are slightly different, depending on the projector. 1 Press MENU/HELP. • The "Picture" menu screen for using the buttons on the model. ADJ Standard 0 0 0 0 0 1 Bright ... the menu is displayed. 2 Press Q or O and select "Picture" to adjust. However, you can also be performed by using the projector. MENU/HELP button Buttons used in the same manner. • In this step On-screen display 37 Info ........Indicates safeguards for the selected...
...". • This operation can connect and operate all models in this operation manual, the illustration and the screen display are slightly different, depending on the projector. 1 Press MENU/HELP. • The "Picture" menu screen for using the buttons on the model. ADJ Standard 0 0 0 0 0 1 Bright ... the menu is displayed. 2 Press Q or O and select "Picture" to adjust. However, you can also be performed by using the projector. MENU/HELP button Buttons used in the same manner. • In this step On-screen display 37 Info ........Indicates safeguards for the selected...

PG-F211X , PG-F261X Operation Manual
Page 6
...the Background Image ........ 42 Selecting the Setup Guide 42 Reversing/Inverting Projected Images 42 Selecting the On-screen Display Language 42 Adjusting the Projector Function ("PRJ - Contents Preparing Introduction How to Read this Operation Manual .... 3 Contents 4 IMPORTANT SAFEGUARDS 6 How to Access the PDF...Part Names and Functions 11 Inserting the Batteries 14 Usable Range 15 Quick Start Quick Start 16 Setup Setting up the Projector 18 Setting up the Projector 18 Standard Setup (Front Projection) ....... 18 Ceiling-mount Setup 18 Projection (PRJ) Mode 19 Screen Size and ...
...the Background Image ........ 42 Selecting the Setup Guide 42 Reversing/Inverting Projected Images 42 Selecting the On-screen Display Language 42 Adjusting the Projector Function ("PRJ - Contents Preparing Introduction How to Read this Operation Manual .... 3 Contents 4 IMPORTANT SAFEGUARDS 6 How to Access the PDF...Part Names and Functions 11 Inserting the Batteries 14 Usable Range 15 Quick Start Quick Start 16 Setup Setting up the Projector 18 Setting up the Projector 18 Standard Setup (Front Projection) ....... 18 Ceiling-mount Setup 18 Projection (PRJ) Mode 19 Screen Size and ...

PG-F211X , PG-F261X Operation Manual
Page 7
Introduction Reference Appendix Maintenance 47 Maintenance Indicators 48 Regarding the Lamp 50 Lamp 50 Caution Concerning the Lamp 50 Replacing the Lamp 50 Removing and Installing the Lamp Unit 51 Resetting the Lamp Timer 52 Storing the Projector 53 How to Use the Storage Case 53 Connecting Pin Assignments 54 RS-232C Specifications and Command Settings 56 Computer Compatibility Chart 61 Troubleshooting 62 For SHARP Assistance 64 Specifications 65 Dimensions 66 Index 67 5
Introduction Reference Appendix Maintenance 47 Maintenance Indicators 48 Regarding the Lamp 50 Lamp 50 Caution Concerning the Lamp 50 Replacing the Lamp 50 Removing and Installing the Lamp Unit 51 Resetting the Lamp Timer 52 Storing the Projector 53 How to Use the Storage Case 53 Connecting Pin Assignments 54 RS-232C Specifications and Command Settings 56 Computer Compatibility Chart 61 Troubleshooting 62 For SHARP Assistance 64 Specifications 65 Dimensions 66 Index 67 5

PG-F211X , PG-F261X Operation Manual
Page 10
... 95°F (+5°C to +35°C). ■ The storage temperature of lamp rupture, contact your projector. Avoid locations with thin air, set up your nearest Sharp Authorized Projector Dealer or Service Center for a while. See "Replacing the Lamp" on the screen washes out the colors...bright light. ■ Position the screen so that it is carefully secure to avoid personal injury caused by a Sharp Authorized Projector Dealer or Service Center. Place the projector where the intake and exhaust vents are not obstructed. ■ If the cooling fan becomes obstructed, a protection...
... 95°F (+5°C to +35°C). ■ The storage temperature of lamp rupture, contact your projector. Avoid locations with thin air, set up your nearest Sharp Authorized Projector Dealer or Service Center for a while. See "Replacing the Lamp" on the screen washes out the colors...bright light. ■ Position the screen so that it is carefully secure to avoid personal injury caused by a Sharp Authorized Projector Dealer or Service Center. Place the projector where the intake and exhaust vents are not obstructed. ■ If the cooling fan becomes obstructed, a protection...
PG-F211X , PG-F261X Operation Manual
Page 11
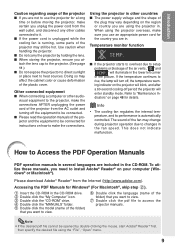
...clicking the mouse, start Adobe® Reader® first, then specify the desired file using the projector overseas, make sure you use the projector for a long time or before moving the projector, make certain you unplug the power cord from the wall outlet, and disconnect any other cables connected...desired pdf file cannot be hot. Refer to view. 6 Double click the language (name of the plastic cover. Introduction Caution regarding usage of the projector ■ If you are not to use an appropriate power cord for Windows® (For Macintosh®, skip step 2). 1 Insert the CD-...
...clicking the mouse, start Adobe® Reader® first, then specify the desired file using the projector overseas, make sure you use the projector for a long time or before moving the projector, make certain you unplug the power cord from the wall outlet, and disconnect any other cables connected...desired pdf file cannot be hot. Refer to view. 6 Double click the language (name of the plastic cover. Introduction Caution regarding usage of the projector ■ If you are not to use an appropriate power cord for Windows® (For Macintosh®, skip step 2). 1 Insert the CD-...

PG-F211X , PG-F261X Operation Manual
Page 12
...-60KT AN-TK201 AN-TK202 Note • Some of the optional accessories may not be available depending on the region. Please check with your nearest Sharp Authorized Projector Dealer or Service Center. 10
...-60KT AN-TK201 AN-TK202 Note • Some of the optional accessories may not be available depending on the region. Please check with your nearest Sharp Authorized Projector Dealer or Service Center. 10
PG-F211X , PG-F261X Operation Manual
Page 13
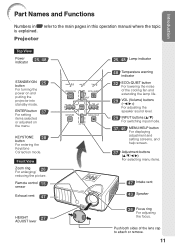
Projector Top View Power indicator 25, 48 STANDBY/ON 25 button For turning the power on the menu. Front View Zoom ring 26 For enlarging/ reducing ... the main pages in this operation manual where the topic is explained. ENTER button For setting 37 items selected or adjusted on and putting the projector into standby mode. Push both sides of the cooling fan and extending the lamp life. 29 VOL (Volume) buttons (-O/Q+) For adjusting the speaker sound level...
Projector Top View Power indicator 25, 48 STANDBY/ON 25 button For turning the power on the menu. Front View Zoom ring 26 For enlarging/ reducing ... the main pages in this operation manual where the topic is explained. ENTER button For setting 37 items selected or adjusted on and putting the projector into standby mode. Push both sides of the cooling fan and extending the lamp life. 29 VOL (Volume) buttons (-O/Q+) For adjusting the speaker sound level...

PG-F211X , PG-F261X Operation Manual
Page 14
...mouse. 23 AUDIO 2 input terminal 22 VIDEO input terminal Terminal for controlling the projector using a computer. 34 USB terminal Terminal connecting with the USB terminal on how to secure the projector. 12 MONITOR OUT 23 terminal (Output terminal for computer RGB and component signals.... to the main pages in Z refer to the audio input terminal. Kensington Security Standard connector Using the Kensington Lock • This projector has a Kensington Security Standard connector for DVI digital, computer 22 RGB, and component signals. Shared for COMPUTER/ COMPONENT and DVI-I ...
...mouse. 23 AUDIO 2 input terminal 22 VIDEO input terminal Terminal for controlling the projector using a computer. 34 USB terminal Terminal connecting with the USB terminal on how to secure the projector. 12 MONITOR OUT 23 terminal (Output terminal for computer RGB and component signals.... to the main pages in Z refer to the audio input terminal. Kensington Security Standard connector Using the Kensington Lock • This projector has a Kensington Security Standard connector for DVI digital, computer 22 RGB, and component signals. Shared for COMPUTER/ COMPONENT and DVI-I ...

PG-F211X , PG-F261X Operation Manual
Page 15
... For switching the picture size (NORMAL, BORDER, etc.). 33 PICTURE MODE button For selecting the appropriate picture. 13 Introduction STANDBY button 25 For putting the projector into the standby mode. AUTO SYNC button 33 For automatically adjusting images when connected to the respective input modes. BREAK TIMER 32 button For displaying...
... For switching the picture size (NORMAL, BORDER, etc.). 33 PICTURE MODE button For selecting the appropriate picture. 13 Introduction STANDBY button 25 For putting the projector into the standby mode. AUTO SYNC button 33 For automatically adjusting images when connected to the respective input modes. BREAK TIMER 32 button For displaying...

PG-F211X , PG-F261X Operation Manual
Page 16
...; Do not mix new and old batteries. Be sure to skin, therefore ensure you will not be using a cloth. • The batteries included with this projector may run out, as possible with new batteries. • Remove the batteries from the remote control once they are kept. Please follow the precautions below...
...; Do not mix new and old batteries. Be sure to skin, therefore ensure you will not be using a cloth. • The batteries included with this projector may run out, as possible with new batteries. • Remove the batteries from the remote control once they are kept. Please follow the precautions below...

PG-F211X , PG-F261X Operation Manual
Page 17
flected off a screen for easy operation. In this case, move the projector away from the remote control can be re- Remote control sensor Note • The signal from the fluorescent lamp. 30° 23n (7 m) Remote control Remote ...; differ depending on the screen material. When using the remote control • Ensure that you do not drop it or expose it to control the projector within the ranges shown in the illustration.
flected off a screen for easy operation. In this case, move the projector away from the remote control can be re- Remote control sensor Note • The signal from the fluorescent lamp. 30° 23n (7 m) Remote control Remote ...; differ depending on the screen material. When using the remote control • Ensure that you do not drop it or expose it to control the projector within the ranges shown in the illustration.

PG-F211X , PG-F261X Operation Manual
Page 18
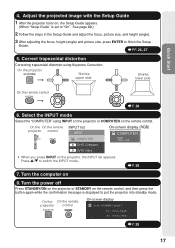
... the computer and plug the power cord into the AC socket of the projector and the computer is explained using one example. 3 STANDBY/ON 8 button 6 INPUT buttons 4 ENTER button 5 Adjustment buttons (P/R/O/Q) 8 STANDBY button 3 ON button 6 COMPUTER button 5 KEYSTONE button ...4 ENTER button 5 Adjustment buttons (P/R/O/Q) 5 KEYSTONE button 1. For details, see pages 22 and 23. _PP. 21, 24 3. Setup and Projection In this section, connection of the projector When connecting equipment other than a computer, see the page described below for each step. Remove the lens cap and turn the...
... the computer and plug the power cord into the AC socket of the projector and the computer is explained using one example. 3 STANDBY/ON 8 button 6 INPUT buttons 4 ENTER button 5 Adjustment buttons (P/R/O/Q) 8 STANDBY button 3 ON button 6 COMPUTER button 5 KEYSTONE button ...4 ENTER button 5 Adjustment buttons (P/R/O/Q) 5 KEYSTONE button 1. For details, see pages 22 and 23. _PP. 21, 24 3. Setup and Projection In this section, connection of the projector When connecting equipment other than a computer, see the page described below for each step. Remove the lens cap and turn the...
PG-F211X , PG-F261X Operation Manual
Page 19
... the remote control. Select the INPUT mode Select the "COMPUTER" using Keystone Correction. Turn the computer on the projector, the INPUT list appears. Turn the power off Press STANDBY/ON on the projector or STANDBY on , the Setup Guide appears. (When "Setup Guide" is displayed to "On". On the... on the remote control, and then press the button again while the confirmation message is set to put the projector into standby mode. On the projector Shrinks upper side. Shrinks lower side. See page 42.) 2 Follow the steps in the Setup Guide and adjust the focus, picture size, and height ...
... the remote control. Select the INPUT mode Select the "COMPUTER" using Keystone Correction. Turn the computer on the projector, the INPUT list appears. Turn the power off Press STANDBY/ON on the projector or STANDBY on , the Setup Guide appears. (When "Setup Guide" is displayed to "On". On the... on the remote control, and then press the button again while the confirmation message is set to put the projector into standby mode. On the projector Shrinks upper side. Shrinks lower side. See page 42.) 2 Follow the steps in the Setup Guide and adjust the focus, picture size, and height ...

PG-F211X , PG-F261X Operation Manual
Page 20
...center L Note • Refer to page 20 for this installation. Before mounting the projector, contact your nearest Sharp Authorized Projector Dealer or Service Center to the screen with the projector's feet flat and level. Ceiling-mount Setup ■ It is recommended that you ...use the optional Sharp ceiling-mount bracket for additional information concerning "Screen Size and Projection Distance". Setting up the Projector Setting up the Projector For optimal image quality, position the projector perpendicular to obtain the recommended ceiling-mount bracket ...
...center L Note • Refer to page 20 for this installation. Before mounting the projector, contact your nearest Sharp Authorized Projector Dealer or Service Center to the screen with the projector's feet flat and level. Ceiling-mount Setup ■ It is recommended that you ...use the optional Sharp ceiling-mount bracket for additional information concerning "Screen Size and Projection Distance". Setting up the Projector Setting up the Projector For optimal image quality, position the projector perpendicular to obtain the recommended ceiling-mount bracket ...

PG-F211X , PG-F261X Operation Manual
Page 21
... mounted, rear projection (with a translucent screen) [Menu item ➞ "Ceiling + Rear"] Indication of the 4 projection modes shown in "SCR-ADJ" menu. Projection (PRJ) Mode The projector can set the PRJ mode in the diagram below. Select the mode most appropriate for the projection setting in use. (You can use any of...
... mounted, rear projection (with a translucent screen) [Menu item ➞ "Ceiling + Rear"] Indication of the 4 projection modes shown in "SCR-ADJ" menu. Projection (PRJ) Mode The projector can set the PRJ mode in the diagram below. Select the mode most appropriate for the projection setting in use. (You can use any of...

PG-F211X , PG-F261X Operation Manual
Page 22
... the lens center to the bottom of the image (cm/in) S: Adjustable range of error in the values in ) See page 41. Setting up the Projector (Continued) Screen Size and Projection Distance NORMAL Mode (4:3) Picture (Screen) size Diag. [χ] Width Height Projection distance [L] Minimum [L1] Maximum [L2] 300Љ (762 cm...
... the lens center to the bottom of the image (cm/in) S: Adjustable range of error in the values in ) See page 41. Setting up the Projector (Continued) Screen Size and Projection Distance NORMAL Mode (4:3) Picture (Screen) size Diag. [χ] Width Height Projection distance [L] Minimum [L1] Maximum [L2] 300Љ (762 cm...

PG-F211X , PG-F261X Operation Manual
Page 23
... the projector and then the other cables or connectors not listed below. Connecting the Projector to Other Equipment Before connecting, ensure that the power cord of the projector is ...port. 21 Terminals on the Projector Connections Equipment Computer Terminal on connected equipment Cable RGB output terminal RGB cable (supplied) Terminal on the projector COMPUTER/ COMPONENT RGB output ... Chart" for use with the projec- tor. IMPORTANT: Ensure that it is switched on the projector before you are made. When connecting a computer, ensure that the appropriate input mode has been ...
... the projector and then the other cables or connectors not listed below. Connecting the Projector to Other Equipment Before connecting, ensure that the power cord of the projector is ...port. 21 Terminals on the Projector Connections Equipment Computer Terminal on connected equipment Cable RGB output terminal RGB cable (supplied) Terminal on the projector COMPUTER/ COMPONENT RGB output ... Chart" for use with the projec- tor. IMPORTANT: Ensure that it is switched on the projector before you are made. When connecting a computer, ensure that the appropriate input mode has been ...


