Operation Manual
Page 2
... OF CONTROLS AND INDICATORS 4-5 POWER SOURCE 6-7 BEFORE RECORDING 8-9 RECORDING USING THE CABLE INCLUDED WITH THE UNIT........ 10-11 RECORDING USING AN OPTIONALLY AVAILABLE DIGITAL CABLE.......... 12 RECORDING USING A MICROPHONE 13-14 CONVENIENT RECORDING FUNCTION 15-18 ABOUT TRACK NUMBERS 19 Page ABOUT THE TOC 20 PLAYING A MINIDISC 21-22 CONVENIENT PLAYBACK FUNCTIONS 23-25 EDITING 26-31 USING WITH OTHER EQUIPMENT.....32 CONVENIENT OPERATION FEATURES 33-35 WHAT IS A MINIDISC 36 TROUBLESHOOTING 36-37 MINIDISC SYSTEM LIMITATIONS ......38 ERROR MESSAGES...
... OF CONTROLS AND INDICATORS 4-5 POWER SOURCE 6-7 BEFORE RECORDING 8-9 RECORDING USING THE CABLE INCLUDED WITH THE UNIT........ 10-11 RECORDING USING AN OPTIONALLY AVAILABLE DIGITAL CABLE.......... 12 RECORDING USING A MICROPHONE 13-14 CONVENIENT RECORDING FUNCTION 15-18 ABOUT TRACK NUMBERS 19 Page ABOUT THE TOC 20 PLAYING A MINIDISC 21-22 CONVENIENT PLAYBACK FUNCTIONS 23-25 EDITING 26-31 USING WITH OTHER EQUIPMENT.....32 CONVENIENT OPERATION FEATURES 33-35 WHAT IS A MINIDISC 36 TROUBLESHOOTING 36-37 MINIDISC SYSTEM LIMITATIONS ......38 ERROR MESSAGES...
Operation Manual
Page 3
... licensed from copyright owners whenever necessary. Model number Serial number Date of purchase Place of purchase Note: This equipment has been tested and found to comply with the limits for help. q Consult the dealer or an experienced radio/TV technician for a Class B digital device, pursuant to Part 15 of the FCC Rules. Please retain this information. use of controls or adjustments or performance of...
... licensed from copyright owners whenever necessary. Model number Serial number Date of purchase Place of purchase Note: This equipment has been tested and found to comply with the limits for help. q Consult the dealer or an experienced radio/TV technician for a Class B digital device, pursuant to Part 15 of the FCC Rules. Please retain this information. use of controls or adjustments or performance of...

Operation Manual
Page 5
... warm. Character/Time Information 6 SYNC REC 1 4 RANDOM TOTAL 5 Indicator R 3. Random Indicator 7 89 10 6. Total Track Number Display 8. Track Number Indicator 11 15 9. Battery Indicator: 10. Hold Switch 12 12. Play Mode Button 16 13. Display Button 16. s Notes about half the normal amount of time, even after a full charge is performed, replace the battery with a new one. q Do not carry the battery in your pocket or in a cold environment, the operating time will damage the battery. q Do...
... warm. Character/Time Information 6 SYNC REC 1 4 RANDOM TOTAL 5 Indicator R 3. Random Indicator 7 89 10 6. Total Track Number Display 8. Track Number Indicator 11 15 9. Battery Indicator: 10. Hold Switch 12 12. Play Mode Button 16 13. Display Button 16. s Notes about half the normal amount of time, even after a full charge is performed, replace the battery with a new one. q Do not carry the battery in your pocket or in a cold environment, the operating time will damage the battery. q Do...

Operation Manual
Page 6
...Line Input Jack 32. Monaural Long-Play Mode Indicator 2. Enter/Fast Play/Synchro Button 24. Eject Lever 26. Record Indicator R 3. Random Indicator 8. Track Number Indicator 9. ton 19. Remaining Recording Time Indicator 15. Hold Switch 30. Character/Time Information Indicator 10. Track Name Indicator 14. Volume/Name Select Buttons: +, - 18. Stop/Power Off/Charge Button: 06 s/:OFF 21. Play/Pause Button: 22. Bass/Delete Button 27. Battery Case Connection Terminals 5 MD-MS702 Total Track Number Display 16. Character Button 20. Battery Indicator: 7. Disc Name...
...Line Input Jack 32. Monaural Long-Play Mode Indicator 2. Enter/Fast Play/Synchro Button 24. Eject Lever 26. Record Indicator R 3. Random Indicator 8. Track Number Indicator 9. ton 19. Remaining Recording Time Indicator 15. Hold Switch 30. Character/Time Information Indicator 10. Track Name Indicator 14. Volume/Name Select Buttons: +, - 18. Stop/Power Off/Charge Button: 06 s/:OFF 21. Play/Pause Button: 22. Bass/Delete Button 27. Battery Case Connection Terminals 5 MD-MS702 Total Track Number Display 16. Character Button 20. Battery Indicator: 7. Disc Name...
Operation Manual
Page 9
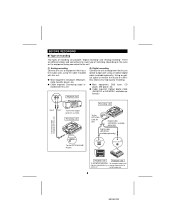
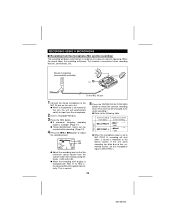
... the unit. (1) Analog recording Connect the unit to a MiniDisc allows very high quality recording. BEFORE RECORDING s Type of recording Two types of recording, depending on the jacks on stereo etc. Using an optical signal to transfer the music to equipment that has an optical output jack using the cable included with this unit. There are different cables and connections for each type of recording are possible: "Digital recording" and "Analog recording". an MD player etc. 8 MD-MS702 q Main equipment: CD player, MD player, radio cassette player...
... the unit. (1) Analog recording Connect the unit to a MiniDisc allows very high quality recording. BEFORE RECORDING s Type of recording Two types of recording, depending on the jacks on stereo etc. Using an optical signal to transfer the music to equipment that has an optical output jack using the cable included with this unit. There are different cables and connections for each type of recording are possible: "Digital recording" and "Analog recording". an MD player etc. 8 MD-MS702 q Main equipment: CD player, MD player, radio cassette player...
Operation Manual
Page 12
... this happens, try making a manual recording. q Depending on a playback-only Mini- q The REC button does not light. 11 MD-MS702 "Synchro recording" section.) q The unit will enter the recording stand- 2 06 Press the button. 06 q Recording will start playback on the disc, the power will light for about 4 seconds. equipment connected to the main unit. Precautions when recording: q Do not jar or bump the main unit while recording. To stop mode. q After the track number has been written...
... this happens, try making a manual recording. q Depending on a playback-only Mini- q The REC button does not light. 11 MD-MS702 "Synchro recording" section.) q The unit will enter the recording stand- 2 06 Press the button. 06 q Recording will start playback on the disc, the power will light for about 4 seconds. equipment connected to the main unit. Precautions when recording: q Do not jar or bump the main unit while recording. To stop mode. q After the track number has been written...

Operation Manual
Page 13
... REC button. (2) Press the ENTER/F.PLAY/SYNCHRO button. (3) Start the playback on the equipment connected to this unit. Before starting a synchro recording, perform the following cases digital recording is impossible, even if you want to record. Notes: q This unit incorporates a sampling rate converter. When you attempt to adjust the recording level. Synchro recording: Page 10 There are using digital cables. Compared to turn the sound skip prevention function off. 12 MD-MS702 Manual recording: Page 11 (1) Insert a recordable MiniDisc...
... REC button. (2) Press the ENTER/F.PLAY/SYNCHRO button. (3) Start the playback on the equipment connected to this unit. Before starting a synchro recording, perform the following cases digital recording is impossible, even if you want to record. Notes: q This unit incorporates a sampling rate converter. When you attempt to adjust the recording level. Synchro recording: Page 10 There are using digital cables. Compared to turn the sound skip prevention function off. 12 MD-MS702 Manual recording: Page 11 (1) Insert a recordable MiniDisc...
Operation Manual
Page 14
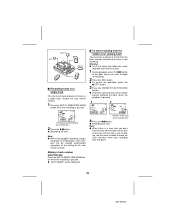
...is connected to input from the microphone. 2 Insert a recordable Minidisc. 3 Press the REC button. Synchro recording Sound level at which level display to start recording Mic input MIC SYNC H -24dB MIC SYNC L -12dB q When the microphone input is set the microphone input to the following table. RECORDING USING A MICROPHONE s Recording from the microphone (Mic synchro recording) The recording will start when a sound is detected at the lowest volume. q A monaural, long-play recording mode is changed , even while recording.) q Refer to MIC SYNC L. 13 MD-MS702 This function...
...is connected to input from the microphone. 2 Insert a recordable Minidisc. 3 Press the REC button. Synchro recording Sound level at which level display to start recording Mic input MIC SYNC H -24dB MIC SYNC L -12dB q When the microphone input is set the microphone input to the following table. RECORDING USING A MICROPHONE s Recording from the microphone (Mic synchro recording) The recording will start when a sound is detected at the lowest volume. q A monaural, long-play recording mode is changed , even while recording.) q Refer to MIC SYNC L. 13 MD-MS702 This function...
Operation Manual
Page 17
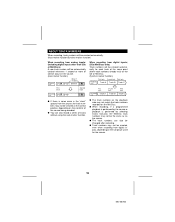
... making digital recordings using a CD player or an MD player, track numbers will be displayed. q Recording will start . s To start recording from the middle of an existing track You can record several pieces of music as a single track, disable the auto marker function. 1 Press the EDIT/A. Making a track number automatically: Press the EDIT/A.MARK/TIME MARK button while the recording is paused. Number of the track to begin re-recording. 2 Press the REC button. MARK/TIME MARK button while the recording is paused. DISPLAY MODE...
... making digital recordings using a CD player or an MD player, track numbers will be displayed. q Recording will start . s To start recording from the middle of an existing track You can record several pieces of music as a single track, disable the auto marker function. 1 Press the EDIT/A. Making a track number automatically: Press the EDIT/A.MARK/TIME MARK button while the recording is paused. Number of the track to begin re-recording. 2 Press the REC button. MARK/TIME MARK button while the recording is paused. DISPLAY MODE...
Operation Manual
Page 18
... channels will be written on the disc and the recording will be monaural. s To check the remaining disc time While recording, you want to create a track number while recording, press the REC button on the main unit or the BASS button on the remote control unit. q The track number will return to the stereo mode automatically. 17 MD-MS702 Remaining recordable time q When the DISPLAY button is stopped after a recording has been made in the monaural long-play mode...
... channels will be written on the disc and the recording will be monaural. s To check the remaining disc time While recording, you want to create a track number while recording, press the REC button on the main unit or the BASS button on the remote control unit. q The track number will return to the stereo mode automatically. 17 MD-MS702 Remaining recordable time q When the DISPLAY button is stopped after a recording has been made in the monaural long-play mode...
Operation Manual
Page 20
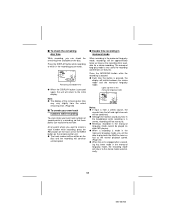
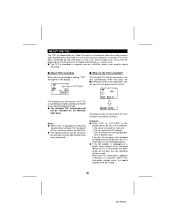
... track Playback side Track A Track B Track C First track Second track Recording Track A side Track B Third track Track C q If there is performed by the source or playback is some noise in the source. (Auto marker function) About 1 second Playback side SSilielenncee First track Second track Recording side When recording from digital inputs: (CDs/MiniDiscs only) Track numbers will be created automatically for the source. 19 MD-MS702 q You can also be the same as on the CD player used...
... track Playback side Track A Track B Track C First track Second track Recording Track A side Track B Third track Track C q If there is performed by the source or playback is some noise in the source. (Auto marker function) About 1 second Playback side SSilielenncee First track Second track Recording side When recording from digital inputs: (CDs/MiniDiscs only) Track numbers will be created automatically for the source. 19 MD-MS702 q You can also be the same as on the CD player used...
Operation Manual
Page 21
...TOC recorded? The entire MD is displayed, the MiniDisc should not be erased. s About TOC recording When you press the s/:OFF button while in a vacant area. TOC display s When is added to record automatically in the stop mode. Turn the power off...used for Table of Contents) is now being changed TOC information will be recorded on the disc after the TOC has been recorded on the disc), the new recording will also turn the power to find musical selections or sounds. Notes: q While "TOC" is controlled by the information in a specific area on a MiniDisc, which enables the unit...
...TOC recorded? The entire MD is displayed, the MiniDisc should not be erased. s About TOC recording When you press the s/:OFF button while in a vacant area. TOC display s When is added to record automatically in the stop mode. Turn the power off...used for Table of Contents) is now being changed TOC information will be recorded on the disc after the TOC has been recorded on the disc), the new recording will also turn the power to find musical selections or sounds. Notes: q While "TOC" is controlled by the information in a specific area on a MiniDisc, which enables the unit...

Operation Manual
Page 22
... remote control unit plug has only one correct orientation, plug it is impossible to adjust the bass level (Bass emphasis is canceled). Each time the BASS/DEL button is pressed, the tone will be switched as shown in the drawing. 3 Load a MiniDisc in . Playback does not start from the first track. (Auto-play function) Track number q When the recordable MiniDisc write protection tab is closed (page 9) q When the auto-play function will stop automatically. Bass sounds...
... remote control unit plug has only one correct orientation, plug it is impossible to adjust the bass level (Bass emphasis is canceled). Each time the BASS/DEL button is pressed, the tone will be switched as shown in the drawing. 3 Load a MiniDisc in . Playback does not start from the first track. (Auto-play function) Track number q When the recordable MiniDisc write protection tab is closed (page 9) q When the auto-play function will stop automatically. Bass sounds...

Operation Manual
Page 23
... disc where playback was halted (Resume auto-play function). When the ignition is turned off the power: Press the s/:OFF button while in . To turn off the power and move the EJECT lever in direct contact with your skin for any remote control unit, except for the one included with just the batteries in the battery case: 06 q The auto-play settings will remain unchanged in the stop mode, the power will start playback...
... disc where playback was halted (Resume auto-play function). When the ignition is turned off the power: Press the s/:OFF button while in . To turn off the power and move the EJECT lever in direct contact with your skin for any remote control unit, except for the one included with just the batteries in the battery case: 06 q The auto-play settings will remain unchanged in the stop mode, the power will start playback...

Operation Manual
Page 32
... MD-MS702. acter information and enter the stop mode, press the EDIT/A.MARK/TIME MARK button to select "NAME STAMP". 4 Press the ENTER/F.PLAY/SYNCHRO button. q To cancel the operation, press the s/:OFF button. 3 4 5 Press the ENTER/F.PLAY/SYNCHRO button. q Check whether the total number of tracks on the newly recorded MiniDisc matches the total number of tracks on the newly recorded MiniDisc using the edit operation. (Pages 27-28) q This function...
... MD-MS702. acter information and enter the stop mode, press the EDIT/A.MARK/TIME MARK button to select "NAME STAMP". 4 Press the ENTER/F.PLAY/SYNCHRO button. q To cancel the operation, press the s/:OFF button. 3 4 5 Press the ENTER/F.PLAY/SYNCHRO button. q Check whether the total number of tracks on the newly recorded MiniDisc matches the total number of tracks on the newly recorded MiniDisc using the edit operation. (Pages 27-28) q This function...

Operation Manual
Page 33
... not work, depending on the MiniDisc unit to a disc using a separate stereo system or radio cassette player, it is recommended that you want to listen to maximum. q When you adjust the volume on your car's stereo. To the jack 32 MD-MS702 USING WITH OTHER EQUIPMENT q Before connecting any other equipment, turn off the power to the main unit. s Listening through commercially available headphones With a 1/8" (3.5 mm) diameter stereo mini plug q The battery life...
... not work, depending on the MiniDisc unit to a disc using a separate stereo system or radio cassette player, it is recommended that you want to listen to maximum. q When you adjust the volume on your car's stereo. To the jack 32 MD-MS702 USING WITH OTHER EQUIPMENT q Before connecting any other equipment, turn off the power to the main unit. s Listening through commercially available headphones With a 1/8" (3.5 mm) diameter stereo mini plug q The battery life...
Operation Manual
Page 38
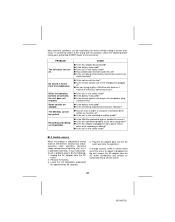
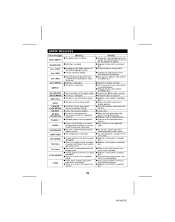
.... q Is the unit in the safety mode? If strange sounds, smell or smoke come out of a MiniDisc containing music? The MiniDisc cannot be wrong with data on it may malfunction. q Is the unit being influenced by mechanical shock or by the owner without calling a service technician. q Is the remote control unit plug or the headphone plug inserted firmly? PROBLEM The unit does not turn on the disc yet?
.... q Is the unit in the safety mode? If strange sounds, smell or smoke come out of a MiniDisc containing music? The MiniDisc cannot be wrong with data on it may malfunction. q Is the unit being influenced by mechanical shock or by the owner without calling a service technician. q Is the remote control unit plug or the headphone plug inserted firmly? PROBLEM The unit does not turn on the disc yet?
Operation Manual
Page 39
... may not be displayed. For MiniDiscs on discs, those sections will be automatically avoided (no recording will be reduced. Even if the number of recording. Even if several short tracks are recorded using the cue and review operations, some sounds may not add up to system limitations, and should be increased by one. 38 MD-MS702 MINIDISC SYSTEM LIMITATIONS MiniDiscs are erased, the remaining recording time may not...
... may not be displayed. For MiniDiscs on discs, those sections will be automatically avoided (no recording will be reduced. Even if the number of recording. Even if several short tracks are recorded using the cue and review operations, some sounds may not add up to system limitations, and should be increased by one. 38 MD-MS702 MINIDISC SYSTEM LIMITATIONS MiniDiscs are erased, the remaining recording time may not...
Operation Manual
Page 40
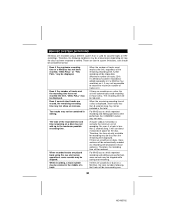
...try the operation again. LOCKED LOCK ERROR NO DISC PB DISC PROTECTED POWER ? q A disc which it with another recorded disc. 39 MD-MS702 q Use one of the digital cable. q Erase all of the SCMS copyright system. q Replace it was recorded. only disc. q Replace the disc with another recordable disc. q Replace it with another recorded disc. q Edit the track with another recordable disc. q Re-record or replace it with the device on a playback- q Turn off the power and remove the MiniDisc. q Recording cannot be played. q A disc has...
...try the operation again. LOCKED LOCK ERROR NO DISC PB DISC PROTECTED POWER ? q A disc which it with another recorded disc. 39 MD-MS702 q Use one of the digital cable. q Erase all of the SCMS copyright system. q Replace it was recorded. only disc. q Replace the disc with another recordable disc. q Replace it with another recorded disc. q Edit the track with another recordable disc. q Re-record or replace it with the device on a playback- q Turn off the power and remove the MiniDisc. q Recording cannot be played. q A disc has...

Operation Manual
Page 42
... lbs. (219 g) with rechargeable battery Line/optical digital, microphone (powered by the main unit) Headphones (impedance: 19 ohms)/ remote control unit s MiniDisc Recorder Type: Signal readout: Audio channels: Frequency response: Rotation speed: Error correction: Coding: Recording method: Sampling frequency: Wow and flutter: Portable MiniDisc recorder Non-contact, 3-beam semi-conductor laser pick-up Stereo 2 channels/monaural (long-play time shows the value when the volume level is set to "VOL 15". q The continuous play mode) 1 channel 20 - 20,000 Hz (±...
... lbs. (219 g) with rechargeable battery Line/optical digital, microphone (powered by the main unit) Headphones (impedance: 19 ohms)/ remote control unit s MiniDisc Recorder Type: Signal readout: Audio channels: Frequency response: Rotation speed: Error correction: Coding: Recording method: Sampling frequency: Wow and flutter: Portable MiniDisc recorder Non-contact, 3-beam semi-conductor laser pick-up Stereo 2 channels/monaural (long-play time shows the value when the volume level is set to "VOL 15". q The continuous play mode) 1 channel 20 - 20,000 Hz (±...
