KB-5121KS , KB-5121KK , KB-5121KW Installation Instructions
Page 1
...-TIP 4-6 CHECKING INSTALLATION 6 ELECTRICAL CONNECTIONS 6 POWER CONNECTIONS 7 MODEL AND SERIAL NUMBER LOCATION 8 CARE, CLEANING AND MAINTENANCE 8 BEFORE YOU CALL FOR SERVICE 8 See Figures 1 and 2. ELECTRIC COOKTOP+MICROWAVE DRAWER INSTALLATION MANUAL SPECIAL WARNING INSTALLATION AND SERVICE MUST BE PERFORMED BY A QUALIFIED INSTALLER. CLEARANCES & DIMENSIONS For SAFETY CONSIDERATIONS do not install a appliance in any combustible...
...-TIP 4-6 CHECKING INSTALLATION 6 ELECTRICAL CONNECTIONS 6 POWER CONNECTIONS 7 MODEL AND SERIAL NUMBER LOCATION 8 CARE, CLEANING AND MAINTENANCE 8 BEFORE YOU CALL FOR SERVICE 8 See Figures 1 and 2. ELECTRIC COOKTOP+MICROWAVE DRAWER INSTALLATION MANUAL SPECIAL WARNING INSTALLATION AND SERVICE MUST BE PERFORMED BY A QUALIFIED INSTALLER. CLEARANCES & DIMENSIONS For SAFETY CONSIDERATIONS do not install a appliance in any combustible...
KB-5121KS , KB-5121KK , KB-5121KW Installation Instructions
Page 2
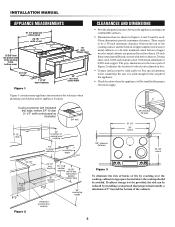
... integrated drip edge, remove 3/4" to clear 31 1/2" width control panel as illustrated. 3/4" min. 30" 30" 13" to bottom of the cooktop to the bottom cover 15" auto drawer open 23 7/16" depth Figure 1 1 11/16" door thickness 30" door and louver width Figure 1 contains many appliance measurements for the ...electrical junction box. • Contact surface must be avoided. INSTALLATION MANUAL APPLIANCE MEASUREMENTS 31 1/2" glass and control panel 29 7/8" width of unit 15 5/8" from the bottom side of max cabinet over the cooktop, cabinet storage space located above the...
... integrated drip edge, remove 3/4" to clear 31 1/2" width control panel as illustrated. 3/4" min. 30" 30" 13" to bottom of the cooktop to the bottom cover 15" auto drawer open 23 7/16" depth Figure 1 1 11/16" door thickness 30" door and louver width Figure 1 contains many appliance measurements for the ...electrical junction box. • Contact surface must be avoided. INSTALLATION MANUAL APPLIANCE MEASUREMENTS 31 1/2" glass and control panel 29 7/8" width of unit 15 5/8" from the bottom side of max cabinet over the cooktop, cabinet storage space located above the...
KB-5121KS , KB-5121KK , KB-5121KW Installation Instructions
Page 3
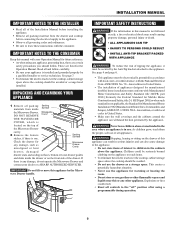
...United States. • Make sure the wall coverings and the cabinets around the appliance can withstand the heat generated by the Anti-Tip bracket attached to the appliance. Children could result. • Reset all appliances. This creates a potentially hazardous situation. • Never use the drawer as misaligned or bent Microwave Drawer Cavity drawer, damaged drawer...your dealer or a SHARP AUTHORIZED SERVICER. Explosions or fires could be seriously burned climbing on the drawer of this manual with local codes in the cabinets above the cooktop should be electronically ...
...United States. • Make sure the wall coverings and the cabinets around the appliance can withstand the heat generated by the Anti-Tip bracket attached to the appliance. Children could result. • Reset all appliances. This creates a potentially hazardous situation. • Never use the drawer as misaligned or bent Microwave Drawer Cavity drawer, damaged drawer...your dealer or a SHARP AUTHORIZED SERVICER. Explosions or fires could be seriously burned climbing on the drawer of this manual with local codes in the cabinets above the cooktop should be electronically ...
KB-5121KS , KB-5121KK , KB-5121KW Installation Instructions
Page 4
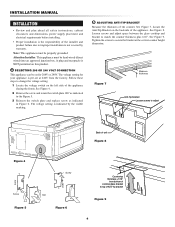
...and product failure due to improper installation is not covered by the visible marking. See Figure 8. Loosen screws and adjust space between the glass cooktop and bracket to top of Anti-Tip bracket Figure 9 4 Figure 7 Measure thickness Anti-Tip bracket Loosen screws to adjust Back of the... appliance (facing the front). Tighten the screws to change the voltage setting. 1 Locate the voltage switch on the left side of unit Figure 8 240V 208V Figure 4 Screw Figure 5 Screw 180˚ Figure 6 Countertop thickness +1/16" from the factory. A SELECTING 208 OR 240...
...and product failure due to improper installation is not covered by the visible marking. See Figure 8. Loosen screws and adjust space between the glass cooktop and bracket to top of Anti-Tip bracket Figure 9 4 Figure 7 Measure thickness Anti-Tip bracket Loosen screws to adjust Back of the... appliance (facing the front). Tighten the screws to change the voltage setting. 1 Locate the voltage switch on the left side of unit Figure 8 240V 208V Figure 4 Screw Figure 5 Screw 180˚ Figure 6 Countertop thickness +1/16" from the factory. A SELECTING 208 OR 240...
KB-5121KS , KB-5121KK , KB-5121KW Installation Instructions
Page 5
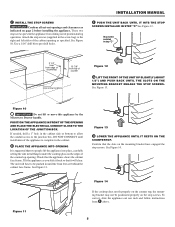
...the front feet are behind the cabinet face frame. Figure 11 Figure 14 If the cooktop does not fit properly on the counter top, the mounting bracket may not be ...UNIT BACK UNTIL IT HITS THE STOP SCREWS INSTALLED IN STEP "C" See Figure 12. Confirm that it back so that the slots on the edges of the cabinet opening . Figure 10 D IMPORTANT Do not lift or move this appliance by the Microwave Drawer... pre-drill holes. Attach the stop screw locations Figure 12 G LIFT THE FRONT OF THE UNIT UP SLIGHTLY (ABOUT 1/2") AND PUSH BACK UNTIL THE SLOTS ON THE MOUNTING BRACKET ENGAGE THE ...
...the front feet are behind the cabinet face frame. Figure 11 Figure 14 If the cooktop does not fit properly on the counter top, the mounting bracket may not be ...UNIT BACK UNTIL IT HITS THE STOP SCREWS INSTALLED IN STEP "C" See Figure 12. Confirm that it back so that the slots on the edges of the cabinet opening . Figure 10 D IMPORTANT Do not lift or move this appliance by the Microwave Drawer... pre-drill holes. Attach the stop screw locations Figure 12 G LIFT THE FRONT OF THE UNIT UP SLIGHTLY (ABOUT 1/2") AND PUSH BACK UNTIL THE SLOTS ON THE MOUNTING BRACKET ENGAGE THE ...

KB-5121KS , KB-5121KK , KB-5121KW Operation Manual
Page 1
..., W = white, S = stainless steel CONTENTS 2 CUSTOMER ASSISTANCE 3 PRECAUTIONS TO AVOID POSSIBLE EXPOSURE TO EXCESSIVE MICROWAVE ENERGY 3 CONSUMER LIMITED WARRANTY 4 IMPORTANT SAFETY INSTRUCTIONS 5-7 UNPACKING AND EXAMINING YOUR COOKTOP+MICROWAVE DRAWER 7 PARTS NAME 8-9 INTRODUCTION TO TOUCHSCREEN 10 BEFORE OPERATING 10-11 COOKTOP USE 12-13 MICROWAVE DRAWER™ COOKING 14-26 OTHER FEATURES 27-28 CLEANING AND CARE 29-30...
..., W = white, S = stainless steel CONTENTS 2 CUSTOMER ASSISTANCE 3 PRECAUTIONS TO AVOID POSSIBLE EXPOSURE TO EXCESSIVE MICROWAVE ENERGY 3 CONSUMER LIMITED WARRANTY 4 IMPORTANT SAFETY INSTRUCTIONS 5-7 UNPACKING AND EXAMINING YOUR COOKTOP+MICROWAVE DRAWER 7 PARTS NAME 8-9 INTRODUCTION TO TOUCHSCREEN 10 BEFORE OPERATING 10-11 COOKTOP USE 12-13 MICROWAVE DRAWER™ COOKING 14-26 OTHER FEATURES 27-28 CLEANING AND CARE 29-30...

KB-5121KS , KB-5121KK , KB-5121KW Operation Manual
Page 2
... 3 CONSUMER LIMITED WARRANTY 4 PRODUCT INFORMATION CARD 4 IMPORTANT SAFETY INSTRUCTIONS 5-7 IMPORTANT SAFETY NOTICE AND WARNING 5 SAFETY PRECAUTIONS 5 RADIANT SURFACE UNITS 5-6 MICROWAVE DRAWER 6-7 UNPACKING AND EXAMINING YOUR COOKTOP+MICROWAVE DRAWER 7 PARTS NAME 8-9 ELECTRIC COOKTOP+MICROWAVE DRAWER 8 GLASS CERAMIC COOKTOP, CONTROL PANEL AND KEYSHEET 9 INTRODUCTION TO TOUCHSCREEN 10 BEFORE OPERATING 10-11 TO SET DATE AND TIME 11 STOP/CLEAR 11 OPEN OR...
... 3 CONSUMER LIMITED WARRANTY 4 PRODUCT INFORMATION CARD 4 IMPORTANT SAFETY INSTRUCTIONS 5-7 IMPORTANT SAFETY NOTICE AND WARNING 5 SAFETY PRECAUTIONS 5 RADIANT SURFACE UNITS 5-6 MICROWAVE DRAWER 6-7 UNPACKING AND EXAMINING YOUR COOKTOP+MICROWAVE DRAWER 7 PARTS NAME 8-9 ELECTRIC COOKTOP+MICROWAVE DRAWER 8 GLASS CERAMIC COOKTOP, CONTROL PANEL AND KEYSHEET 9 INTRODUCTION TO TOUCHSCREEN 10 BEFORE OPERATING 10-11 TO SET DATE AND TIME 11 STOP/CLEAR 11 OPEN OR...

KB-5121KS , KB-5121KK , KB-5121KW Operation Manual
Page 3
...door or allow soil or cleaner residue to accumulate on the unit. MODEL NUMBER SERIAL NUMBER DATE OF PURCHASE / / DEALER TELEPHONE SERVICER TELEPHONE TO PHONE: DIAL 1-800-BE-SHARP (237-4277) for: SERVICE (for your nearest Sharp Authorized Servicer) PARTS (for your authorized parts distributor) ADDITIONAL .... It is important not to defeat or tamper with the door open since open-door operation can result in reporting this electric Cooktop+Microwave Drawer, please record below the model number and serial number located on sealing surfaces. (c) Do not operate the oven if it is...
...door or allow soil or cleaner residue to accumulate on the unit. MODEL NUMBER SERIAL NUMBER DATE OF PURCHASE / / DEALER TELEPHONE SERVICER TELEPHONE TO PHONE: DIAL 1-800-BE-SHARP (237-4277) for: SERVICE (for your nearest Sharp Authorized Servicer) PARTS (for your authorized parts distributor) ADDITIONAL .... It is important not to defeat or tamper with the door open since open-door operation can result in reporting this electric Cooktop+Microwave Drawer, please record below the model number and serial number located on sealing surfaces. (c) Do not operate the oven if it is...

KB-5121KS , KB-5121KK , KB-5121KW Operation Manual
Page 4
... a total of five (5) years, with respect to the Product, and shall constitute full satisfaction of Sharp to the purchaser with respect to the glass ceramic cooktop, radiant surface units and magnetron tube in the Product for this additional period. Non-functional accessories and light bulb. Be sure... This will also enable us to whatever implied warranties may not apply to purchasers by calling 1-800-BE-SHARP. SAVE THE PROOF OF PURCHASE AS IT IS NEEDED SHOULD YOUR COOKTOP+MICROWAVE DRAWER EVER REQUIRE WARRANTY SERVICE. In-home service is in addition to contact you in the...
... a total of five (5) years, with respect to the Product, and shall constitute full satisfaction of Sharp to the purchaser with respect to the glass ceramic cooktop, radiant surface units and magnetron tube in the Product for this additional period. Non-functional accessories and light bulb. Be sure... This will also enable us to whatever implied warranties may not apply to purchasers by calling 1-800-BE-SHARP. SAVE THE PROOF OF PURCHASE AS IT IS NEEDED SHOULD YOUR COOKTOP+MICROWAVE DRAWER EVER REQUIRE WARRANTY SERVICE. In-home service is in addition to contact you in the...
KB-5121KS , KB-5121KK , KB-5121KW Operation Manual
Page 5
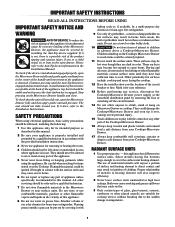
...then apply gentle outward pressure. To check that may result in ignition of clothing. Children climbing on the Cooktop+Microwave Drawer to climb, stand or hang on Microwave Drawer or cooktop. RADIANT SURFACE UNITS 1 Use proper pan size - Please refer to direct contact and may catch on fire. 3 Only ...surfaces may cause severe burns. 6 Do not repair or replace any service, disconnect the Cooktop+Microwave Drawer power supply at the back of the appliance top, but it with hot surface units and may result in the Installation Manual. A small amount of movement is acceptable at...
...then apply gentle outward pressure. To check that may result in ignition of clothing. Children climbing on the Cooktop+Microwave Drawer to climb, stand or hang on Microwave Drawer or cooktop. RADIANT SURFACE UNITS 1 Use proper pan size - Please refer to direct contact and may catch on fire. 3 Only ...surfaces may cause severe burns. 6 Do not repair or replace any service, disconnect the Cooktop+Microwave Drawer power supply at the back of the appliance top, but it with hot surface units and may result in the Installation Manual. A small amount of movement is acceptable at...

KB-5121KS , KB-5121KK , KB-5121KW Operation Manual
Page 6
..., turn the surface units off before removing cookware. 11 Keep an eye on closing it is in this appliance only in water. Do not use . You can cause spillovers when food is specifically designed to a hot surface. This Microwave Drawer is added. Contact a qualified technician immediately. 6 Clean cooktop with items such as sharp instruments, rings...
..., turn the surface units off before removing cookware. 11 Keep an eye on closing it is in this appliance only in water. Do not use . You can cause spillovers when food is specifically designed to a hot surface. This Microwave Drawer is added. Contact a qualified technician immediately. 6 Clean cooktop with items such as sharp instruments, rings...

KB-5121KS , KB-5121KK , KB-5121KW Operation Manual
Page 7
...Microwave Drawer guides and dents inside the Microwave Drawer. Use a wide-mouthed container. Check the drawer for 20 seconds before removing the container. c If materials inside the Microwave Drawer ignite, keep Microwave Drawer door closed, turn microwave off and shut off power at least for any damage, do not operate the Microwave Drawer and contact your dealer or a SHARP... the Microwave Drawer for storage purposes. d After heating, allow the container to surface tension of the Microwave Drawer. SAVE THESE INSTRUCTIONS UNPACKING AND EXAMINING YOUR COOKTOP+MICROWAVE DRAWER 1...
...Microwave Drawer guides and dents inside the Microwave Drawer. Use a wide-mouthed container. Check the drawer for 20 seconds before removing the container. c If materials inside the Microwave Drawer ignite, keep Microwave Drawer door closed, turn microwave off and shut off power at least for any damage, do not operate the Microwave Drawer and contact your dealer or a SHARP... the Microwave Drawer for storage purposes. d After heating, allow the container to surface tension of the Microwave Drawer. SAVE THESE INSTRUCTIONS UNPACKING AND EXAMINING YOUR COOKTOP+MICROWAVE DRAWER 1...

KB-5121KS , KB-5121KK , KB-5121KW Operation Manual
Page 8
PARTS NAME ELECTRIC COOKTOP WITH MICROWAVE DRAWER 3 1 2 2 10 11 4 5 15 6 7 12 8 13 9 14 1 Hot surface indicator 2 Radiant surface units 3 Cooktop Warm Zone 4 Control panel 5 Cooktop Warm indicator 6 Cooktop-on indicator 7 Waveguide cover DO NOT REMOVE. 8 Drawer sealing surfaces 9 Microwave Drawer guides 10 Glass ceramic cooktop 11 Control knobs 12 Drawer light 13 Microwave Drawer™ 14 Vent 15 Rating plate 8
PARTS NAME ELECTRIC COOKTOP WITH MICROWAVE DRAWER 3 1 2 2 10 11 4 5 15 6 7 12 8 13 9 14 1 Hot surface indicator 2 Radiant surface units 3 Cooktop Warm Zone 4 Control panel 5 Cooktop Warm indicator 6 Cooktop-on indicator 7 Waveguide cover DO NOT REMOVE. 8 Drawer sealing surfaces 9 Microwave Drawer guides 10 Glass ceramic cooktop 11 Control knobs 12 Drawer light 13 Microwave Drawer™ 14 Vent 15 Rating plate 8

KB-5121KS , KB-5121KK , KB-5121KW Operation Manual
Page 10
... You can be set the clock, touch the Setup pad, touch Clock and follow the directions. INTRODUCTION TO TOUCHSCREEN This Sharp Insight Cooktop+Microwave Drawer features an LCD Touchscreen that selecting from the various cooking options is easy and fun-and the guesswork has been eliminated. After... sure you six options: Reheat, Defrost, Automatic Cooking, Popcorn, Minute Plus and Keep Warm. BEFORE OPERATING Before operating your new Cooktop+Microwave Drawer make operation easy by providing step-by following pages for 30 seconds, the Video Demo will see pages 16-17). To set ...
... You can be set the clock, touch the Setup pad, touch Clock and follow the directions. INTRODUCTION TO TOUCHSCREEN This Sharp Insight Cooktop+Microwave Drawer features an LCD Touchscreen that selecting from the various cooking options is easy and fun-and the guesswork has been eliminated. After... sure you six options: Reheat, Defrost, Automatic Cooking, Popcorn, Minute Plus and Keep Warm. BEFORE OPERATING Before operating your new Cooktop+Microwave Drawer make operation easy by providing step-by following pages for 30 seconds, the Video Demo will see pages 16-17). To set ...

KB-5121KS , KB-5121KK , KB-5121KW Operation Manual
Page 11
... To cancel a program during cooking, the program will return to change the setting of the time of the display. Do not push or pull the Microwave Drawer by touching the number pads on the control panel. When set for the correct month, touch ENTER. 2 Enter the date by hand, except in ... the directions. • If the month, date and time are not set clock again, touch Setup pad on the control panel to your Cooktop+Microwave Drawer should be erased. The Home Page will intermittently show Video Demo or Set Clock after the power is reinstated. Select AM/PM and then touch...
... To cancel a program during cooking, the program will return to change the setting of the time of the display. Do not push or pull the Microwave Drawer by touching the number pads on the control panel. When set for the correct month, touch ENTER. 2 Enter the date by hand, except in ... the directions. • If the month, date and time are not set clock again, touch Setup pad on the control panel to your Cooktop+Microwave Drawer should be erased. The Home Page will intermittently show Video Demo or Set Clock after the power is reinstated. Select AM/PM and then touch...

KB-5121KS , KB-5121KK , KB-5121KW Operation Manual
Page 12
...the center of pan - Check for its intended purpose. Pans with the entire surface unit. Do not use cooktop as a cutting board. 12 An indicator light, on the cooktop, comes on when the surface unit is on, the cooktop-on indicator, next to cycle on and off . • Temperature limiter - ... burst. • Don't store heavy items above the cooktop as below 150˚F even after the unit is broken or if metal melts on the cooktop. • Position of the surface unit you are clean before turning on even if the cooktop unit doesn't look red. Always use a utensil for flatness...
...the center of pan - Check for its intended purpose. Pans with the entire surface unit. Do not use cooktop as a cutting board. 12 An indicator light, on the cooktop, comes on when the surface unit is on, the cooktop-on indicator, next to cycle on and off . • Temperature limiter - ... burst. • Don't store heavy items above the cooktop as below 150˚F even after the unit is broken or if metal melts on the cooktop. • Position of the surface unit you are clean before turning on even if the cooktop unit doesn't look red. Always use a utensil for flatness...

KB-5121KS , KB-5121KK , KB-5121KW Operation Manual
Page 13
... setting. Î When cooking is turned on the radiant surface unit. Ó To use the large surface unit, push the knob in the center of the cooktop will influence the setting needed. Remove pan. Brown meat, heat oil for surface unit: A hot surface indicator light in and turn it to continue ...; Push the knob in and turn in and turn the knob to OFF. The glass ceramic cooktop retains heat after the radiant surface units have finished cooking. To use the small surface unit, push the knob in either to match the diameter of cooking Bring liquid to about 150˚F....
... setting. Î When cooking is turned on the radiant surface unit. Ó To use the large surface unit, push the knob in the center of the cooktop will influence the setting needed. Remove pan. Brown meat, heat oil for surface unit: A hot surface indicator light in and turn it to continue ...; Push the knob in and turn in and turn the knob to OFF. The glass ceramic cooktop retains heat after the radiant surface units have finished cooking. To use the small surface unit, push the knob in either to match the diameter of cooking Bring liquid to about 150˚F....

KB-5121KS , KB-5121KK , KB-5121KW Operation Manual
Page 14
... to touch food. When opening or closing the Microwave Drawer quickly, food in the Microwave Drawer may come from the Cooktop+Microwave Drawer as needed. MICROWAVE DRAWER COOKING INFORMATION YOU NEED TO KNOW ALWAYS have food in the Microwave Drawer when it is on page 30. The vent under the Microwave Drawer must be blocked. During microwaving, steam may be any thin areas of...
... to touch food. When opening or closing the Microwave Drawer quickly, food in the Microwave Drawer may come from the Cooktop+Microwave Drawer as needed. MICROWAVE DRAWER COOKING INFORMATION YOU NEED TO KNOW ALWAYS have food in the Microwave Drawer when it is on page 30. The vent under the Microwave Drawer must be blocked. During microwaving, steam may be any thin areas of...

KB-5121KS , KB-5121KK , KB-5121KW Operation Manual
Page 18
USING SENSOR SETTINGS: 1 After the Cooktop+Microwave Drawer power supply is connected, wait 2 minutes before using the sensor. Wipe ... will appear. For reheating these foods, simply follow the directions on page 19. Do not open the Microwave Drawer or touch Stop/Clear during this occurs, an error message will appear. COVERING FOODS: Some foods work best...programmed with More/Less Time Adjustment. When reheating foods with foods at least one inch to cover. MICROWAVE DRAWER COOKING SENSOR SETTINGS Sharp's Sensor is a semi-conductor device that use "Sensing" will flash on the display. To ...
USING SENSOR SETTINGS: 1 After the Cooktop+Microwave Drawer power supply is connected, wait 2 minutes before using the sensor. Wipe ... will appear. For reheating these foods, simply follow the directions on page 19. Do not open the Microwave Drawer or touch Stop/Clear during this occurs, an error message will appear. COVERING FOODS: Some foods work best...programmed with More/Less Time Adjustment. When reheating foods with foods at least one inch to cover. MICROWAVE DRAWER COOKING SENSOR SETTINGS Sharp's Sensor is a semi-conductor device that use "Sensing" will flash on the display. To ...

KB-5121KS , KB-5121KK , KB-5121KW Operation Manual
Page 27
.... Check the Kitchen Timer in the banner to make sure you have set the timer as by small children. All Microwave Drawer and Cooktop Warm functions must be used (except for 3 seconds. The Cooktop can be deactivated, if desired. SETUP The Setup has eight functions. 1. Sound Adjustment 4. Video Demo 8. See page...pad. Touch Setup, touch Sound Adjustment and then follow the directions on the screen. This function can be off after 15 minutes if the unit has not been in the display will remain, but the display will remain on . When the countdown timer reaches 59 minutes, 59 seconds...
.... Check the Kitchen Timer in the banner to make sure you have set the timer as by small children. All Microwave Drawer and Cooktop Warm functions must be used (except for 3 seconds. The Cooktop can be deactivated, if desired. SETUP The Setup has eight functions. 1. Sound Adjustment 4. Video Demo 8. See page...pad. Touch Setup, touch Sound Adjustment and then follow the directions on the screen. This function can be off after 15 minutes if the unit has not been in the display will remain, but the display will remain on . When the countdown timer reaches 59 minutes, 59 seconds...