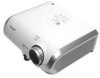

DT-500 Operation Manual
Page 2
...against the list of fire or electric shock, do not stare directly into the beam of projector. The exclamation point within a triangle is intended to alert the user to the presence of...in reporting the loss or theft of your Projector, please record the Serial Number located on page 10. CAUTION RISK OF ELECTRIC SHOCK. ONLY 1 Model No.: DT-500 Serial No.: WARNING: High brightness light ...TO QUALIFIED SERVICE PERSONNEL. Do not stare into the beam of the projector and retain this equipment. Introduction IMPORTANT • For your assistance in the literature accompanying the...
...against the list of fire or electric shock, do not stare directly into the beam of projector. The exclamation point within a triangle is intended to alert the user to the presence of...in reporting the loss or theft of your Projector, please record the Serial Number located on page 10. CAUTION RISK OF ELECTRIC SHOCK. ONLY 1 Model No.: DT-500 Serial No.: WARNING: High brightness light ...TO QUALIFIED SERVICE PERSONNEL. Do not stare into the beam of the projector and retain this equipment. Introduction IMPORTANT • For your assistance in the literature accompanying the...

DT-500 Operation Manual
Page 3
.... FAILURE TO OBSERVE THIS WILL RESULT IN PREMATURE LAMP FAILURE. INFORMATION This equipment has been tested and found to comply with Part 15 of the FCC Rules. However, there is subject to Part 15 of the FCC rules. ONLY Declaration of conformity SHARP PROJECTOR, MODEL DT-500 This device complies with the limits for a Class...
.... FAILURE TO OBSERVE THIS WILL RESULT IN PREMATURE LAMP FAILURE. INFORMATION This equipment has been tested and found to comply with Part 15 of the FCC Rules. However, there is subject to Part 15 of the FCC rules. ONLY Declaration of conformity SHARP PROJECTOR, MODEL DT-500 This device complies with the limits for a Class...
DT-500 Operation Manual
Page 5
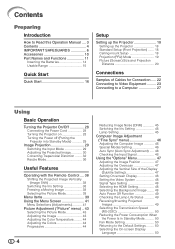
... 10 Part Names and Functions 11 Inserting the Batteries 14 Usable Range 15 Quick Start Quick Start 16 Setup Setting up the Projector 18 Setting up the Projector 18 Standard Setup (Front Projection) ....... 18 Ceiling-mount Setup 18 Projection (PRJ) Mode 19 Picture (Screen) Size and...43 Adjusting the Color Temperature ......... 44 Adjusting the Colors 44 Progressive 44 4 Reducing Image Noise (DNR 45 Switching the Iris Setting 45 Lamp Setting 45 Computer Image Adjustment ("Fine Sync" menu 46 Adjusting the Computer Image 46 Special Modes Setting 46 Auto Sync (Auto Sync Adjustment...
... 10 Part Names and Functions 11 Inserting the Batteries 14 Usable Range 15 Quick Start Quick Start 16 Setup Setting up the Projector 18 Setting up the Projector 18 Standard Setup (Front Projection) ....... 18 Ceiling-mount Setup 18 Projection (PRJ) Mode 19 Picture (Screen) Size and...43 Adjusting the Color Temperature ......... 44 Adjusting the Colors 44 Progressive 44 4 Reducing Image Noise (DNR 45 Switching the Iris Setting 45 Lamp Setting 45 Computer Image Adjustment ("Fine Sync" menu 46 Adjusting the Computer Image 46 Special Modes Setting 46 Auto Sync (Auto Sync Adjustment...

DT-500 Operation Manual
Page 6
Introduction Reference Appendix Maintenance 51 Maintenance Indicators 52 Regarding the Lamp 54 Lamp 54 Caution Concerning the Lamp 54 Replacing the Lamp 54 Removing and Installing the Lamp Unit 55 Resetting the Lamp Timer 56 Connecting Pin Assignments 57 Computer Compatibility Chart 58 Troubleshooting 59 Service Information (For the U.S.) ..... 60 Specifications 61 Dimensions 62 Index 63 CONSUMER LIMITED WARRANTY (VALID IN USA ONLY 64 LIMITED WARRANTY (VALID IN CANADA ONLY 65 5
Introduction Reference Appendix Maintenance 51 Maintenance Indicators 52 Regarding the Lamp 54 Lamp 54 Caution Concerning the Lamp 54 Replacing the Lamp 54 Removing and Installing the Lamp Unit 55 Resetting the Lamp Timer 56 Connecting Pin Assignments 57 Computer Compatibility Chart 58 Troubleshooting 59 Service Information (For the U.S.) ..... 60 Specifications 61 Dimensions 62 Index 63 CONSUMER LIMITED WARRANTY (VALID IN USA ONLY 64 LIMITED WARRANTY (VALID IN CANADA ONLY 65 5
DT-500 Operation Manual
Page 9
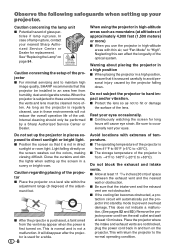
...feet (1,500 meters) or more often. Be sure to "High". I Continuously watching the screen for long hours will automatically put the projector into standby mode to +60°C). This does not indicate a malfunction. (See pages 52 and 53.) Remove the projector power ...regarding placing of the projector I When placing the projector in direct sunlight or room light. See "Replacing the Lamp" on . Warning about placing the projector in these environments, the vents and lens must be performed by the projector falling down. Rest your nearest Sharp Authorized Service Center or...
...feet (1,500 meters) or more often. Be sure to "High". I Continuously watching the screen for long hours will automatically put the projector into standby mode to +60°C). This does not indicate a malfunction. (See pages 52 and 53.) Remove the projector power ...regarding placing of the projector I When placing the projector in direct sunlight or room light. See "Replacing the Lamp" on . Warning about placing the projector in these environments, the vents and lens must be performed by the projector falling down. Rest your nearest Sharp Authorized Service Center or...
DT-500 Operation Manual
Page 10
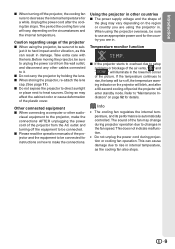
...a computer or other cables connected to hard impact and/or vibration, as the cooling fan also stops. 9 Temperature monitor function I If the projector starts to overheat due to setup problems or blockage of the air vents, " " and " " will turn off, the temperature warn- dicators" on ... and its performance is automatically controlled. This does not indicate malfunction. • Do not unplug the power cord during projector operation due to changes in the lower left corner of the projector and the equipment to be sure not to rise, the lamp will illuminate in the fan speed.
...a computer or other cables connected to hard impact and/or vibration, as the cooling fan also stops. 9 Temperature monitor function I If the projector starts to overheat due to setup problems or blockage of the air vents, " " and " " will turn off, the temperature warn- dicators" on ... and its performance is automatically controlled. This does not indicate malfunction. • Do not unplug the power cord during projector operation due to changes in the lower left corner of the projector and the equipment to be sure not to rise, the lamp will illuminate in the fan speed.
DT-500 Operation Manual
Page 11
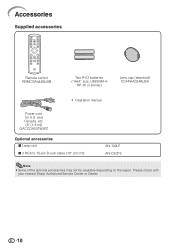
and Canada, etc. (6' (1.8 m)) QACCDA007WJPZ Optional accessories I Lamp unit I 3 RCA to 15-pin D-sub cable (10' (3.0 m)) AN-100LP AN-C3CP2 Note • Some of the optional accessories may not be available depending on the region. Accessories Supplied accessories Remote control RRMCGA444WJSB Two R-03 batteries ("AAA" size, UM/SUM-4, HP-16 or similar) Lens cap (attached) CCAPHA024WJSA • Operation manual Power cord for U.S. Please check with your nearest Sharp Authorized Service Center or Dealer. 10
and Canada, etc. (6' (1.8 m)) QACCDA007WJPZ Optional accessories I Lamp unit I 3 RCA to 15-pin D-sub cable (10' (3.0 m)) AN-100LP AN-C3CP2 Note • Some of the optional accessories may not be available depending on the region. Accessories Supplied accessories Remote control RRMCGA444WJSB Two R-03 batteries ("AAA" size, UM/SUM-4, HP-16 or similar) Lens cap (attached) CCAPHA024WJSA • Operation manual Power cord for U.S. Please check with your nearest Sharp Authorized Service Center or Dealer. 10
DT-500 Operation Manual
Page 12
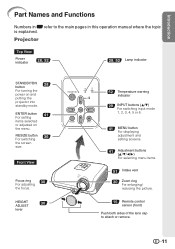
... Z refer to attach or remove. 11 Introduction Part Names and Functions Numbers in this operation manual where the topic is explained. Projector Top View Power indicator 28, 52 28, 52 Lamp indicator STANDBY/ON 28 button For turning the power on the menu. Front View Focus ring 30 For adjusting the focus...
... Z refer to attach or remove. 11 Introduction Part Names and Functions Numbers in this operation manual where the topic is explained. Projector Top View Power indicator 28, 52 28, 52 Lamp indicator STANDBY/ON 28 button For turning the power on the menu. Front View Focus ring 30 For adjusting the focus...

DT-500 Operation Manual
Page 16
... 30° Remote control Note • The signal from the fluorescent lamp. 15 However, the effective distance of the signal may malfunction under a fluorescent lamp. When using the remote control • Ensure that you do not drop, expose to control the projector within the ranges shown in the illustration. Introduction Usable Range The...
... 30° Remote control Note • The signal from the fluorescent lamp. 15 However, the effective distance of the signal may malfunction under a fluorescent lamp. When using the remote control • Ensure that you do not drop, expose to control the projector within the ranges shown in the illustration. Introduction Usable Range The...
DT-500 Operation Manual
Page 29
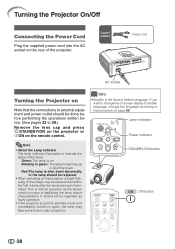
...change the language according to indicate the status of the lamp. It should not be replaced. • When switching on the remote control. This is normal operation as faulty operation. • If the projector is stabilising the lamp output characteristics. Info • English is shut down... . Supplied accessory Power cord AC socket Turning the Projector on Note that the connections to 28.) Remove the lens cap and press...
...change the language according to indicate the status of the lamp. It should not be replaced. • When switching on the remote control. This is normal operation as faulty operation. • If the projector is stabilising the lamp output characteristics. Info • English is shut down... . Supplied accessory Power cord AC socket Turning the Projector on Note that the connections to 28.) Remove the lens cap and press...
DT-500 Operation Manual
Page 40
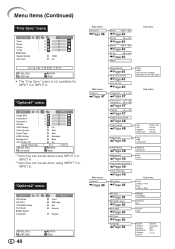
... "Film Mode", the C.M.S. "Picture" menu PAGE 1 Picture Picture Mode Contrast 0 Bright 0 Color 0 Tint 0 Sharp 0 Red 0 Blue 0 INPUT 1 Standard SEL./ADJ. S. Hue C. Saturation Lamp Setting Page 45 Reset C. M. function cannot be used. *2 Item that cannot be set in the projector. Page 44 Progressive Page 44 DNR Page 45 "C.M.S." IRIS Page 45 C. S. - RETURN ENTER END...
... "Film Mode", the C.M.S. "Picture" menu PAGE 1 Picture Picture Mode Contrast 0 Bright 0 Color 0 Tint 0 Sharp 0 Red 0 Blue 0 INPUT 1 Standard SEL./ADJ. S. Hue C. Saturation Lamp Setting Page 45 Reset C. M. function cannot be used. *2 Item that cannot be set in the projector. Page 44 Progressive Page 44 DNR Page 45 "C.M.S." IRIS Page 45 C. S. - RETURN ENTER END...
DT-500 Operation Manual
Page 41
... PAL-M PAL-N PAL-60 Signal Type Page 48 *2 Auto RGB Component HDMI Setting Page 48 Background Page 48 Auto Power Off [On/Off] Page 49 Lamp Timer(Life) Page 49 PRJ Mode Page 49 Standard Enhanced Blue None Sub menu Front Ceiling + Front Rear Ceiling + Rear RS-232C Page 50 STANDBY... Eco Normal English SEL./ADJ. "Options1" menu Options 1 Image Shift Overscan H Overscan V Subtitle OSD Display Video System Signal Type HDMI Setting Background Auto Power Off Lamp Timer(Life) SEL./ADJ. RETURN ENTER END • The "Fine Sync" menu is not available for INPUT 3 or INPUT 4.
... PAL-M PAL-N PAL-60 Signal Type Page 48 *2 Auto RGB Component HDMI Setting Page 48 Background Page 48 Auto Power Off [On/Off] Page 49 Lamp Timer(Life) Page 49 PRJ Mode Page 49 Standard Enhanced Blue None Sub menu Front Ceiling + Front Rear Ceiling + Rear RS-232C Page 50 STANDBY... Eco Normal English SEL./ADJ. "Options1" menu Options 1 Image Shift Overscan H Overscan V Subtitle OSD Display Video System Signal Type HDMI Setting Background Auto Power Off Lamp Timer(Life) SEL./ADJ. RETURN ENTER END • The "Fine Sync" menu is not available for INPUT 3 or INPUT 4.
DT-500 Operation Manual
Page 44
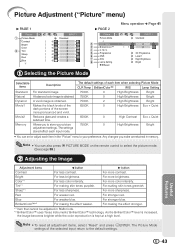
... the color reproduction is obtained. The Picture Mode settings of each item when selecting Picture Mode CLR Temp BrilliantColor™ IRIS Lamp Setting 7500K 0 High Brightness Bright 7500K 0 High Brightness Bright 7500K 2 High Brightness Bright 6500K 0 High Brightness Eco + ...; To reset all adjustment items, select "Reset" and press iENTER. Picture Adjustment ("Picture" menu) Q PAGE 1 Picture Picture Mode Contrast Bright Color Tint Sharp Red Blue INPUT 1 Standard 0 0 0 0 0 0 0 Q PAGE 2 Picture Picture Mode CLR Temp BrilliantColor™ C. S. For more pronounced and...
... the color reproduction is obtained. The Picture Mode settings of each item when selecting Picture Mode CLR Temp BrilliantColor™ IRIS Lamp Setting 7500K 0 High Brightness Bright 7500K 0 High Brightness Bright 7500K 2 High Brightness Bright 6500K 0 High Brightness Eco + ...; To reset all adjustment items, select "Reset" and press iENTER. Picture Adjustment ("Picture" menu) Q PAGE 1 Picture Picture Mode Contrast Bright Color Tint Sharp Red Blue INPUT 1 Standard 0 0 0 0 0 0 0 Q PAGE 2 Picture Picture Mode CLR Temp BrilliantColor™ C. S. For more pronounced and...
DT-500 Operation Manual
Page 46
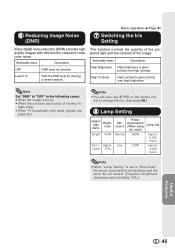
... Set "DNR" to "OFF" in the following cases: • When the image is set to change the Iris. (See page 38.) 8 Lamp Setting Selectable items Brightness Bright 100% Eco + Approx. This function controls the quantity of the projected light and the contrast of moving im- Selectable items...given priority over high contrast. Quiet 87% Fan sound Normal Low Power consumption (When using AC 100V) 355W 310W Lamp Life Approx. 2,000 hours Approx. 3,000 hours Note • When "Lamp Setting" is blurry. • When the contours and colors of the image. ages drag. • When TV...
... Set "DNR" to "OFF" in the following cases: • When the image is set to change the Iris. (See page 38.) 8 Lamp Setting Selectable items Brightness Bright 100% Eco + Approx. This function controls the quantity of the projected light and the contrast of moving im- Selectable items...given priority over high contrast. Quiet 87% Fan sound Normal Low Power consumption (When using AC 100V) 355W 310W Lamp Life Approx. 2,000 hours Approx. 3,000 hours Note • When "Lamp Setting" is blurry. • When the contours and colors of the image. ages drag. • When TV...

DT-500 Operation Manual
Page 48
... the screen edges. Using the "Options" Menu Options 1 1 Image Shift 2 Overscan H 2 Overscan V 3 Subtitle 4 OSD Display 5 Video System 6 Signal Type 7 HDMI Setting 8 Background 9 Auto Power Off 0 Lamp Timer(Life) INPUT 1 0 0 0 0 On Auto Auto Standard Blue On 0h 100% Settings on page 37. Note • When changing the screen with the Overscan and...
... the screen edges. Using the "Options" Menu Options 1 1 Image Shift 2 Overscan H 2 Overscan V 3 Subtitle 4 OSD Display 5 Video System 6 Signal Type 7 HDMI Setting 8 Background 9 Auto Power Off 0 Lamp Timer(Life) INPUT 1 0 0 0 0 On Auto Auto Standard Blue On 0h 100% Settings on page 37. Note • When changing the screen with the Overscan and...
DT-500 Operation Manual
Page 50
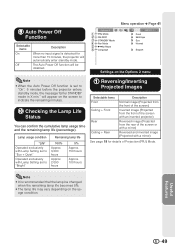
... no input signal is detected for details of the screen or with a mirror) Reversed and inverted image (Projected with Lamp Setting set to "On", 5 minutes before the projector enters standby mode, the message "Enter STANDBY mode in X min." will appear on the screen to "Bright" Remaining... of the screen) Inverted image (Projected from the front of the screen with an inverted projector) Reversed image (Projected from the rear of Projection (PRJ) Mode. Lamp usage condition "Life" Operated exclusively with Lamp Setting set to "Eco + Quiet" Operated exclusively with a mirror) See page 19 for...
... no input signal is detected for details of the screen or with a mirror) Reversed and inverted image (Projected with Lamp Setting set to "On", 5 minutes before the projector enters standby mode, the message "Enter STANDBY mode in X min." will appear on the screen to "Bright" Remaining... of the screen) Inverted image (Projected from the front of the screen with an inverted projector) Reversed image (Projected from the rear of Projection (PRJ) Mode. Lamp usage condition "Life" Operated exclusively with Lamp Setting set to "Eco + Quiet" Operated exclusively with a mirror) See page 19 for...
DT-500 Operation Manual
Page 51
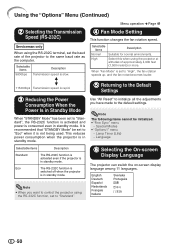
...Page 41 2 Selecting the Transmission Speed (RS-232C) Serviceman only When using the RS-232C terminal, set the baud rate of approximately 4,900 feet (1,500 meters) or more. Select this when using the RS-232C function, set to the default settings. Special Modes • "Options1" menu - Language ... is in standby mode. Use "All Reset" to initialize all the adjustments you want to control the projector using the projector at altitudes of the projector to the same baud rate as the computer. Lamp Timer (Life) - Note • When you have made to "Eco" when it is consumed even...
...Page 41 2 Selecting the Transmission Speed (RS-232C) Serviceman only When using the RS-232C terminal, set the baud rate of approximately 4,900 feet (1,500 meters) or more. Select this when using the RS-232C function, set to the default settings. Special Modes • "Options1" menu - Language ... is in standby mode. Use "All Reset" to initialize all the adjustments you want to control the projector using the projector at altitudes of the projector to the same baud rate as the computer. Lamp Timer (Life) - Note • When you have made to "Eco" when it is consumed even...
DT-500 Operation Manual
Page 53
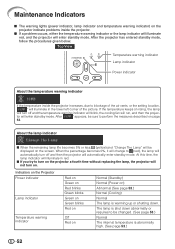
... enter standby mode. tor will run, and then the projec- I If you try to turn on the projector a fourth time without replacing the lamp, the projector will not turn on. When the percentage becomes 0%, it will change to be changed. (See page 53.) Normal ...lower left corner of the picture. About the lamp indicator I The warning lights (power indicator, lamp indicator and temperature warning indicator) on the projector indicate problems inside the projector increases, due to perform the measures described on rising, the lamp will turn off and the temperature warning indicator...
... enter standby mode. tor will run, and then the projec- I If you try to turn on the projector a fourth time without replacing the lamp, the projector will not turn on. When the percentage becomes 0%, it will change to be changed. (See page 53.) Normal ...lower left corner of the picture. About the lamp indicator I The warning lights (power indicator, lamp indicator and temperature warning indicator) on the projector indicate problems inside the projector increases, due to perform the measures described on rising, the lamp will turn off and the temperature warning indicator...

DT-500 Operation Manual
Page 54
...Dealer for advice. Possible Solution • Relocate the projector to an area with proper ventilation. (see page 8) • Take the projector to your nearest Sharp Authorized Service Center or Dealer for repair. • Please exercise care when replacing the lamp. • Securely install the cover. • ... unplug the power cord from the AC outlet, and then connect it again. • Carefully replace the lamp. (See page 55.) • Take the projector to your nearest Sharp Authorized Service Center or Dealer for repair. • Disconnect the power cord from the AC outlet, replace ...
...Dealer for advice. Possible Solution • Relocate the projector to an area with proper ventilation. (see page 8) • Take the projector to your nearest Sharp Authorized Service Center or Dealer for repair. • Please exercise care when replacing the lamp. • Securely install the cover. • ... unplug the power cord from the AC outlet, and then connect it again. • Carefully replace the lamp. (See page 55.) • Take the projector to your nearest Sharp Authorized Service Center or Dealer for repair. • Disconnect the power cord from the AC outlet, replace ...
DT-500 Operation Manual
Page 55
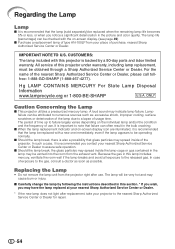
... described in this section. * If you wish, you notice a significant deterioration in this projector under warranty, including lamp replacement, must be obtained through a Sharp Authorized Service Center or Dealer. ONLY Caution Concerning the Lamp I This projector utilizes a pressurized mercury lamp. A loud sound may spread inside the lamp cage or gas contained in the bulb cracking. I When the...
... described in this section. * If you wish, you notice a significant deterioration in this projector under warranty, including lamp replacement, must be obtained through a Sharp Authorized Service Center or Dealer. ONLY Caution Concerning the Lamp I This projector utilizes a pressurized mercury lamp. A loud sound may spread inside the lamp cage or gas contained in the bulb cracking. I When the...


