
CV-10NH Operation Manual
Page 3
.... ENGLISH ENGLISH This manual explains the proper use of your new air conditioner. Please read this manual carefully before using the product. CONTENTS • FOR CUSTOMER ASSISTANCE E-2 • CONSUMER LIMITED WARRANTY E-3 • PRECAUTIONS E-4 • LOCATION E-7 • INCLUDED E-7 • PART NAMES E-8 • INSTALL WINDOW PANEL E-10 • INSTALLATION AND REMOVAL OF EXHAUST HOSE .........E-14 • PRE...
.... ENGLISH ENGLISH This manual explains the proper use of your new air conditioner. Please read this manual carefully before using the product. CONTENTS • FOR CUSTOMER ASSISTANCE E-2 • CONSUMER LIMITED WARRANTY E-3 • PRECAUTIONS E-4 • LOCATION E-7 • INCLUDED E-7 • PART NAMES E-8 • INSTALL WINDOW PANEL E-10 • INSTALLATION AND REMOVAL OF EXHAUST HOSE .........E-14 • PRE...
CV-10NH Operation Manual
Page 7
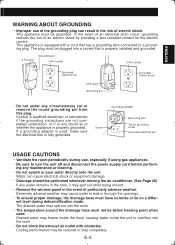
...electrical shock or equipment damage. • Drainage should be performed whenever moving the air conditioner. (See Page 26) If any water remains in the tank, it may spill out while being moved. • Remove the window panel in any doubt as to whether the appliance is fully grounded. In the .... Screw Grounding adapter Grounding wire Tab for the electric current. Drained water may spill out into the room. • Do not block the exhaust air outlet with a cord that is used . ENGLISH WARNING ABOUT GROUNDING • Improper use , especially if using gas appliances. • Be sure ...
...electrical shock or equipment damage. • Drainage should be performed whenever moving the air conditioner. (See Page 26) If any water remains in the tank, it may spill out while being moved. • Remove the window panel in any doubt as to whether the appliance is fully grounded. In the .... Screw Grounding adapter Grounding wire Tab for the electric current. Drained water may spill out into the room. • Do not block the exhaust air outlet with a cord that is used . ENGLISH WARNING ABOUT GROUNDING • Improper use , especially if using gas appliances. • Be sure ...
CV-10NH Operation Manual
Page 9
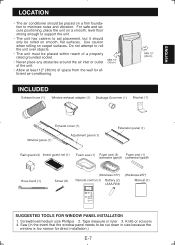
... to minimize noise and vibration. Tape measure or ruler 3. Knife or scissors 4. MIN.12" (30cm) INCLUDED MIN.12" (30cm) SUGGESTED TOOLS FOR WINDOW PANEL INSTALLATION 1. ENGLISH LOCATION • The air conditioner should only be rolled on smooth, flat least 12" (30cm) of the unit. • Allow at surfaces. Do not attempt to aid... support the unit. • The unit has casters to roll the unit over objects. • The unit must be cut down in size because the window is too narrow for efficient...
... to minimize noise and vibration. Tape measure or ruler 3. Knife or scissors 4. MIN.12" (30cm) INCLUDED MIN.12" (30cm) SUGGESTED TOOLS FOR WINDOW PANEL INSTALLATION 1. ENGLISH LOCATION • The air conditioner should only be rolled on smooth, flat least 12" (30cm) of the unit. • Allow at surfaces. Do not attempt to aid... support the unit. • The unit has casters to roll the unit over objects. • The unit must be cut down in size because the window is too narrow for efficient...
CV-10NH Operation Manual
Page 12
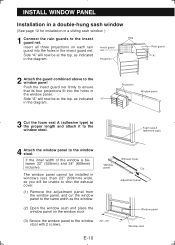
... at the top, as indicated in the diagram. E-10 Cut Window panel Window stool Side "A" will now be at the top, as the window. (2) Open the window sash and place the window panel on each rain Insect guard guard into the holes in the window panel. If the inner width of the window is between 22" (559mm) and 24" (609mm) inclusive...
... at the top, as indicated in the diagram. E-10 Cut Window panel Window stool Side "A" will now be at the top, as the window. (2) Open the window sash and place the window panel on each rain Insect guard guard into the holes in the window panel. If the inner width of the window is between 22" (559mm) and 24" (609mm) inclusive...
CV-10NH Operation Manual
Page 13
... opening between 36.8" (934mm) and 48" (1219mm) inclusive. (1) Attach the extension panel to the adjustment panel. (2) Open the window sash and place the window panel on the window stool. (2) Slide the adjustment panel to fit the window frame width. (3) Secure the window panel to the window stool with 4 screws. Extension panel 36.8"~48" 5 Cut the foam seals (adhesive type) A and B to the...
... opening between 36.8" (934mm) and 48" (1219mm) inclusive. (1) Attach the extension panel to the adjustment panel. (2) Open the window sash and place the window panel on the window stool. (2) Slide the adjustment panel to fit the window frame width. (3) Secure the window panel to the window stool with 4 screws. Extension panel 36.8"~48" 5 Cut the foam seals (adhesive type) A and B to the...

CV-10NH Operation Manual
Page 14
... will be installed in the insect guard net. INSTALL WINDOW PANEL Installation in a sliding sash window (See page 10 for installation in the window panel. Side "A" will now be at the top, as indicated in the diagram, when it to the insect guard net. Window panel E-12 "A" Rain guard Window panel "A" Foam seal A (adhesive type) Cut 22"~24" Projection 3 Cut...
... will be installed in the insect guard net. INSTALL WINDOW PANEL Installation in a sliding sash window (See page 10 for installation in the window panel. Side "A" will now be at the top, as indicated in the diagram, when it to the insect guard net. Window panel E-12 "A" Rain guard Window panel "A" Foam seal A (adhesive type) Cut 22"~24" Projection 3 Cut...

CV-10NH Operation Manual
Page 15
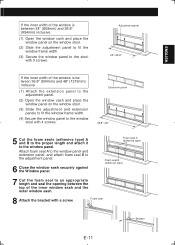
... panel. (2) Open the window sash and place the window panel on the window frame. (2) Slide the adjustment panel to fit the window frame height. (3) Secure the window panel to the window frame with a screw. Attach foam seal A to the window panel and extension panel, and attach foam seal B to the adjustment panel. 6 Close the window sash securely against the Window panel. 7 Cut the foam seal to the window panel...
... panel. (2) Open the window sash and place the window panel on the window frame. (2) Slide the adjustment panel to fit the window frame height. (3) Secure the window panel to the window frame with a screw. Attach foam seal A to the window panel and extension panel, and attach foam seal B to the adjustment panel. 6 Close the window sash securely against the Window panel. 7 Cut the foam seal to the window panel...
CV-10NH Operation Manual
Page 16
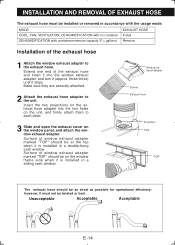
... side when it (approx. however, it must be at the top when it is installed in a sliding sash window. Surface of window exhaust adapter marked "TOP" should be on the window panel, and attach the window exhaust adapter. INSTALLATION AND REMOVAL OF EXHAUST HOSE The exhaust hose must not be as short as possible for...
... side when it (approx. however, it must be at the top when it is installed in a sliding sash window. Surface of window exhaust adapter marked "TOP" should be on the window panel, and attach the window exhaust adapter. INSTALLATION AND REMOVAL OF EXHAUST HOSE The exhaust hose must not be as short as possible for...
CV-10NH Operation Manual
Page 17
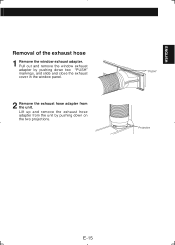
"PUSH" Projection E-15 Lift up and remove the exhaust hose adapter from the unit by pushing down on the two projections. Pull out and remove the window exhaust adapter by pushing down two "PUSH" markings, and slide and close the exhaust cover in the window panel. 2 Remove the exhaust hose adapter from the unit. ENGLISH Removal of the exhaust hose 1 Remove the window exhaust adapter.
"PUSH" Projection E-15 Lift up and remove the exhaust hose adapter from the unit by pushing down on the two projections. Pull out and remove the window exhaust adapter by pushing down two "PUSH" markings, and slide and close the exhaust cover in the window panel. 2 Remove the exhaust hose adapter from the unit. ENGLISH Removal of the exhaust hose 1 Remove the window exhaust adapter.
CV-10NH Operation Manual
Page 29
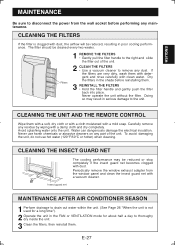
... hotter) when cleaning. To avoid damaging the unit, do not use harsh chemicals or abrasive cleaners on any maintenance. Insect guard net MAINTENANCE AFTER AIR CONDITIONER SEASON 1 Perform drainage to drain out water within the unit. (See Page 26 "When the unit is clogged with a damp cloth and dry... filter handle and gently push the filter back into place. ENGLISH MAINTENANCE Be sure to disconnect the power from the window panel and clean the insect guard net with a mild soap. Carefully remove any dust. Water can dangerously damage the electrical insulation. E-27
... hotter) when cleaning. To avoid damaging the unit, do not use harsh chemicals or abrasive cleaners on any maintenance. Insect guard net MAINTENANCE AFTER AIR CONDITIONER SEASON 1 Perform drainage to drain out water within the unit. (See Page 26 "When the unit is clogged with a damp cloth and dry... filter handle and gently push the filter back into place. ENGLISH MAINTENANCE Be sure to disconnect the power from the window panel and clean the insect guard net with a mild soap. Carefully remove any dust. Water can dangerously damage the electrical insulation. E-27


