
CV-10NH Operation Manual
Page 12
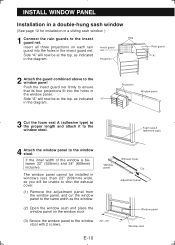
Side "A" will now be at the top, as indicated in the diagram. E-10 Cut Window panel Window stool The window panel cannot be installed in windows less than 22" (559mm) wide, as you will now be unable to ... the top, as the window. (2) Open the window sash and place the window panel on each rain Insect guard guard into the holes in the diagram. Projection Rain guard "A" 2 Attach the guard combined above to the window panel Push the insect guard net firmly to ensure that its four projections...
Side "A" will now be at the top, as indicated in the diagram. E-10 Cut Window panel Window stool The window panel cannot be installed in windows less than 22" (559mm) wide, as you will now be unable to ... the top, as the window. (2) Open the window sash and place the window panel on each rain Insect guard guard into the holes in the diagram. Projection Rain guard "A" 2 Attach the guard combined above to the window panel Push the insect guard net firmly to ensure that its four projections...

CV-10NH Operation Manual
Page 14
... the window panel on each rain guard into the holes in the insect guard net. INSTALL WINDOW PANEL Installation in a sliding sash window (See page 10 for installation in a double-hung window.) 1 Connect the rain guards to the window frame. 4 Install the window panel into the window frame. Projection ..." Insect guard net Hole Projection 2 Attach the guard combined above to the window panel. If the inner height of the window is installed in the diagram. Side "A" will now be at the top, as indicated in the window. Side "A" will now be at the top, as indicated in the...
... the window panel on each rain guard into the holes in the insect guard net. INSTALL WINDOW PANEL Installation in a sliding sash window (See page 10 for installation in a double-hung window.) 1 Connect the rain guards to the window frame. 4 Install the window panel into the window frame. Projection ..." Insect guard net Hole Projection 2 Attach the guard combined above to the window panel. If the inner height of the window is installed in the diagram. Side "A" will now be at the top, as indicated in the window. Side "A" will now be at the top, as indicated in the...
CV-10NH Operation Manual
Page 23
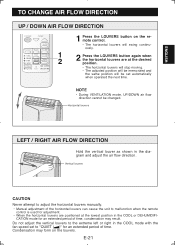
...moving. • The adjusted position will be memorized and the same position will be changed. Condensation may result. Horizontal louvers LEFT / RIGHT AIR FLOW DIRECTION Hold the vertical louver as shown in the COOL or DEHUMIDIFI- Do not adjust the vertical louvers to "QUIET ( )" for... • When the horizontal louvers are at the lowest position in the diagram and adjust the air flow direction. E-21 CATION mode for an extended period of time. ENGLISH TO CHANGE AIR FLOW DIRECTION UP / DOWN AIR FLOW DIRECTION 1 Press the LOUVERS button on the louvers. NOTE •...
...moving. • The adjusted position will be memorized and the same position will be changed. Condensation may result. Horizontal louvers LEFT / RIGHT AIR FLOW DIRECTION Hold the vertical louver as shown in the COOL or DEHUMIDIFI- Do not adjust the vertical louvers to "QUIET ( )" for... • When the horizontal louvers are at the lowest position in the diagram and adjust the air flow direction. E-21 CATION mode for an extended period of time. ENGLISH TO CHANGE AIR FLOW DIRECTION UP / DOWN AIR FLOW DIRECTION 1 Press the LOUVERS button on the louvers. NOTE •...
