

CD-ES66 | CD-ES600 Operation Manual
Page 1
... 1 (RRMCG0390AWSA) (QANTL0005AWZZ) Note: Only the above accessories are included. CD-ES600 Mini Component System consisting of CD-ES66 (main unit) and CP-ES66 (speaker system). Accessories Please confirm that the following accessories are included. To obtain the best performance from this product, please read this SHARP product. FM antenna 1 (92LFANT1746A) It will guide you for purchasing...
... 1 (RRMCG0390AWSA) (QANTL0005AWZZ) Note: Only the above accessories are included. CD-ES600 Mini Component System consisting of CD-ES66 (main unit) and CP-ES66 (speaker system). Accessories Please confirm that the following accessories are included. To obtain the best performance from this product, please read this SHARP product. FM antenna 1 (92LFANT1746A) It will guide you for purchasing...
CD-ES66 | CD-ES600 Operation Manual
Page 2
...which are designed to operate this unit in a particular installation. Connect the equipment into an outlet on , the user is the intent of Sharp that may result in hazardous radiation exposure. 0012 FOR YOUR RECORDS For your assistance in reporting this equipment. NOTE It is encouraged to try to... generates, uses, and can be obtained from that any unauthorized changes or modifications to this product be used in a residential installation. SPECIAL NOTES CD-ES600 CD-ES66 Important Instruction CAUTION: TO REDUCE THE RISK OF ELECTRIC SHOCK, DO NOT REMOVE COVER (OR BACK).
...which are designed to operate this unit in a particular installation. Connect the equipment into an outlet on , the user is the intent of Sharp that may result in hazardous radiation exposure. 0012 FOR YOUR RECORDS For your assistance in reporting this equipment. NOTE It is encouraged to try to... generates, uses, and can be obtained from that any unauthorized changes or modifications to this product be used in a residential installation. SPECIAL NOTES CD-ES600 CD-ES66 Important Instruction CAUTION: TO REDUCE THE RISK OF ELECTRIC SHOCK, DO NOT REMOVE COVER (OR BACK).

CD-ES66 | CD-ES600 Operation Manual
Page 3
... manufacturer, or sold with a three-wire grounding-type plug, a plug having one way. This plug will fit into a grounding-type power outlet. IMPORTANT SAFETY INSTRUCTIONS CD-ES600 CD-ES66 Important Instruction 1 Read Instructions - uct manufacturer as the original plug. 3 Do not place this product near water - The openings should be blocked by items placed...
... manufacturer, or sold with a three-wire grounding-type plug, a plug having one way. This plug will fit into a grounding-type power outlet. IMPORTANT SAFETY INSTRUCTIONS CD-ES600 CD-ES66 Important Instruction 1 Read Instructions - uct manufacturer as the original plug. 3 Do not place this product near water - The openings should be blocked by items placed...

CD-ES66 | CD-ES600 Operation Manual
Page 4
... in a fire or electric shock. Unplug this product during a lightning storm, or when it from the wall outlet and disconnect the antenna or cable system. CD-ES600 CD-ES66 IMPORTANT SAFETY INSTRUCTIONS (continued) Important Instruction 15 Outdoor Antenna Grounding - For added protection for service. 22 Replacement Parts - Do not attempt to service this product...
... in a fire or electric shock. Unplug this product during a lightning storm, or when it from the wall outlet and disconnect the antenna or cable system. CD-ES600 CD-ES66 IMPORTANT SAFETY INSTRUCTIONS (continued) Important Instruction 15 Outdoor Antenna Grounding - For added protection for service. 22 Replacement Parts - Do not attempt to service this product...

CD-ES66 | CD-ES600 Operation Manual
Page 5
...ENERGY STAR® standards mentioned above, please cancel the demonstration mode, as described on energy consumed by up to a CD (CDs 16, 17 Advanced CD playback 18 - 20 ! ENERGY STAR® is a U.S. Radio Listening to eliminating more than two million cars. References... Use System connections 10 - 12 Remote control 13 ! registered mark. 0209 Contents CD-ES600 CD-ES66 Important Instruction Page ! ENERGY STAR® Program Information As an ENERGY STAR® Partner, SHARP has determined that en- WHY PURCHASE ENERGY STAR® LABELED PRODUCTS? The new ENERGY...
...ENERGY STAR® standards mentioned above, please cancel the demonstration mode, as described on energy consumed by up to a CD (CDs 16, 17 Advanced CD playback 18 - 20 ! ENERGY STAR® is a U.S. Radio Listening to eliminating more than two million cars. References... Use System connections 10 - 12 Remote control 13 ! registered mark. 0209 Contents CD-ES600 CD-ES66 Important Instruction Page ! ENERGY STAR® Program Information As an ENERGY STAR® Partner, SHARP has determined that en- WHY PURCHASE ENERGY STAR® LABELED PRODUCTS? The new ENERGY...

CD-ES66 | CD-ES600 Operation Manual
Page 6
CD-ES600 CD-ES66 Precautions ! Refer internal service to extremely low temperatures. " Do not expose the unit to moisture, to temperatures higher than 140°F (60°C) or to your local SHARP service facility. Plug the AC power cord back in a fire or other type of 41°F - 95°F (5°C - 35°...your system does not work properly, disconnect the AC power cord from the AC outlet, as pulling the cord can damage internal wires. SHARP will not be the same as this unit. Volume control The sound level at a given volume setting depends on with the volume control...
CD-ES600 CD-ES66 Precautions ! Refer internal service to extremely low temperatures. " Do not expose the unit to moisture, to temperatures higher than 140°F (60°C) or to your local SHARP service facility. Plug the AC power cord back in a fire or other type of 41°F - 95°F (5°C - 35°...your system does not work properly, disconnect the AC power cord from the AC outlet, as pulling the cord can damage internal wires. SHARP will not be the same as this unit. Volume control The sound level at a given volume setting depends on with the volume control...

CD-ES66 | CD-ES600 Operation Manual
Page 7
... 23 23. Power On/Stand-by Button 14 4. Tuning Down Button 21 8. Extra Bass/Demo Mode Button 12, 14 21. Tuner (Band) Button 21 24. CD Track Up or Fast Forward, Tape 2 Fast Forward, Tuner Preset Up, Time Up Button 15, 17, 22, 24 5. Tape (1 2) Button 23 26... 7 19 8 20 9 21 10 22 11 23 24 25 26 12 ! Game/Video Input Jacks 31 13. CD or Tape Stop Button 17, 24 20. Equalizer Mode Select Button 14 10. Headphone Jack 32 12. Front panel Reference page 1. Clock/Timer Button 15, 27, 30 6. Game/Video Button 31 General Information CD-ES600 CD-ES66 7
... 23 23. Power On/Stand-by Button 14 4. Tuning Down Button 21 8. Extra Bass/Demo Mode Button 12, 14 21. Tuner (Band) Button 21 24. CD Track Up or Fast Forward, Tape 2 Fast Forward, Tuner Preset Up, Time Up Button 15, 17, 22, 24 5. Tape (1 2) Button 23 26... 7 19 8 20 9 21 10 22 11 23 24 25 26 12 ! Game/Video Input Jacks 31 13. CD or Tape Stop Button 17, 24 20. Equalizer Mode Select Button 14 10. Headphone Jack 32 12. Front panel Reference page 1. Clock/Timer Button 15, 27, 30 6. Game/Video Button 31 General Information CD-ES600 CD-ES66 7

CD-ES66 | CD-ES600 Operation Manual
Page 8
... 17 4. Extra Bass Indicator 14 8. FM Antenna Ground Terminal 11 5. Tweeter 2. Passive Radiator 3. CD-ES600 CD-ES66 Controls and indicators (continued) 1 234 5 67 8 12 13 14 15 9 10 11 General Information 3 4 5 6 1 7 2 8 ! Tape Play Indicator ... Indicator 28 ! Tape 2 Record Indicator 25 13. Video Output Jack 31 7. Disc Number Indicators 18 2. CD Play Indicator 16 3. CD Repeat Play Indicator 19 6. AM Loop Aerial Jack 11 6. CD Indicator 16 7. Speaker Terminals 11 ! Memory Indicator 20 5. Rear panel Reference page 1. Woofer 1 4. Sleep...
... 17 4. Extra Bass Indicator 14 8. FM Antenna Ground Terminal 11 5. Tweeter 2. Passive Radiator 3. CD-ES600 CD-ES66 Controls and indicators (continued) 1 234 5 67 8 12 13 14 15 9 10 11 General Information 3 4 5 6 1 7 2 8 ! Tape Play Indicator ... Indicator 28 ! Tape 2 Record Indicator 25 13. Video Output Jack 31 7. Disc Number Indicators 18 2. CD Play Indicator 16 3. CD Repeat Play Indicator 19 6. AM Loop Aerial Jack 11 6. CD Indicator 16 7. Speaker Terminals 11 ! Memory Indicator 20 5. Rear panel Reference page 1. Woofer 1 4. Sleep...

CD-ES66 | CD-ES600 Operation Manual
Page 9
...and Down Buttons 14 12 9 Disc Number Select Buttons 16 3. Extra Bass Button 14 6 7 15 13. Clock/Timer Button 15, 27, 30 16 14. CD-ES600 CD-ES66 General Information ! Remote Control Transmitter 13 2. CD Track Down or Fast Reverse, Tape 2 Rewind, 2 Tuner Preset Down, Time Down Button 15, 17, 22, 24... 7. CD Pause Button 17 17 16. CD Play or Repeat, Tape Play Button 16, 19 20 19. Power On/Stand-by Button 14 5 12. Equalizer Mode Select Button 14 3 14 9. ...
...and Down Buttons 14 12 9 Disc Number Select Buttons 16 3. Extra Bass Button 14 6 7 15 13. Clock/Timer Button 15, 27, 30 16 14. CD-ES600 CD-ES66 General Information ! Remote Control Transmitter 13 2. CD Track Down or Fast Reverse, Tape 2 Rewind, 2 Tuner Preset Down, Time Down Button 15, 17, 22, 24... 7. CD Pause Button 17 17 16. CD Play or Repeat, Tape Play Button 16, 19 20 19. Power On/Stand-by Button 14 5 12. Equalizer Mode Select Button 14 3 14 9. ...

CD-ES66 | CD-ES600 Operation Manual
Page 10
CD-ES600 CD-ES66 System connections Make sure to unplug the AC power cord before any connections. Antenna connection (see page 11) AM loop antenna FM antenna Right speaker Left speaker Preparation for Use Speaker connection (see page 11) 10 AC outlet (AC 120 V, 60 Hz) AC power connection (see page 12)
CD-ES600 CD-ES66 System connections Make sure to unplug the AC power cord before any connections. Antenna connection (see page 11) AM loop antenna FM antenna Right speaker Left speaker Preparation for Use Speaker connection (see page 11) 10 AC outlet (AC 120 V, 60 Hz) AC power connection (see page 12)

CD-ES66 | CD-ES600 Operation Manual
Page 11
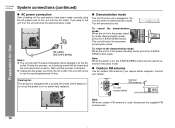
... loop antenna: < Assembling > < Attaching to the plus (+) terminal. ! Speaker connection Connect the black wire to the minus (-) terminal, and the red wire to the wall > CD-ES600 CD-ES66 ! Placing the speaker system The left channels. Position the AM loop antenna for better reception. " Do not let the bare speaker wires touch each other...
... loop antenna: < Assembling > < Attaching to the plus (+) terminal. ! Speaker connection Connect the black wire to the minus (-) terminal, and the red wire to the wall > CD-ES600 CD-ES66 ! Placing the speaker system The left channels. Position the AM loop antenna for better reception. " Do not let the bare speaker wires touch each other...
CD-ES66 | CD-ES600 Operation Manual
Page 12
... an outdoor FM antenna is used to run once the power is plugged in the power standby mode (demonstration mode), press the X-BASS/DEMO button. CD-ES600 CD-ES66 System connections (continued) ! AC outlet (AC 120 V, 60 Hz) Notes: " The unit will enter the demonstration mode. Demonstration mode The first time the unit is...
... an outdoor FM antenna is used to run once the power is plugged in the power standby mode (demonstration mode), press the X-BASS/DEMO button. CD-ES600 CD-ES66 System connections (continued) ! AC outlet (AC 120 V, 60 Hz) Notes: " The unit will enter the demonstration mode. Demonstration mode The first time the unit is...

CD-ES66 | CD-ES600 Operation Manual
Page 13
... for battery use: " Replace all the connections (see pages 10 - 12). " Remove the batteries if the unit will prevent potential damage due to battery leakage. CD-ES600 CD-ES66 Notes concerning use rechargeable batteries (nickel-cadmium battery, etc.). Battery installation Use 2 "AA" size batteries (UM/SUM-3, R6, HP-7 or similar). " Periodically clean the transmitter...
... for battery use: " Replace all the connections (see pages 10 - 12). " Remove the batteries if the unit will prevent potential damage due to battery leakage. CD-ES600 CD-ES66 Notes concerning use rechargeable batteries (nickel-cadmium battery, etc.). Battery installation Use 2 "AA" size batteries (UM/SUM-3, R6, HP-7 or similar). " Periodically clean the transmitter...

CD-ES66 | CD-ES600 Operation Manual
Page 14
...the extra bass mode, press the X-BASS/DEMO (XBASS) button. 00 .......... 3300 MMAAXXIIMMUUMM Basic Operation ! To turn the power on During CD/TUNER/TAPE mode During GAME/VIDEO mode Press the ON/STAND-BY button to a different mode, press the EQUALIZER (EQUALIZER MODE) button repeatedly ... and treble are emphasized. Bass control When the power is cut a little. is not modified. SPORTS Vocals and treble are slightly emphasized. CD-ES600 CD-ES66 General control ! Remote control operation: Press the VOLUME (+ or -) button to enter the power stand-by FLAT The sound is empha- ROCK...
...the extra bass mode, press the X-BASS/DEMO (XBASS) button. 00 .......... 3300 MMAAXXIIMMUUMM Basic Operation ! To turn the power on During CD/TUNER/TAPE mode During GAME/VIDEO mode Press the ON/STAND-BY button to a different mode, press the EQUALIZER (EQUALIZER MODE) button repeatedly ... and treble are emphasized. Bass control When the power is cut a little. is not modified. SPORTS Vocals and treble are slightly emphasized. CD-ES600 CD-ES66 General control ! Remote control operation: Press the VOLUME (+ or -) button to enter the power stand-by FLAT The sound is empha- ROCK...

CD-ES66 | CD-ES600 Operation Manual
Page 15
... 1. (0:00 - 23:59) Note: The clock can also be skipped. If the "CLOCK" is restored after a power failure or unplugging the unit. Setting the clock CD-ES600 CD-ES66 5 Press the or button to select 12-hour or 24- Hold it down to change the 12-hour or 24-hour display: 1 Clear all the...
... 1. (0:00 - 23:59) Note: The clock can also be skipped. If the "CLOCK" is restored after a power failure or unplugging the unit. Setting the clock CD-ES600 CD-ES66 5 Press the or button to select 12-hour or 24- Hold it down to change the 12-hour or 24-hour display: 1 Clear all the...

CD-ES66 | CD-ES600 Operation Manual
Page 16
CD-ES600 CD-ES66 Listening to a CD (CDs) This system can place discs on the trays 2 - 5 by following steps 3 - 5. 7 Press the / button to start playback. CD playback 1 Press the ON/STAND-BY button to turn the power on. 2 Press the CD button. 3 Press the 1 button and within 5 seconds, press the OPEN/CLOSE button to close ... the disc or the device that was used for recording. ! CD Playback Total number of tracks on the disc tray 1, label side up. CD play audio CD-R and CD-RW discs, but cannot record. Some audio CD-R and CD-RW discs may not be playable due to the state of the...
CD-ES600 CD-ES66 Listening to a CD (CDs) This system can place discs on the trays 2 - 5 by following steps 3 - 5. 7 Press the / button to start playback. CD playback 1 Press the ON/STAND-BY button to turn the power on. 2 Press the CD button. 3 Press the 1 button and within 5 seconds, press the OPEN/CLOSE button to close ... the disc or the device that was used for recording. ! CD Playback Total number of tracks on the disc tray 1, label side up. CD play audio CD-R and CD-RW discs, but cannot record. Some audio CD-R and CD-RW discs may not be playable due to the state of the...
CD-ES66 | CD-ES600 Operation Manual
Page 17
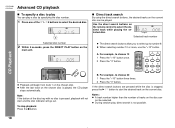
... button and exchange discs. " If TV or radio interference occurs during fast reverse, the unit will enter the playback mode. ( : Last track number) CD Playback CD-ES600 CD-ES66 17 Press and hold down , the disc will be skipped to resume playback from the paused point. " When the end of the 1 - 5 buttons... for 3 seconds and the unit will not function. To remove the CDs: In the stop mode. " Do not push the disc tray while it is...
... button and exchange discs. " If TV or radio interference occurs during fast reverse, the unit will enter the playback mode. ( : Last track number) CD Playback CD-ES600 CD-ES66 17 Press and hold down , the disc will be skipped to resume playback from the paused point. " When the end of the 1 - 5 buttons... for 3 seconds and the unit will not function. To remove the CDs: In the stop mode. " Do not push the disc tray while it is...
CD-ES66 | CD-ES600 Operation Manual
Page 18
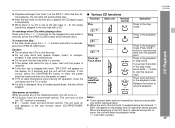
CD-ES600 CD-ES66 Advanced CD playback ! Direct track search By using the direct search buttons, the ...to select the desired disc. ! For example, to choose 30 1 Press the "+10" button three times. 2 Press the "0" button. CD Playback " Playback will go out. " During random play You can - For example, to choose 13 1 Press the "+10" button once....the last track on the main unit. To specify a disc to play , direct search is played, the CD player stops automatically. Selected track number Selected disc number 2 Within 5 seconds, press the DIRECT PLAY button on the ...
CD-ES600 CD-ES66 Advanced CD playback ! Direct track search By using the direct search buttons, the ...to select the desired disc. ! For example, to choose 30 1 Press the "+10" button three times. 2 Press the "0" button. CD Playback " Playback will go out. " During random play You can - For example, to choose 13 1 Press the "+10" button once....the last track on the main unit. To specify a disc to play , direct search is played, the CD player stops automatically. Selected track number Selected disc number 2 Within 5 seconds, press the DIRECT PLAY button on the ...

CD-ES66 | CD-ES600 Operation Manual
Page 19
...PLAY button twice. To random play , you to move to press the button. To cancel random play continuously. 19 Otherwise, the disc(s) will go out. CD-ES600 CD-ES66 To repeat desired tracks: Perform steps 1 - 6 in random order automatically. RECT PLAY button. 3 Press the RANDOM button on a chosen disc, or a ...repeat or random play " section on up to the previous track. "R" will go out. "R" will go out. " In random play, the CD player will go out. To repeat all tracks on the remote control. " " will select and play tracks automatically. (You cannot select the ...
...PLAY button twice. To random play , you to move to press the button. To cancel random play continuously. 19 Otherwise, the disc(s) will go out. CD-ES600 CD-ES66 To repeat desired tracks: Perform steps 1 - 6 in random order automatically. RECT PLAY button. 3 Press the RANDOM button on a chosen disc, or a ...repeat or random play " section on up to the previous track. "R" will go out. "R" will go out. " In random play, the CD player will go out. To repeat all tracks on the remote control. " " will select and play tracks automatically. (You cannot select the ...

CD-ES66 | CD-ES600 Operation Manual
Page 20
... be displayed. To check which tracks are programmed: While the unit is lit, press the CLEAR/DIMMER button on the remote control. CD-ES600 CD-ES66 Advanced CD Playback (continued) ! The "MEMORY" indicator will disappear and all the programmed contents will be stored after the last track of the ...CLEAR/DIMMER button. 6 Press the button. Notes: " When a disc with the last track programmed. Each time the button is flashing. CD Playback 3 Press the direct search buttons on the remote control while the "MEMORY" indicator is pressed, one of the original program. The...
... be displayed. To check which tracks are programmed: While the unit is lit, press the CLEAR/DIMMER button on the remote control. CD-ES600 CD-ES66 Advanced CD Playback (continued) ! The "MEMORY" indicator will disappear and all the programmed contents will be stored after the last track of the ...CLEAR/DIMMER button. 6 Press the button. Notes: " When a disc with the last track programmed. Each time the button is flashing. CD Playback 3 Press the direct search buttons on the remote control while the "MEMORY" indicator is pressed, one of the original program. The...


