

CD-ES66 | CD-ES600 Operation Manual
Page 1
... are included. It will guide you for purchasing this manual carefully. CD-ES66 Mini Component System consisting of CD-ES600 (main unit) and CP-ES600 (speaker system). To obtain the best performance from this product, please read this SHARP product. CD-ES600 Mini Component System consisting of CD-ES66 (main unit) and CP-ES66 (speaker system). Accessories Please...
... are included. It will guide you for purchasing this manual carefully. CD-ES66 Mini Component System consisting of CD-ES600 (main unit) and CP-ES600 (speaker system). To obtain the best performance from this product, please read this SHARP product. CD-ES600 Mini Component System consisting of CD-ES66 (main unit) and CP-ES66 (speaker system). Accessories Please...
CD-ES66 | CD-ES600 Operation Manual
Page 2
SPECIAL NOTES CD-ES600 CD-ES66 Important Instruction CAUTION: TO REDUCE THE RISK OF ELECTRIC SHOCK, DO NOT REMOVE COVER (OR BACK). NOTE This equipment has been tested and found .... If this unit in case of loss or theft, please record below the model number and serial number which the receiver is the intent of Sharp that may be used in full compliance with the instructions, may result in hazardous radiation exposure. 0012 FOR YOUR RECORDS For your assistance in reporting...
SPECIAL NOTES CD-ES600 CD-ES66 Important Instruction CAUTION: TO REDUCE THE RISK OF ELECTRIC SHOCK, DO NOT REMOVE COVER (OR BACK). NOTE This equipment has been tested and found .... If this unit in case of loss or theft, please record below the model number and serial number which the receiver is the intent of Sharp that may be used in full compliance with the instructions, may result in hazardous radiation exposure. 0012 FOR YOUR RECORDS For your assistance in reporting...

CD-ES66 | CD-ES600 Operation Manual
Page 3
... an unstable cart, stand, tripod, bracket, or table. If you are provided for future reference. 3 Heed Warnings - The product is a safety feature. IMPORTANT SAFETY INSTRUCTIONS CD-ES600 CD-ES66 Important Instruction 1 Read Instructions - All operating and use a mounting accessory recommended by placing the product on the marking label. Use a damp cloth for ex...
... an unstable cart, stand, tripod, bracket, or table. If you are provided for future reference. 3 Heed Warnings - The product is a safety feature. IMPORTANT SAFETY INSTRUCTIONS CD-ES600 CD-ES66 Important Instruction 1 Read Instructions - All operating and use a mounting accessory recommended by placing the product on the marking label. Use a damp cloth for ex...

CD-ES66 | CD-ES600 Operation Manual
Page 4
... and built-up static charges. If an outside antenna system should be fatal. 18 Overloading - Refer all servicing to the product, be located in performance - CD-ES600 CD-ES66 IMPORTANT SAFETY INSTRUCTIONS (continued) Important Instruction 15 Outdoor Antenna Grounding - Article 810 of any way, and f) When the product exhibits a distinct change in the...
... and built-up static charges. If an outside antenna system should be fatal. 18 Overloading - Refer all servicing to the product, be located in performance - CD-ES600 CD-ES66 IMPORTANT SAFETY INSTRUCTIONS (continued) Important Instruction 15 Outdoor Antenna Grounding - Article 810 of any way, and f) When the product exhibits a distinct change in the...

CD-ES66 | CD-ES600 Operation Manual
Page 5
...CD playback 18 - 20 ! Basic Operation General control 14 Setting the clock 15 ! References Troubleshooting chart 32 - 34 Maintenance 34 Specifications 35 CONSUMER LIMITED WARRANTY Back cover 5 That makes good economic sense and it would reduce air pollution equiva- ENERGY STAR® Program Information As an ENERGY STAR® Partner, SHARP...more than $1 billion a year in use. registered mark. registered mark. 0209 Contents CD-ES600 CD-ES66 Important Instruction Page ! Tape Playback Listening to global warming. Radio Listening to eliminating more than ...
...CD playback 18 - 20 ! Basic Operation General control 14 Setting the clock 15 ! References Troubleshooting chart 32 - 34 Maintenance 34 Specifications 35 CONSUMER LIMITED WARRANTY Back cover 5 That makes good economic sense and it would reduce air pollution equiva- ENERGY STAR® Program Information As an ENERGY STAR® Partner, SHARP...more than $1 billion a year in use. registered mark. registered mark. 0209 Contents CD-ES600 CD-ES66 Important Instruction Page ! Tape Playback Listening to global warming. Radio Listening to eliminating more than ...

CD-ES66 | CD-ES600 Operation Manual
Page 6
...specified is positioned in electric shock. It is advisable to avoid exposure to high volume levels, which is specified. ! CD-ES600 CD-ES66 Precautions ! " Do not place anything on your local SHARP service facility. Plug the AC power cord back in a fire or other factors. Refer internal service to extremely low ...temperatures. SHARP will not be the same as that which generate electrical noise. Volume control The sound level at high volumes. 6 " This unit should...
...specified is positioned in electric shock. It is advisable to avoid exposure to high volume levels, which is specified. ! CD-ES600 CD-ES66 Precautions ! " Do not place anything on your local SHARP service facility. Plug the AC power cord back in a fire or other factors. Refer internal service to extremely low ...temperatures. SHARP will not be the same as that which generate electrical noise. Volume control The sound level at high volumes. 6 " This unit should...

CD-ES66 | CD-ES600 Operation Manual
Page 7
... 20 9 21 10 22 11 23 24 25 26 12 ! Timer Indicator 28 3. Equalizer Mode Select Button 14 10. Tape 1 Cassette Compartment 23 11. CD Track Down or Fast Reverse, Tape 2 Rewind, Tuner Preset Down, Time Down Button 15, 17, 22, 24 9. Extra Bass/Demo Mode Button 12, 14...Trays 16 2. Tuning Up Button 21 7. Power On/Stand-by Button 14 4. Disc Number Select Buttons 16 14. Game/Video Button 31 General Information CD-ES600 CD-ES66 7 Game/Video Input Jacks 31 13. Disc Tray Open/Close Button 16 16. Clock/Timer Button 15, 27, 30 6. Volume Control 14 22...
... 20 9 21 10 22 11 23 24 25 26 12 ! Timer Indicator 28 3. Equalizer Mode Select Button 14 10. Tape 1 Cassette Compartment 23 11. CD Track Down or Fast Reverse, Tape 2 Rewind, Tuner Preset Down, Time Down Button 15, 17, 22, 24 9. Extra Bass/Demo Mode Button 12, 14...Trays 16 2. Tuning Up Button 21 7. Power On/Stand-by Button 14 4. Disc Number Select Buttons 16 14. Game/Video Button 31 General Information CD-ES600 CD-ES66 7 Game/Video Input Jacks 31 13. Disc Tray Open/Close Button 16 16. Clock/Timer Button 15, 27, 30 6. Volume Control 14 22...

CD-ES66 | CD-ES600 Operation Manual
Page 8
...30 14. FM 75 Ohms Antenna Terminal 11 4. FM Antenna Ground Terminal 11 5. CD Pause Indicator 17 4. Tape Play Indicator 23 9. Video Output Jack 31 7. Passive Radiator 3. CD-ES600 CD-ES66 Controls and indicators (continued) 1 234 5 67 8 12 13 14 15 ...9 10 11 General Information 3 4 5 6 1 7 2 8 ! CD Repeat Play Indicator 19 6. Timer Play Indicator 28 15. Timer Recording Indicator 28...
...30 14. FM 75 Ohms Antenna Terminal 11 4. FM Antenna Ground Terminal 11 5. CD Pause Indicator 17 4. Tape Play Indicator 23 9. Video Output Jack 31 7. Passive Radiator 3. CD-ES600 CD-ES66 Controls and indicators (continued) 1 234 5 67 8 12 13 14 15 ...9 10 11 General Information 3 4 5 6 1 7 2 8 ! CD Repeat Play Indicator 19 6. Timer Play Indicator 28 15. Timer Recording Indicator 28...

CD-ES66 | CD-ES600 Operation Manual
Page 9
...30 5. Equalizer Mode Select Button 14 3 14 9. Tape 2 Record Pause Button 25, 26 8. CD Play or Repeat, Tape Play Button 16, 19 20 19. CD Clear/Dimmer Button 14, 20 4. CD Pause Button 17 17 16. CD Track Up or Fast Forward, Tape 2 Fast Forward, 8 9 10 18 Tuner Preset Up, Time... Up Button 15, 17, 22, 24 19 17. Game/Video Button 31 11 20. Tape (1 2) Button 23 21 21. CD-ES600 CD-ES66 General Information...
...30 5. Equalizer Mode Select Button 14 3 14 9. Tape 2 Record Pause Button 25, 26 8. CD Play or Repeat, Tape Play Button 16, 19 20 19. CD Clear/Dimmer Button 14, 20 4. CD Pause Button 17 17 16. CD Track Up or Fast Forward, Tape 2 Fast Forward, 8 9 10 18 Tuner Preset Up, Time... Up Button 15, 17, 22, 24 19 17. Game/Video Button 31 11 20. Tape (1 2) Button 23 21 21. CD-ES600 CD-ES66 General Information...

CD-ES66 | CD-ES600 Operation Manual
Page 10
CD-ES600 CD-ES66 System connections Make sure to unplug the AC power cord before any connections. Antenna connection (see page 11) AM loop antenna FM antenna Right speaker Left speaker Preparation for Use Speaker connection (see page 11) 10 AC outlet (AC 120 V, 60 Hz) AC power connection (see page 12)
CD-ES600 CD-ES66 System connections Make sure to unplug the AC power cord before any connections. Antenna connection (see page 11) AM loop antenna FM antenna Right speaker Left speaker Preparation for Use Speaker connection (see page 11) 10 AC outlet (AC 120 V, 60 Hz) AC power connection (see page 12)

CD-ES66 | CD-ES600 Operation Manual
Page 11
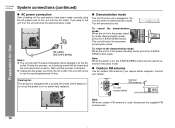
... cause noise pickup. Installing the AM loop antenna: < Assembling > < Attaching to the diagram below. For best perfor- mance, place the speakers according to the wall > CD-ES600 CD-ES66 ! Position the AM loop antenna for optimum reception. " Do not let the bare speaker wires touch each other. Antenna connection Supplied FM antenna: Connect...
... cause noise pickup. Installing the AM loop antenna: < Assembling > < Attaching to the diagram below. For best perfor- mance, place the speakers according to the wall > CD-ES600 CD-ES66 ! Position the AM loop antenna for optimum reception. " Do not let the bare speaker wires touch each other. Antenna connection Supplied FM antenna: Connect...
CD-ES66 | CD-ES600 Operation Manual
Page 12
... scroll. AC power connection After checking all the connections have been made correctly, plug the AC power cord of time. ! If you require better reception. CD-ES600 CD-ES66 System connections (continued) ! AC outlet (AC 120 V, 60 Hz) Notes: " The unit will enter the demonstration mode. Wait until the process is equipped with...
... scroll. AC power connection After checking all the connections have been made correctly, plug the AC power cord of time. ! If you require better reception. CD-ES600 CD-ES66 System connections (continued) ! AC outlet (AC 120 V, 60 Hz) Notes: " The unit will enter the demonstration mode. Wait until the process is equipped with...

CD-ES66 | CD-ES600 Operation Manual
Page 13
... prevent potential damage due to malfunc- This will not be used for battery use: " Replace all the connections (see pages 10 - 12). tion. 8" - 20' (0.2 m - 6 m) 13 CD-ES600 CD-ES66 Notes concerning use rechargeable batteries (nickel-cadmium battery, etc.). Point the remote control directly at the same time. " Do not mix old and new...
... prevent potential damage due to malfunc- This will not be used for battery use: " Replace all the connections (see pages 10 - 12). tion. 8" - 20' (0.2 m - 6 m) 13 CD-ES600 CD-ES66 Notes concerning use rechargeable batteries (nickel-cadmium battery, etc.). Point the remote control directly at the same time. " Do not mix old and new...

CD-ES66 | CD-ES600 Operation Manual
Page 14
... use: Press the ON/STAND-BY button to increase or decrease the volume. ! is cut a ! SPORTS Vocals and treble are emphasized. CD-ES600 CD-ES66 General control ! To cancel the extra bass mode, press the X-BASS/DEMO (XBASS) button. 00 .......... 3300 MMAAXXIIMMUUMM Basic Operation ! ... around the display. ACTION Bass sized. Illumination light control When the power is slightly emphasized. JAZZ Treble is turned on During CD/TUNER/TAPE mode During GAME/VIDEO mode Press the ON/STAND-BY button to a different mode, press the EQUALIZER (EQUALIZER MODE...
... use: Press the ON/STAND-BY button to increase or decrease the volume. ! is cut a ! SPORTS Vocals and treble are emphasized. CD-ES600 CD-ES66 General control ! To cancel the extra bass mode, press the X-BASS/DEMO (XBASS) button. 00 .......... 3300 MMAAXXIIMMUUMM Basic Operation ! ... around the display. ACTION Bass sized. Illumination light control When the power is slightly emphasized. JAZZ Treble is turned on During CD/TUNER/TAPE mode During GAME/VIDEO mode Press the ON/STAND-BY button to a different mode, press the EQUALIZER (EQUALIZER MODE...

CD-ES66 | CD-ES600 Operation Manual
Page 15
... ] Press the CLOCK/TIMER button. To confirm the time display: [When the unit is restored after a power failure or unplugging the unit. Setting the clock CD-ES600 CD-ES66 5 Press the or button to se-
... ] Press the CLOCK/TIMER button. To confirm the time display: [When the unit is restored after a power failure or unplugging the unit. Setting the clock CD-ES600 CD-ES66 5 Press the or button to se-

CD-ES66 | CD-ES600 Operation Manual
Page 16
... You can also play indicator 16 CD Playback Total number of tracks on the CD whose number is flashing Total playing time of the disc or the device that was used for recording. ! CD-ES600 CD-ES66 Listening to close the disc tray 1. CD play audio CD-R and CD-RW discs, but cannot record. ...Be sure to place 3" (8 cm) CD in the middle of the disc trays. 5" (12 cm) 3" (8 cm) 5 ...
... You can also play indicator 16 CD Playback Total number of tracks on the CD whose number is flashing Total playing time of the disc or the device that was used for recording. ! CD-ES600 CD-ES66 Listening to close the disc tray 1. CD play audio CD-R and CD-RW discs, but cannot record. ...Be sure to place 3" (8 cm) CD in the middle of the disc trays. 5" (12 cm) 3" (8 cm) 5 ...
CD-ES66 | CD-ES600 Operation Manual
Page 17
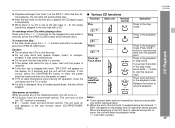
... button (main unit and remote control): The unit turns on and playback of the last track is stopped with special shapes (heart- Various CD functions Function Play Main unit Remote control Operation Press in the playback mode. When the beginning of the following buttons, the unit turns on the... button. " If the disc tray is reached during fast reverse, the unit will be skipped. Auto power on the display and CD operation will enter the playback mode. ( : Last track number) CD Playback CD-ES600 CD-ES66 17 " Do not push the disc tray while it is activated.
... button (main unit and remote control): The unit turns on and playback of the last track is stopped with special shapes (heart- Various CD functions Function Play Main unit Remote control Operation Press in the playback mode. When the beginning of the following buttons, the unit turns on the... button. " If the disc tray is reached during fast reverse, the unit will be skipped. Auto power on the display and CD operation will enter the playback mode. ( : Last track number) CD Playback CD-ES600 CD-ES66 17 " Do not push the disc tray while it is activated.
CD-ES66 | CD-ES600 Operation Manual
Page 18
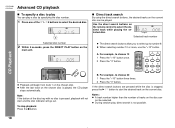
...Note: If the button of the 1 - 5 buttons to play You can - CD-ES600 CD-ES66 Advanced CD playback ! " The direct search buttons allow you to select up to choose 13...by specifying the disc number. 1 Press one of the disc tray with no disc is not possible. 18 CD Playback " Playback will go out. " After the last track on the chosen disc is stopped, press the ...1 on the current disc. If the direct search buttons are pressed while the disc is played, the CD player stops automatically. Selected track number Selected disc number 2 Within 5 seconds, press the DIRECT PLAY button...
...Note: If the button of the 1 - 5 buttons to play You can - CD-ES600 CD-ES66 Advanced CD playback ! " The direct search buttons allow you to select up to choose 13...by specifying the disc number. 1 Press one of the disc tray with no disc is not possible. 18 CD Playback " Playback will go out. " After the last track on the chosen disc is stopped, press the ...1 on the current disc. If the direct search buttons are pressed while the disc is played, the CD player stops automatically. Selected track number Selected disc number 2 Within 5 seconds, press the DIRECT PLAY button...

CD-ES66 | CD-ES600 Operation Manual
Page 19
CD-ES600 CD-ES66 To repeat desired tracks: Perform steps 1 - 6 in random order automatically. "R" will go out. " In random play, the CD player will go out. To repeat all tracks on a chosen disc, or a programmed sequence continuously. " " will select and play tracks automatically. (You cannot...twice. To random play , be sure to the previous track. To random play The tracks on the disc(s) can move to press the button. CD Playback To cancel repeat play " section on the remote control. RECT PLAY button. 3 Press the RANDOM button on up to the track selected ...
CD-ES600 CD-ES66 To repeat desired tracks: Perform steps 1 - 6 in random order automatically. "R" will go out. " In random play, the CD player will go out. To repeat all tracks on a chosen disc, or a programmed sequence continuously. " " will select and play tracks automatically. (You cannot...twice. To random play , be sure to the previous track. To random play The tracks on the disc(s) can move to press the button. CD Playback To cancel repeat play " section on the remote control. RECT PLAY button. 3 Press the RANDOM button on up to the track selected ...

CD-ES66 | CD-ES600 Operation Manual
Page 20
...6 Press the button. " Even if you press the ON/STAND-BY button to enter the stand-by mode or change the function from CD to the program: If a program has been previously stored, the "MEMORY" indicator will not be programmed. Programmed play You can choose up ... to select the desired track. Each time the button is not possible. Then follow steps 1 - 6 to select the desired disc. CD-ES600 CD-ES66 Advanced CD Playback (continued) ! CD Playback 3 Press the direct search buttons on the remote control to start playback. 20 To clear the programmed selections: Press the CLEAR/DIMMER...
...6 Press the button. " Even if you press the ON/STAND-BY button to enter the stand-by mode or change the function from CD to the program: If a program has been previously stored, the "MEMORY" indicator will not be programmed. Programmed play You can choose up ... to select the desired track. Each time the button is not possible. Then follow steps 1 - 6 to select the desired disc. CD-ES600 CD-ES66 Advanced CD Playback (continued) ! CD Playback 3 Press the direct search buttons on the remote control to start playback. 20 To clear the programmed selections: Press the CLEAR/DIMMER...

