Installation Guide
Page 2
Contents Getting Started ...1 Installing the FreeAgent Tools 1 Using the FreeAgent Tools Icons 9 Using the System Tray Icon 10 Disconnecting the FreeAgent Drive 10 File Encryption ...12 Creating a Password 12 Encrypting a File ...13 Decrypting a File ...15 Drag-and-Drop Encryption and ...Decryption 16 Using Drag and Drop to Encrypt 16 Using Drag and Drop to Decrypt 17 Managing Your Drives ...19 Synchronizing Folders ......
Contents Getting Started ...1 Installing the FreeAgent Tools 1 Using the FreeAgent Tools Icons 9 Using the System Tray Icon 10 Disconnecting the FreeAgent Drive 10 File Encryption ...12 Creating a Password 12 Encrypting a File ...13 Decrypting a File ...15 Drag-and-Drop Encryption and ...Decryption 16 Using Drag and Drop to Encrypt 16 Using Drag and Drop to Decrypt 17 Managing Your Drives ...19 Synchronizing Folders ......

Installation Guide
Page 3
Adjusting the Drive Sleep Interval 43 Adjusting the Drive Lights 45 Index ...i FreeAgent Go Data Mover Contents ii
Adjusting the Drive Sleep Interval 43 Adjusting the Drive Lights 45 Index ...i FreeAgent Go Data Mover Contents ii
Installation Guide
Page 4
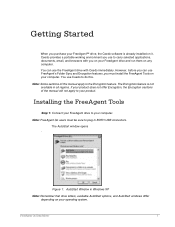
... Data Mover 1 The Encryption feature is already installed on your operating system. Installing the FreeAgent Tools Step 1: Connect your FreeAgent drive to plug in BOTH USB connectors. Figure 1: AutoStart Window in Windows XP Note: Remember that drive letters, available AutoStart options, and AutoStart windows differ depending on it. If your product does not offer Encryption...
... Data Mover 1 The Encryption feature is already installed on your operating system. Installing the FreeAgent Tools Step 1: Connect your FreeAgent drive to plug in BOTH USB connectors. Figure 1: AutoStart Window in Windows XP Note: Remember that drive letters, available AutoStart options, and AutoStart windows differ depending on it. If your product does not offer Encryption...

Installation Guide
Page 5
The Ceedo License Agreement window opens: Figure 3: Ceedo License Agreement Step 4: Select I accept the agreement and click OK. Step 2: Select Start Ceedo and click OK. The Installing Ceedo window opens: FreeAgent Go Data Mover 2 The Welcome to Ceedo window opens: Figure 2: Welcome to install the latest version of its software than the version installed on your FreeAgent drive, a Ceedo Update window opens: Figure 4: Update Ceedo Step 5: Click Yes to Ceedo Step 3: Select a language from the dropdown menu and click OK. If Ceedo has released a more current version of Ceedo.
The Ceedo License Agreement window opens: Figure 3: Ceedo License Agreement Step 4: Select I accept the agreement and click OK. Step 2: Select Start Ceedo and click OK. The Installing Ceedo window opens: FreeAgent Go Data Mover 2 The Welcome to Ceedo window opens: Figure 2: Welcome to install the latest version of its software than the version installed on your FreeAgent drive, a Ceedo Update window opens: Figure 4: Update Ceedo Step 5: Click Yes to Ceedo Step 3: Select a language from the dropdown menu and click OK. If Ceedo has released a more current version of Ceedo.

Installation Guide
Page 6
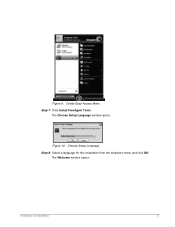
..., the Loading Ceedo window opens: Figure 6: Loading Ceedo Note: If you are unable to access the Ceedo Easy-Access menu, you may have a firewall conflict. FreeAgent Go Data Mover 3
..., the Loading Ceedo window opens: Figure 6: Loading Ceedo Note: If you are unable to access the Ceedo Easy-Access menu, you may have a firewall conflict. FreeAgent Go Data Mover 3
Installation Guide
Page 7
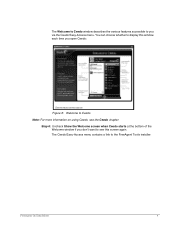
The Welcome to Ceedo window describes the various features accessible to you don't want to see this window each time you open Ceedo: Figure 8: Welcome to Ceedo Note: For more information on using Ceedo, see the Ceedo chapter. Step 6: Uncheck Show the Welcome screen when Ceedo starts at the bottom of the Welcome window if you via the Ceedo Easy-Access menu. You can choose whether to the FreeAgent Tools installer: FreeAgent Go Data Mover 4 The Ceedo Easy-Access menu contains a link to display this screen again.
The Welcome to Ceedo window describes the various features accessible to you don't want to see this window each time you open Ceedo: Figure 8: Welcome to Ceedo Note: For more information on using Ceedo, see the Ceedo chapter. Step 6: Uncheck Show the Welcome screen when Ceedo starts at the bottom of the Welcome window if you via the Ceedo Easy-Access menu. You can choose whether to the FreeAgent Tools installer: FreeAgent Go Data Mover 4 The Ceedo Easy-Access menu contains a link to display this screen again.
Installation Guide
Page 8
Figure 9: Ceedo Easy-Access Menu Step 7: Click Install FreeAgent Tools. The Welcome window opens: FreeAgent Go Data Mover 5 The Choose Setup Language window opens: Figure 10: Choose Setup Language Step 8: Select a language for this installation from the dropdown menu and click OK.
Figure 9: Ceedo Easy-Access Menu Step 7: Click Install FreeAgent Tools. The Welcome window opens: FreeAgent Go Data Mover 5 The Choose Setup Language window opens: Figure 10: Choose Setup Language Step 8: Select a language for this installation from the dropdown menu and click OK.

Installation Guide
Page 9
The License Agreement window opens: Figure 12: License Agreement Step 10: Select Yes if you agree to the terms of the License Agreement. Figure 11: Welcome Step 9: Click Next. The Choose Destination Location window opens: FreeAgent Go Data Mover 6
The License Agreement window opens: Figure 12: License Agreement Step 10: Select Yes if you agree to the terms of the License Agreement. Figure 11: Welcome Step 9: Click Next. The Choose Destination Location window opens: FreeAgent Go Data Mover 6

Installation Guide
Page 10
Click Browse to the desired folder and click OK in the Choose Folder window, then Next in the Choose Destination Location window. The Setup Status window opens: FreeAgent Go Data Mover 7 If you click Browse, a Choose Folder window opens: Figure 14: Change Installation Folder Browse to select a different installation folder. Figure 13: Choose Installation Folder Step 11: Click Next to accept the default installation folder - OR -
Click Browse to the desired folder and click OK in the Choose Folder window, then Next in the Choose Destination Location window. The Setup Status window opens: FreeAgent Go Data Mover 7 If you click Browse, a Choose Folder window opens: Figure 14: Change Installation Folder Browse to select a different installation folder. Figure 13: Choose Installation Folder Step 11: Click Next to accept the default installation folder - OR -

Installation Guide
Page 11
Step 13: Click Next. Figure 15: Setup Status When the setup is complete, the Registration window opens: Figure 16: Registration Step 12: If you wish, click Register to go to the Seagate registration website and register your FreeAgent drive. The InstallShield Wizard Complete window opens: FreeAgent Go Data Mover 8
Step 13: Click Next. Figure 15: Setup Status When the setup is complete, the Registration window opens: Figure 16: Registration Step 12: If you wish, click Register to go to the Seagate registration website and register your FreeAgent drive. The InstallShield Wizard Complete window opens: FreeAgent Go Data Mover 8
Installation Guide
Page 12
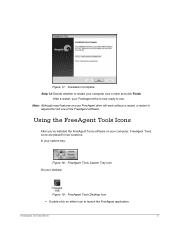
... icons are placed in two locations: In your system tray: Figure 18: FreeAgent Tools System Tray Icon On your desktop: Figure 19: FreeAgent Tools Desktop Icon • Double-click on your FreeAgent drive is required for full use . FreeAgent Go Data Mover 9 Note: Although most features on either icon to restart your computer now or...
... icons are placed in two locations: In your system tray: Figure 18: FreeAgent Tools System Tray Icon On your desktop: Figure 19: FreeAgent Tools Desktop Icon • Double-click on your FreeAgent drive is required for full use . FreeAgent Go Data Mover 9 Note: Although most features on either icon to restart your computer now or...
Installation Guide
Page 13
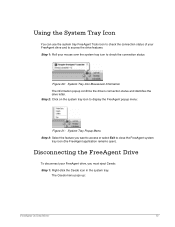
...click the Ceedo icon in the system tray. The Ceedo menu pops up: FreeAgent Go Data Mover 10 Disconnecting the FreeAgent Drive To disconnect your FreeAgent drive, you want to access or select Exit to access the drive features. Using the System Tray Icon You can use the system tray... FreeAgent Tools icon to check the connection status of your FreeAgent drive and to close the FreeAgent system tray icon (the FreeAgent ...
...click the Ceedo icon in the system tray. The Ceedo menu pops up: FreeAgent Go Data Mover 10 Disconnecting the FreeAgent Drive To disconnect your FreeAgent drive, you want to access or select Exit to access the drive features. Using the System Tray Icon You can use the system tray... FreeAgent Tools icon to check the connection status of your FreeAgent drive and to close the FreeAgent system tray icon (the FreeAgent ...

Installation Guide
Page 14
The Ejecting Ceedo progress window opens: Figure 24: Ejecting Ceedo Progress Window When Ceedo has been ejected, the Safe to Remove Hardware popup appears in your computer. The Ejecting Ceedo window opens to confirm that you want to Remove Hardware Popup Step 4: Disconnect the FreeAgent drive from your system tray. Figure 25: Safe to eject Ceedo: Figure 23: Ejecting Ceedo Confirmation Window Step 3: Click Yes. FreeAgent Go Data Mover 11 Figure 22: Ceedo System Tray Popup Menu Step 2: Select Eject.
The Ejecting Ceedo progress window opens: Figure 24: Ejecting Ceedo Progress Window When Ceedo has been ejected, the Safe to Remove Hardware popup appears in your computer. The Ejecting Ceedo window opens to confirm that you want to Remove Hardware Popup Step 4: Disconnect the FreeAgent drive from your system tray. Figure 25: Safe to eject Ceedo: Figure 23: Ejecting Ceedo Confirmation Window Step 3: Click Yes. FreeAgent Go Data Mover 11 Figure 22: Ceedo System Tray Popup Menu Step 2: Select Eject.
Installation Guide
Page 15
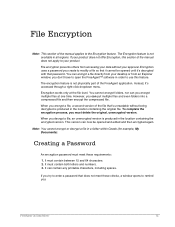
... then encrypted again. Creating a Password An encryption password must delete the original, unencrypted version. If you don't have to open the FreeAgent™ software in order to use this section of the manual does not apply to enter a password that password. Instead, it 's... decrypt a file, an unencrypted version is not available in the location containing the encrypted version. File Encryption Note: This section of the FreeAgent application. Note: You cannot encrypt or decrypt a file in the location containing the original file. Encryption uses a password you create to modify...
... then encrypted again. Creating a Password An encryption password must delete the original, unencrypted version. If you don't have to open the FreeAgent™ software in order to use this section of the manual does not apply to enter a password that password. Instead, it 's... decrypt a file, an unencrypted version is not available in the location containing the encrypted version. File Encryption Note: This section of the FreeAgent application. Note: You cannot encrypt or decrypt a file in the location containing the original file. Encryption uses a password you create to modify...

Installation Guide
Page 16
Step 2: Select Encrypt on the file. Encrypting a File To encrypt a file, Step 1: Right-click on the dropdown menu: Figure 2: Encrypt Menu The Seagate Encryption window opens: FreeAgent Go Data Mover 13 Figure 1: Encryption Password Information Window Note: A forgotten encryption password cannot be recovered, so be sure to choose a password you can remember easily or record and store it in a safe place.
Step 2: Select Encrypt on the file. Encrypting a File To encrypt a file, Step 1: Right-click on the dropdown menu: Figure 2: Encrypt Menu The Seagate Encryption window opens: FreeAgent Go Data Mover 13 Figure 1: Encryption Password Information Window Note: A forgotten encryption password cannot be recovered, so be sure to choose a password you can remember easily or record and store it in a safe place.

Installation Guide
Page 17
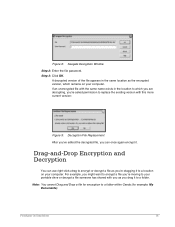
If you've already encrypted this more current version: Figure 4: Encryption File Replacement Step 4: Click Yes. You're asked permission to replace the existing version with this file before, the previously encrypted version remains on your computer. The Encryption window displays the progress of the encryption: Figure 5: Encryption in Progress When the window closes, an encrypted version of the file appears: FreeAgent Go Data Mover 14 Figure 3: Seagate Encryption Window Step 3: Enter and confirm a password and click OK.
If you've already encrypted this more current version: Figure 4: Encryption File Replacement Step 4: Click Yes. You're asked permission to replace the existing version with this file before, the previously encrypted version remains on your computer. The Encryption window displays the progress of the encryption: Figure 5: Encryption in Progress When the window closes, an encrypted version of the file appears: FreeAgent Go Data Mover 14 Figure 3: Seagate Encryption Window Step 3: Enter and confirm a password and click OK.

Installation Guide
Page 18
Figure 6: Encrypted File Logo Step 5: Delete the original, unencrypted version of the file to complete the encryption process. Right-click on the file - Decrypting a File To decrypt a file, Step 1: Double-click on the file and select Decrypt from the dropdown menu: Figure 7: Decrypt Menu The Seagate Decryption window opens: FreeAgent Go Data Mover 15 OR -
Figure 6: Encrypted File Logo Step 5: Delete the original, unencrypted version of the file to complete the encryption process. Right-click on the file - Decrypting a File To decrypt a file, Step 1: Double-click on the file and select Decrypt from the dropdown menu: Figure 7: Decrypt Menu The Seagate Decryption window opens: FreeAgent Go Data Mover 15 OR -
Installation Guide
Page 19
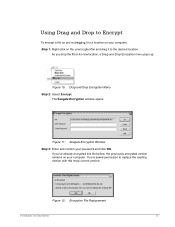
...: You cannot Drag and Drop a file for example, My Documents). A decrypted version of the file appears in the location to which remains on your portable drive or decrypt a file someone has shared with you as you can use right-click+drag to encrypt or decrypt a file as the encrypted version, which... to a folder. If an unencrypted file with this more current version: Figure 9: Decryption File Replacement After you've edited the decrypted file, you drag it . FreeAgent Go Data Mover 16 For example, you might want to encrypt a file you're moving to your computer. Figure...
...: You cannot Drag and Drop a file for example, My Documents). A decrypted version of the file appears in the location to which remains on your portable drive or decrypt a file someone has shared with you as you can use right-click+drag to encrypt or decrypt a file as the encrypted version, which... to a folder. If an unencrypted file with this more current version: Figure 9: Decryption File Replacement After you've edited the decrypted file, you drag it . FreeAgent Go Data Mover 16 For example, you might want to encrypt a file you're moving to your computer. Figure...
Installation Guide
Page 20
... up: Figure 10: Drag-and-Drop Encryption Menu Step 2: Select Encrypt. As you 've already encrypted this more current version: Figure 12: Encryption File Replacement FreeAgent Go Data Mover 17 The Seagate Encryption window opens: Figure 11: Seagate Encryption Window Step 3: Enter and confirm your computer.
... up: Figure 10: Drag-and-Drop Encryption Menu Step 2: Select Encrypt. As you 've already encrypted this more current version: Figure 12: Encryption File Replacement FreeAgent Go Data Mover 17 The Seagate Encryption window opens: Figure 11: Seagate Encryption Window Step 3: Enter and confirm your computer.
Installation Guide
Page 21
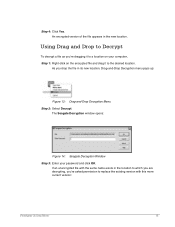
...'re dragging it to a location on your password and click OK. If an unencrypted file with this more current version: FreeAgent Go Data Mover 18 The Seagate Decryption window opens: Figure 14: Seagate Decryption Window Step 3: Enter your computer, Step 1: Right-click on the encrypted file and drag it to the desired location...
...'re dragging it to a location on your password and click OK. If an unencrypted file with this more current version: FreeAgent Go Data Mover 18 The Seagate Decryption window opens: Figure 14: Seagate Decryption Window Step 3: Enter your computer, Step 1: Right-click on the encrypted file and drag it to the desired location...


