Installation Guide
Page 2
... Getting Started ...1 Installing the FreeAgent Tools 1 Using the FreeAgent Tools Icons 9 Using the System Tray Icon 10 Disconnecting the FreeAgent Drive 10 File Encryption ...12 Creating a Password 12 Encrypting a File ...13 Decrypting a File ...15 Drag-and-Drop Encryption and Decryption 16 Using Drag and Drop to Encrypt 16 Using Drag and Drop to Decrypt 17 Managing Your Drives ...19 Synchronizing Folders ...20 Using the Default Sync Settings 20 Selecting Your Own Folders for Sync 22 Editing your Sync Settings 24 Changing Folder...
... Getting Started ...1 Installing the FreeAgent Tools 1 Using the FreeAgent Tools Icons 9 Using the System Tray Icon 10 Disconnecting the FreeAgent Drive 10 File Encryption ...12 Creating a Password 12 Encrypting a File ...13 Decrypting a File ...15 Drag-and-Drop Encryption and Decryption 16 Using Drag and Drop to Encrypt 16 Using Drag and Drop to Decrypt 17 Managing Your Drives ...19 Synchronizing Folders ...20 Using the Default Sync Settings 20 Selecting Your Own Folders for Sync 22 Editing your Sync Settings 24 Changing Folder...
Installation Guide
Page 4
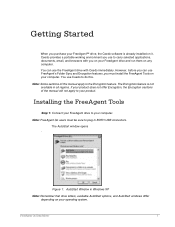
... BOTH USB connectors. Installing the FreeAgent Tools Step 1: Connect your FreeAgent drive to the Encryption feature. The AutoStart window opens . Getting Started When you purchase your FreeAgent™ drive, the Ceedo software is not available in Windows XP Note: Remember that drive letters, available AutoStart options, and AutoStart windows differ depending on your operating system. However, before you can use to do this manual apply to your computer. You use FreeAgent's Folder...
... BOTH USB connectors. Installing the FreeAgent Tools Step 1: Connect your FreeAgent drive to the Encryption feature. The AutoStart window opens . Getting Started When you purchase your FreeAgent™ drive, the Ceedo software is not available in Windows XP Note: Remember that drive letters, available AutoStart options, and AutoStart windows differ depending on your operating system. However, before you can use to do this manual apply to your computer. You use FreeAgent's Folder...
Installation Guide
Page 15
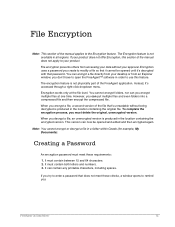
.... Encryption works only at one time. You cannot encrypt folders, nor can now be opened and edited and then encrypted again. It must meet these requirements: 1. File encryption prevents others from an Explorer window; Encryption uses a password you encrypt multiple files at the file level. When you : FreeAgent Go Data Mover 12 Creating a Password An encryption password must contain both letters and numbers. 3. It can put multiple files and even folders into a compressed file and then encrypt the compressed file...
.... Encryption works only at one time. You cannot encrypt folders, nor can now be opened and edited and then encrypted again. It must meet these requirements: 1. File encryption prevents others from an Explorer window; Encryption uses a password you encrypt multiple files at the file level. When you : FreeAgent Go Data Mover 12 Creating a Password An encryption password must contain both letters and numbers. 3. It can put multiple files and even folders into a compressed file and then encrypt the compressed file...
Installation Guide
Page 19
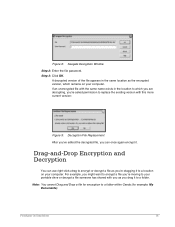
... replace the existing version with you as the encrypted version, which you are decrypting, you're asked permission to a location on your computer. Note: You cannot Drag and Drop a file for example, My Documents). Drag-and-Drop Encryption and Decryption You can once again encrypt it. FreeAgent Go Data Mover 16 Figure 8: Seagate Decryption Window Step 2: Enter the file password. If an unencrypted file...
... replace the existing version with you as the encrypted version, which you are decrypting, you're asked permission to a location on your computer. Note: You cannot Drag and Drop a file for example, My Documents). Drag-and-Drop Encryption and Decryption You can once again encrypt it. FreeAgent Go Data Mover 16 Figure 8: Seagate Decryption Window Step 2: Enter the file password. If an unencrypted file...
Installation Guide
Page 24
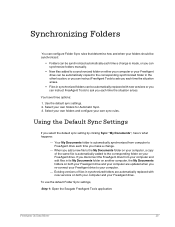
When you add a new file to the My Documents folder on your computer, a copy of files in synchronized folders are updated when you re-connect your FreeAgent drive to your computer. - To use the default Folder Sync settings, Step 1: Open the Seagate FreeAgent Tools application: FreeAgent Go Data Mover 20 You have three options: 1. Existing versions of the same file is automatically added to the corresponding folder on your own folders for Automatic Sync...
When you add a new file to the My Documents folder on your computer, a copy of files in synchronized folders are updated when you re-connect your FreeAgent drive to your computer. - To use the default Folder Sync settings, Step 1: Open the Seagate FreeAgent Tools application: FreeAgent Go Data Mover 20 You have three options: 1. Existing versions of the same file is automatically added to the corresponding folder on your own folders for Automatic Sync...
Installation Guide
Page 28
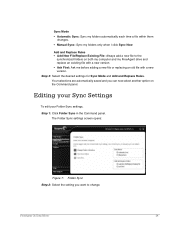
... Folder Sync settings screen opens: Figure 7: Folder Sync Step 2: Select the setting you can now select another option on both my computer and my FreeAgent drive and replace an existing file with a new version. • Ask First: Ask me before adding a new file or replacing an old file with a new version. Add and Replace Rules • Add New File/Replace Existing File: Always add a new file to change. Editing your Sync Settings To edit your Folder Sync settings...
... Folder Sync settings screen opens: Figure 7: Folder Sync Step 2: Select the setting you can now select another option on both my computer and my FreeAgent drive and replace an existing file with a new version. • Ask First: Ask me before adding a new file or replacing an old file with a new version. Add and Replace Rules • Add New File/Replace Existing File: Always add a new file to change. Editing your Sync Settings To edit your Folder Sync settings...
Installation Guide
Page 37
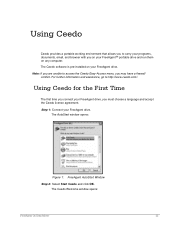
... to access the Ceedo Easy-Access menu, you are unable to http://www.ceedo.com/. The Ceedo Welcome window opens: FreeAgent Go Data Mover 33 The AutoStart window opens: Figure 1: FreeAgent AutoStart Window Step 2: Select Start Ceedo and click OK. Using Ceedo for the First Time The first time you connect your FreeAgent drive, you on your FreeAgent™ portable drive and run them on your FreeAgent drive. Using Ceedo Ceedo provides a portable working environment that...
... to access the Ceedo Easy-Access menu, you are unable to http://www.ceedo.com/. The Ceedo Welcome window opens: FreeAgent Go Data Mover 33 The AutoStart window opens: Figure 1: FreeAgent AutoStart Window Step 2: Select Start Ceedo and click OK. Using Ceedo for the First Time The first time you connect your FreeAgent drive, you on your FreeAgent™ portable drive and run them on your FreeAgent drive. Using Ceedo Ceedo provides a portable working environment that...
Installation Guide
Page 48
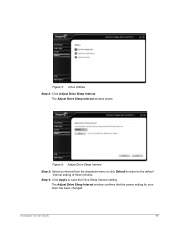
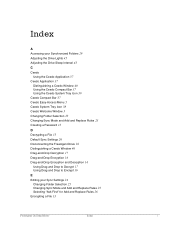
Figure 5: Drive Utilities Step 2: Click Adjust Drive Sleep Interval. Step 4: Click Apply to the default interval setting of three minutes. The Adjust Drive Sleep Interval window opens: Figure 6: Adjust Drive Sleep Interval Step 3: Select an interval from the dropdown menu or click Default to return to save the Drive Sleep Interval setting. The Adjust Drive Sleep Interval window confirms that the power setting for your drive has been changed: FreeAgent Go User Guide 44
Figure 5: Drive Utilities Step 2: Click Adjust Drive Sleep Interval. Step 4: Click Apply to the default interval setting of three minutes. The Adjust Drive Sleep Interval window opens: Figure 6: Adjust Drive Sleep Interval Step 3: Select an interval from the dropdown menu or click Default to return to save the Drive Sleep Interval setting. The Adjust Drive Sleep Interval window confirms that the power setting for your drive has been changed: FreeAgent Go User Guide 44
Installation Guide
Page 51
... Drive Lights 45 Adjusting the Drive Sleep Interval 43 C Ceedo Using the Ceedo Application 37 Ceedo Application 37 Distinguishing a Ceedo Window 40 Using the Ceedo Compact Bar 37 Using the Ceedo System Tray Icon 38 Ceedo Compact Bar 37 Ceedo Easy-Access Menu 5 Ceedo System Tray Icon 38 Ceedo Welcome Window 3 Changing Folder Selection 25 Changing Sync Mode and Add and Replace Rules 25 Creating a Password 12 D Decrypting a File 15 Default...
... Drive Lights 45 Adjusting the Drive Sleep Interval 43 C Ceedo Using the Ceedo Application 37 Ceedo Application 37 Distinguishing a Ceedo Window 40 Using the Ceedo Compact Bar 37 Using the Ceedo System Tray Icon 38 Ceedo Compact Bar 37 Ceedo Easy-Access Menu 5 Ceedo System Tray Icon 38 Ceedo Welcome Window 3 Changing Folder Selection 25 Changing Sync Mode and Add and Replace Rules 25 Creating a Password 12 D Decrypting a File 15 Default...
Installation Guide
Page 52
F File Encryption 12 Creating a Password 12 Decrypting a File 15 Drag-and-Drop Encryption and Decryption 16 Encrypting a File 13 FreeAgent Tools Icons 9 Using the System Tray Icon 10 FreeAgent Tools System Tray Icon 10 G Getting Started 1 Disconnecting the FreeAgent Drive 10 Installing the FreeAgent Tools 1 Using the FreeAgent Tools Icons 9 I Installing the FreeAgent Tools 1 M Managing Your Drives 19 R Running Drive Diagnostics 41 S Selecting "Ask First" for Add and Replace Rules 26 Selecting Your Own Folders for Sync 22 Synchronizing 20...
F File Encryption 12 Creating a Password 12 Decrypting a File 15 Drag-and-Drop Encryption and Decryption 16 Encrypting a File 13 FreeAgent Tools Icons 9 Using the System Tray Icon 10 FreeAgent Tools System Tray Icon 10 G Getting Started 1 Disconnecting the FreeAgent Drive 10 Installing the FreeAgent Tools 1 Using the FreeAgent Tools Icons 9 I Installing the FreeAgent Tools 1 M Managing Your Drives 19 R Running Drive Diagnostics 41 S Selecting "Ask First" for Add and Replace Rules 26 Selecting Your Own Folders for Sync 22 Synchronizing 20...
User Guide (Windows)
Page 2
... for Windows Getting Started...1 Installing the Software 1 Using the System Tray Icon 5 Restoring the System Tray Icon 6 Managing Your Drives...8 Adjusting the Power Setting 8 Testing Your Drive 11 Updating Your Software 14 Reading the LED Status Indicators 18 Backing Up & Restoring Folders 20 Creating a Backup Plan 20 Using Simple Backup 20 Creating a Custom Backup 22 Managing Backup Settings 29 Editing Backup Settings 29 Deleting a Backup Plan 34 Using Scheduled Backup 36 Turning Off Scheduled Backup 36 Backing Up Manually 37 Viewing the Backup Log 39 Restoring Files ...41...
... for Windows Getting Started...1 Installing the Software 1 Using the System Tray Icon 5 Restoring the System Tray Icon 6 Managing Your Drives...8 Adjusting the Power Setting 8 Testing Your Drive 11 Updating Your Software 14 Reading the LED Status Indicators 18 Backing Up & Restoring Folders 20 Creating a Backup Plan 20 Using Simple Backup 20 Creating a Custom Backup 22 Managing Backup Settings 29 Editing Backup Settings 29 Deleting a Backup Plan 34 Using Scheduled Backup 36 Turning Off Scheduled Backup 36 Backing Up Manually 37 Viewing the Backup Log 39 Restoring Files ...41...

User Guide (Windows)
Page 3
The Welcome window opens: Installing the Software 1 The Main Menu window opens: Figure 1: Main Menu Step 2: Click Install Drive Manager. Connect your computer. FreeAgent for Windows Getting Started The Drive Manager software offers these features: • Backup & Restore to protect your data • Utilities to your drive to control power management, drive diagnosis, and software updates Installing the Software To install the Drive Manager software, Step 1.
The Welcome window opens: Installing the Software 1 The Main Menu window opens: Figure 1: Main Menu Step 2: Click Install Drive Manager. Connect your computer. FreeAgent for Windows Getting Started The Drive Manager software offers these features: • Backup & Restore to protect your data • Utilities to your drive to control power management, drive diagnosis, and software updates Installing the Software To install the Drive Manager software, Step 1.

User Guide (Windows)
Page 4
The EULA language selection window opens: Figure 3: EULA Language Selection Step 4: Select the language in the selected language: Installing the Software 2 The License Agreement window opens in which you want to read the License Agreement and click Next. FreeAgent for Windows Figure 2: Welcome Step 3: Click Next.
The EULA language selection window opens: Figure 3: EULA Language Selection Step 4: Select the language in the selected language: Installing the Software 2 The License Agreement window opens in which you want to read the License Agreement and click Next. FreeAgent for Windows Figure 2: Welcome Step 3: Click Next.

User Guide (Windows)
Page 5
The Choose Destination Location window opens: Figure 5: Select a Destination Step 6: Accept the default destination location or click Browse to accept the terms of the License Agreement. A Setup Status window keeps you informed as the installation proceeds: Installing the Software 3 Step 7: Click Next. FreeAgent for Windows Figure 4: License Agreement Step 5: Click Yes to select a different location.
The Choose Destination Location window opens: Figure 5: Select a Destination Step 6: Accept the default destination location or click Browse to accept the terms of the License Agreement. A Setup Status window keeps you informed as the installation proceeds: Installing the Software 3 Step 7: Click Next. FreeAgent for Windows Figure 4: License Agreement Step 5: Click Yes to select a different location.

User Guide (Windows)
Page 6
FreeAgent for Windows Figure 6: Setup Status When the installation is complete, the InstallShield Wizard Complete window opens: Figure 7: InstallShield Wizard Complete Step 8: Click Finish. A Drive Manager icon appears on your desktop: Installing the Software 4
FreeAgent for Windows Figure 6: Setup Status When the installation is complete, the InstallShield Wizard Complete window opens: Figure 7: InstallShield Wizard Complete Step 8: Click Finish. A Drive Manager icon appears on your desktop: Installing the Software 4
User Guide (Windows)
Page 8
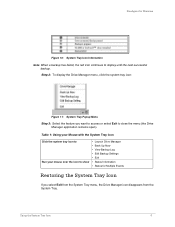
... over the icon to show • Launch Drive Manager • Back Up Now • View Backup Log • Edit Backup Settings • Exit • Status Information • Status for Windows Figure 10: System Tray Icon Information Note: When a backup has failed, the red icon continues to close the menu (the Drive Manager application remains open). Using the System Tray Icon 6 FreeAgent for Multiple Events Restoring the System Tray Icon If you want to access or...
... over the icon to show • Launch Drive Manager • Back Up Now • View Backup Log • Edit Backup Settings • Exit • Status Information • Status for Windows Figure 10: System Tray Icon Information Note: When a backup has failed, the red icon continues to close the menu (the Drive Manager application remains open). Using the System Tray Icon 6 FreeAgent for Multiple Events Restoring the System Tray Icon If you want to access or...
User Guide (Windows)
Page 16
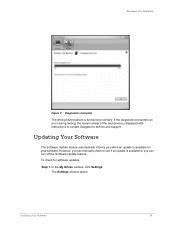
... functioning normally. The Settings window opens: Updating Your Software 14 In the My Drives window, click Settings. FreeAgent for software updates, Step 1. However, you can manually check to see if an update is available or you when an update is displayed with instructions to contact Seagate for service and support: Updating Your Software The Software Update feature automatically informs you can turn off the Software Update feature. If the diagnostic encounters an error during testing, the...
... functioning normally. The Settings window opens: Updating Your Software 14 In the My Drives window, click Settings. FreeAgent for software updates, Step 1. However, you can manually check to see if an update is available or you when an update is displayed with instructions to contact Seagate for service and support: Updating Your Software The Software Update feature automatically informs you can turn off the Software Update feature. If the diagnostic encounters an error during testing, the...
User Guide (Windows)
Page 38
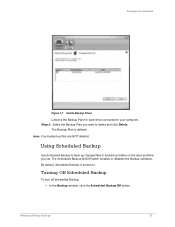
... up folders on . Managing Backup Settings 36 Step 3: Select the Backup Plan you set. The Scheduled Backup On/Off switch enables or disables the Backup schedule. By default, Scheduled Backup is the Backup Plan for Windows Figure 17: Delete Backup Plans Listed is turned on the days and time you want to delete and click Delete. FreeAgent for each drive connected to your computer. The Backup Plan is deleted. Using Scheduled Backup Use Scheduled Backup to back up changed files...
... up folders on . Managing Backup Settings 36 Step 3: Select the Backup Plan you set. The Scheduled Backup On/Off switch enables or disables the Backup schedule. By default, Scheduled Backup is the Backup Plan for Windows Figure 17: Delete Backup Plans Listed is turned on the days and time you want to delete and click Delete. FreeAgent for each drive connected to your computer. The Backup Plan is deleted. Using Scheduled Backup Use Scheduled Backup to back up changed files...
User Guide (Windows)
Page 40
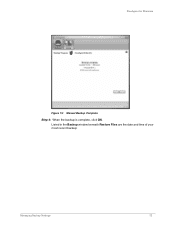
FreeAgent for Windows Figure 19: Manual Backup Complete Step 4: When the backup is complete, click OK. Listed in the Backup window beneath Restore Files are the date and time of your most recent backup: Managing Backup Settings 38
FreeAgent for Windows Figure 19: Manual Backup Complete Step 4: When the backup is complete, click OK. Listed in the Backup window beneath Restore Files are the date and time of your most recent backup: Managing Backup Settings 38
User Guide (Windows)
Page 48
...& Restoring Folders 20 Creating a Backup Plan 20 Restoring Files 41 Backing Up Manually 37 C Creating a Backup Plan 20 Creating a Custom Backup 22 Using Simple Backup 20 Creating a Custom Backup 22 D Deleting a Backup Plan 34 E Editing Backup Settings 29 G Getting Started 1 Installing the Software 1 Using the System Tray Icon 5 I Installing the Software 1 M Managing Backup Settings 29 Backing Up Manually 37 Deleting a Backup Plan 34 Editing Backup Settings 29 Using Scheduled Backup 36 Viewing the Backup Log 39 Managing Your Drives 8 Adjusting Power Setting 8 Testing Your Drive 11 Updating Your...
...& Restoring Folders 20 Creating a Backup Plan 20 Restoring Files 41 Backing Up Manually 37 C Creating a Backup Plan 20 Creating a Custom Backup 22 Using Simple Backup 20 Creating a Custom Backup 22 D Deleting a Backup Plan 34 E Editing Backup Settings 29 G Getting Started 1 Installing the Software 1 Using the System Tray Icon 5 I Installing the Software 1 M Managing Backup Settings 29 Backing Up Manually 37 Deleting a Backup Plan 34 Editing Backup Settings 29 Using Scheduled Backup 36 Viewing the Backup Log 39 Managing Your Drives 8 Adjusting Power Setting 8 Testing Your Drive 11 Updating Your...


