Product Information
Page 2
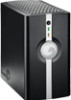
... Mirra Sync and Share Personal Server will be restored. Enjoy setting up your Mirra, effortlessly Set up on your Mirra in the restoration and, if necessary, Seagate's Data Recovery Service will assist you want them via Mirra.com. We guarantee it. Mirra Sync and Share Personal Server Sync...; 256MB RAM and 50MB free hard disk space Contents • Mirra Sync and Share Personal Server • Mirra Sync and Share software for Macintosh and Windows • Getting Started Guide for Mac and Windows • Mirra Manual for Mac and Windows (on operating environment and formatting. 06...
... Mirra Sync and Share Personal Server will be restored. Enjoy setting up your Mirra, effortlessly Set up on your Mirra in the restoration and, if necessary, Seagate's Data Recovery Service will assist you want them via Mirra.com. We guarantee it. Mirra Sync and Share Personal Server Sync...; 256MB RAM and 50MB free hard disk space Contents • Mirra Sync and Share Personal Server • Mirra Sync and Share software for Macintosh and Windows • Getting Started Guide for Mac and Windows • Mirra Manual for Mac and Windows (on operating environment and formatting. 06...

Setup Guide
Page 3
...on to step 2. (Note: Please refer to your network router A. C. D. STEP 1: Plug it in Connect the Mirra Sync and Share Personal Server to the electronic Mirra Manual on the software CD if your configuration differs from the one shown here.) PC or Mac Router, Hub, or Switch Cable Modem or ...DSL Access Box A simple home or office setup with Mirra includes high speed Internet access via a cable or DSL ...
...on to step 2. (Note: Please refer to your network router A. C. D. STEP 1: Plug it in Connect the Mirra Sync and Share Personal Server to the electronic Mirra Manual on the software CD if your configuration differs from the one shown here.) PC or Mac Router, Hub, or Switch Cable Modem or ...DSL Access Box A simple home or office setup with Mirra includes high speed Internet access via a cable or DSL ...
Setup Guide
Page 4
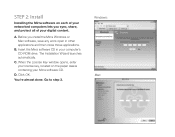
...the License Key window opens, enter your license key, located on each of your digital content. D. Go to step 3. Click OK. Insert the Mirra software CD in other applications and then close those applications. C. You're almost done. Windows: Mac: A. The Installation Wizard launches automatically. Before you... sync, share, and protect all of your networked computers lets you install the Mirra Windows or Mac software, save any work open in your computer's CD-ROM drive. STEP 2: Install Installing the...
...the License Key window opens, enter your license key, located on each of your digital content. D. Go to step 3. Click OK. Insert the Mirra software CD in other applications and then close those applications. C. You're almost done. Windows: Mac: A. The Installation Wizard launches automatically. Before you... sync, share, and protect all of your networked computers lets you install the Mirra Windows or Mac software, save any work open in your computer's CD-ROM drive. STEP 2: Install Installing the...
Setup Guide
Page 5
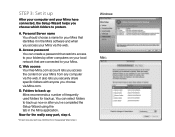
...or after you've completed the Setup Wizard using the tab in the Mirra software and when you access your Mirra have connected, the Setup Wizard helps you choose via Mirra.com. D. Web access Your free Mirra.com account lets you access the content on the appropriate Wizard screen.)...B. It also lets you securely share specific folders with anyone you choose which folders to your Mirra from any computer via the web. Personal Server name You should choose a name for your Mirra that are connected to protect. C. You can create a password that restricts access to your ...
...or after you've completed the Setup Wizard using the tab in the Mirra software and when you access your Mirra have connected, the Setup Wizard helps you choose via Mirra.com. D. Web access Your free Mirra.com account lets you access the content on the appropriate Wizard screen.)...B. It also lets you securely share specific folders with anyone you choose which folders to your Mirra from any computer via the web. Personal Server name You should choose a name for your Mirra that are connected to protect. C. You can create a password that restricts access to your ...
User Guide (Mac)
Page 2
... in all copies of Seagate Technology LLC. To request copies of the Software, and to permit persons to do so, provided that the above copyright notice(s) and this permission notice appear in the Copyrights folder on the web at http://support.mirra.com. THE SOFTWARE IS PROVIDED "AS IS...index.html). All rights reserved. No part of this publication or the Seagate Mirra software, in source code or object code form, may be reproduced, stored in a retrieval system, or transmitted in any form or by any person obtaining a copy of the Debian Linux distribution (http:// www.debian.org...
... in all copies of Seagate Technology LLC. To request copies of the Software, and to permit persons to do so, provided that the above copyright notice(s) and this permission notice appear in the Copyrights folder on the web at http://support.mirra.com. THE SOFTWARE IS PROVIDED "AS IS...index.html). All rights reserved. No part of this publication or the Seagate Mirra software, in source code or object code form, may be reproduced, stored in a retrieval system, or transmitted in any form or by any person obtaining a copy of the Debian Linux distribution (http:// www.debian.org...
User Guide (Mac)
Page 3
...6,928,476 U.S. Please read all the instructions and warnings marked on an unstable cart, stand, or table. Do not place Mirra on this product or included in the preparation of this manual. 3. While reasonable efforts have been made in this document to... assure its users. Trademarks Seagate™ and the Mirra logo are trademarks of fire, electric shock, or bodily injury. IN NO EVENT SHALL THE COPYRIGHT HOLDER OR..., ARISING OUT OF OR IN CONNECTION WITH THE USE OR PERFORMANCE OF THIS SOFTWARE.
...6,928,476 U.S. Please read all the instructions and warnings marked on an unstable cart, stand, or table. Do not place Mirra on this product or included in the preparation of this manual. 3. While reasonable efforts have been made in this document to... assure its users. Trademarks Seagate™ and the Mirra logo are trademarks of fire, electric shock, or bodily injury. IN NO EVENT SHALL THE COPYRIGHT HOLDER OR..., ARISING OUT OF OR IN CONNECTION WITH THE USE OR PERFORMANCE OF THIS SOFTWARE.

User Guide (Mac)
Page 5
... Up a Single Computer 4 Setting Up Multiple Computers 5 Connecting your Mirra to a Power Source 6 Chapter 3: Setting Up your Mirra 8 Installing the Mirra Software 8 Setting Up the Mirra Software 15 Creating a New Web Account 25 Organizing your Mirra 29 Using Mirra Icons and Aliases 29 Using the Mirra Widget 30 Setting Mirra Preferences 31 Changing Your Email Address 32 Adjusting Network Settings...
... Up a Single Computer 4 Setting Up Multiple Computers 5 Connecting your Mirra to a Power Source 6 Chapter 3: Setting Up your Mirra 8 Installing the Mirra Software 8 Setting Up the Mirra Software 15 Creating a New Web Account 25 Organizing your Mirra 29 Using Mirra Icons and Aliases 29 Using the Mirra Widget 30 Setting Mirra Preferences 31 Changing Your Email Address 32 Adjusting Network Settings...
User Guide (Mac)
Page 10
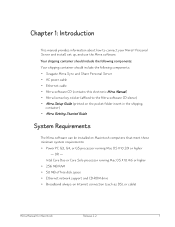
... Release 2.2 1 Your shipping container should include the following components: Your shipping container should include the following components: • Seagate Mirra Sync and Share Personal Server • AC power cable • Ethernet cable • Mirra software CD (contains this electronic Mirra Manual) • Mirra license key sticker (affixed to connect your Mirra™ Personal Server and install, set up, and use the...
... Release 2.2 1 Your shipping container should include the following components: Your shipping container should include the following components: • Seagate Mirra Sync and Share Personal Server • AC power cable • Ethernet cable • Mirra software CD (contains this electronic Mirra Manual) • Mirra license key sticker (affixed to connect your Mirra™ Personal Server and install, set up, and use the...
User Guide (Mac)
Page 17
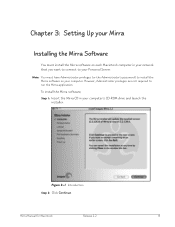
... install the Mirra software on each Macintosh computer in your Personal Server. However, Administrator privileges are not required to your computer's CD-ROM drive and launch the installer: Figure 3~1 Introduction Step 2: Click Continue. Note: You must install the Mirra software on your computer. Mirra Manual for Macintosh Release 2.2 8 To install the Mirra software, Step 1: Insert the Mirra CD in your...
... install the Mirra software on each Macintosh computer in your Personal Server. However, Administrator privileges are not required to your computer's CD-ROM drive and launch the installer: Figure 3~1 Introduction Step 2: Click Continue. Note: You must install the Mirra software on your computer. Mirra Manual for Macintosh Release 2.2 8 To install the Mirra software, Step 1: Insert the Mirra CD in your...

User Guide (Mac)
Page 20
Step 6: Click Continue. Mirra Manual for ALL Mirra users on this window to tell Mirra where to accept the default destination folder or choose a folder and select any locations at which you want a Mirra alias. Note: Aliases will be created for Macintosh Release 2.2 11 Step 5: Decide whether to install the Mirra software and aliases. The Select Destination window opens: Figure 3~4 Select Destination Use this computer.
Step 6: Click Continue. Mirra Manual for ALL Mirra users on this window to tell Mirra where to accept the default destination folder or choose a folder and select any locations at which you want a Mirra alias. Note: Aliases will be created for Macintosh Release 2.2 11 Step 5: Decide whether to install the Mirra software and aliases. The Select Destination window opens: Figure 3~4 Select Destination Use this computer.

User Guide (Mac)
Page 24
Setting Up the Mirra Software Mirra Setup walks you through the steps to exit the Installer and set up the Mirra software at another time. Click Done to set up your Mirra4 Mac software. Mirra Manual for Macintosh Release 2.2 15 When the installation is complete, the Finish Up window opens: Figure 3~8 Finish Up Step 11: Click Launch Mirra to close the Installer and automatically open Mirra Setup. - OR -
Setting Up the Mirra Software Mirra Setup walks you through the steps to exit the Installer and set up the Mirra software at another time. Click Done to set up your Mirra4 Mac software. Mirra Manual for Macintosh Release 2.2 15 When the installation is complete, the Finish Up window opens: Figure 3~8 Finish Up Step 11: Click Launch Mirra to close the Installer and automatically open Mirra Setup. - OR -

User Guide (Mac)
Page 27
... the default name, Mirra Personal Server, and click Next. Your Mirra license key sticker is affixed to your Personal Server. Mirra Manual for Macintosh Release 2.2 18 Note: You can change the Personal Server name at any time in your network have access to the Mirra software CD sleeve. Entering a license key insures that only authorized Personal Servers are connected to your Personal Server, you must...
... the default name, Mirra Personal Server, and click Next. Your Mirra license key sticker is affixed to your Personal Server. Mirra Manual for Macintosh Release 2.2 18 Note: You can change the Personal Server name at any time in your network have access to the Mirra software CD sleeve. Entering a license key insures that only authorized Personal Servers are connected to your Personal Server, you must...
User Guide (Mac)
Page 33
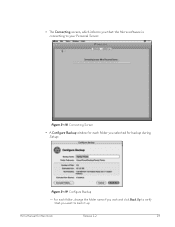
• The Connecting screen, which informs you that you selected for backup during Setup: Figure 3~19 Configure Backup - Mirra Manual for each folder, change the folder name if you wish and click Back Up to verify that the Mirra software is connecting to back it up. For each folder you want to your Personal Server: Figure 3~18 Connecting Screen • A Configure Backup window for Macintosh Release 2.2 24
• The Connecting screen, which informs you that you selected for backup during Setup: Figure 3~19 Configure Backup - Mirra Manual for each folder, change the folder name if you wish and click Back Up to verify that the Mirra software is connecting to back it up. For each folder you want to your Personal Server: Figure 3~18 Connecting Screen • A Configure Backup window for Macintosh Release 2.2 24
User Guide (Mac)
Page 34
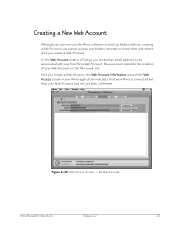
... folders without creating a Web Account, you cannot access your folders remotely or share them with your free Mirra Web Account. Creating a New Web Account Although you can now use the Mirra software to be associated with others until you create a Web Account. Now you create a Web Account, the... Web Account Information area of your Web Account has not yet been confirmed: Figure 3~20 Web Access Screen - No Web Account Mirra Manual for Macintosh Release ...
... folders without creating a Web Account, you cannot access your folders remotely or share them with your free Mirra Web Account. Creating a New Web Account Although you can now use the Mirra software to be associated with others until you create a Web Account. Now you create a Web Account, the... Web Account Information area of your Web Account has not yet been confirmed: Figure 3~20 Web Access Screen - No Web Account Mirra Manual for Macintosh Release ...

User Guide (Mac)
Page 38
... Web Account: Figure 3~24 Web Access Screen - The icon indicates whether your Mirra is placed in the menu bar. To open the Mirra application and to set preferences . Organizing your Mirra Using Mirra Icons and Aliases During the installation of the Mirra software, a Mirra icon is connected and working properly and can be used to open the...
... Web Account: Figure 3~24 Web Access Screen - The icon indicates whether your Mirra is placed in the menu bar. To open the Mirra application and to set preferences . Organizing your Mirra Using Mirra Icons and Aliases During the installation of the Mirra software, a Mirra icon is connected and working properly and can be used to open the...

User Guide (Mac)
Page 39
... bar. To turn off the pulsing behavior, Step 1: Click the Mirra icon in the Applications folder or wherever you wish. Note: The Mirra application is doing without opening the Mirra application. When you install the Mirra software, a Mirra icon is placed in the widget bar of them to the menu ...bar icon, Mirra aliases appear on your desktop and in progress. You can drag the Mirra widget onto your desktop...
... bar. To turn off the pulsing behavior, Step 1: Click the Mirra icon in the Applications folder or wherever you wish. Note: The Mirra application is doing without opening the Mirra application. When you install the Mirra software, a Mirra icon is placed in the widget bar of them to the menu ...bar icon, Mirra aliases appear on your desktop and in progress. You can drag the Mirra widget onto your desktop...
User Guide (Mac)
Page 46
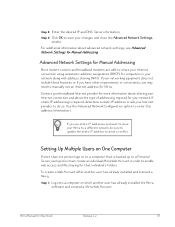
... If you may need to enable web access and file sharing for Mirra. To create a Web Account after another user has already installed the Mirra software and created a Mirra Web Account. Mirra Manual for computers in order to manually set an Internet address for ...Mirra, Step 1: Log onto a computer on to a computer that individual's folders. Step 3: Enter the desired IP and DNS Server information. For additional information about the type of addressing required for Manual Addressing. If static IP addressing is backed up to a Personal Server, each person must create an individual Mirra...
... If you may need to enable web access and file sharing for Mirra. To create a Web Account after another user has already installed the Mirra software and created a Mirra Web Account. Mirra Manual for computers in order to manually set an Internet address for ...Mirra, Step 1: Log onto a computer on to a computer that individual's folders. Step 3: Enter the desired IP and DNS Server information. For additional information about the type of addressing required for Manual Addressing. If static IP addressing is backed up to a Personal Server, each person must create an individual Mirra...

User Guide (Mac)
Page 50
... must install the Mirra software and enter your Mirra license key on your email for Macintosh Release 2.2 41 Mirra Manual for a welcome message from Mirra: Figure 3~39 Welcome Email Using Mirra with One Mirra In order to back up two or more computers to a Mirra, you must then create a separate Mirra Web Account in order to a Personal Server, those files are...
... must install the Mirra software and enter your Mirra license key on your email for Macintosh Release 2.2 41 Mirra Manual for a welcome message from Mirra: Figure 3~39 Welcome Email Using Mirra with One Mirra In order to back up two or more computers to a Mirra, you must then create a separate Mirra Web Account in order to a Personal Server, those files are...
User Guide (Mac)
Page 51
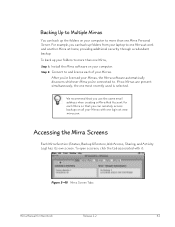
...Activity Log) has its own screen. To back up your folders to more than one Mirra, Step 1: Install the Mirra software on all your Mirras with it: Figure 3~40 Mirra Screen Tabs Mirra Manual for each of your Mirras. For example, you 're connected to. To open a screen, click the tab... that you use the same email address when creating a Mirra Web Account for Macintosh Release 2.2 42 Backing Up to Multiple Mirras You can back up the folders on your computer to more than one Mirra Personal Server. If two Mirras are present simultaneously, the one most recently used is selected...
...Activity Log) has its own screen. To back up your folders to more than one Mirra, Step 1: Install the Mirra software on all your Mirras with it: Figure 3~40 Mirra Screen Tabs Mirra Manual for each of your Mirras. For example, you 're connected to. To open a screen, click the tab... that you use the same email address when creating a Mirra Web Account for Macintosh Release 2.2 42 Backing Up to Multiple Mirras You can back up the folders on your computer to more than one Mirra Personal Server. If two Mirras are present simultaneously, the one most recently used is selected...

User Guide (Mac)
Page 74
...or right-click) the folder in the Finder. The shortcut menu appears: Figure 5~12 Shortcut Menu Step 2: Select Add Folder "Foldername" to Mirra Backups. The Configure Backup window opens. The folder is added to the list on the shortcut menu until you do restart.. To select a...menu. Although you aren't required to restart your computer after you install the Mirra software, these Mirra entries won't appear on the Backup & Restore screen. From the Finder When you install the Mirra for Macintosh software, Mirra-specific entries are both benefits and drawbacks to backing up your home folder....
...or right-click) the folder in the Finder. The shortcut menu appears: Figure 5~12 Shortcut Menu Step 2: Select Add Folder "Foldername" to Mirra Backups. The Configure Backup window opens. The folder is added to the list on the shortcut menu until you do restart.. To select a...menu. Although you aren't required to restart your computer after you install the Mirra software, these Mirra entries won't appear on the Backup & Restore screen. From the Finder When you install the Mirra for Macintosh software, Mirra-specific entries are both benefits and drawbacks to backing up your home folder....


