

User Guide for Windows
Page 3
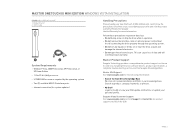
..., review the solution features in case of loss or unauthorized use - Italics Used for emphasis and to encrypt your sensitive data - Status Light 3. This user's guide will see. Maxtor EasyManage software features include: - Diagnostic utilities to backup your files - Mini USB 2.0 Port 4. the simple way to check the health of your OneTouch III Mini Edition - Using Maxtor Backup...
..., review the solution features in case of loss or unauthorized use - Italics Used for emphasis and to encrypt your sensitive data - Status Light 3. This user's guide will see. Maxtor EasyManage software features include: - Diagnostic utilities to backup your files - Mini USB 2.0 Port 4. the simple way to check the health of your OneTouch III Mini Edition - Using Maxtor Backup...
User Guide for Windows
Page 4
Two (2) available USB 2.0 interface ports - Review the Seagate Limited Warranty for the following information: - Maxtor Product Support Seagate Technology provides a comprehensive product support section on or near the drive. Do not bump, move or drop ... the product warranty. Maxtor USA Support Visit www.seagate.com for more as required by product, category, keywords, or phrases. - Seagate Global Customer Support Visit www.seagate.com and click Support or Contact Us for system updates) Handling Precautions Please handle your new OneTouch III Mini Edition with care! My...
Two (2) available USB 2.0 interface ports - Review the Seagate Limited Warranty for the following information: - Maxtor Product Support Seagate Technology provides a comprehensive product support section on or near the drive. Do not bump, move or drop ... the product warranty. Maxtor USA Support Visit www.seagate.com for more as required by product, category, keywords, or phrases. - Seagate Global Customer Support Visit www.seagate.com and click Support or Contact Us for system updates) Handling Precautions Please handle your new OneTouch III Mini Edition with care! My...
User Guide for Windows
Page 6
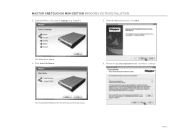
The Main Menu opens. 4. The InstallShield Wizard for the OneTouch III Setup loads. From the Welcome Screen, click Next. PAGE 4 Click Install Software. 6. Review the License Agreement and click Yes to continue. MAXTOR ONETOUCH III MINI EDITION WINDOWS VISTA INSTALLATION 3. From the Menu, select your Language (e.g. English). 5.
The Main Menu opens. 4. The InstallShield Wizard for the OneTouch III Setup loads. From the Welcome Screen, click Next. PAGE 4 Click Install Software. 6. Review the License Agreement and click Yes to continue. MAXTOR ONETOUCH III MINI EDITION WINDOWS VISTA INSTALLATION 3. From the Menu, select your Language (e.g. English). 5.
User Guide for Windows
Page 7
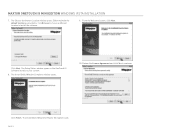
From the Welcome Screen, click Next. Review the License Agreement and click Yes to your system. 8. The Choose destination Location window opens. PAGE 5 The InstallShield Window Complete window opens. 10. MAXTOR ONETOUCH III MINI EDITION WINDOWS VISTA INSTALLATION 7. The Setup Status window opens as provided or click Browse to choose a different location to install the software. 9. Either maintain the default location as the OneTouch III Software installs to continue. The InstallShield Wizard for Maxtor Encryption loads. Click Next. Click Finish.
From the Welcome Screen, click Next. Review the License Agreement and click Yes to your system. 8. The Choose destination Location window opens. PAGE 5 The InstallShield Window Complete window opens. 10. MAXTOR ONETOUCH III MINI EDITION WINDOWS VISTA INSTALLATION 7. The Setup Status window opens as provided or click Browse to choose a different location to install the software. 9. Either maintain the default location as the OneTouch III Software installs to continue. The InstallShield Wizard for Maxtor Encryption loads. Click Next. Click Finish.

User Guide for Windows
Page 8
MAXTOR ONETOUCH III MINI EDITION WINDOWS VISTA INSTALLATION 11. Either maintain the default location as the Maxtor Encryption Software installs to your system. 12. The InstallShield Window Complete window opens. 15. Review the License Agreement and click Yes to install the software. 14. Click Next. PAGE 6 Click Finish. The InstallShield Wizard for Maxtor Backup loads. From the Welcome Screen, click Next. The Choose destination Location window opens. The Setup Status window opens as provided or click Browse to choose a different location to proceed. 13.
MAXTOR ONETOUCH III MINI EDITION WINDOWS VISTA INSTALLATION 11. Either maintain the default location as the Maxtor Encryption Software installs to your system. 12. The InstallShield Window Complete window opens. 15. Review the License Agreement and click Yes to install the software. 14. Click Next. PAGE 6 Click Finish. The InstallShield Wizard for Maxtor Backup loads. From the Welcome Screen, click Next. The Choose destination Location window opens. The Setup Status window opens as provided or click Browse to choose a different location to proceed. 13.
User Guide for Windows & Mac
Page 3
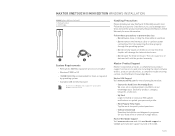
The OneTouch III Mini Edition features: - Maxtor OneTouch™ button - Maxtor Encryption to encrypt your drive in case of your new OneTouch III Mini Edition. Using Maxtor Backup to protect the contents of your files - Components Before installing, review the solution features in case of your drive and includes helpful tips for menu, command, and keyboard selections you make and screens you will help...
The OneTouch III Mini Edition features: - Maxtor OneTouch™ button - Maxtor Encryption to encrypt your drive in case of your new OneTouch III Mini Edition. Using Maxtor Backup to protect the contents of your files - Components Before installing, review the solution features in case of your drive and includes helpful tips for menu, command, and keyboard selections you make and screens you will help...
User Guide for Windows & Mac
Page 4
... the drive properly through the operating system. - Pentium III, 500 Mhz equivalent processor or higher - Follow the precautions listed here or you could damage your new OneTouch III Mini Edition with care! Do not open the drive enclosure. Search...phrases. - Review the Maxtor Limited Warranty for product support outside of data and will damage the internal electronics. - Most Popular Help Topics Top five most frequently asked questions. - Liquids will void the product warranty. Search by operating system - MAXTOR ONETOUCH III MINI EDITION WINDOWS INSTALLATION ...
... the drive properly through the operating system. - Pentium III, 500 Mhz equivalent processor or higher - Follow the precautions listed here or you could damage your new OneTouch III Mini Edition with care! Do not open the drive enclosure. Search...phrases. - Review the Maxtor Limited Warranty for product support outside of data and will damage the internal electronics. - Most Popular Help Topics Top five most frequently asked questions. - Liquids will void the product warranty. Search by operating system - MAXTOR ONETOUCH III MINI EDITION WINDOWS INSTALLATION ...

User Guide for Windows & Mac
Page 6
... will open . When the InstallShield Wizard completes, click Finish to My Maxtor OneTouch screen is displayed. Right-click on the Maxtor icon in the same way as your other drives connected to your computer. PAGE 4 MAXTOR ONETOUCH III MINI EDITION WINDOWS INSTALLATION 4. Review the License Agreement and click Yes to restart your computer. 1. When the InstallShield Wizard completes, click...
... will open . When the InstallShield Wizard completes, click Finish to My Maxtor OneTouch screen is displayed. Right-click on the Maxtor icon in the same way as your other drives connected to your computer. PAGE 4 MAXTOR ONETOUCH III MINI EDITION WINDOWS INSTALLATION 4. Review the License Agreement and click Yes to restart your computer. 1. When the InstallShield Wizard completes, click...
User Guide for Windows & Mac
Page 19
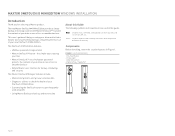
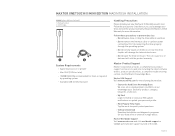
... symbols and conventions are used in Figure 1. Components Before installing, review the solution features in this guide: Bold Used for menu, command, and keyboard selections you make and screens you for performing backups and getting the most out of your files - MAXTOR ONETOUCH III MINI EDITION MACINTOSH INSTALLATION Introduction Thank you will help you setup your...
... symbols and conventions are used in Figure 1. Components Before installing, review the solution features in this guide: Bold Used for menu, command, and keyboard selections you make and screens you for performing backups and getting the most out of your files - MAXTOR ONETOUCH III MINI EDITION MACINTOSH INSTALLATION Introduction Thank you will help you setup your...
User Guide for Windows & Mac
Page 20
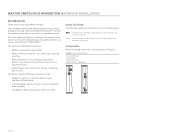
.... Search by operating system - Apple G4 processor or greater - Review the Maxtor Limited Warranty for the following information: - USB Y-Cable System Requirements - Do not open the drive enclosure. Maxtor USA Support Visit www.maxtorkb.com for more as required by product, category, keywords, or phrases. - MAXTOR ONETOUCH III MINI EDITION MACINTOSH INSTALLATION FIGURE 2 INCLUDED IN PACKAGE 1. Backup Solution...
.... Search by operating system - Apple G4 processor or greater - Review the Maxtor Limited Warranty for the following information: - USB Y-Cable System Requirements - Do not open the drive enclosure. Maxtor USA Support Visit www.maxtorkb.com for more as required by product, category, keywords, or phrases. - MAXTOR ONETOUCH III MINI EDITION MACINTOSH INSTALLATION FIGURE 2 INCLUDED IN PACKAGE 1. Backup Solution...
User Guide for Windows & Mac
Page 21
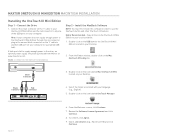
... be purchased from Maxtor at www.maxstore.com FIGURE 3 CONNECTING THE ONETOUCH III MINI EDITION Step 2 - From the Finder window, double-click on your local hard drive. 1. Select a Destination (e.g., Macintosh HD) and click Continue. If both ports fail to supply enough power to your computer. Highly Recommended - Small Connector Black Connector Red Connector 3. Review the Software...
... be purchased from Maxtor at www.maxstore.com FIGURE 3 CONNECTING THE ONETOUCH III MINI EDITION Step 2 - From the Finder window, double-click on your local hard drive. 1. Select a Destination (e.g., Macintosh HD) and click Continue. If both ports fail to supply enough power to your computer. Highly Recommended - Small Connector Black Connector Red Connector 3. Review the Software...


